How to Show Categories on WooCommerce Shop Page
An essential part of having a great shop design is to be able to categorize your products. Displaying what you sell the right way can make a big difference in your sales. The more accessible your products are, the higher the chances that your customers will end up checking them out and buying them That’s why in this guide, we’ll show you different ways to show categories on the WooCommerce Shop Page.
Why show categories on the Shop page?
If you’re selling many products with a large variety of categories, you want to ensure that visitors find what they’re looking for easily. That requires careful organization. Displaying all your products at once might overwhelm shoppers and can be an easy way to lose leads. Instead, you should consider organizing your Shop page in a way that benefits your store.
One of the best ways to do that is to make full use of your Shop layout by showing your categories individually. This way your customers can focus on the category of products they want and can juggle around between all the types of products they are interested in. This makes navigation much easier, resulting in them finding what they want fast which leads to more sales.
Setting up Categories and Specific Categories
For example, if you sell electronic products, you want to ensure that your smartphones, desktop PC, PC parts, and other equipment are shown in separate categories. This way, if a customer is interested in computer parts, they can check out that specific category and find what they want in there. Similarly, if they’re unsure about what category their required products are listed on, the reference to other products in the same category can help them figure that out.
Alternatively, you can also show only a specific category of products on your Shop page to focus on a smaller catalog. Promote only specific products on your shop page and help them stand out if you’re selling a small number of quality goods.
The organization of your shop page is critical as a customer-friendly layout can have a great impact on your sales. With that in mind, let’s have a look at some methods to show categories on the WooCommerce Shop page and how you can customize it.
How to Show Categories on the WooCommerce Shop Page
There are different ways to display categories on the Shop page in WooCommerce:
- With the Theme Customizer from the dashboard
- Using a shortcode
- Programmatically
Let’s have a closer look at each method.
NOTE: For this demo, we’ll use the Storefront theme, so the options on your theme may be slightly different. However, most options will be similar, so you shouldn’t have issues following this guide.
1) Display Categories with the WooCommerce Dashboard
The easiest way to show categories on your Shop page is by using the WooCommerce settings. For this, in your dashboard, to Appearance > Customize and then click WooCommerce > Product Catalog on the Customizer sidebar.
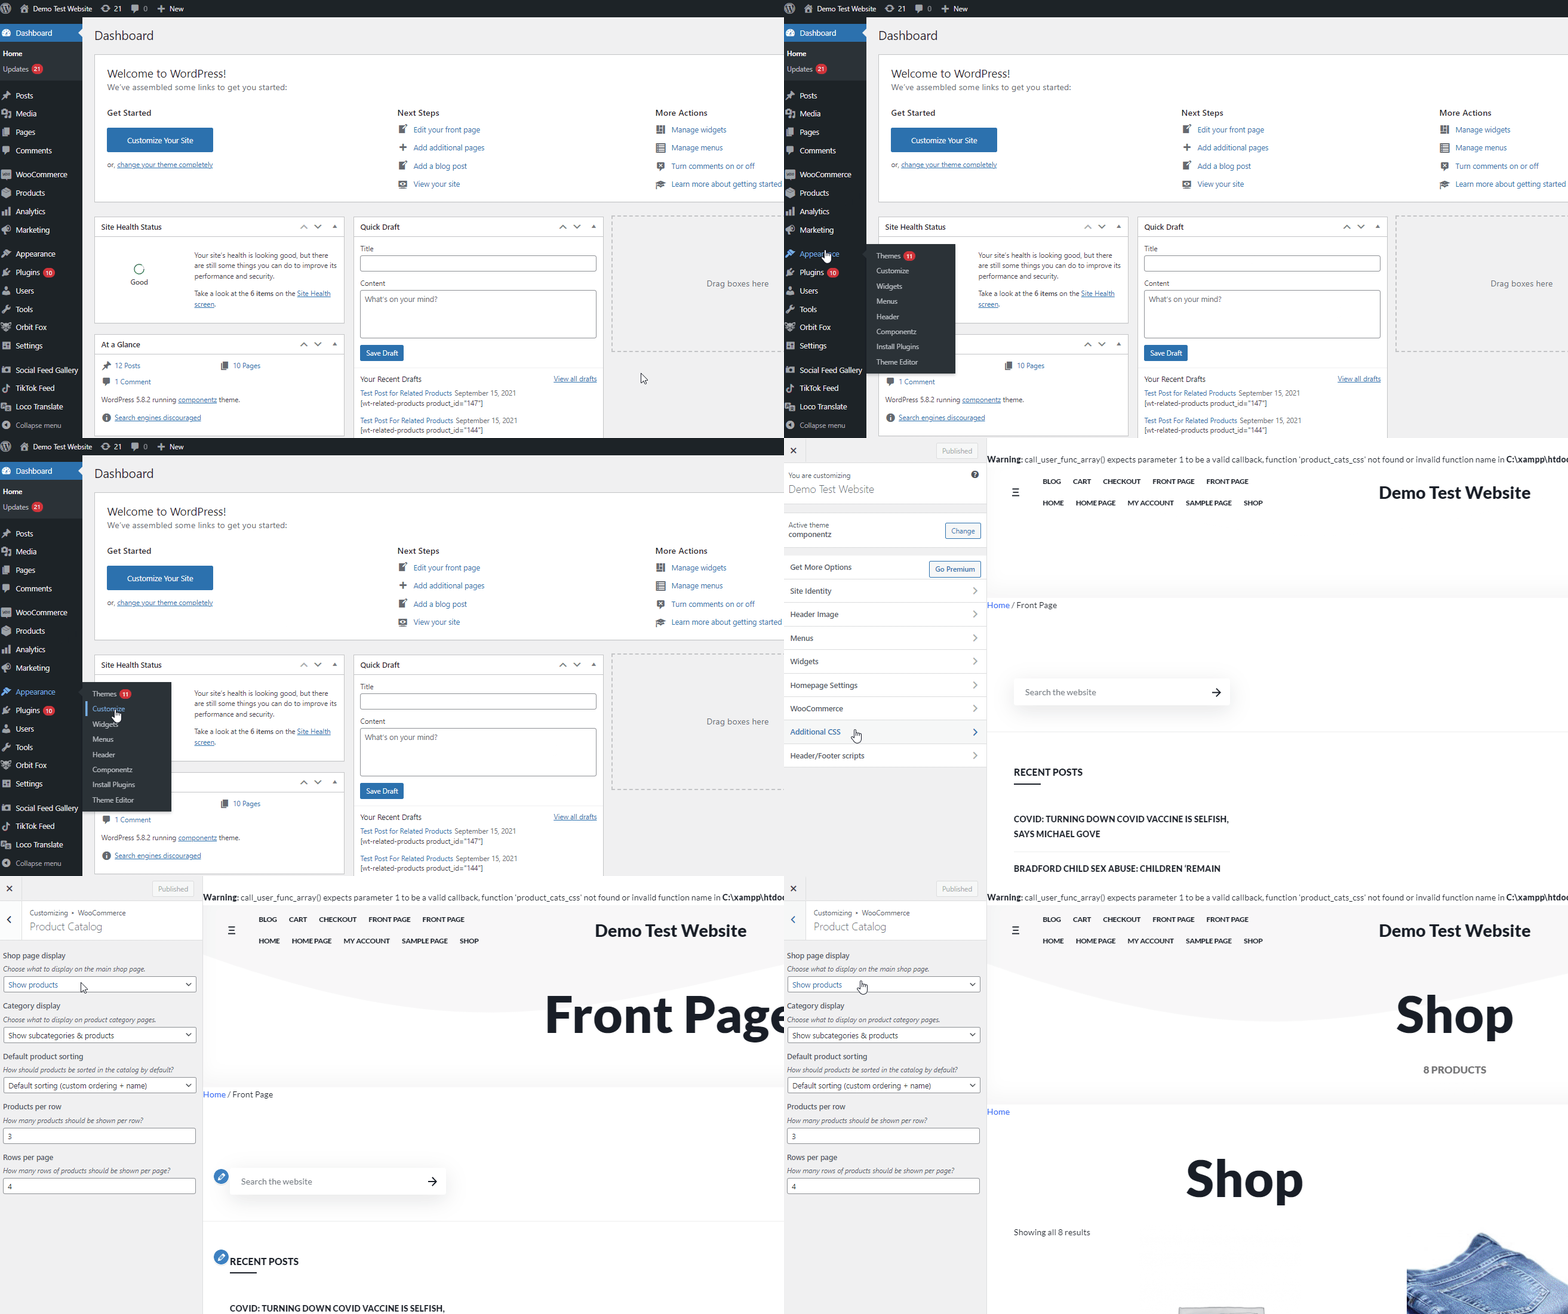
From here, you can use the Shop Page Display and choose to either Show Categories or Show Categories and Products.
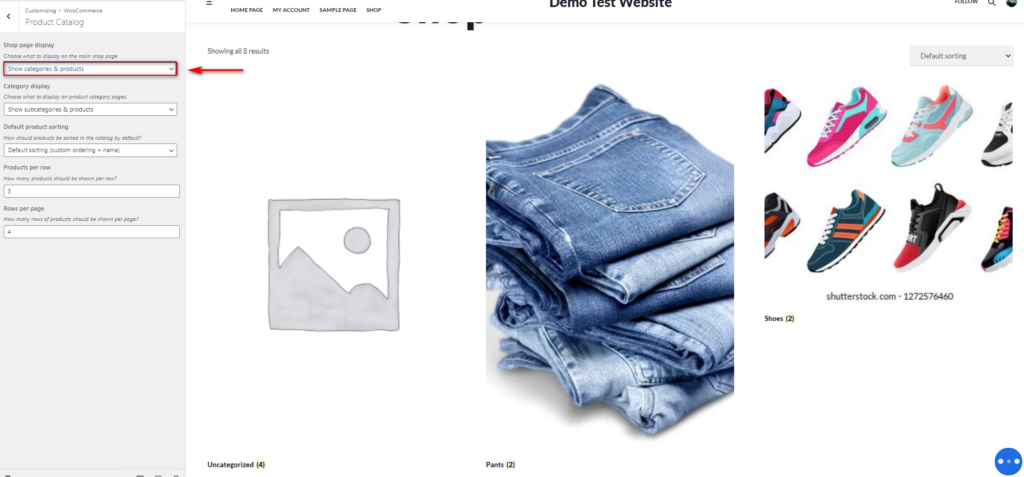
The first option will only show your Product Categories on your Shop page while the second one will display your Product Categories as well as the rest of your products. For example, if you enable Show Categories under Shop Page Display, your Shop page will only show product categories as shown below:
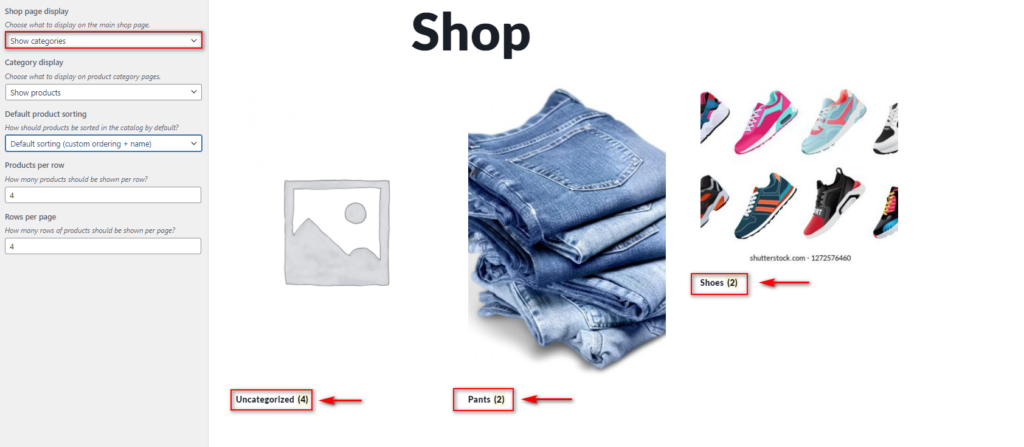
However, if you choose Categories and Products, it will display your Categories first and then the rest of your product catalog:
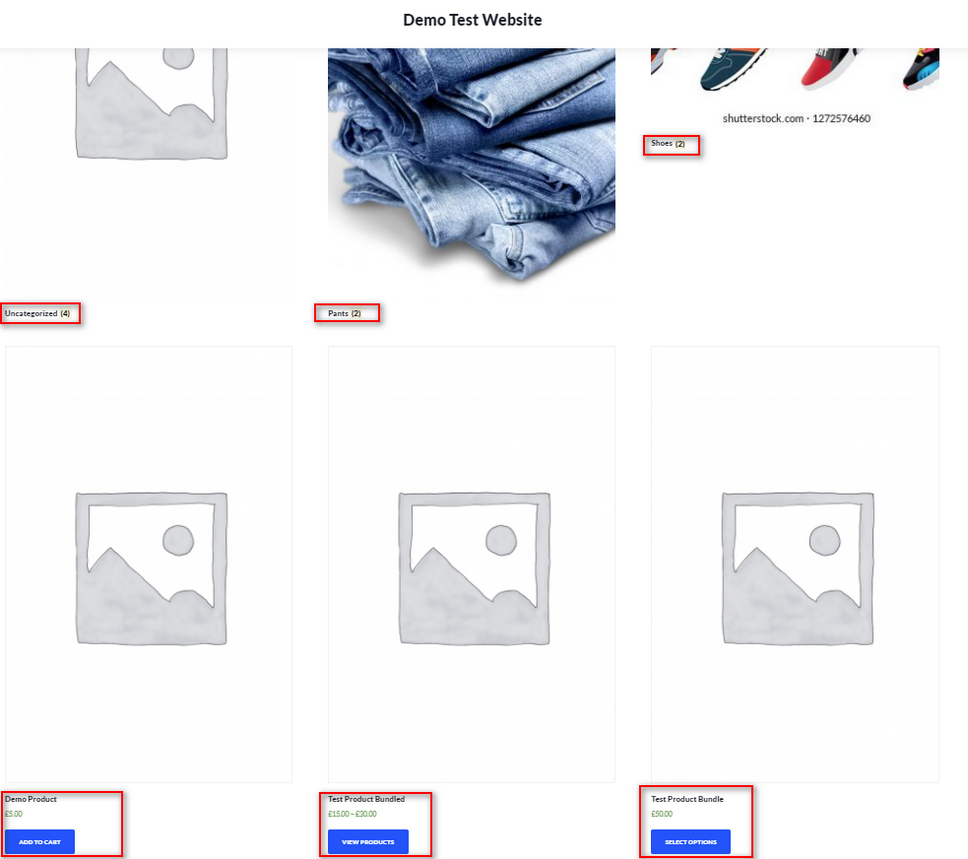
You can also use the option below-labeled Category Display to show/hide Product Subcategories and Products on your Product Category pages.
Once you’re happy with your customization, remember to click Publish to save the changes.
One of the most useful things about this method is that you can preview your changes in real-time, which makes it easy to use. However, it doesn’t provide you with much control as you only have two options. If you want more flexibility, check out the next methods.
2) Show Categories Using Shortcodes
If you have a custom Shop page setup using Page builders or a custom-designed Shop page, you can enable a WooCommerce shortcode to display your product categories. This provides you with more control over what to show and how to display your product categories than using the dashboard. Furthermore, you can use this method to show your categories on any WordPress page or post.
To do this, you need to simply add the following shortcode to your Shop page:
[product_categories]
This will display your Product Categories on your Shop page. But that’s not all. You can use additional attributes to customize the shortcode. For example, you can change the order of the Product categories, display only parent categories, hide empty categories, define the number of categories, and much more.
To know more about how to use WooCommerce shortcodes, we recommend you have a look at this post. And for more information about all the category attributes you can use, check out this site.
If you’re using Gutenberg, simply go to the Shop page, add the shortcode block and paste the [product_categories] shortcode.
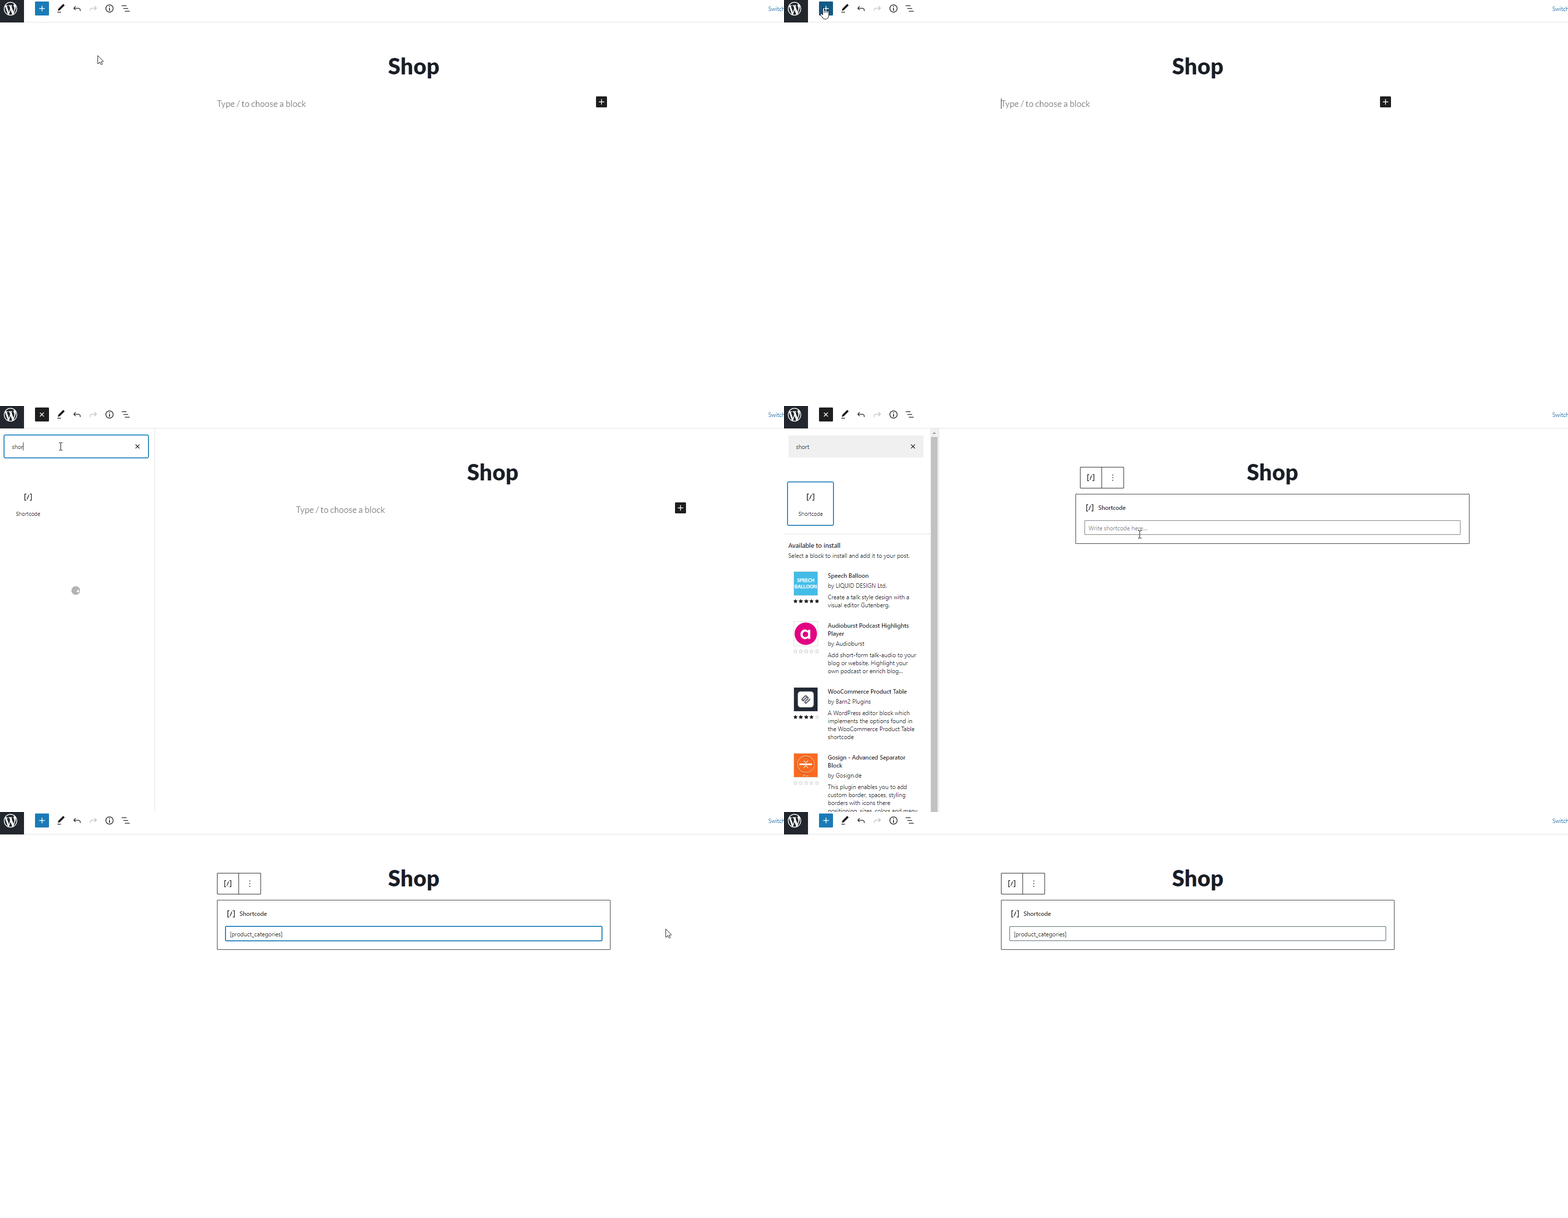
Now let’s see how to use the shortcode. If you want to show categories on the WooCommerce Shop page, ordered by category ID in ascending order, you would use the following shortcode:
[product_categories orderby = “id” order = “ASC”]
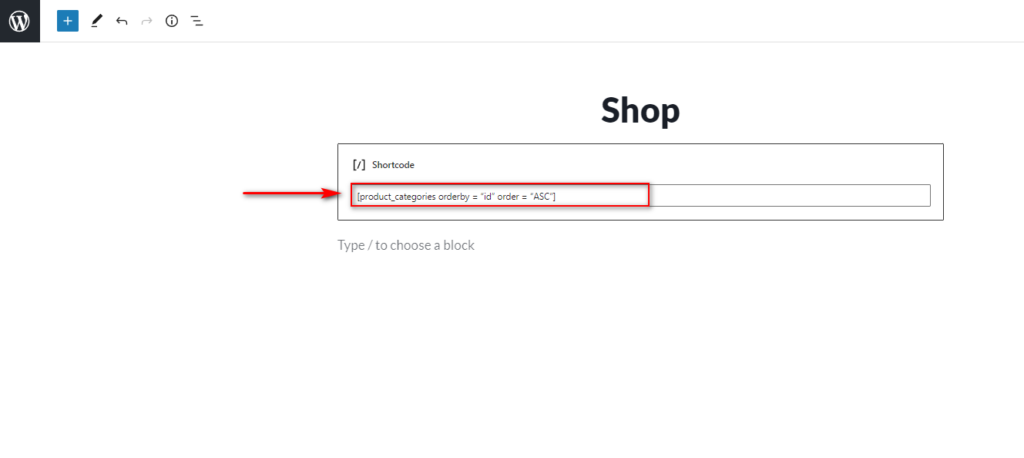
This will show up on your Shop page like this:
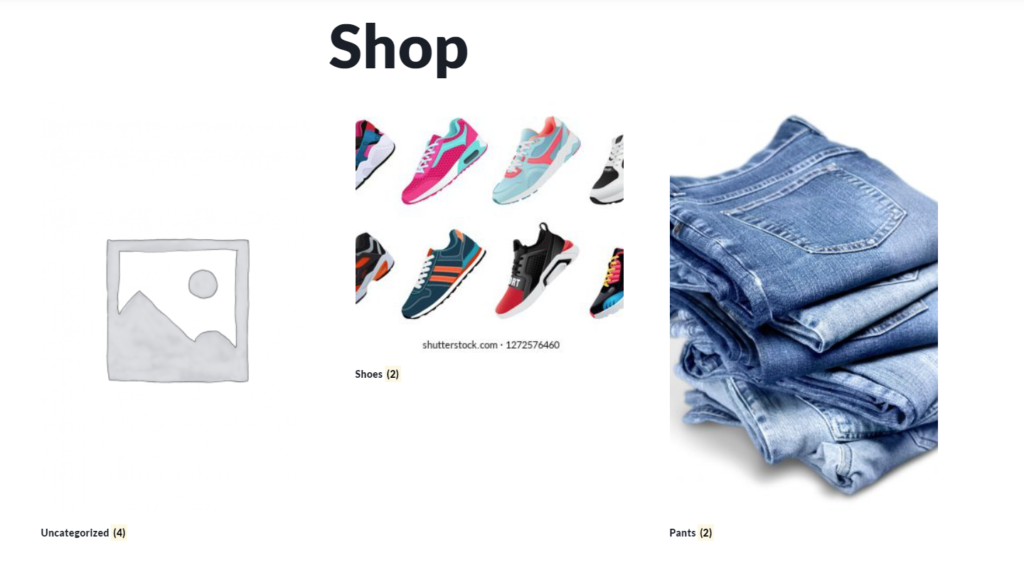
How to Show Specific Category on WooCommerce Shop Page
You can also use the shortcode method to show a specific WooCommerce Product Category.
To use it, you need to use the slug of your Product Categories. You can view your Category slugs under Products > Categories.
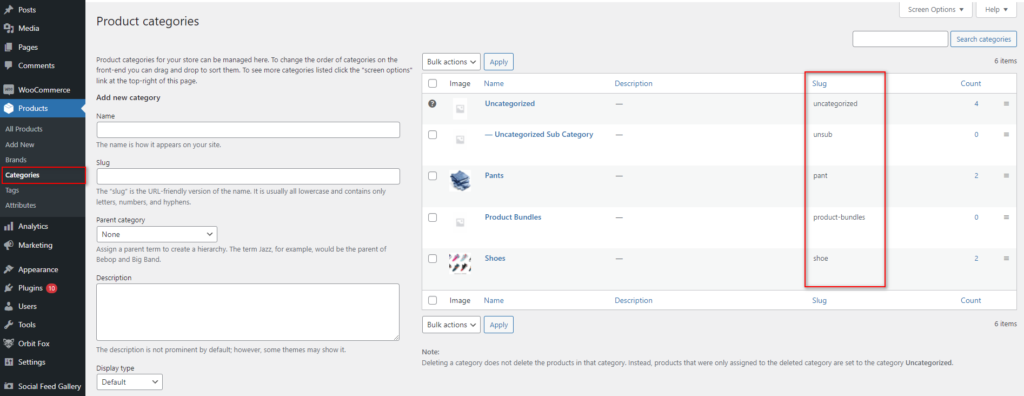
Once you know your specific product’s slug, you can use it on your Shop page as follows:
[product category category=”slug”]
Simply replace the slug text with your corresponding category slug. For example, if the slug is Show, the shortcode will be:
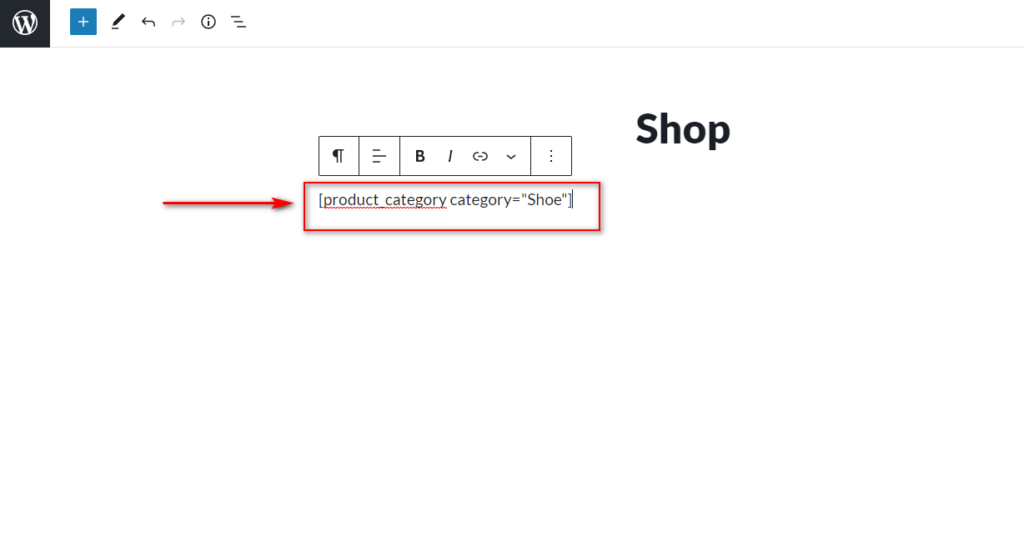
And on the frontend, you will see something like this:
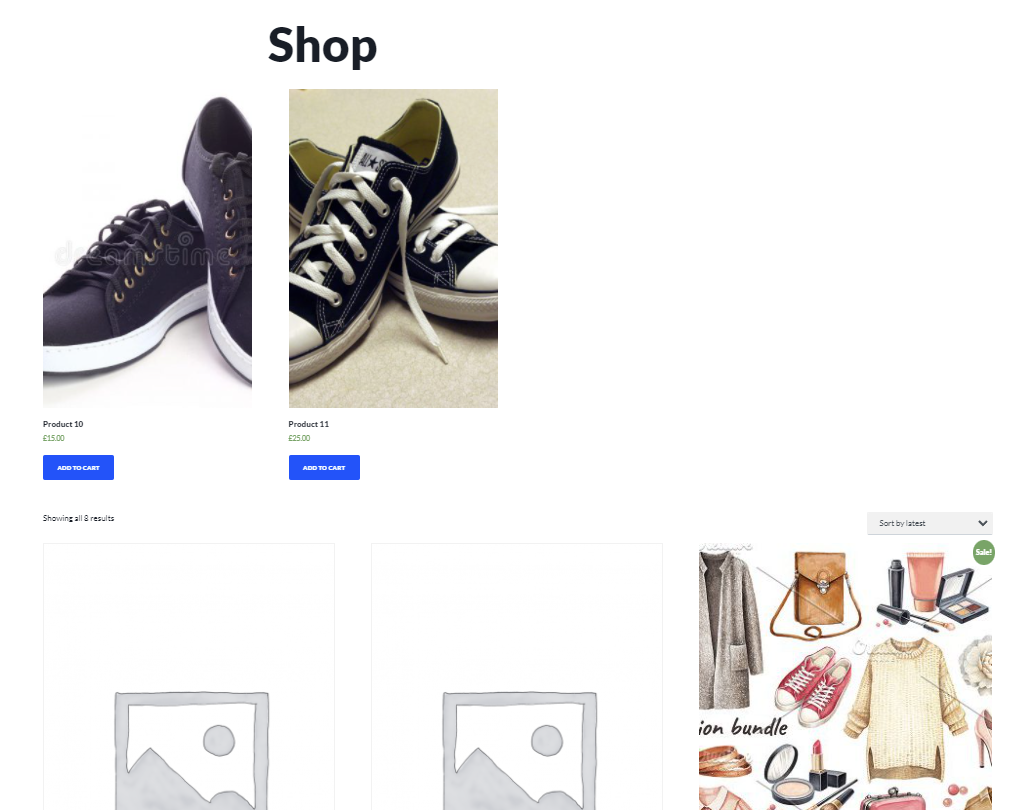
You can also use the same attributes available for [product categories] for further customization.
3) Display Categories Programmatically
Another way to add categories to the WooCommerce Shop Page is to use a bit of code. This method is recommended for users that have coding skills and are capable of configuring their theme files. Apart from knowledge of PHP, it’s recommended that you also have a basic understanding of CSS. If you aren’t comfortable with these languages, we recommend you follow the above methods.
As we’ll edit some core files, before you start with this process, we recommend you backup your site and create a child theme if you don’t have one already. If you aren’t sure how to do it, have a look at some of the best child theme plugins.
Now without further ado, let’s see how to show categories on the WooCommerce shop page.
Adding a Function to Show Categories on the Shop page
Once you have your child theme set up, open your theme functions.php file by going to Appearance > Theme Editor. Once there, click on the functions.php file on the right Theme Files sidebar.
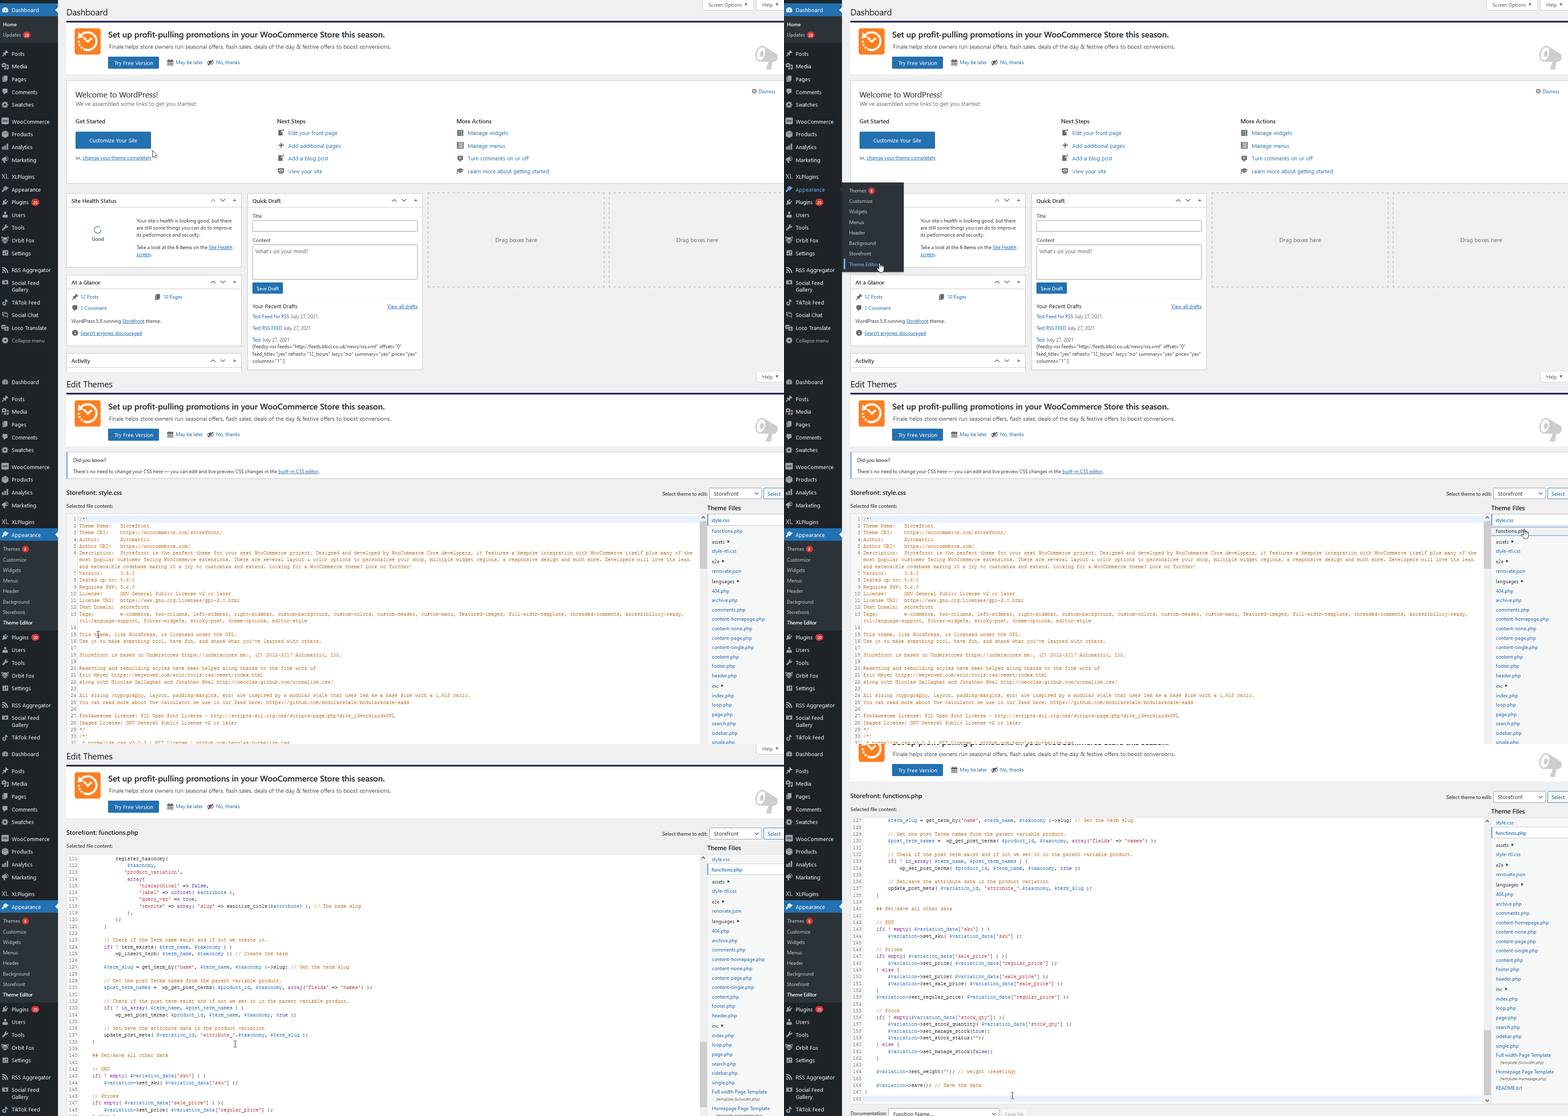
Now you’re ready to paste the following scripts to the editor to add your custom functions.
This function adds your product categories before loading the rest of your Shop page products. This is a great way to add all your Product Categories items before showing the rest of your product catalog.
function product_subcategories( $args = array() ) {
$parentid = get_queried_object_id();

$args = array(
'parent' => $parentid
);

$terms = get_terms( 'product_cat', $args );

if ( $terms ) {
echo '<ul class="product-cats">';

foreach ( $terms as $term ) {
echo '<li class="category">';
woocommerce_subcategory_thumbnail( $term );
echo '<h2>';
echo '<a href="' . esc_url( get_term_link( $term ) ) . '" class="' . $term->slug . '">';
echo $term->name;
echo '</a>';
echo '</h2>';
echo '</li>';
}

echo '</ul>';
}

}

add_action( 'woocommerce_before_shop_loop', 'product_subcategories', 50 );

As mentioned above, this function will add your Categories section to your WooCommerce Shop page. However, it might not look the way you want and might not match your site’s style. This is because you still need to style your newly created Categories section.
Setting up Styling for your Custom Categories Section
Now let’s add the customizable CSS to the Additional CSS section of your Theme customizer. In your WordPress dashboard, go to Appearance > Customize to open the theme Customizer menu and then click Additional CSS.
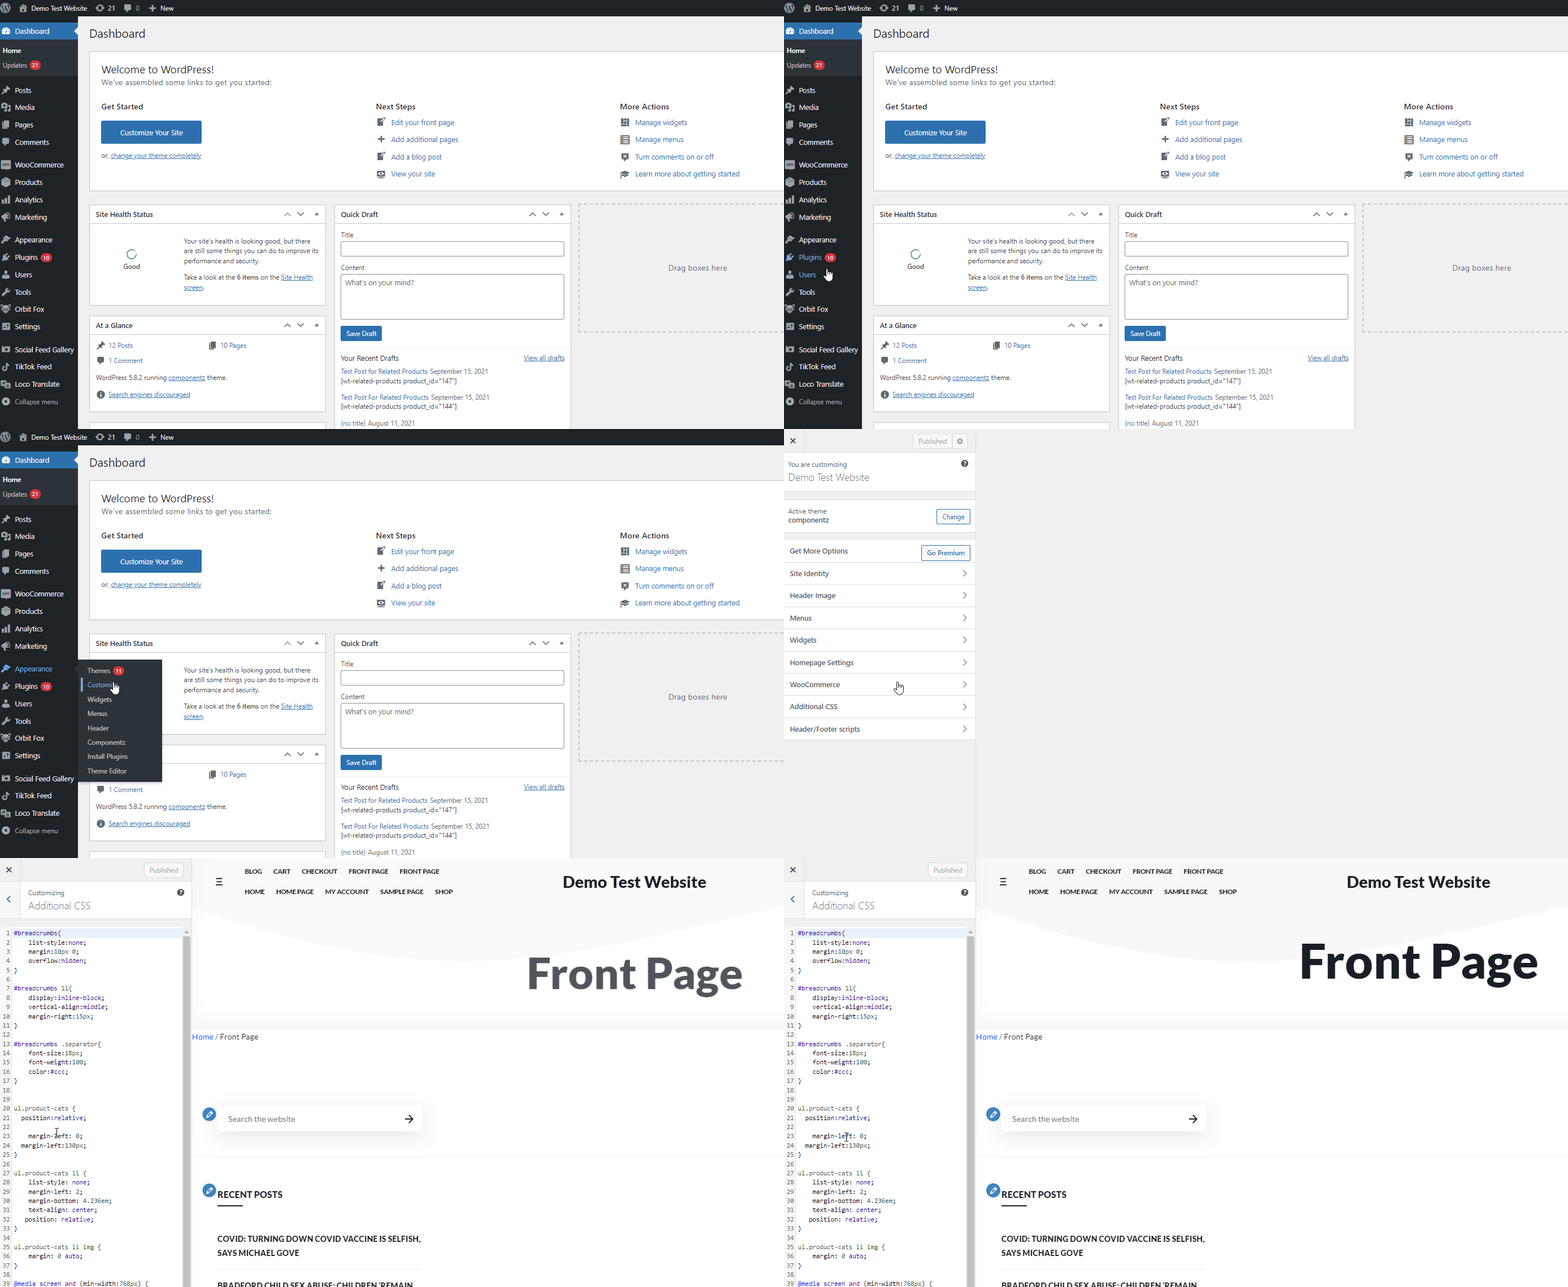
Then, paste the following CSS snippets into the Additional CSS section and customize it so it matches your website style.
As you can imagine, you will have many more options if you have knowledge of CSS. If you aren’t sure how to add code, have a look at our guide on how to add CSS to WordPress.
The following snippets will change the size of the images and the text under the images. This code is a sample, so feel free to customize them and give them the right style for your site to set up your categories section.
ul.product-cats {
margin-left: 0;
}

ul.product-cats li {
list-style: none;
margin-left: 0;
margin-bottom: 4.236em;
text-align: center;
position: relative;
}

ul.product-cats li img {
margin: 0 auto;
}

@media screen and (min-width:768px) {

ul.product-cats li {
width: 29.4117647059%;
float: left;
margin-right: .8823529412%;
}

ul.product-cats li:nth-of-type(3) {
margin-right: 0;
}
}
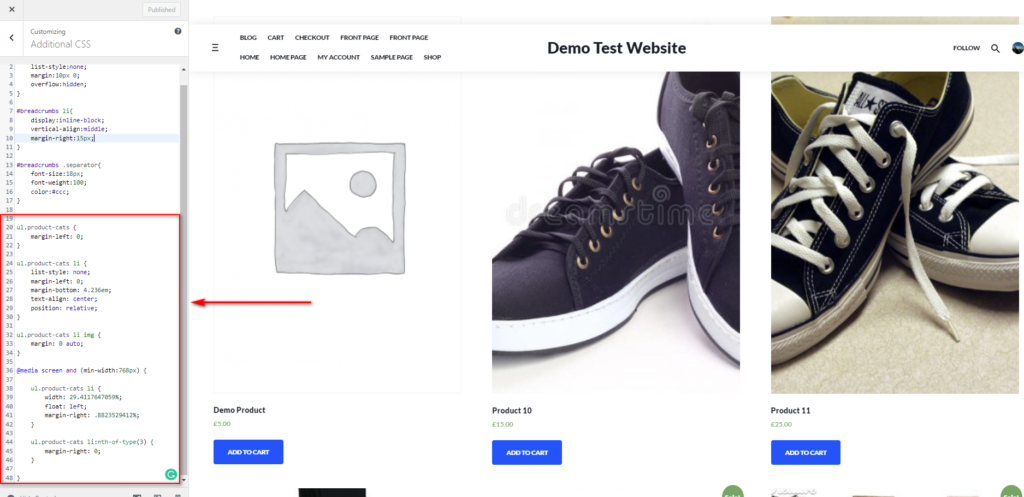
Once you’re done with the changes, update the Customizer settings and your Shop page should be updated with your new categories section.
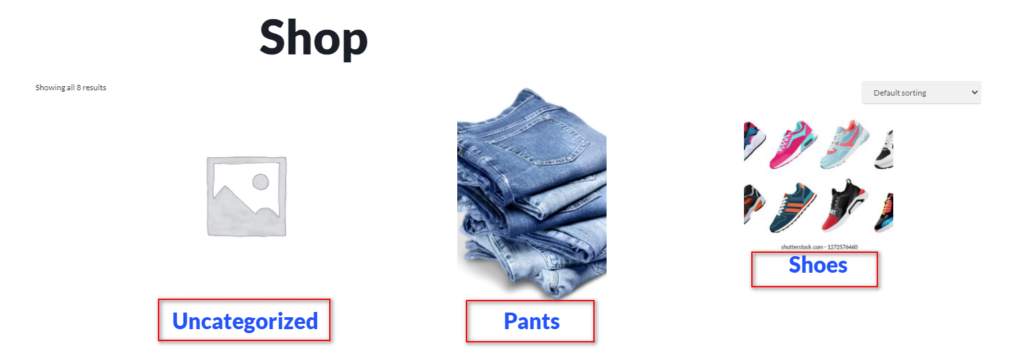
Bonus: Additional Ways to Improve Your Shop Page
There are other changes you can apply to ensure that your Shop Page is as customer-friendly as possible. This includes managing how many products are displayed, adding a section with Top Rated products, and much more. The idea is to make your products easy to find and provide your customers with a better shopping experience. Let’s take a look at how you can customize your Shop page to boost your sales.
First, let’s look at how you can add the Most popular Products list right under your Product Categories.
How to Display Most Popular Products on WooCommerce Shop Page
Besides adding your Product categories, you can also add custom product catalogs using shortcodes. This includes a Most Popular Products section that you can display using this shortcode:
[products orderby="popularity"]
As seen before, you can add shortcode attributes that you can find here.
To add the Most Popular Products section to your Shop page, you can simply add the following shortcode. In this case, we’re adding a few attributes to display the products in two columns.
[products orderby="popularity" class="m-popular" columns="2" limit="2"]
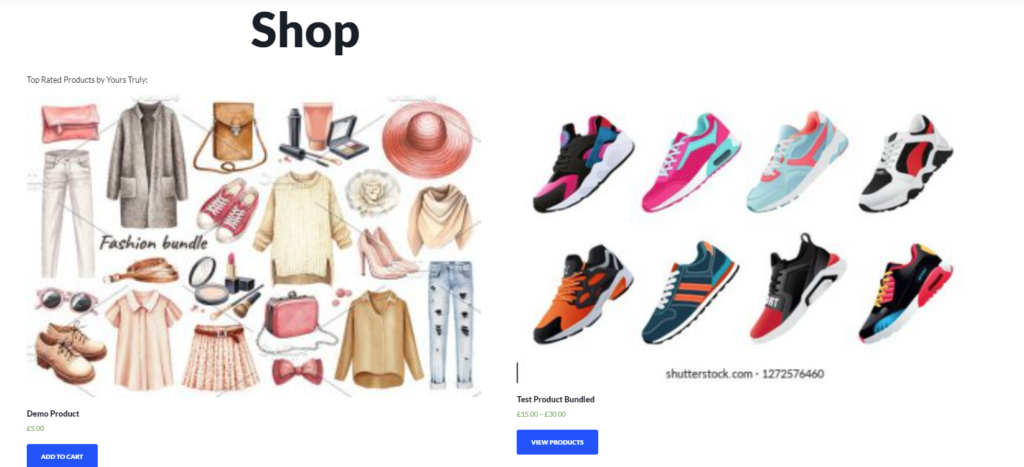
Additionally, you can add multiple sections such as products On Sale, Best Selling, Top Rated products and more using shortcodes:
- [
best_selling_products] - [
top_rated_products] - [
recent_products]
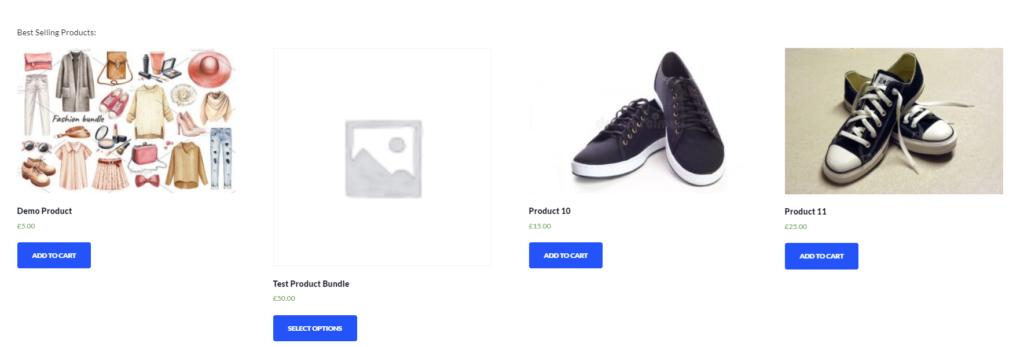
The best part is that you can use these shortcodes in different parts of your Shop page and customize them adding attributes. This way, you can control the flow of your Shop Page and increase your sales.
These are just a few examples but there’s a lot more you can do to make the most of your shop page. To learn more, check out our full guide on how to customize the WooCommerce Shop page.
Conclusion
In summary, the way you display your products on the shop page can have a great impact on your sales. That’s why displaying categories and smartly organizing your products is a must for every store owner.
In this tutorial, we’ve shown you different ways to show categories on the WooCommerce Shop Page:
- With the WooCommerce Settings under Theme Customizer
- Using shortcodes
- With a custom function and a bit of CSS to customize it
If you want an easy solution, you can use the options from the WordPress dashboard. However, that method doesn’t provide many customization options. Another option is to use a shortcode that you can customize. However, if you want even more flexibility and have coding skills, you can display product categories programmatically. Keep in mind that for that, you’ll need knowledge of both PHP and CSS.
Moreover, if you’re looking for a way to customize your Shop Page using a template instead of starting from scratch, you can choose to do so too. For this, however, you’ll have to configure your template files and modify your Theme files. We have our full guides on customizing the Shop page programmatically as well as configuring your WooCommerce templates here:
Have you customized your shop page and displayed the product categories? Which method did you use? Let us know in the comments section below!
Finally, if you’re looking for other ways to improve your shop page, have a look at the following articles:

I’ll right away grasp your rss as I can’t to find your email subscription hyperlink or e-newsletter service.
Do you’ve any? Please let me know so that I may just subscribe.
Thanks.