
How to add WooCommerce product attributes with variations: 2 methods
Do you want to create product attributes with different variations? You’ve come to the right place. In this guide, we’ll show you how to add WooCommerce product attributes with variations.
What are WooCommerce attributes?
In WooCommerce, you can add information to your products via attributes. These attributes depend on the product. For example, common attributes for clothing items are size and color, while for a laptop they may be screen size, RAM, and storage capacity.
The interesting thing about attributes is that they are global. Instead of applying them to each product, you simply create them and add them to different products.
Attributes are essential for:
- Variable products: Before creating variable products, you have to define attributes for them. This allows you to add variations of the product.
- Filtering products: A common way of filtering is based on attributes. For example, a user may be looking for a 15-inch screen laptop.
Additionally, you can also create default product attributes. For more information about that, check out this full guide.
Now that we have a better understanding of attributes, let’s see how to add product attributes with variations in WooCommerce.
How to add WooCommerce product attributes with variations
There are two main ways to add product attributes with variations in WooCommerce:
- From the WooCommerce dashboard
- Programmatically
Let’s have a look at both options.
1) Create product attributes with variations from the WooCommerce dashboard
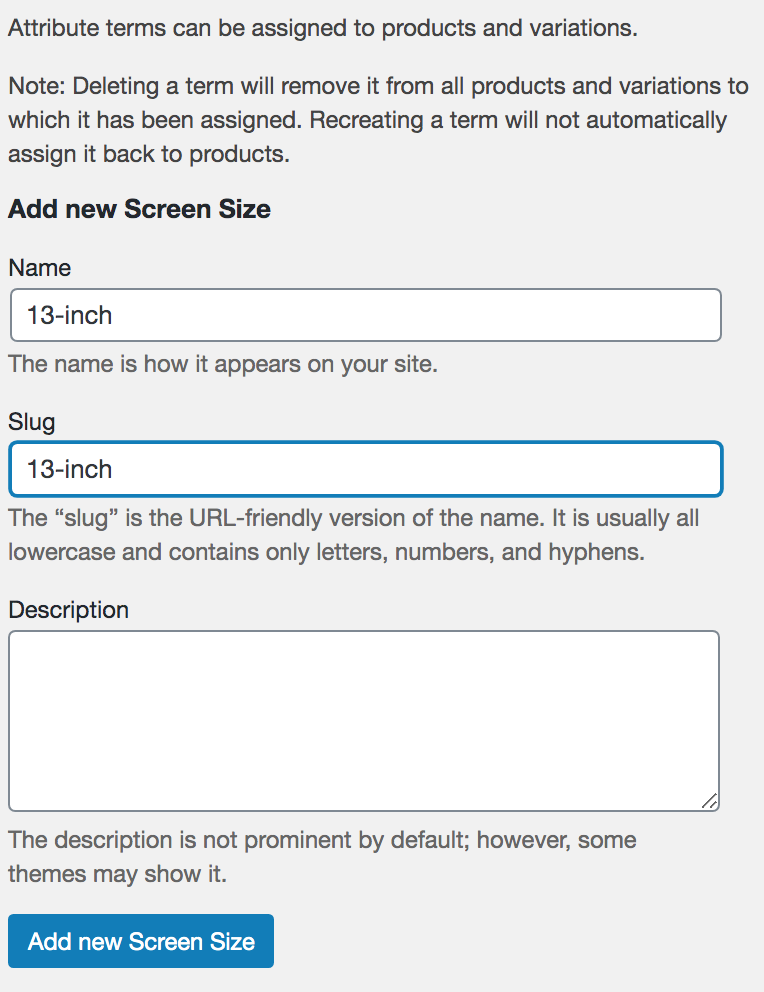
The easiest way to add an attribute in WooCommerce is from the Attributes section. To do that, in your dashboard, go to Products > Attributes. There you will have to choose a name and slug and click on the “Add attribute” button to create a new product attribute.

As mentioned before, attributes are global, so the new attribute will be available for all the products in your store.
After adding the product attribute, you have to add some terms that will become variations of certain products.

For example, if the attribute is screen size, the different sizes (13-inch, 15-inch, 17-inch) will be the terms.
This way, you can combine the different attributes of each product and create different variations. For example, you can get a red 13-inch laptop, a blue 15-inch laptop, and so on.
As you can see, adding attributes and variations from the WooCommerce dashboard is quite easy. However, it can be time-consuming if you need to create many variations. To create attributes with variations in bulk and manage a large number of attributes, you can use a bit of coding.
Let’s have a look at how to add product attributes with variations in WooCommerce programmatically.
2. How to create product attributes with variations programmatically
If you have coding skills, you can add product attributes and their variations programmatically. This is a great option if you want to save time when creating attributes as you can add them in bulk.
NOTE: As we’ll edit some core files, before you start, we recommend you:
- Create a full backup of your site, so you can restore it if something goes wrong
- Create a child theme: You can install any of these plugins or check out this guide to create one. This way, you won’t lose your customizations when you update your theme to a new version.
Note that you should insert your custom code in the functions.php file of your child theme.
After you’ve backed up your site and created your child theme, in your WordPress dashboard go to Appearance > Customize and look for the functions.php file on the right column. Then, paste the following code at the end of the file.
Full PHP script
This is the full script, in the next section, we’ll split it into pieces and explain what each part does.
add_action('admin_init', 'QuadLayers_add_product_attributes');

function QuadLayers_add_product_attributes(){
    $atts=array(
        'size'=>array('XL','Small'),
        'color'=>array('brown','gray','yellow'),
    );
    foreach ($atts as $key => $values) {
       new add_attribute($key,$values);
    }
}

class add_attribute{
     /*
     * Register a global woocommerce product attribute Class.
     *
     * @param str   $nam | name of attribute
     * @param arr   $vals | array of variations
     *
     */
    public function __construct($nam,$vals){

                $attrs = array();
                $attributes = wc_get_attribute_taxonomies();
                    foreach ($attributes as $key => $value) {
                        array_push($attrs,$attributes[$key]->attribute_name);
                    }
               if ( ! in_array( $nam, $attrs ) ) {
                    $args = array(
                        'id' => '',
                        'slug'    => $nam,
                        'name'   => __( $nam, 'woocommerce' ),
                        'type'    => 'select',
                        'orderby' => 'menu_order',
                        'has_archives'  => false,
                        'limit' => 1,
                        'is_in_stock' => 1
                    );
                   return wc_create_attribute( $args );
                }
               $this->add_var($nam,$vals);
    }

    public function add_var($nam,$vals ){
        $taxonomy = 'pa_'.$nam;
        $term_slug = sanitize_title($nam);
        // Check if the term exist and if not it create it (and get the term ID).
        for ($ff=0; $ff term_id;
            }
        }
    }
}
It’s worth noting that this script won’t remove any existing attributes, it only adds new ones. And if the attributes you’re trying to add are already there, the script won’t do anything.
Additionally, note that for this example, we’re adding some attributes and terms. You need to edit the below array and create your own attributes.
function QuadLayers_add_product_attributes(){
    $atts=array(
        'new-attribute'=>array('aside','beside','long','none','short'),
    );
After that head to the Products > Attributes in your admin dashboard. If everything went well, you will see the attributes and terms you’ve just added with the PHP script.
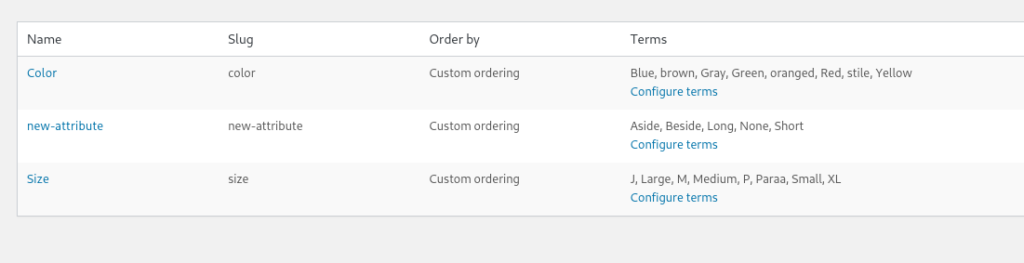
If you can’t see the variations, just reload the page so they can populate.
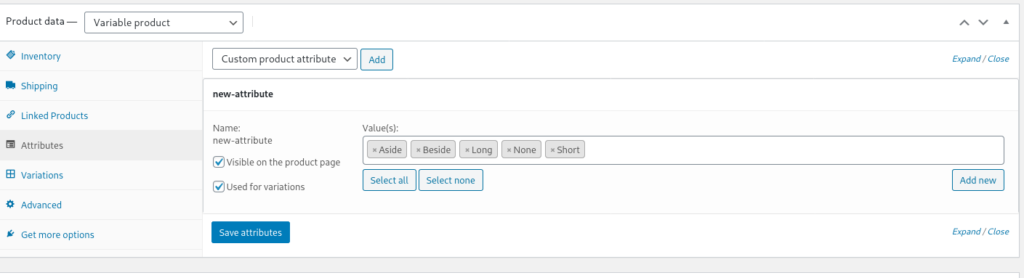
On top of that, the attributes will also be available to set up product variations on the product editor page:
And that’s it! Now you can simply edit the PHP script and add your own WooCommerce product attributes and variations. You can even update it dynamically by applying conditional logic.
How does the script work?
So far, we have shown you a script to add WooCommerce product attributes with variations to your store. Now let’s break it down, so you can better understand how it works and customize it.
The main sections of the script are:
The hook
add_action('admin_init', 'QuadLayers_add_product_attributes');

function QuadLayers_add_product_attributes(){
    $atts=array(
        'size'=>array('XL','Small'),
        'color'=>array('brown','gray','yellow'),
    );
    foreach ($atts as $key => $values) {
       new add_attribute($key,$values);
    }
}
We use the admin_init() hook to launch the code. You can use several other hooks here but in our case, we liked the performance of the script using this one.
In the hooked function, we define our attribute values and variations in a single multidimensional array. The foreach() loop will create an attribute for each one of the elements of the main array.
Inside the loop, the attribute is created by our class add_attribute();.
The class
We’ve created an OOP class that is responsible for creating the attribute and adding some variations to it. This is made in a single run each time the class is instantiated, using the new add_attribute() in the above section.
class add_attribute{
    public function __construct($nam,$vals){
                $attrs = array();
                $attributes = wc_get_attribute_taxonomies();
                    foreach ($attributes as $key => $value) {
                        array_push($attrs,$attributes[$key]->attribute_name);
                    }
               if ( ! in_array( $nam, $attrs ) ) {
                    $args = array(
                        'id' => '',
                        'slug'    => $nam,
                        'name'   => __( $nam, 'woocommerce' ),
                        'type'    => 'select',
                        'orderby' => 'menu_order',
                        'has_archives'  => false,
                        'limit' => 1,
                        'is_in_stock' => 1
                    );
                   return wc_create_attribute( $args );
                }
               $this->add_var($nam,$vals);
    }
The first function is a construct() and it creates the attribute using the wc_create_attribute() WooCommerce in-built function, while also calling the second function: add_var()
public function add_var($nam,$vals ){
        $taxonomy = 'pa_'.$nam;
        $term_slug = sanitize_title($nam);
        // Check if the term exist and if not it create it (and get the term ID).
        for ($ff=0; $ff < count($vals) ; $ff++) {
            if( ! term_exists( $vals[$ff], $taxonomy ) ){ $term_data = wp_insert_term($vals[$ff], $taxonomy ); $term_id = $term_data['term_id']; } else { $term_id = get_term_by( 'name', $vals[$ff], $taxonomy )->term_id; } } }
The second function add_var() will add all the variations included in the original array for the attribute that it’s also passed through the functions.
Conclusion
In summary, product attributes allow you to create variable products and help users filter products based on certain features.
In this guide, we’ve seen two different ways to add product attributes with variations in WooCommerce:
- From the admin dashboard
- Programmatically
Creating attributes from the WooCommerce dashboard is easy. However, it can be time-consuming if you need to add many attributes for several products.
Alternatively, if you have coding skills, you can create them programmatically. This is a more advanced method that allows you to add product attributes in bulk. The script we used in this post is fully tested and works, so feel free to take it as a base and customize it. However, keep in mind that it’s designed to be used on a single uploading attribute, we don’t recommend you deploy it into production permanently.
If you get an error when trying to run the script, don’t worry. This usually happens because you are on the attributes listing page. The correct way to update the script is by reloading the permalink page of the WordPress admin dashboard.
For more information on how to correctly add WooCommerce products both programmatically and from the admin dashboard, have a look at this guide.
Have you created product attributes in your store? Which method did you use? Let us know in the comments below!
