
How to configure and integrate WooCommerce with Stripe
Using WooCommerce is the ultimate choice for anyone running an eCommerce store. This plugin simplifies everything from store management to selling digital and physical goods, so it isn’t hyperbole to say that WooCommerce is one of the most crucial tools for any WordPress website. Additionally, its security and ease of integration with other tools are some of its most attractive features. That’s why today we’ll have a look at how to integrate WooCommerce with Stripe payment gateway. In this guide, we’ll discuss why you should consider adding Stripe as a payment gateway service for your site and how you can do so.
But before we talk about how to add this tool to your store, let’s understand what Stripe is, what it does and why you need it for your business.
What is Stripe?

Stripe is one of the biggest online payment services developed especially for businesses. Rather than general payments, Stripe is designed to help individuals manage their payments smoothly and provide a secure means to run businesses through the Internet. That’s why integrating WooCommerce with Stripe is crucial, especially for websites that are involved in business-to-business operations.
Nowadays, competition on the internet is fierce and customers want to have many options both in terms of products and payment methods. This means that the more the number of payment services you provide, the better. With its secure payment features, low external costs and it’s business-friendly operations, Stripe is one of the best payment gateways for WooCommerce.
Moreover, it’s important to highlight that Stripe is very secure for both the business and the customers. It easily filters out the fraudulent payments and has secure payment processing to ensure that the user’s details and payment information are kept highly secure. What’s more, the addition of support for Cryptocurrency makes it a great option for online businesses, especially since the world is moving towards using Cryptocurrencies such as Eth and Bitcoin. You can also enable mobile payment features such as Google Pay and Apple Pay.
Another interesting Stripe feature is that it provides you with detailed reports and statistics regarding payments and transactions on your website. Detailed notifications, webhooks, and easy debugging features ensure that your business payments remain smooth and issueless. Moreover, you can keep track of what products you are selling the most and manage your transactions with full control using the Stripe Dashboard.
Stripe for WooCommerce
Stripe for WooCommerce includes features such as creating on-site checkout systems, simple and easy fill in payment forms, and convenient payment processing. Furthermore, you can also provide options for automatic recurring payments and subscription services with barely any hassle. Stripe also allows you to enable refund services for your products to improve your customer service.
And the best part is that Stripe for WooCommerce is completely free. All the features this plugin offers are free from the start with no additional payments behind the plugin itself.
Moreover, installing and setting the tool is a breeze. The entire process won’t take more than a few minutes. With no set-up costs (there are fees per transaction though) and barely any effort required, enabling Stripe for WooCommerce is one of the best decisions you can make to take your eCommerce store to the next level.
Now that we have a better idea of what it is and how it can help you improve your business, let’s have a look at how you can install and set up Stripe.
How to Install Stripe for WooCommerce
Before you start with the installation process, it’s important to note that you’ll need to have some requisites covered. This includes having HTTPS enabled for your website as well as having an activated Stripe account. Also, you might be required to have your WooCommerce WordPress installation set up.
To start with the process, you’ll need to install your WooCommerce Stripe plugin. For this, click on Add New under Plugins on your WordPress Dashboard. Then using the search bar on the top right, search for Stripe WooCommerce.
Find the appropriate plugin labeled as WooCommerce Stripe Payment Gateway and click on Install. Then, click on Activate and your plugin should be good to go.
You can double-check that the plugin has been installed and activated by checking the Plugins page on your WordPress Dashboard.
Getting your Stripe API keys
Once you’ve installed and activated Stripe for WooCommerce, you need to set up a few things before you enable it as your payment service. Stripe requires you to register for your site’s API keys. You can easily retrieve your API keys from the Dashboard website of Stripe. You can open your stripe Dashboard from here and after you log in, you’ll be able to access your Stripe Dashboard.
Next, under the Developers section click on API keys. Here, by default, you’ll be given your Test keys. If not, you can simply click on the Viewing test data toggle button to display them.
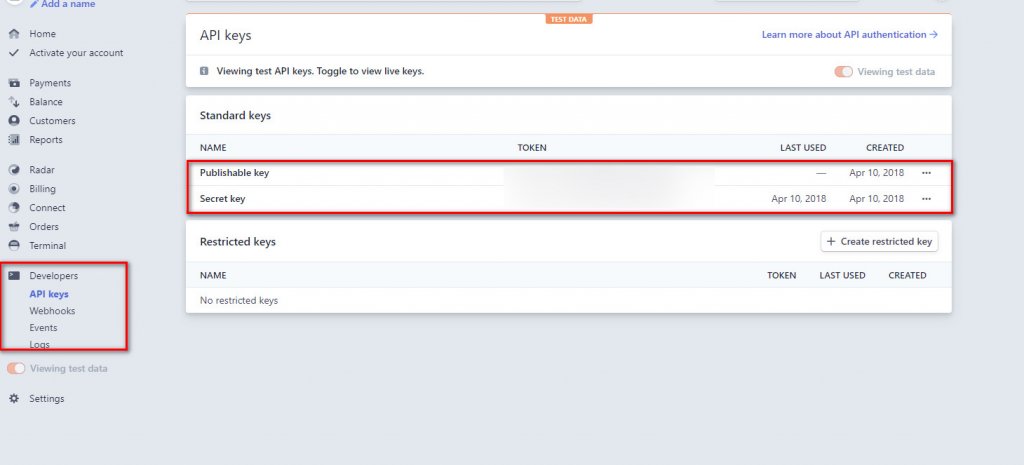
Copy both your Test Publishable key and your Test Secret key. Then, click on the Viewing Test Data button and turn it off and you’ll get your Live keys in the same fields. Copy them again and save them as you’ll need them later on. Once you’ve done that, open your WooCommerce interface on your WordPress Dashboard by clicking on WooCommerce on your WP sidebar.
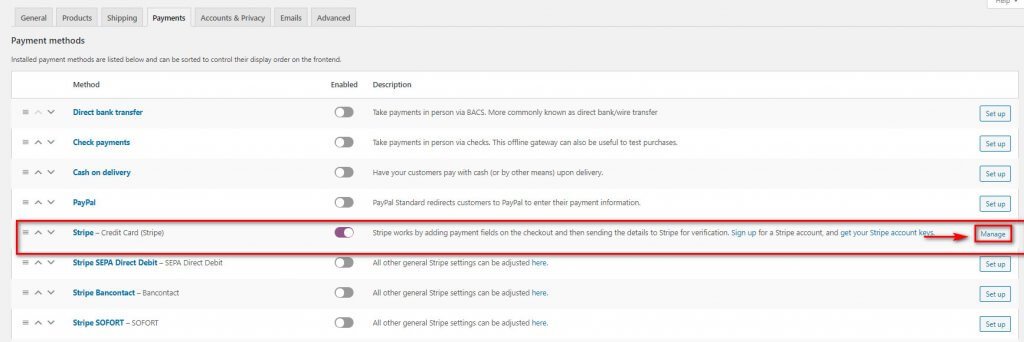
Next, click on Settings under WooCommerce and go to the Payments tab where you’ll see multiple options for your Payment services. Next to Stripe, you can enable a slider button. Click on it to enable Stripe and integrate it with WooCommerce.
Now before we celebrate, we still have to set up Stripe first. For this, click on Set up/Manage on the far right of the slider you’ve just enabled.
Setup WooCommerce Stripe for your payments
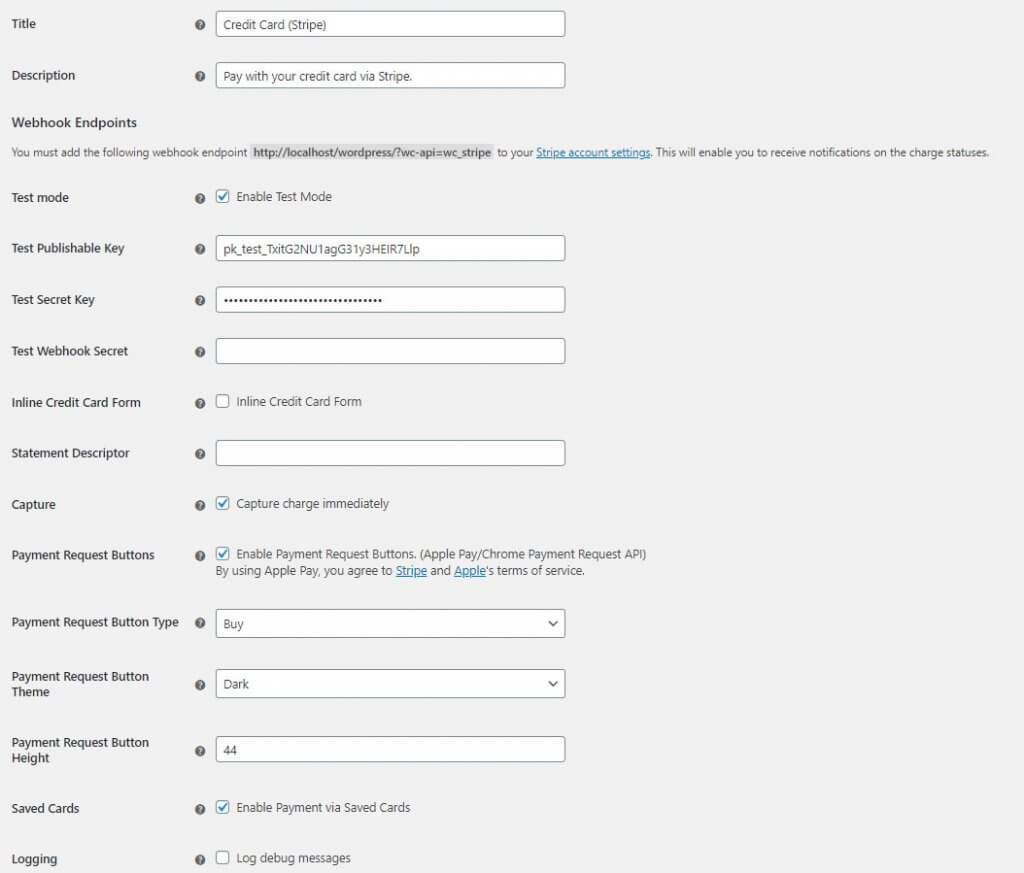
There’s a ton of things you can customize on this setup screen. This ranges from the Title of your payment services to its descriptions to customizing payment buttons.
However, the main things you need to set up here are your API keys. First, you can use the keys you received from your Stripe dashboard. If you have the Test keys, you can use them by using the Test mode. This is enabled by default and you can insert your Test API Publishable key and Secret key to enable a test mode description on your website.
From here, you can test your payments and in your Stripe account, you’ll receive the relevant information.
Test mode for WooCommerce Stripe
Simply copy and paste both the Test Publishable key and your Test secret key in the given fields. Now, you’ll enable Stripe payments for your store but the actual payments won’t go through. Any valid payment details will be sent to your Dashboard in the form of Test data. We highly recommend you use this mode first before customizing the rest of your Stripe payment to make sure that it all works smoothly.
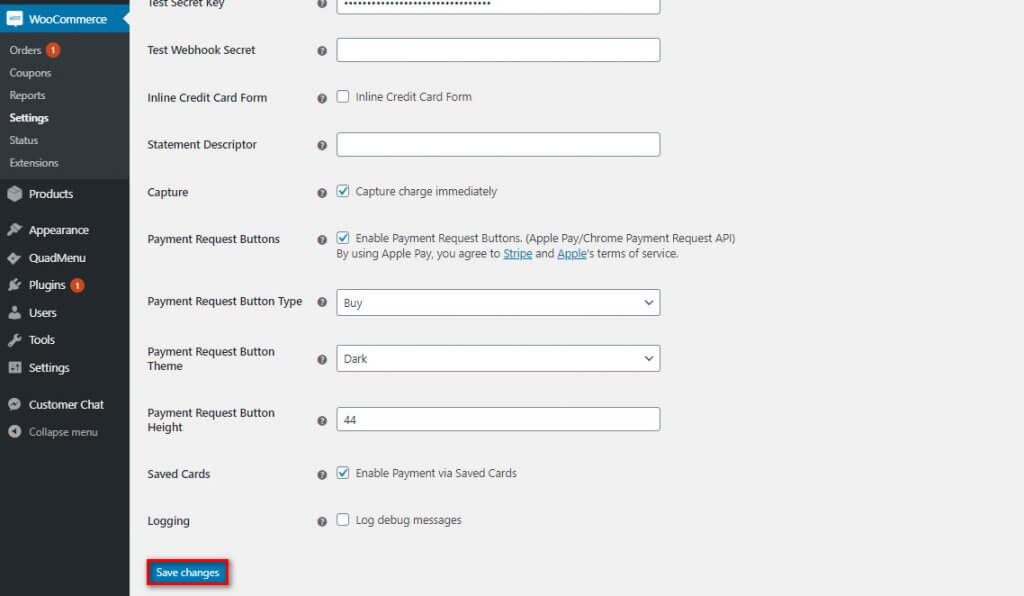
To enable the Stripe test mode, scroll down and click on Save changes. Then, you can go ahead and make some payments on your website to verify that the plugin works. You can use the Test credit card number and tokens from this page to verify that everything works well.
Testing WooCommerce Stripe
To test whether or not it’s working properly, you can set up a demo product on your website and make a purchase transaction for it. Simply fill in the billing details and then use one of the Testing cards for the credit card details.

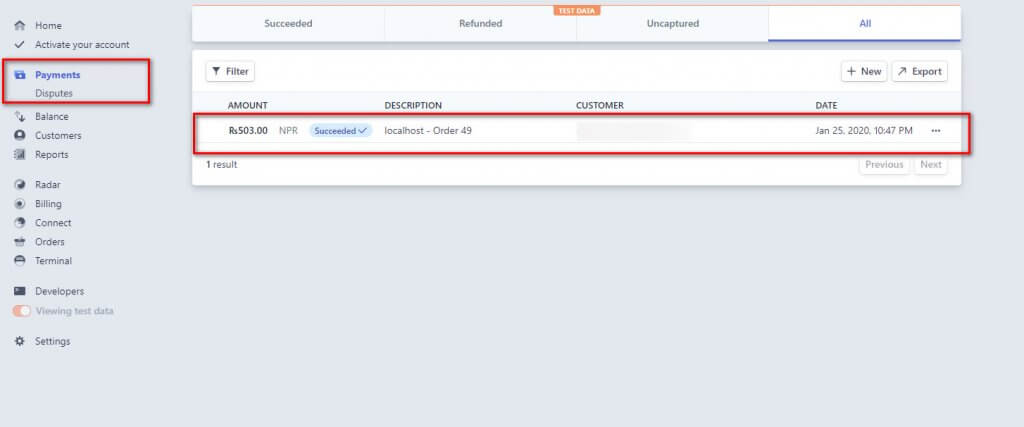
Once you click on Purchase, the details regarding the payment will be sent to your Stripe dashboard. Open your Stripe dashboard and click on Payments. There, you’ll see your latest transactions alongside the amount, customer, as well as the date and time of the payment.
Once you’ve verified that Stripe is working properly, you can enable the live mode to fully enable Stripe for WooCommerce and start accepting legitimate payments.
Enable Live mode for Stripe payments
To enable the live mode, simply untick the Live mode option. Then, copy and paste your Live Publishable Key and Live Secret key. Click Save changes and that’s it! You’ve just enabled Stripe as a payment service for your store! Now you should be able to receive live payments.
Once again, you should make sure that everything works properly on the Test mode before enabling your Live keys and Live Mode. You don’t want your payment system to break when your customers are trying to buy your products or services.
Customizing Stripe for WooCommerce
Once you’ve integrated WooCommerce with Stripe, it’s time to go one step further and customize a wide number of details regarding your payments. This includes adding Statement descriptors to the Credit card statements and adding options for payment using Google Play and Apple Play. Before you start, you can customize the following details on your eCommerce store using the same setup page:
- Title and Description: Lets you add a custom Title and Description for your Checkout section for additional details regarding the purchase.
- Statement Descriptor: You can add a text that will be shown in your buyer’s credit card statement.
- Inline credit card form: Lets you enable an inline page to add in credit card details. This means that the credit card form will show up inside the purchase page instead of opening a different page.
- Webhooks: Enabling webhooks for your website on Stripe provides you with notifications regarding charge statuses. You can learn more about this here.
- Capture: Unticking this feature disables automatic authorizing and capturing all the payments. If you choose to do so, you will have to manually capture the funds for each payment within 7 days. This document provides more detail about this feature.
- Saved Cards: Enabling this option lets your customers use a card that they’ve saved on their account for easier payments.
- Log debug messages: You can use this feature to save logs for troubleshooting various issues. These logs will be saved under WooCommerce > Status > Logs.
In addition to these options, you can choose to customize your payment request buttons to receive payments through Apple Pay or Google Pay, their themes and heights.
Once you’ve customized all the details and options you want, click Save changes. And that’s it! You’ve integrated WooCommerce with Stripe!
Conclusion
That’s our guide on how to integrate WooCommerce with Stripe to allow your store to receive payments. Let’s do a quick recap with all the necessary steps you need to take to make sure that it all works smoothly:
- Install and enable WooCommerce and WooCommerce Stripe Payment Gateway plugin.
- Retrieve your API keys from your Stripe Dashboard.
- Enable Stripe on your WooCommerce payment options and enable it by inserting your API keys.
- Customize your Payment form with additional information, inline forms and more.
If you followed these steps, your Stripe payment gateway service should be enabled for your WooCommerce store. This is an excellent integration that will help you grow your business. But there are many other things you can do to improve your website. You can enable Facebook shop or select the right WooCommerce free theme to provide better customer experience and increase your sales.
Have you tried integrating Stripe on your site? Let us know how it worked for you in the comment section below.
