WordPress Update Failed Error: How to Fix it
Do you get the “WordPress updating failed” error message while updating your site? Failures when updating and publishing in WordPress can be very annoying. That’s why we have put together this guide that will show you how to address the possible reasons and methods to fix the WordPress update failed error.
WordPress has auto-update features that make the update process easier. If you enable auto-updates, your site will automatically install all the new releases, e.g., 5.7.1 to 5.7.2, in the background. For any major updates, you get a notification that asks you to update WordPress and within a few clicks, you can update your site to the latest version.
As you probably know, keeping your site up to date is really important. Each new release contains crucial bug fixes, optimizations, and new features. However, sometimes the update fails and you get the WordPress update failed error. In that case, you will be stuck with the current version and will miss out on the latest features.
Now let’s have a look at how to fix the WordPress update failed error.
Identifying the cause of the WordPress Update Failed Error
To fix the failed updating problem, you have to identify the root cause of the failure first. Depending on the failure reason, you can apply different fixes.
If you have a look at the WordPress update failed error message, it states the possible cause. For example, let’s say your current WordPress version is 5.7.1, and you want to update to 5.7.2, but the update fails. The error message you get will be something like this:
Downloading update from http://wordpress.org/wordpress-5.7.2.zip...
Unpacking the update...
Verifying the unpacked files...
Installing the latest version...
Could not copy the file.: /httpdocs/wordpress/wp-admin/js/list table.dev.js
Installation Failed
If you check line 5, it states that WordPress is unable to copy the mentioned file. Similarly, you may receive an error message that contains the possible reason for your update failure.
How to fix the WordPress Update Failed Error
Several reasons can cause the WordPress update failed error. In this section, we’ll have a look at different solutions:
- Delete the .maintenance file
- File permissions
- Turn off safe mode
- Add FTP details to the wp-config file
- Update WordPress manually
Let’s have a look at each of these solutions that can help you solve the WordPress updating failed issue.
1. Delete the .maintenance file
Usually, after a failed WordPress update you get locked out of your site. This means that you will no longer have access to your WP Admin Dashboard or any page of your website. The end-user visiting your site will see a message that says “Briefly unavailable for scheduled maintenance. Check back in a minute.”
This happens because during the update process WordPress puts the site in maintenance mode. Now since the update failed, it remains in maintenance mode. This info is stored in the .maintenance file (remember that the file name starts with a “dot”) in your WordPress directory.
To solve this issue, all you need to do is find your way to your site’s root directory and delete the .maintenance file. For this, you need FTP access to the root directory of your WordPress site, which you can get via the server’s control panel or by using an FTP Client like FileZilla.
Once you have removed the .maintenance file, you will get access to your website again. You can then login and check the error message that caused the update to fail.
2. File Permissions
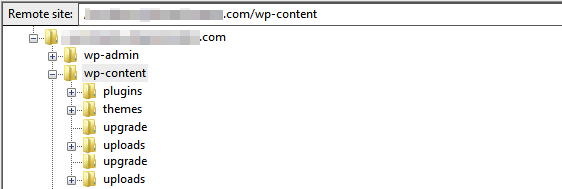
Another reason that may cause the WordPress update failed error is when the server is unable to create a temporary file that is required during the update in the /upgrade/ directory. To create the temporary file, the server needs permission to write to that directory.
To solve this issue, you need to route again to the WordPress root directory. In the root directory, locate the /upgrade/ directory and give write permissions to it. You can either give it the required 755 (CHMOD) permissions or go with full 777 permissions for a short time.
Once you have given the directory proper file permissions, you can attempt to update your site again. If the auto-update still fails, delete the /upgrade/ directory, re-create it, and give it the required permissions. After that, initiate the update again and it should work.
Keep in mind that if you give the /upgrade/ directory full 777 permissions, you should change it back to strict 755 permissions after the update. Allowing full 777 permissions to the server isn’t a recommended practice, so you should keep them as short as possible.
3. Turn Off Safe Mode
Turning off safe mode might help you with the WordPress update failed issue. However, safe mode is deprecated as of PHP version 5.3.0, and removed in version 5.4, as per the PHP manual. The manual states:
This feature has been DEPRECATED as of PHP 5.3.0 and REMOVED as of PHP 5.4.0.
If you are working with an older version of PHP, you might want to turn off the safe mode as it may resolve some issues that are hindering the update. You can turn off the safe mode via the server’s control panel or editing the php.ini file via an FTP client. Simply open the php.ini file in an editor and change the line
safe_mode = on
to
safe_mode=off
Afterward, restart Apache and log in to your site. You should be able to update WordPress without any issues.
4. Add FTP details to the wp-config file
Sometimes the update may fail in WordPress because your FTP credentials aren’t updated. This might happen because your site has been moved recently, or you have updated things like passwords, permissions, and so on.
In such cases, you can provide WordPress with the updated credentials manually by editing the wp-config file.
First, make sure you have the correct FTP credentials with you. Then, make your way to the wp-config file through the cPanel or an FTP client.
Open the wp-config file with a text editor like Notepad and paste the following lines to the file just above the line that says, “/* That’s all, stop editing! Happy blogging. */”.
define(‘FS_METHOD’, ‘ftpext’);
define(‘FTP_HOST’, ‘ftp.website.com’);
define(‘FTP_USER’, ‘username’);
define(‘FTP_PASS’, ‘password’);
NOTE: You need to replace the FTP_HOST, FTP_USER, and FTP_PASS with your website, username, and password respectively.
Finally, try again and you should be able to update WordPress.
5. Manually Update WordPress
Are you still getting the WordPress update failed error even after trying all the above methods? In that case, a manual update might be your best bet.
Though it is a bit technical, it isn’t as complex as it may seem. WordPress has put up a detailed guide on how to manually update it for those who don’t know how to proceed. If you follow all the instructions correctly, you will have no problems updating your site.
It’s worth noting that you won’t have to apply all future updates manually like this. Once you finish with this update, all future updates will be applied automatically, as they should.
By following the methods explained above, you will be able to fix the WordPress update failed error.
However, that’s not the only common issue that you may experience. Let’s see how to fix the publishing failed error in WordPress.
BONUS: How to Fix WordPress Publishing Failed Error
Another common error is the WordPress Publishing Failed or WordPress updating failure. This error happens when WordPress is unable to publish or update a post or page. The error is quite common and causes a lot of frustration among users.
Why does the Publishing Failed Error happen?
In most cases, the WordPress update failed error is caused due to issues with the REST API. This API manages the requests that are sent and received from the WordPress database, so when it fails it can cause problems on your site.
And what are the causes of the REST API issues? There could be several reasons but the most common ones are connectivity issues, conflicts with plugins or themes, or problems with third-party services.
As you can imagine, this error can be quite annoying as you won’t be able to update anything or add new posts on your website. Below, we have compiled a list of solutions that will help you fix the publishing failed error in WordPress.
1. Check Internet Connection and Site URL
In most cases, WordPress failed to publish something because there’s a connectivity problem. If your internet connection is weak or lost, you may not be able to publish or update a post/page and WordPress will show an error message. That’s why you should make sure that you have a stable working internet connection.
Though it’s not actually a solution, it’s worth mentioning because it’s the most common reason that causes the publishing issue.
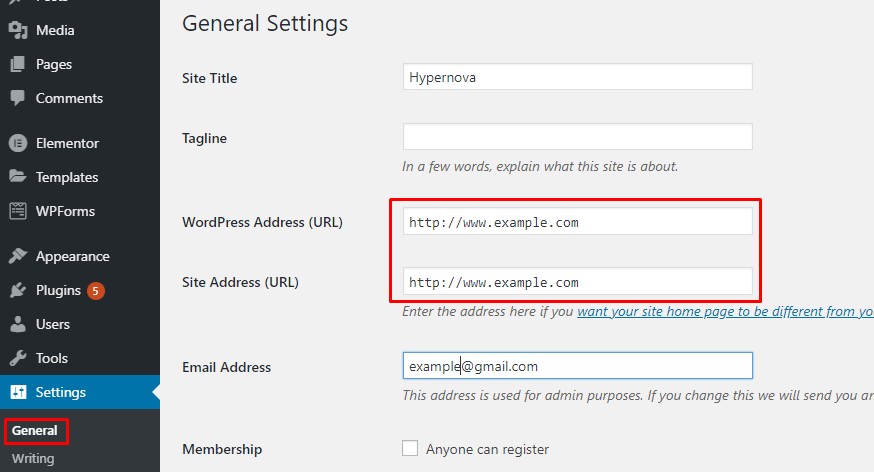
On the other hand, if your internet connection is working correctly, you should check your WordPress and site URLs. You can do so by going to the WP Admin Dashboard and navigating to Settings > General. Make sure both the WordPress URL and site URL are correct, otherwise, they can create problems.
If you don’t have connection problems and the URLs are correct but you are still experiencing the publishing failed error, it’s time to troubleshoot other things.
2. Check REST API Status using Site Health
As mentioned above, the REST API is a way that WordPress and other applications like the block editor communicate with the server. Issues with the REST API can create issues when publishing or updating something.
The first step to troubleshoot this is to make sure that the REST API is working properly. One way to identify if the REST API is blocked is via the built-in WordPress Site Health tool. It shows recommendations and any issues that may require user attention.
To check the Site Health, simply go to the WP Admin Dashboard and navigate to Tools > Site Health.
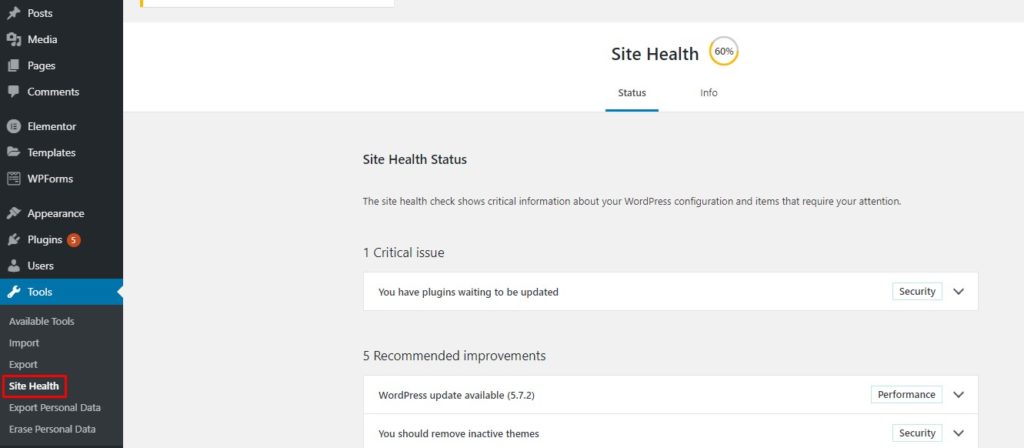
If there is an issue with the REST API, you will see it under the recommended improvements section as “The REST API encountered an unexpected result.” If you expand the message, you will see the details or at least a hint about the actual cause of the failed REST API call. Once you have identified the cause, you can take measures accordingly to re-enable the REST API.
3. Disable all the Plugins
If you don’t get any practical hints and are unable to locate the cause for a failed REST API call, you can try disabling all your plugins and see if that resolves your issue. The idea behind this is that one of the plugins on your site might be interfering with the API calls.
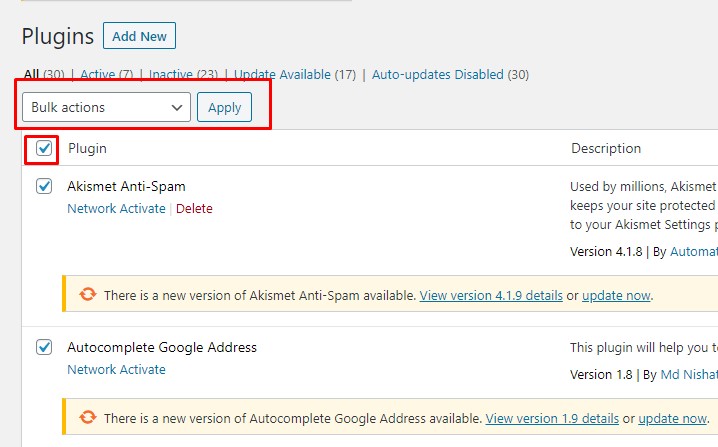
There are different ways to deactivate the plugins in bulk. If you’re not sure how to do it, check out our guide. The easiest way is to select all the plugins from your WordPress dashboard and deactivate them using the bulk actions.
If after disabling all the plugins you’re able to publish or update your posts/pages, it will indicate that one of the plugins is causing the problem. Then, start activating them one by one and updating a post until you find the plugin that is creating the issues.
Once you have identified the plugin, you can contact their support team for assistance.
4. Enter Debugging Mode
If none of the above solutions worked, you should try troubleshooting with the WordPress Debug mode. This mode will log all the PHP responses in the debug.log file under the wp-content directory. You can then inspect the log file to identify the errors blocking the REST API calls and take corrective measures.
To enable debug mode, you will need to edit the wp-config file through your cPanel or an FTP client. Open the wp-config file using a text editor like Notepad and add the following lines of code just above the line that reads “/* That’s all, stop editing! Happy blogging. */”
// Enable WP_DEBUG mode
define( 'WP_DEBUG', true );
// Enable Debug logging to the debug.log file
define( ‘WP_DEBUG_LOG’, true );
Note that you should only use the debugging mode as a troubleshooting tool. Once you have resolved the error, make sure to remove these lines from the wp-config file to disable debugging mode.
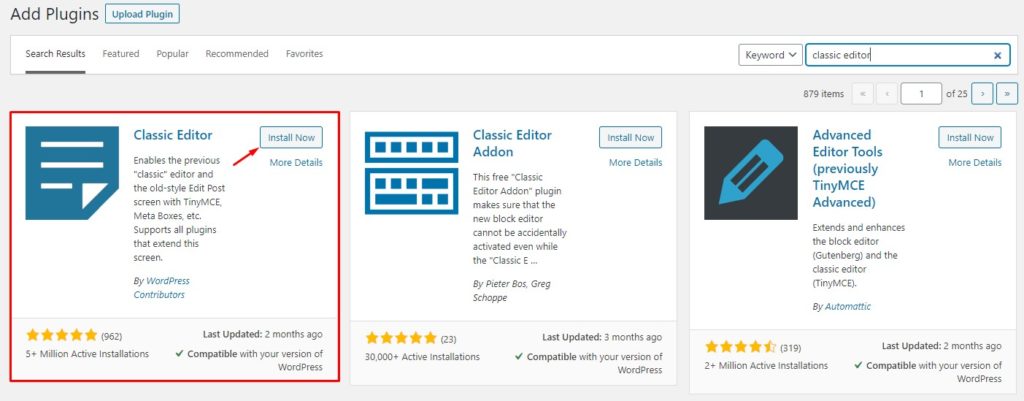
5. Alternative Solution: Switch back to Classic Editor
If none of the solutions worked for you or you are not comfortable editing core WordPress files, you can try switching back to the Classic Editor. The WordPress publishing failed error is mainly associated with the new block editor (Guttenberg) since it relies on API calls to communicate with WordPress.
If you switch back to the Classic Editor, you shouldn’t face the publishing failed error anymore. So until you fix the error, switching back to the Classic Editor can be a quick temporary solution.
To install the Classic Editor, go to the WP Admin Dashboard and navigate to Plugins > Add new. Search for the Classic Editor, click on the Install button, and then activate it.
That’s it! These are all the possible methods that will help you fix the WordPress Publishing Failed error.
Conclusion
All in all, WordPress updates are very important as they include crucial bug fixes, optimizations, and extra features. Not being able to update your WordPress can cause many problems and you would miss out on important functionalities.
In this guide, we’ve had a look at different solutions to fix the WordPress Update Failed Error. Additionally, we understood what may cause the Publishing failed error and explained different solutions depending on the root cause of the problem.
In summary, in this post we’ve seen:
- Five methods to fix the WordPress update failed error
- Deleting the .maintenance file
- Giving proper file permissions
- Turning off safe mode
- Adding FTP details to the wp-config file
- Manually updating WordPress if everything else fails
- Five methods to fix WordPress Publishing failed error
- Checking internet connections and site URLs
- Checking REST API status using WordPress site health
- Disabling all the plugins and then re-enabling one by one
- Inspecting the debug.log file by entering debug mode
- Switching back to Classic Editor as a temporary fix
If you’re looking for more information to solve the most common issues in WordPress, have a look at the following guides:
- How to Fix the “Link You Followed Has Expired” Error in WordPress
- Learn to Fix Maximum Execution Time Exceeded Error in WordPress
- WordPress login not working? How to fix it
Have you faced any of these issues before? What was your experience and how did you solve it? Let us know in the comments section below.

Hi, I have a problem with WordPress and to be exact with the sitemap, which the online validator tells me to be working and correct but Google Search Console keeps telling me “impossible to read”. The address is https://www.cartomanzia.fun/sitemap_index.xml
Hi Roberto, you need to submit the sitemap to Google Search Console. After that, it usually takes some time for Google to recognize it.
A me Sitemap con WordPress non ha mai funzionato, non so il perchè!
Hey Tarocchi, you can follow this guide (Step 6) to set up Sitemaps with the RankMath plugin. Alternatively, you can try out one of the plugins from this list of Best Sitemap Plugins for WordPress. However, if none of that works for you, I would recommend you to consult an expert or contact Google/WordPress support teams. Hope that helps!
Another reason — I just discovered — is disk memory is full. WordPress can’t write new files to the server becasue lack of space. Simple. Thanks for helping me out with this, cheers
Yes, that may also be one of the reasons. Thanks for sharing!