3. Getting Started
In this guide will look at how we create test cases about the two types of products support by our complement (simple and variable), following step by step each one of the configurations.
3.1. Simple product
3.1.1. Creation.
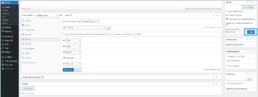
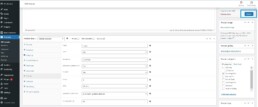
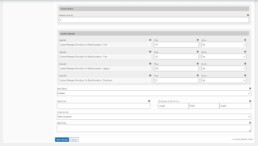
To create a simple product, go to ‘Products’ and click on “Add new” option. There, you can set up the name and select into the dropdown option “product data” the type of product you going to create.
Remember that our compelement License Manager only work with simple and variables products.
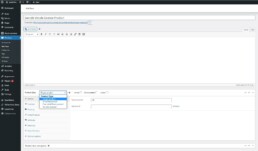
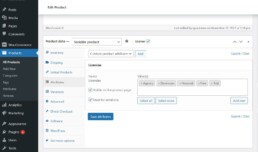
3.1.2. Enable the "License" option inside the product.
To enable the options of our complement inside the created product, click on “License” checkbox. After clicking, three new options will be displayed in the product menu called “License”, “Software” y “Wordpress” from wich set the differents options that our complement offer.
If you want to deepen about this three product sections, we offer a link hereunder: https://quadlayers.com/documentation/woocommerce-license-manager/products/
Remember that your product must have a price to be available in the store.

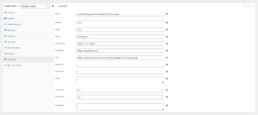
3.1.3. Wordpress configurations
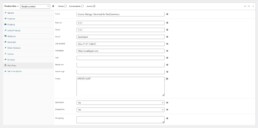
Like we seen before this action allow to custom the product information. For example Author’s name, WordPress requirements or recent version, allowing to define alerts based on automatics updates.
3.1.4. Client integration.
When all configurations are done and you are sure that they are suitable for your type of product, you must do the integration with our client, according to the next steps: https://quadlayers.com/documentation/woocommerce-license-manager/developer/

3.1.5. Publication
Lastly, done the integration you have to click in “Publish/Update” to display your product with the license in your shop.
3.2. Variable product.
With the case of variables products it's a little different. Woocommerce allow to create attributes with taxonomy, in this way they can be reused in the variables products and always have the same license structure.
3.2.1. Attributes and terms creation.
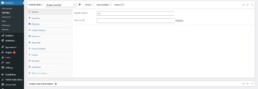
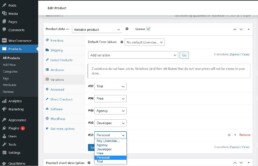
For this reason, before publish a product we have to create an attribute. To do this, go to “Products” section and enter in “Attributes” where you have “Add attribute” option.
After the attribute was created, is necessary configure the terms, more specifically each type of options that your product offer.
In this case, we configured some examples like “Personal, Agency, Developer, Free y Trial”.

3.2.2. Variable product configuration.
With the attributes and predefined terms, now you have to create a variable product from section “Products” –> “Add New”.
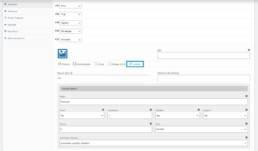
Also you have to allow the “license” option, like with simple products, and you need to add to it as attribute that you created before.
Remember have activated the “Used for variations” option for the next step.
3.2.3. Variations creation
From Here you can create variations for your differents types of licenses, recognizing each one with its term.
3.2.4. "License" in variables products.
Unlike the simple products, the “License” section won’t be available in the general menu of the product, but get into each one of the variations to activate them and make the configurations.
Remember that all variations should have a price to be available in the shop.
3.2.5. Wordpress configurations.
Like we seen before this section allows customize the product information. For example Author’s name, WordPress requirements or recent version, allowing to define alerts based on automatics updates.
3.2.6. Client integration
When all configurations are done and you are sure that they are suitable for your type of product, you must do the integration with our client, according to the next steps: https://quadlayers.com/documentation/woocommerce-license-manager/developer/

3.2.7. Publication
Lastly, done the integration you have to click in “Publish/Update” to display your product with the license in your shop.