
How to set up and integrate WooCommerce with PayPal Checkout
Do you want to increase your online presence and start selling online? One of the most important elements in e-Commerce is having a good online payment gateway. PayPal is the most famous one out there so today we’ll show you how to set up and integrate WooCommerce with PayPal step by step.
Why integrate WooCommerce with PayPal?
Even though the COVID-19 outbreak is affecting many economies and industries in every continent, some companies are quickly adapting their business to the new situation. With millions of people forced to stay at home, delivery businesses are flourishing so many shops around the world are focusing their efforts on their online strategies. We have already discussed the perks of using WooCommerce Stripe Payments and how you could integrate Stripe payments onto your website. However, there are many other payment gateways, and today we’re going to tackle the bigger beast when it comes to online payment services: PayPal.
PayPal is the number one payment gateway service available on the internet. Its ease of use, global availability, and great security make it the best online payment tool for most people. Additionally, for merchants, PayPal provides a wide array of features that makes receiving and sending large payments much easier.
According to Statista, there are currently more than 300 million active PayPal accounts around the world and so if you don’t support payments with PayPal, you may be missing out on a lot of customers that prefer paying through this popular method.
So, if you’re selling some products online, it’s a no brainer to enable PayPal payments on your website. In this guide, you will learn how to integrate WooCommerce with Paypal Checkout step by step.
Paypal as a Payment Gateway
In the current context of e-commerce, there are tons of payment gateways available for global payments. Some of the more popular options are Stripe, Amazon payments, Authorize.net, and many others. However, there’s a reason why PayPal has retained its position as one of the best, if not the best, payment gateway service in the market with more than 300 million active accounts. The options for transaction options are highly varied, and you even can choose to use Cryptocurrencies.
Additionally, the fees for using PayPal remain constant at 2.9% + USD 0.30, which is cheap considering the security and the services it provides. What’s more, PayPal supports recurring payments, which means that setting up Subscriptions for your products is quite easy. Along with the bonuses of various anti-fraud features and security measures, PayPal also provides easy integration with any app or e-commerce website.
So if you’re setting up your online shop, you should consider PayPal as your number one choice for payment service. WooCommerce, by default, provides you an easy way to implement PayPal payments straight from the get-go. However, you can also choose to integrate the PayPal checkout plugin for WooCommerce, which comes with the additional means of enabling your website’s checkout page.
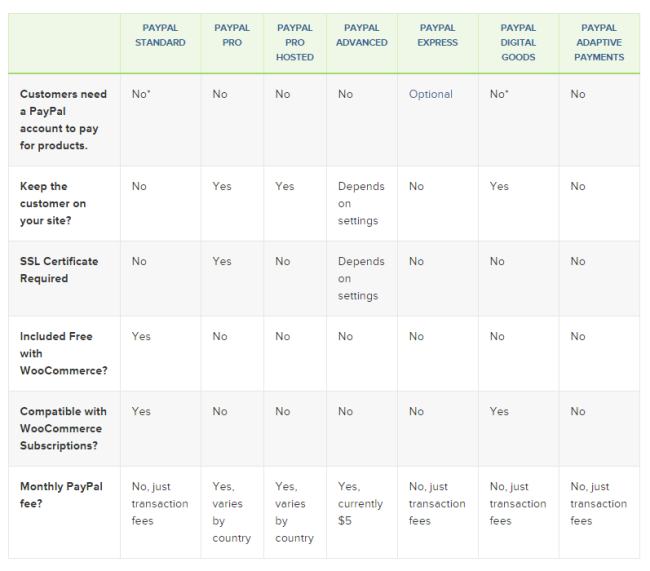
Why should you use the Paypal Checkout Plugin for WooCommerce?
Supporting PayPal transactions on your website is an obvious thing for most online retailers, service providers, and shop owners. WooCommerce, by default, provides you with the option to enable PayPal payments through the Payments tab on your settings. This reduces the hassle required to set up your basic means of receiving payments.
However, the checkout is still done on PayPal’s end which you don’t control. So to avoid that extra step and keep the shoppers on your site, you can install the PayPal Checkout plugin. Simply put, this tool makes it easy for you to verify and enable payments straight from your store. You choose how to display your checkout page on your website, along with additional detail, overlays, buttons, and much more.
Moreover, this plugin provides you with a lot of flexibility. Besides the huge range of options and settings, the main advantage is that setting up and customizing this tool is as easy as it gets. You don’t even need to register, copy, or paste API keys.
How to integrate WooCommerce with PayPal
Before showing you how to integrate your WordPress store with PayPal, let’s list out all the things you will need to get the integration working:
- Download the PayPal Checkout plugin and install it.
- Set up your PayPal checkout API.
- Set up and customize your PayPal checkout page.
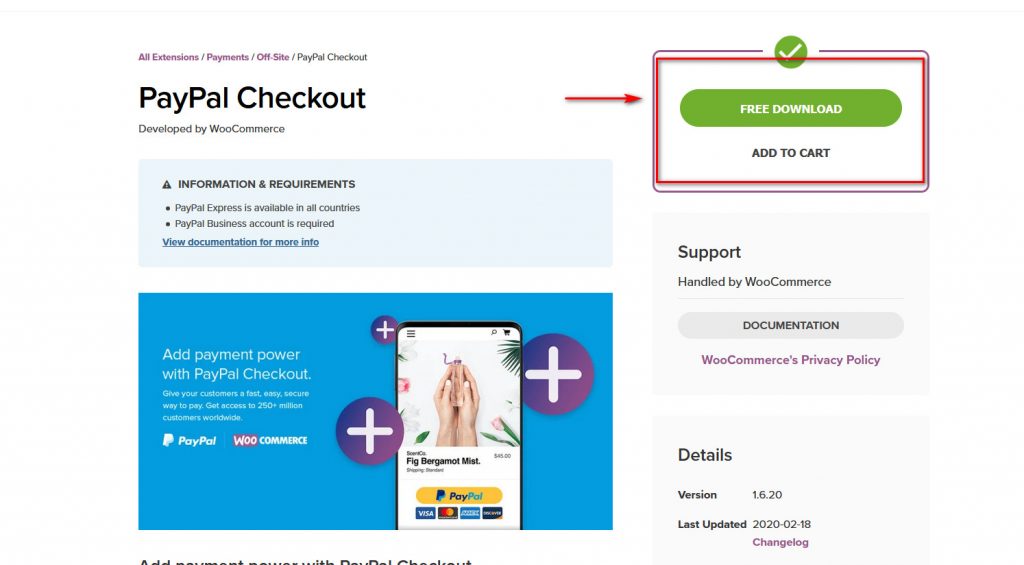
1) Download the PayPal Checkout plugin
First, you need to download the WooCommerce PayPal Checkout plugin. You can do it from this link.
Simply click Free Download on the right, then log in and fill in the checkout form. Don’t worry, the plugin is completely free so you don’t need to fill in any credit card details.
Once you’ve filled in the required fields, click Purchase on the right and you’ll be given a download link for the plugin file. Simply click Download and you should be good to go. Place the files somewhere handy because you’ll need them in the following step.
2) Install PayPal WooCommerce plugin:
Once you’ve downloaded the PayPal Checkout plugin, you need to install it. To do that, open your WordPress Admin Dashboard, hover over Plugins on the sidebar and click Add New. Then, click the Upload plugin button on the top right, and on the next page, click Browse.
After that, you will need to select the PayPal Checkout zip file you downloaded in the previous step.
After this, click Install Now and the plugin installation should begin.

Once it’s finished, click Activate, and your plugin should now be activated and installed on your WordPress website.
Now, to enable the Paypal Checkout plugin, you will have to fiddle around a bit with the WooCommerce settings. So go ahead and open your WooCommerce settings by hovering over WooCommerce on your WordPress Admin Dashboard sidebar and click on Settings.
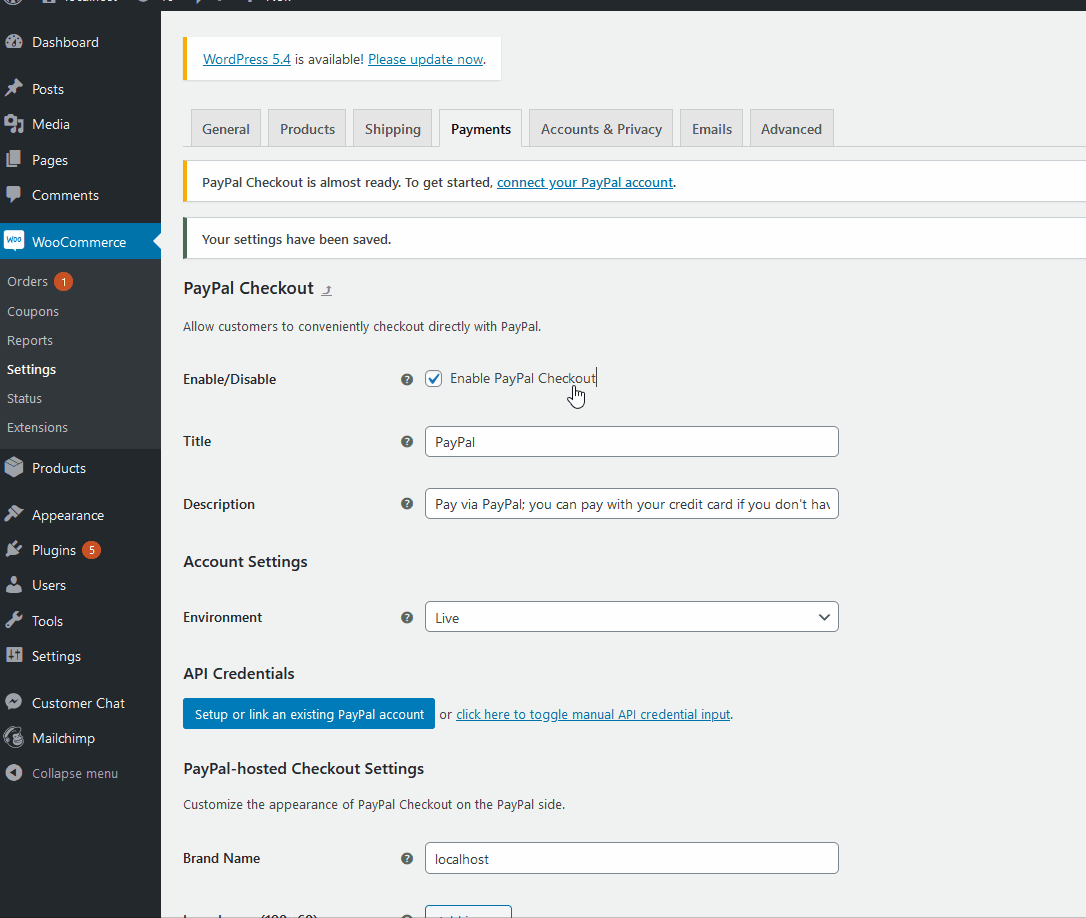
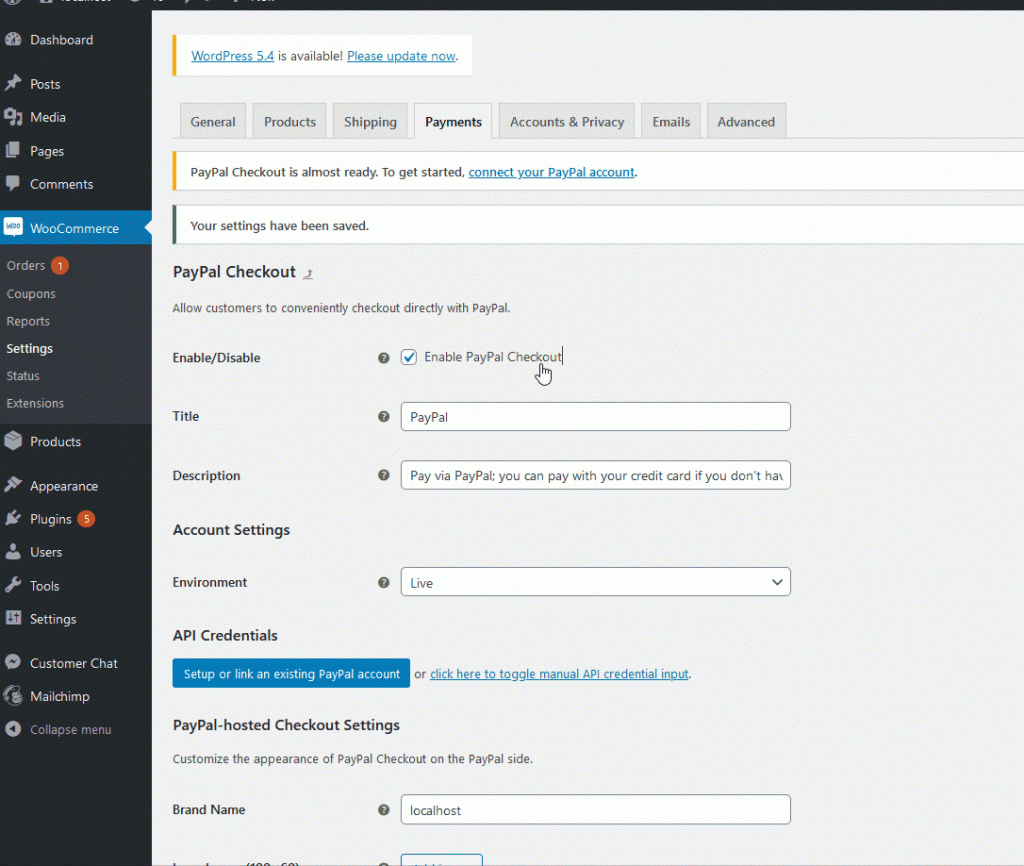
Next, click on the Payments tab and look for Paypal Checkout. Click on the Enable/Disable toggle switch, and on the right of the switch, you should be able to see a Set-up or Manage option. Click on it to start the setup process.
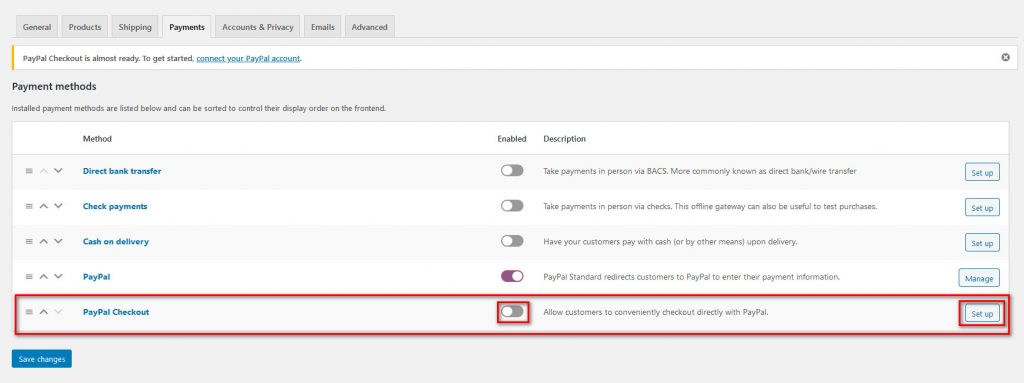
Once you click on Set up/Manage, you’ll be taken to the Paypal checkout settings section.
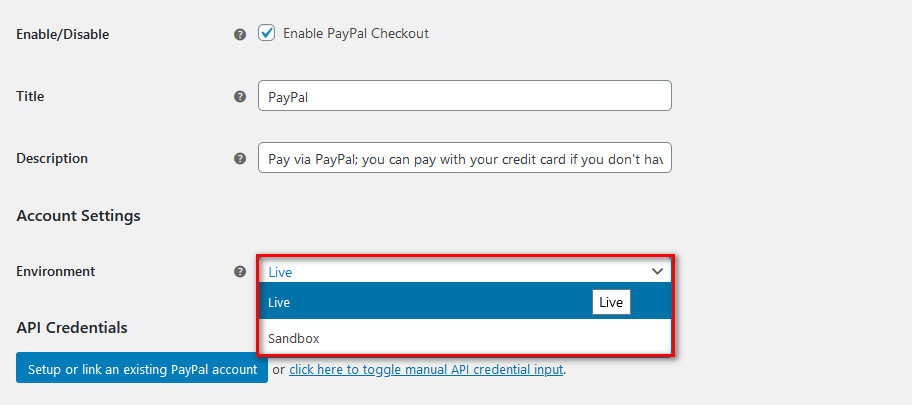
Here you can set up the Title and Description for your Paypal checkout page at the top. Underneath, using the Environment settings, you can choose to enable Live transactions or Simulated transactions using Paypal Sandbox. Using the Sandbox environment, you can test the checkout page before going ahead with a live page to make sure that everything works correctly.
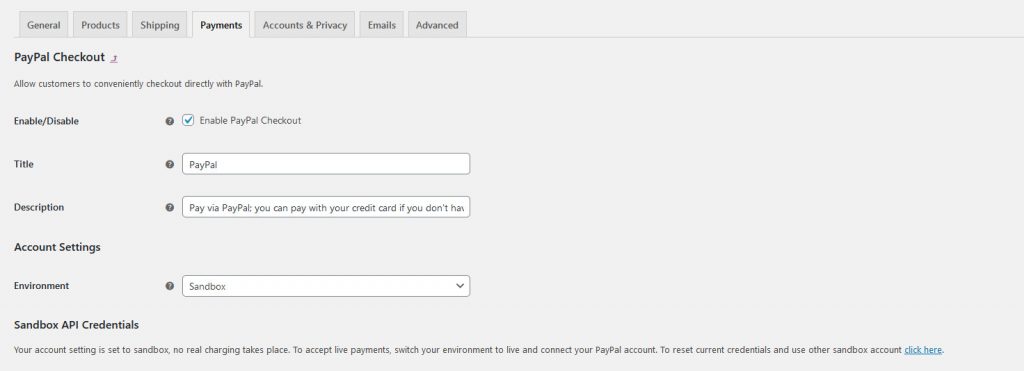
For this guide, we’ll be using the Sandbox environment as a demo.
3) Integrating Paypal Checkout API
Now, it’s time to integrate WooCommerce with PayPal. To do that, first set up your checkout API, which links your website to PayPal transactions.
To start, scroll down to the section of settings under API credentials. If you’re in a Sandbox environment, this will be labeled as Sandbox API credentials. Click the button Setup or link an existing PayPal account.
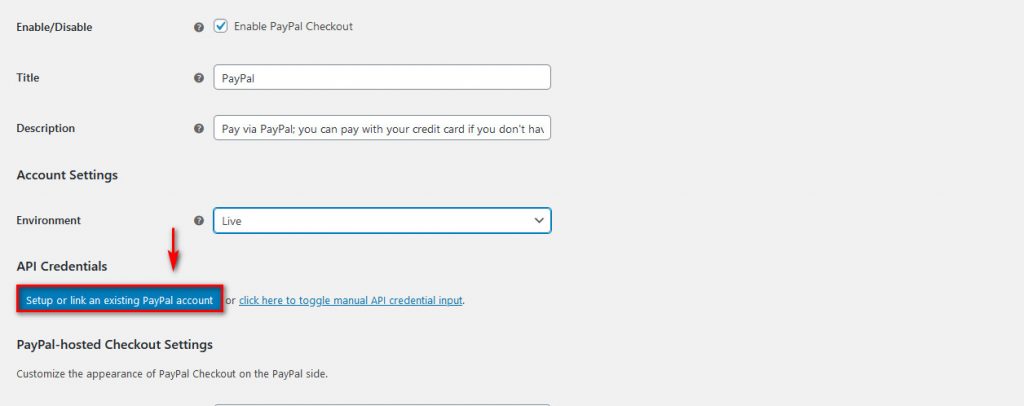
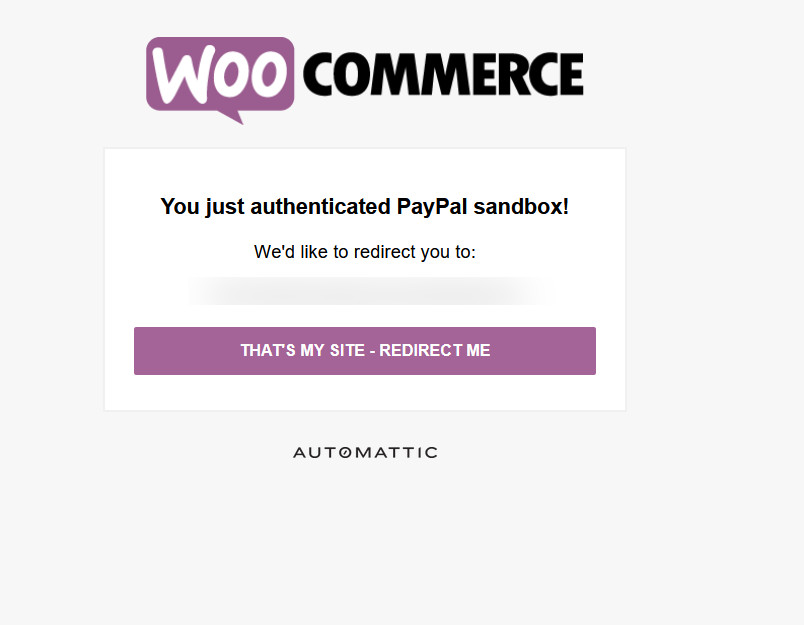
After this, you can simply log in to the window that opens asking for your PayPal login credentials. It’s important to note that you will need a Business PayPal account if you want to enable Live Transactions.
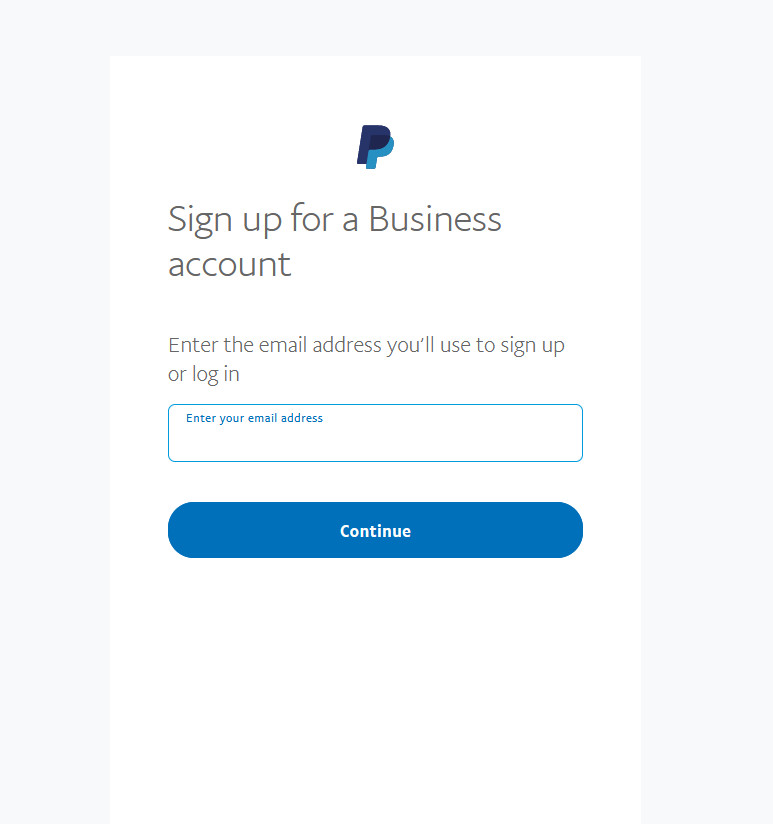
Once you log in, it’ll notify you that you need to authenticate your PayPal Checkout. Click the Redirect button to return to your checkout settings.
With this, your API should be completely set up on its own. No need to search for your API keys or register for them. The plugin automatically handles all of it on its own!
Then, make sure to enable PayPal Checkout and click Save Changes on the bottom of the settings page. With this, the basics of your PayPal checkout page should be set up. However, there are many other options to customize your Checkout page.
This plugin provides you with a lot of customization features. In this guide, we’ll cover some of the main ones.
WooCommerce Paypal Checkout additional settings
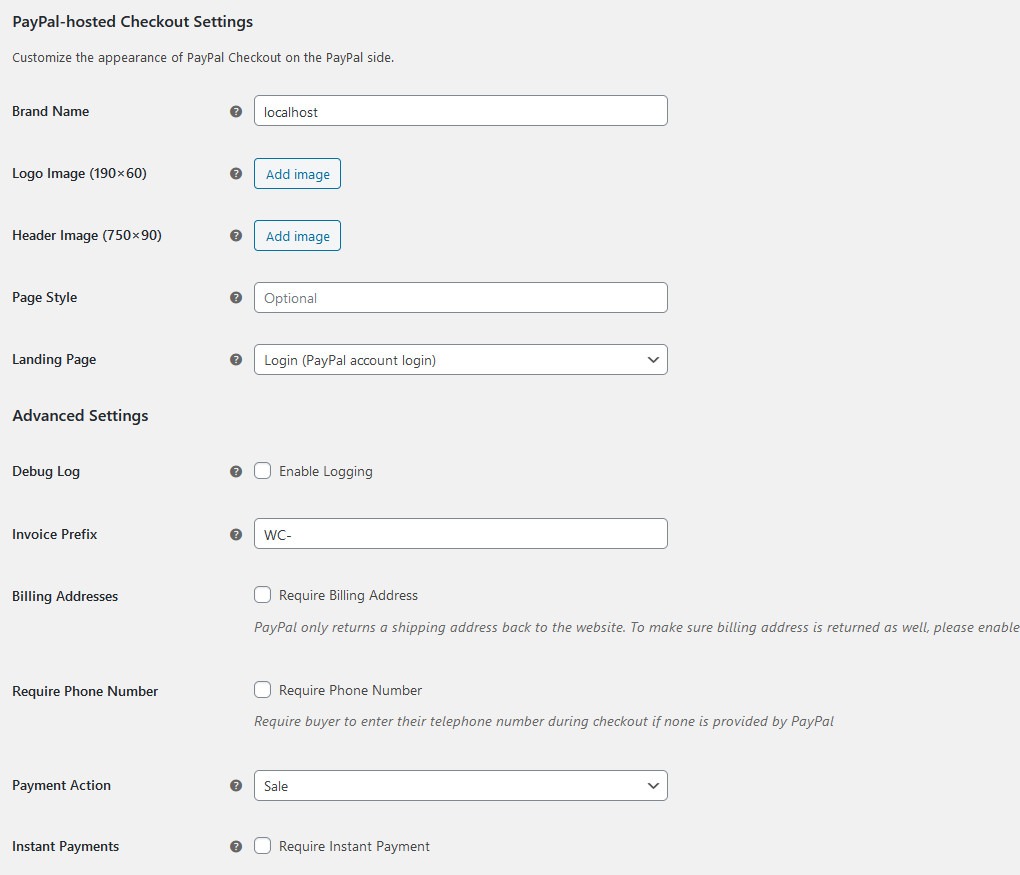
Once you’ve integrated WooCommerce with PayPal Checkout, it’s time to customize the checkout page to optimize it as much as possible. You can add your logo and header images as well as your brand name. You can also choose if you want the checkout page to take your customers directly to the billing page or the login page.
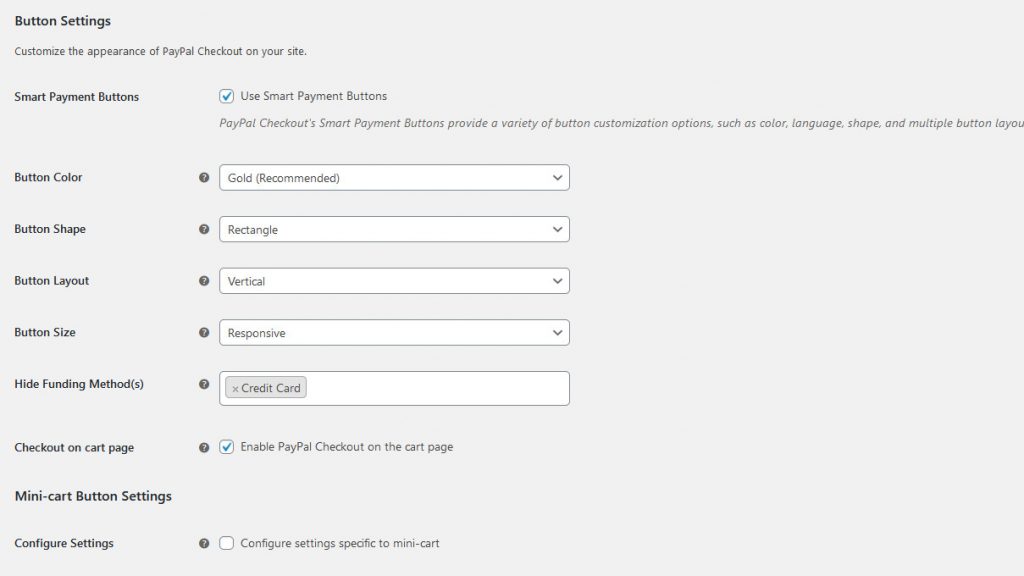
Additionally, if you scroll down, you will see the customizations for the buttons, mini-cart, and more on your checkout page. There are dozens of personalization options! You can choose button layouts, colors, size, enable checkout directly from your cart, and much more. You must take the time to explore the settings to ensure that your checkout page is well optimized. More information about how to optimize your checkout page here.
Once you’ve customized the checkout page, you can go ahead and enable PayPal Checkout in the Live environment. To do this, simply open your PayPal Checkout manage page and under Environment, click the Live option. This will finally implement the integration between your WooCommerce store and PayPal Checkout!
NOTE: Please note that you might need to log in again to your Business PayPal account to integrate your Live API. Click on Setup or Link an existing PayPal account to do so.
Conclusion
All in all, PayPal is the most popular payment gateway in the market so you should receive PayPal payments in your store. And to keep your customers on your site during the checkout, consider integrating your WooCommerce site with PayPal Checkout plugin. It’s very simple and it only takes a few minutes.
So apart from allowing more than 300 million PayPal users to pay in your store, this tool ensures that your whole payment checkout occurs directly on your website using your customized checkout page without actually taking your shoppers to Paypal’s site. This tool also provides you with features to enable the checkout page directly on your cart, and you can enable features for better security measures too.
All these things make WooCommerce PayPal checkout one of the most important plugins for your store. Stripe is another popular payment gateway so you may also want to check out our guide to integrate it with WooCommerce or if you want general tips to improve your checkout page, you can have a look at this post.
Have you integrated your site with PayPal Checkout? What do you think about this tool? Please let us know your thoughts in the comment section below!
