
How To Add Google Analytics To WordPress (The Definitive Guide)
Whether you’re running a personal blog or a business website, your goal is to attract more visitors so then they can become subscribers or shoppers. To run your site successfully, you should understand where those visitors come from, how they interact with your website, what pages they go to, and so on. That’s why learning how to add Google Analytics to WordPress can give you valuable insights about your visitors, so you can make decisions and adapt your business strategy.
In this post, we are going to show you how to connect WordPress with Google Analytics step-by-step using different methods. Don’t worry if you don’t have any coding skills, there are plugins that you can use too.
What’s Google Analytics and why should you add it to WordPress?
Google Analytics (GA) is an entirely free analytics solution developed by the Google team in 2006 that provides in-depth information about a website’s visitors. This tool is used by most bloggers, marketers, business owners, and everyone with a site or an app.
Nowadays, there’s a lot of competition on the internet so understanding your audience is key. Google Analytics gives you valuable information about your traffic and users’ behavior to help you make data-driven decisions. This tool gives you information about:
- What are the most viewed pages?
- How long do visitors spend on your site?
- What’s the bounce and exit rate?
- Where are they from?
- Where do they come from? (Sources such as organic searches, social media, newsletters, direct traffic, and so on)
- Are there more mobile or desktop users?
- And many others!

If you are running an online shop using WordPress or WooCommerce and not using Google Analytics, you’re missing out on a lot of valuable information!
NOTE: Google Analytics shouldn’t be confused with Search Console (GSC). While Google Analytics gives you information about your visitors and how they interact with your site, Google Search Console provides data about who’s linking your site, the most searched keywords, and others to help you improve your search results.
Google Analytics can be combined with JetPack for WordPress that also provides information about traffic analysis. For more information, you can have a look at our JetPack review.
How to Add Google Analytics to WordPress?
So now that we better understand what it is and its advantages, let’s have a look at how to add Google Analytics to WordPress. There are a couple of options so, in this guide, we’re going to list the best three methods for integrating GA with your site. You can choose the one that suits your needs.
- Header.php
- Functions.php
- Plugins
To connect Google Analytics with your website, you’ll need a Google Analytics account so if you don’t have one, create one before we start.
Before you start
NOTE: We have added two methods that require modifying your WordPress theme’s core files. So before starting, if you’re going to integrate Google Analytics with your site by customizing the header.php or functions.php files, we recommend installing a child theme so the modifications aren’t overridden when you update the parent theme. Why? Because if you modify the theme’s files (instead of the child theme’s files), when you update the theme, the new files replace your customizations and the modifications you made will be lost.
If you don’t want to install a child theme, you can:
- Generate a complete website backup: This way, if anything goes wrong, you can restore the website from the previously created backup (but your modifications will still be overridden when you update the theme).
- Use a plugin: This option is described in section 3.
1) Header.php
As the heading suggests, with this method you will be making some changes to your website’s header and adding the Google Analytics tracking code.
No matter which WordPress theme you are using, they all have a header.php. It contains some PHP codes which will help you display and customize the header section of your website. This may sound complicated but the truth is that it’s pretty straightforward.
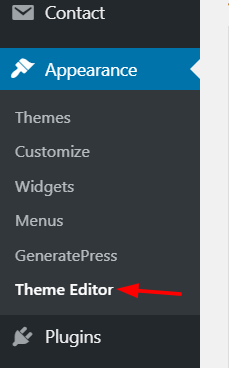
A) The first thing you need to do is log in to your WordPress admin area. There, click the section called Theme Editor under Appearance.
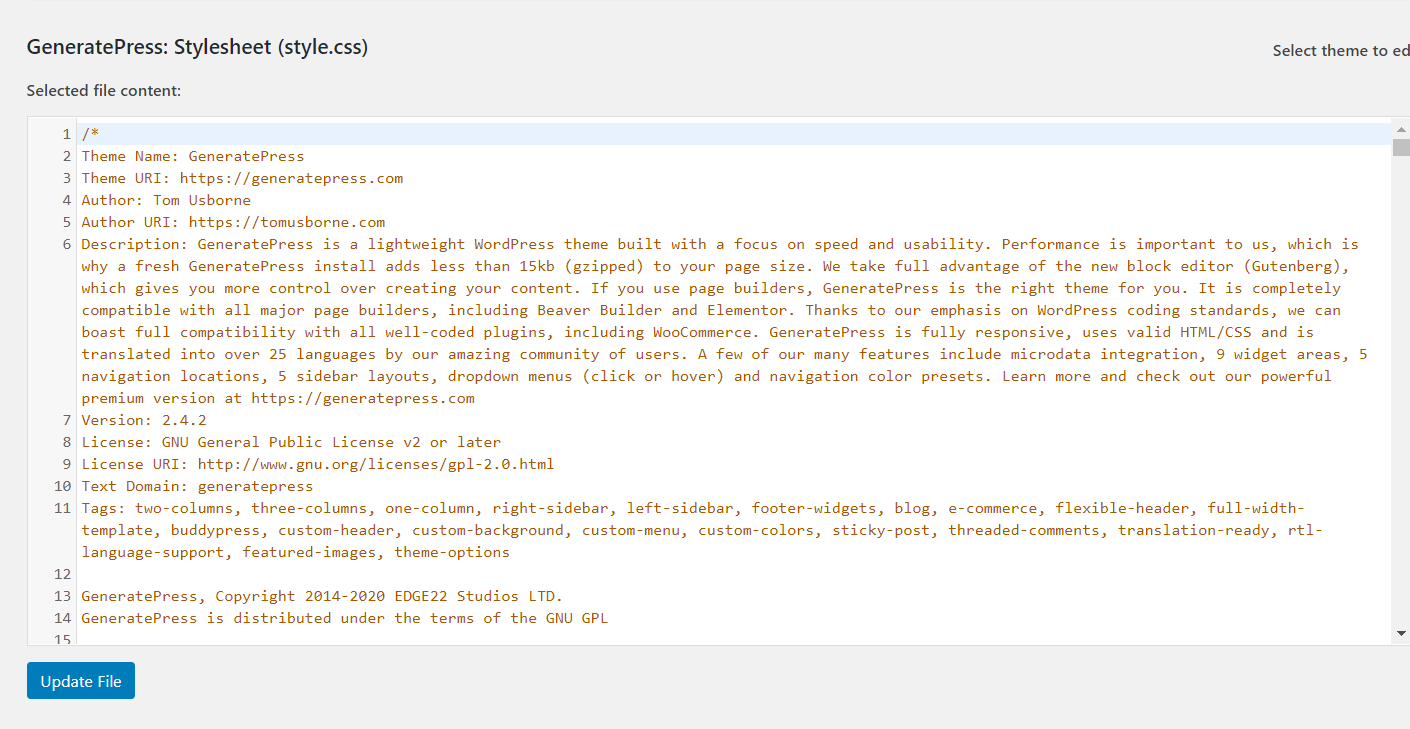
B) After opening it, WordPress will show you the style.css file of your current theme that will look like this:
C) On the right side, you will see all the available files in your WordPress themes’ directory. Look for Theme Header (header.php) and click on it.
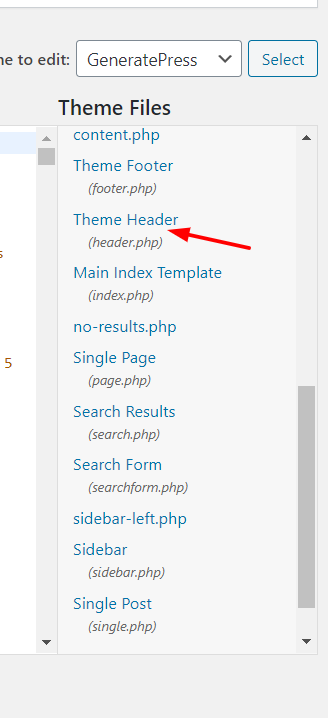
D) Once you click on header.php, the file will be inserted to the editor.

NOTE: Don’t remove any code from there. If you do, your WordPress website will throw an error and won’t work correctly.
E) Now that you have the header.php file in front of you, it’s time to get the Google Analytics tracking code. To do that, go to the tracking section and copy the code from there. To do that you have to follow the following route in GA: Admin page > Tracking info (under Property) > Tracking Code. There you have to copy the code under Website tracking.
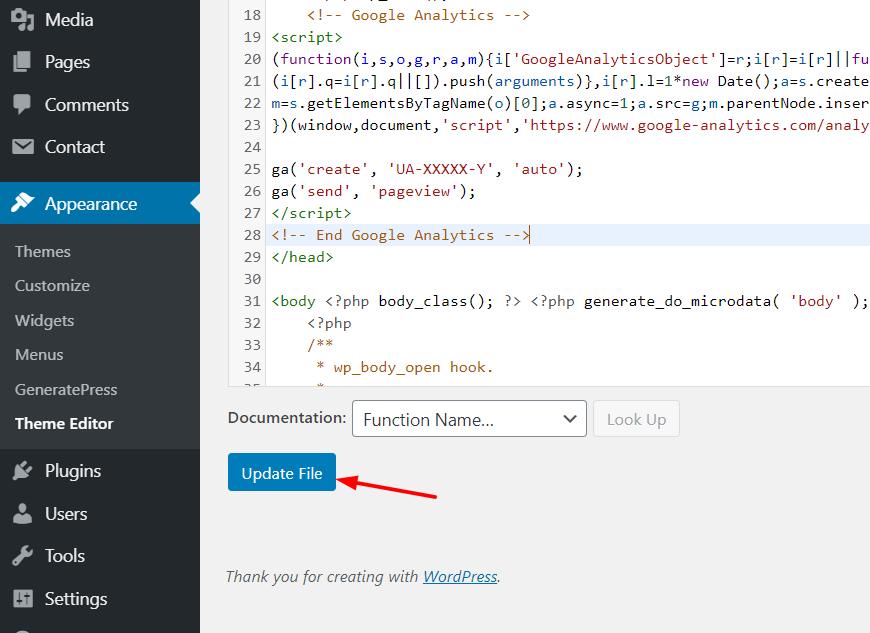
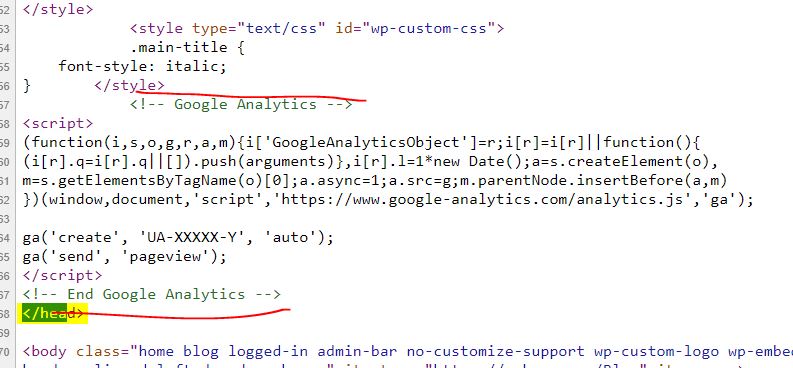
F) Then, go back to the WordPress theme editor and paste the tracking code you’ve just copied just before the </head> tag. It will look something like this:
![]()
As you can see in the above image, you should place the code between the <head> and </head> tag.
G) Once you have modified your header.php file, update the file to save the modifications.
How to verify that it works correctly
To verify that everything is correct, there are two options.
- You can check the website’s frontend checking the source code and searching for the analytics code.
- You can send test traffic from your Google Analytics property and verify if it appears in GA. When you send test traffic to your blog, the same would be updated in your GA dashboard.
If you use premium WordPress themes like Avada or Divi, you probably know that they come with dedicated theme panels so they include an option to edit the header/ insert code to the header. In that way, the theme updates won’t affect you and your theme customization will be safe.
However, if you need more details regarding how to customize the header, have a look at our guide about how to edit WordPress header securely.
2) Functions.php
The second method to add Google Analytics to WordPress also involves modifying the theme files. However, instead of editing the header.php file, you’ll edit the functions.php file.
It’s worth noting that if you have already added the GA tracking code to your header, you don’t need to follow any other steps. You are done, and the tracking is enabled on your site. Some people prefer to edit the functions.php file instead so here you’ll learn how to do it step-by-step.
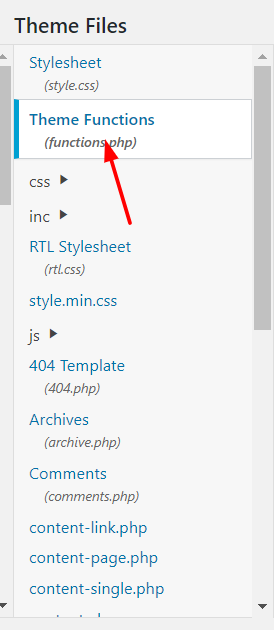
A) First, log in to your WordPress admin area and click Theme Editor under Appearance.
B) There, you will see the style.css file of your current theme.
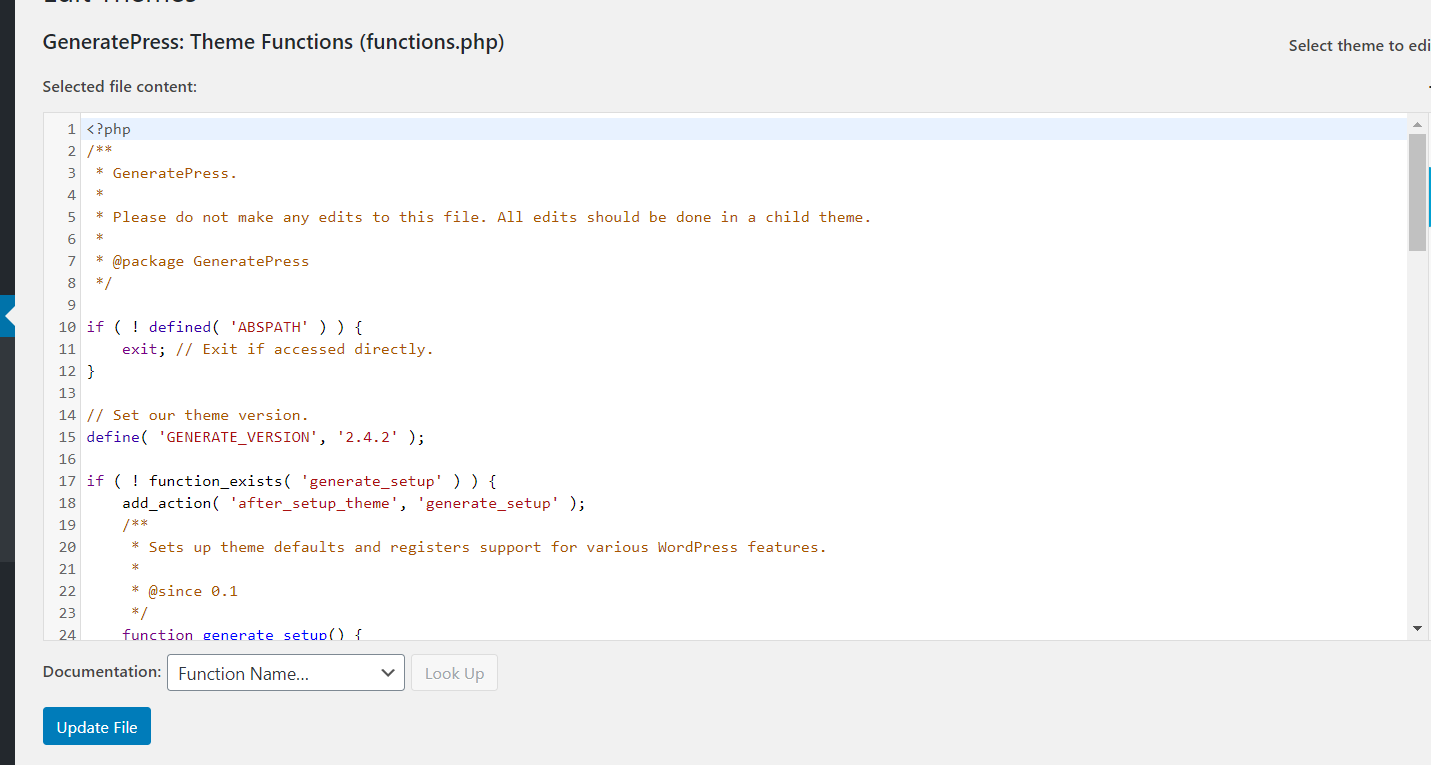
C) On the right side, you can find all the files in your WordPress theme’s directory. Click Theme Functions (functions.php).
D) You will see the functions file in the editor.
E) Then, copy the following code:
<?php
add_action('wp_head', 'wpb_add_googleanalytics');
function wpb_add_googleanalytics() { ?>

// Paste your Google Analytics code

<?php } ?>
However, where it says // Paste your Google Analytics code, you need to enter your tracking code, which you can get from the Google Analytics tracking section: Admin page > Tracking info (under Property) > Tracking Code > copy the code under Website tracking.
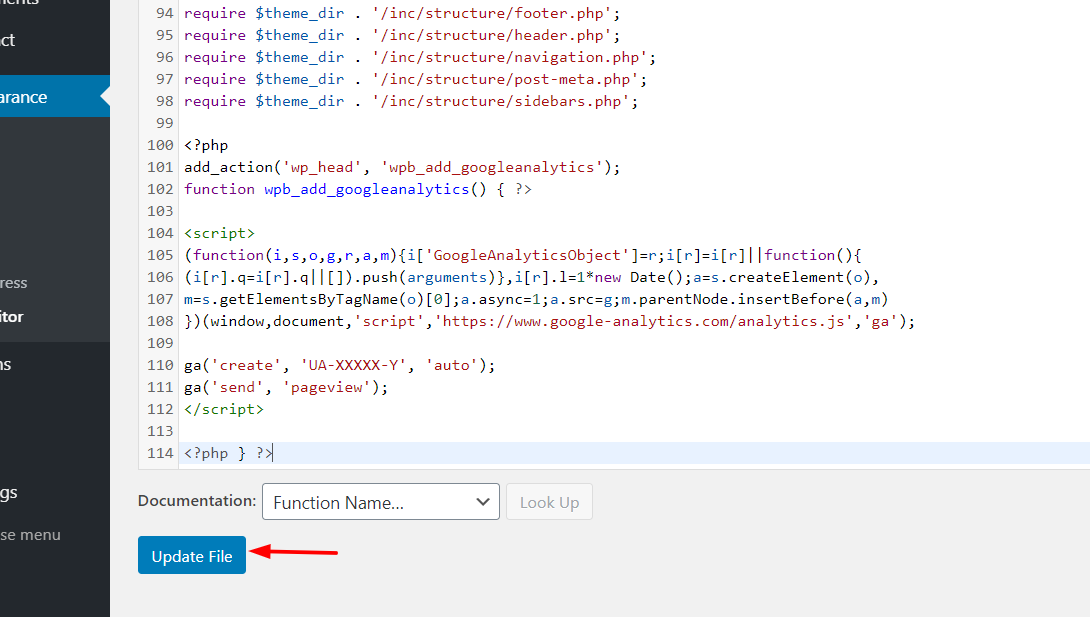
So the code will look something like this:
<?php
add_action('wp_head', 'wpb_add_googleanalytics');
function wpb_add_googleanalytics() { ?>

<script>
(function(i,s,o,g,r,a,m){i['GoogleAnalyticsObject']=r;i[r]=i[r]||function(){
(i[r].q=i[r].q||[]).push(arguments)},i[r].l=1*new Date();a=s.createElement(o),
m=s.getElementsByTagName(o)[0];a.async=1;a.src=g;m.parentNode.insertBefore(a,m)
})(window,document,'script','https://www.google-analytics.com/analytics.js','ga');

ga('create', 'UA-XXXXX-Y', 'auto');
ga('send', 'pageview');
</script>

<?php } ?>
F) Then, paste that code on your functions file and click Update File.
G) That’s it! You’ve added Google Analytics to WordPress by editing the functions.php file.
The disadvantage of modifying the theme’s files
These two methods modify the theme’s files so they have one disadvantage. When the theme receives an update, all the changes you’ve made will be overridden. The old modified files will be replaced with the new ones, and the tracking code will be lost. To avoid this, you can install a child theme.
Another option to avoid this is to use plugins. So, now let’s have a look at how to add Google Analytics to WordPress using a plugin.
3) Plugins
If you don’t want to edit the core files or write a single line of code, you can still integrate Google Analytics to your WordPress site using a plugin.
If you’ve been working with WordPress for a while, you probably know MonsterInsights plugin. Created by the Awesome Motive, Inc team, the same guys behind OptinMonster, WPForms, and WP Mail SMTP, it’s one of the most famous and beginner-friendly Google Analytics tools. And the best part is that it’s a freemium plugin.
In the WordPress plugins repository, you can find the free version called MonsterInsights LITE. If you want to enable basic tracking and features, the free version is good enough. However, if you want more advanced functionalities, integrations, and more complex tools, you can choose one of the premium versions that start at 99 USD per year.
Regardless of the version you choose, the integration process is the same.
How to add Google Analytics to WordPress with MonsterInsights
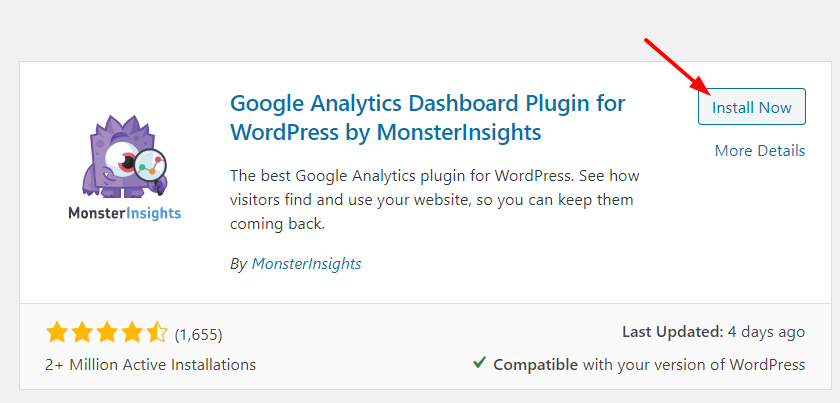
A) The first thing you need to do is install the plugin. If you are going to use the free version, log in to your WordPress account, go to the Plugins section, click Add new and search for MonsterInsights.

B) Click on the Install Now button.
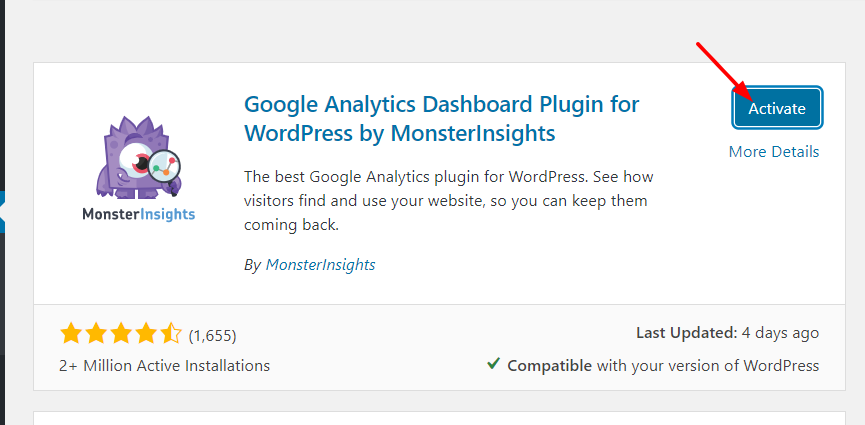
C) Once you’ve installed the plugin, activate it.
D) Then, in your WordPress admin page, you will see the MonsterInsights configurations.

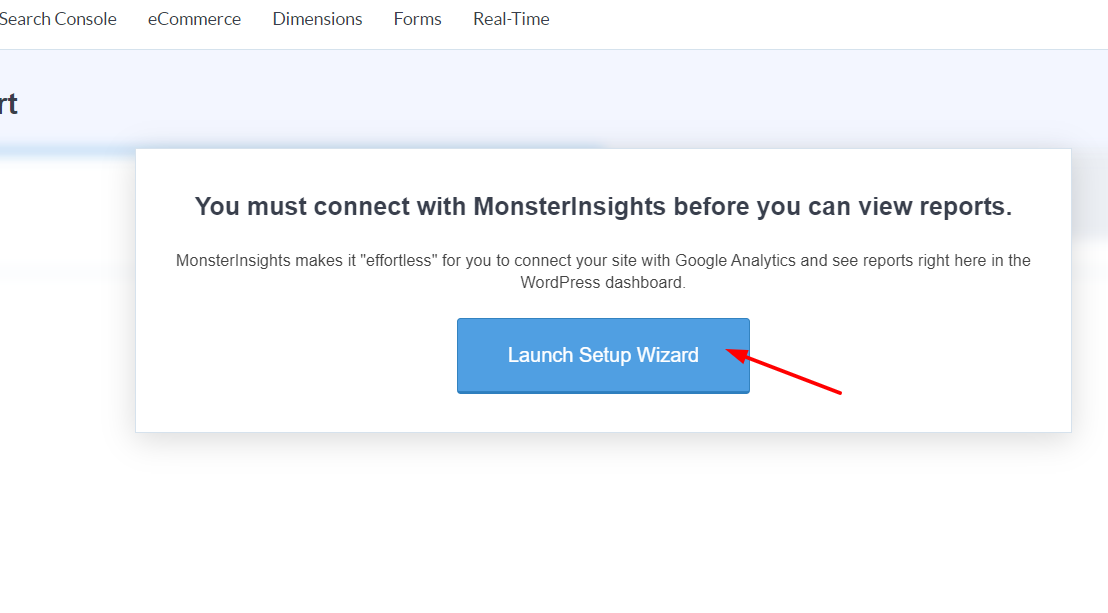
E) Just activating the plugin won’t work, you need to connect it with Google Analytics. MonsterInsights offers seamless integration, and you can connect your Google Analytics property without writing a single line of code or editing the core files.
F) To start the integration, click on the Launch Setup Wizard button.
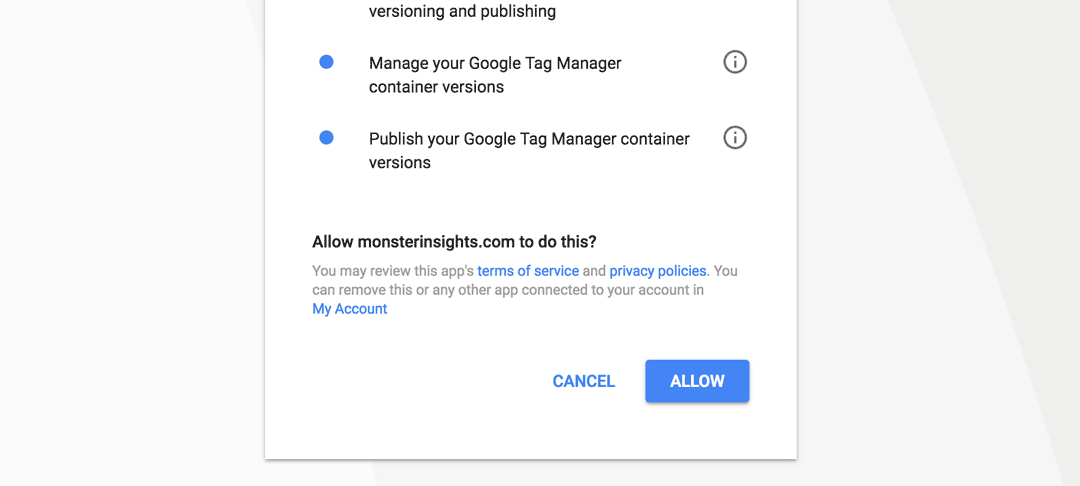
G) Then, select the Google Account you used to create the property.

And allow MonsterInsights to access your data.
If you have multiple properties linked with the Google Account, select the one you wish to use with your WordPress website.
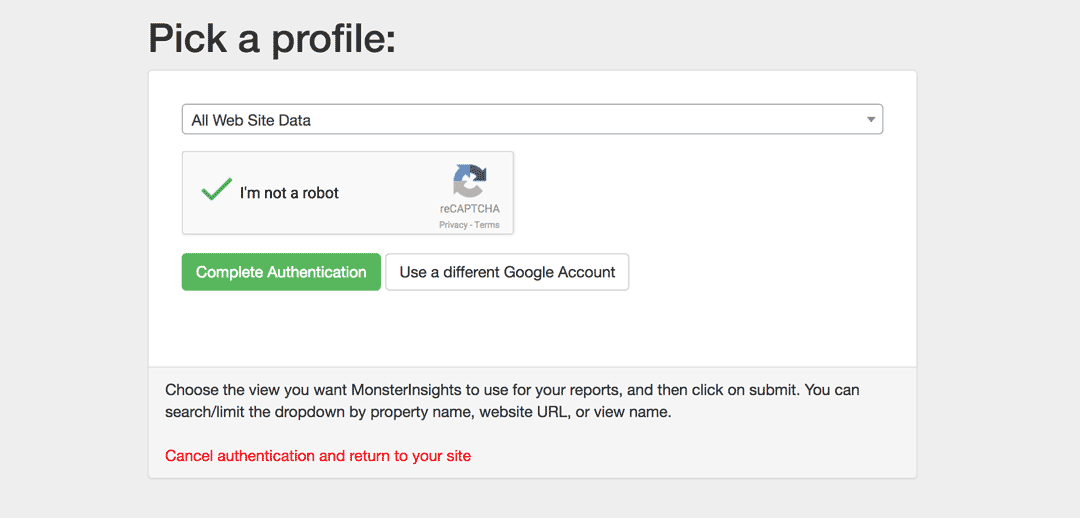
Check the box and complete the authentication.
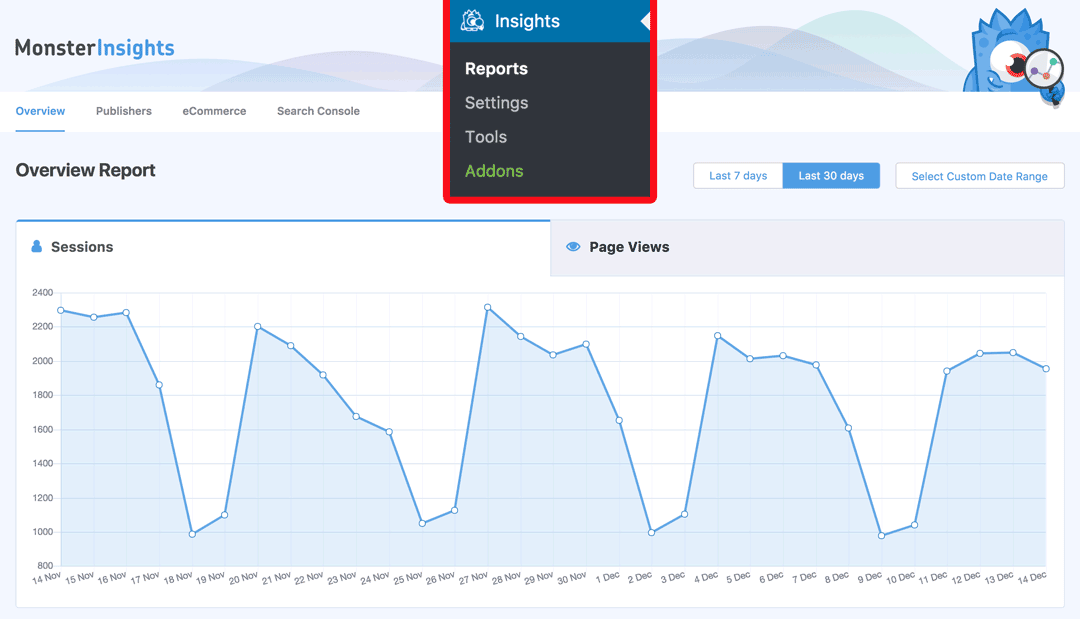
H) After you’ve done that, you will see the traffic stats in your Reports section (be patient, it can take a few minutes).
That’s it! You’ve just added Google Analytics to WordPress with MonsterInsights!
If you’ve purchased the premium version, you can enable features like Form Tracking, affiliate link tracking, author tracking, and many others. So, with this plugin, you can track your entire website and get in-depth insights about your audience to understand what’s working and what’s not.
Having too many WordPress plugins can indeed slow down your website (especially the poorly coded ones). However, in our experience with MonsterInsights, its code is very stable and didn’t affect the performance at all.
If you need to optimize your site for better speed, check out our list of the best WordPress caching plugins.
Conclusion
All in all, Google Analytics is an excellent free tool that provides you with in-depth insights about your visitors and their behavior on your site. That’s why adding Google Analytics to your WordPress site is essential to better understand your audience and make decisions to grow your business.
So what’s the best method to do it? It depends on your skills and needs but as a general rule, we don’t recommend modifying the theme’s files. So, integrating Google Analytics with a dedicated plugin like MonsterInsights is an excellent choice. The MonsterInsights’ free version comes with basic features but it’s enough to track every page, find the best performing posts, and so on. If you want even more details, the premium versions allow you to expand the features and enjoy more integrations.
If you are still planning to go with the coding method, keep in mind that when a theme update rolls out, your header.php and functions.php file will get updated with new ones and you will lose all your modifications. You can avoid this by installing a child theme and doing all the changes there. Another option is that before updating the theme, you could copy the changes you’ve made and then paste them in the new theme version to re-enable the Google Analytics tracking feature.
Which method are you going to use? If you like this post and learned how to add Google Analytics to WordPress, feel free to share it on social media, and subscribe to our newsletter.
