
How to Add Authorize.Net to WooCommerce (3 Methods!)
Providing your customers with a wide array of payment options is crucial to avoid drop-offs. That’s why using a payment gateway in your store is a must. In this guide, we’ll show you how to add Authorize.Net to WooCommerce.
Did you know that more than 20% of customers abandon their carts on the checkout page? In most cases, users don’t trust the site or the website doesn’t offer a payment method they want. Nowadays, online transactions are becoming more and more common so eCommerce sites are booming. Shoppers are getting used to buying more and more things online. According to research by The Federal Reserve Bank of Atlanta, for example, consumers prefer to pay their largest bills online. The same research found out that users paid nearly half of their bills via payment gateways in 2018. As the number of online transactions keeps growing, store owners need a payment gateway that is not only functional and reliable but also offers the best security for online transactions.
Even though PayPal and Stripe are the most famous ones, Authorize.Net is an excellent payment gateway that focuses on small and medium-sized businesses. So, today, we’ll have a look at how to add Authorize.Net to your WooCommerce store.
Why add Authorize.Net to your WooCommerce store?
If you have an online business, integrating a payment gateway with your WooCommerce store is a must. A good payment gateway will give customers the assurance they need, facilitating the purchasing process, and keeping transactions safe. However, there are many options out there so it can be hard to choose the right one for you.
You probably know PayPal and Stripe, but have you heard of Authorize.Net? Authorize.Net is one of the smartest and most comprehensive payment gateways. This company belongs to Visa Inc and enables businesses to process different types of online payments such as credit and debit cards, PayPal, Visa Checkout, Apple Pay, and more.
Additionally, Authorize.Net focuses on small and medium-sized stores and as it’s part of Visa Inc, it has one of the most advanced security mechanisms in the world.
To sum up, there are several reasons to add Authorize.Net to WooCommerce:
- Gives users more options to pay and reduce cart abandonment
- Provides a secure platform for your customers’ transactions
- The fraud protection is second-to-none, including various effective filters such as IP Filters, Velocity Filters, Shipping Filters, and more
- Customer Information Management (CIM) doesn’t simply store information, it also helps simplify PCI DSS (payment card industry standards) compliance
- Allows monthly recurring or installment payments with the help of ARB (Automated Recurring Billing)
- It can also help update card data within customers’ CIM profiles and ARB subscriptions
How to add Authorize.Net to your WooCommerce store
In this guide, we’ll show you three ways to add Authorize.Net to WooCommerce:
- Using ELEX Authorize.Net Payment Gateway
- With Authorize.Net Payment Gateway for WooCommerce plugin
- With the official Authorize.Net for WooCommerce extension
In this guide, we will elaborate on both methods so you can choose the one that best suits you.
Before You Start
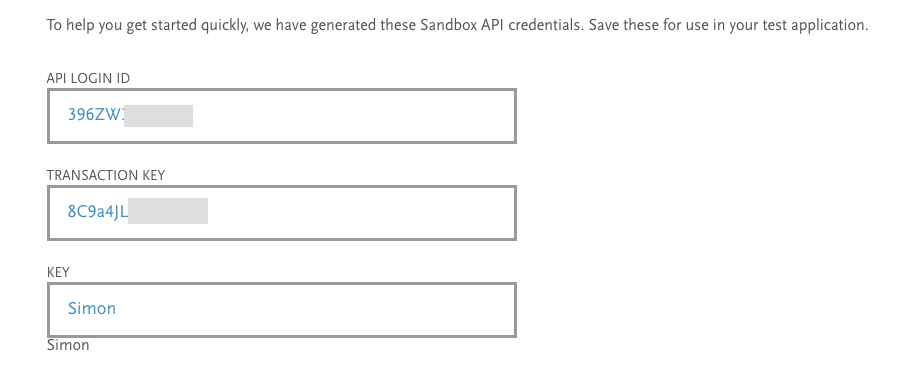
Regardless of the integration method you choose, you’ll need an Authorize.Net account. You can either create a sandbox account for testing purposes (there won’t be any real card processing or actual payments) or create an account by selecting a suitable plan.
After creating an account, Authorize.Net will provide you with an API Login ID and a Transaction Key. Copy them and put them somewhere handy because you will need them later.
Now that you have an account, let’s see how to add Authorize.Net to WooCommerce by using third-party plugins.
1) Integrate Authorize.Net with WooCommerce using ELEX Authorize.Net Payment Gateway
ELEX Authorize.Net Payment Gateway is the best free plugin for the job. Besides accepting all major credit and debit cards, this plugin also offers a secure, easy, and fast credit card processing stage. What is even better, customers never have to leave your site during the checkout process. ELEX has a free version and premium plans that start at 79 USD for one site.
Now, let’s see how to add Authorize.Net to WooCommerce using ELEX.
Step 1: Install and Activate ELEX
First, let’s install and activate the plugin. You can find the free version on the official website. Simply fill in the required information and download the product.
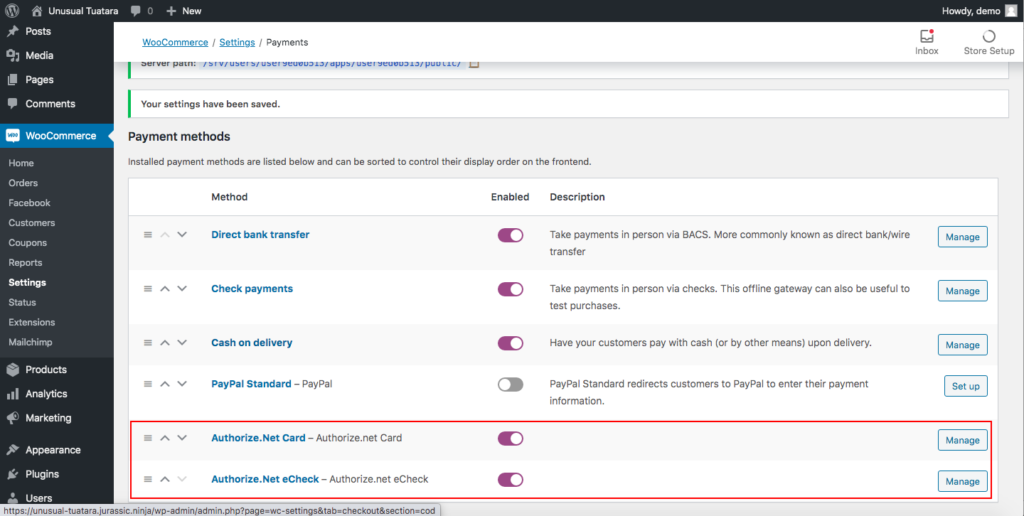
After that, go to your WordPress dashboard > Plugins > Add New to upload the file and activate it. Then, go to WooCommerce > Settings and you will see the Authorize.Net options under the Payments tab. Activate Authorize.Net eCheck and Authorize.Net Card options and save the changes.
Now, let’s see how to customize the settings.
Step 2: Configure Authorize.Net Card
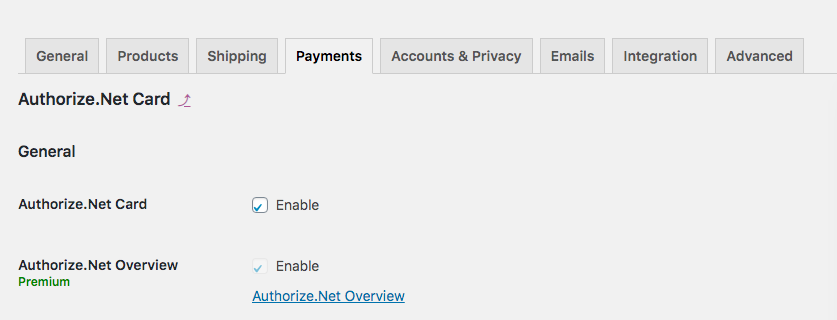
After enabling the Authorize.Net services, it’s time to configure the Authorize.Net Card. So, in the Payments tab, click Manage next to the Authorize.Net Card option and you will see two checkboxes to enable Authorize.Net Card and Authorize.Net Overview. To enable secured payment options in your store, tick the first checkbox. The Overview option, on the other hand, is optional. It allows you to capture or refund payments with a click but it’s only available for premium plans.
Select card types
Now, it’s time to choose the card types you want to accept on your site. For that, scroll down and select the card types you want in the Show Preferred Cards box. For each card that you add, Authorize.Net will add a logo and display it on the checkout page. By default, ELEX displays all the options, so you only need to omit those you don’t want to show.

After that, you have to register your account. So, copy your API Login ID and Transaction Key and paste them in the corresponding fields under the Authentication section.
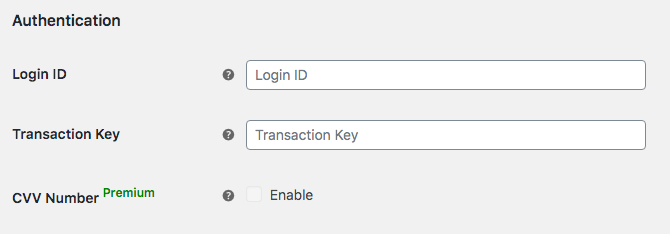
You may enable the CVV number if you’re using the premium plans. This is the Card Verification Value you can find on credit cards. For different types of cards, the structure of the numbers will be different, for example, it is either:
- A 3-digit number on VISA and MasterCard
- A 4-digit number on American Express
Configure the Transaction settings
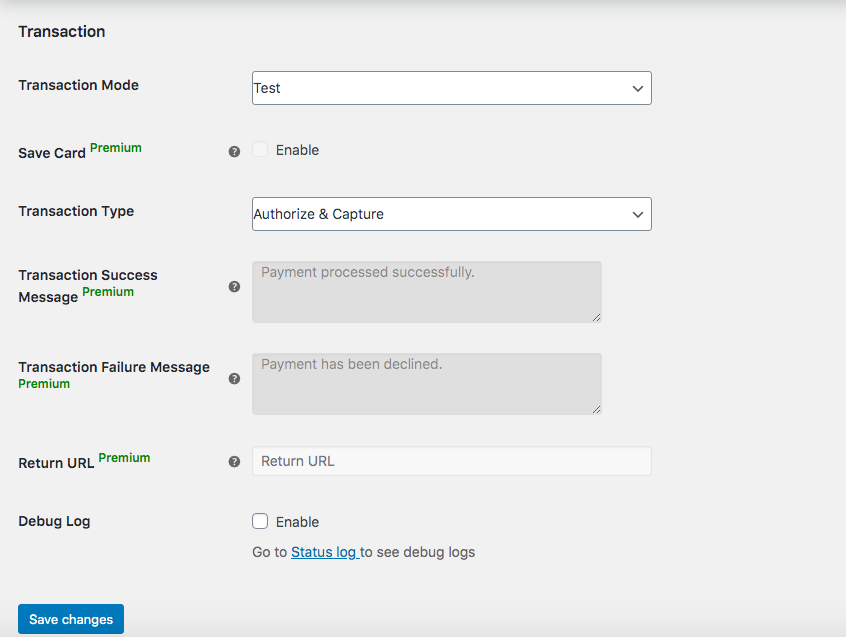
Finally, it’s time to configure the Transaction settings. Here, you can enable the Save card feature to allow customers to save their credit card profiles (available only for premium plans). For Transaction Type, decide between Authorize and Capture or Authorize Only. While the first option lets store owners receive the payment right after shoppers place the order, the second option will require them to navigate to another page to capture the payment after authorizing the charges. Additionally, if you’re a premium user, you can customize the transaction success and failure messages.
The Redirect URL is also a premium feature that takes customers to a payment success page rather than the WooCommerce default payment page. Lastly, you can also tick the debug log to receive the bugs that the plugin presents. Once you select all the options you want, press Save changes.
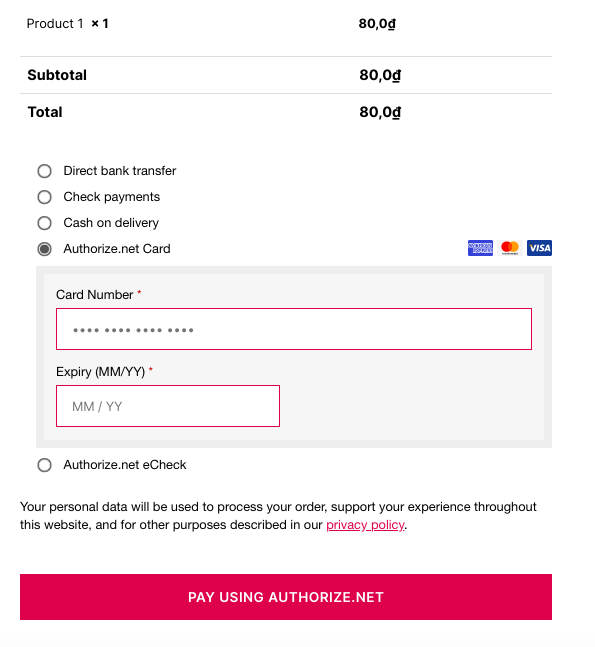
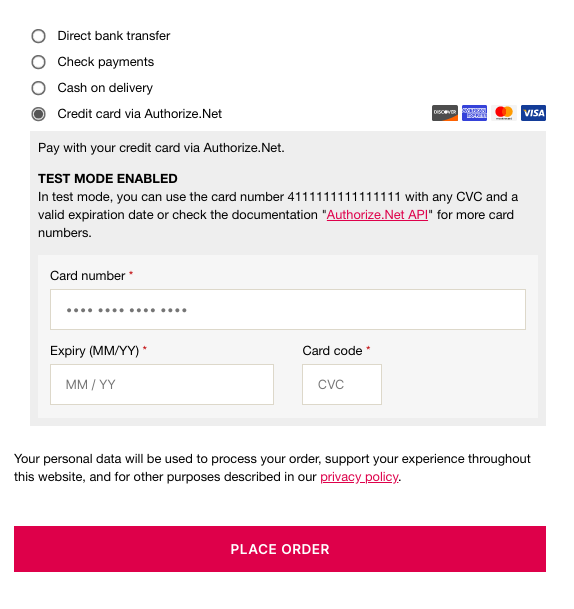
That’s it, you’ve added Authorize.Net to your WooCommerce store! Now, the payment options on your checkout page will look something like this:
Step 3: Configure Authorize.Net eCheck (Optional)
You’ve already enabled Authorize.Net on your site but here, we’ll have a look at a few more configuration options. For example, if you want to diversify payment options even more, you can allow your customers to pay with Checking, Business Checking, or Saving accounts. This way, you will also accept eCheck payments providing your customers with more alternatives to purchase your products.
To do this, go to WooCommerce > Settings > Payments and activate Authorize.Net eCheck. Then, press Manage and you will see the configuration interface.
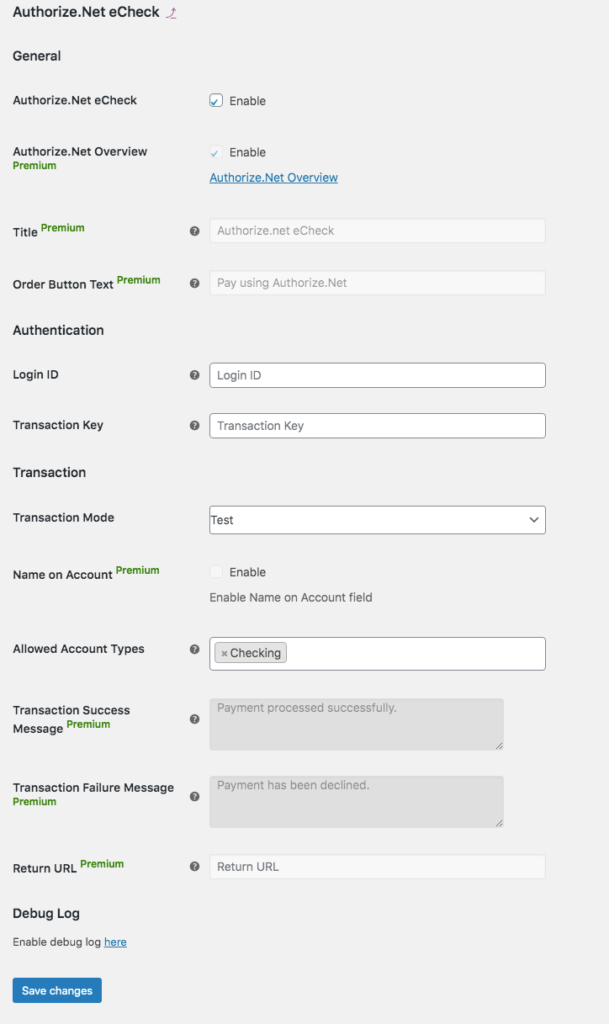
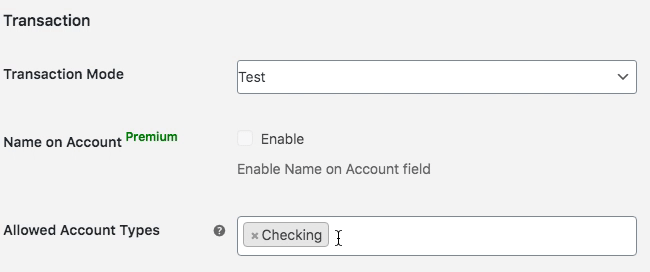
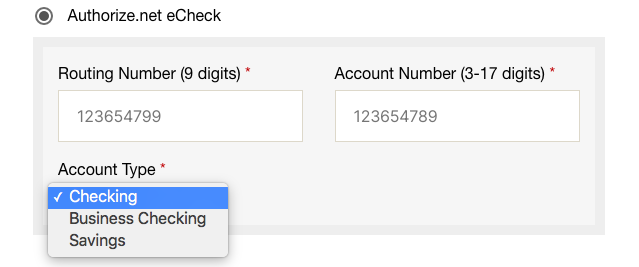
Its features are very similar to those of the Authorize.Net Card, so you can customize it based on what we’ve seen in Step 2. For example, you will need to enter the Login ID and Transaction Key provided by Authorize.Net to get it started. Then, scroll down to choose account types. By default, it only displays a Checking account but you can add Business Checking and Savings as shown below.
Even though eCheck is similar to Authorize.Net Card, it also presents some differences. For example, the Order Button Text allows you to change the default text that will appear on the checkout page (premium feature).
Once you finish the setup, you can visit your store to see the results on the frontend. If you’ve enabled the three account types, it will look like this on the checkout page.
Besides integrating payment gateways, ELEX offers several other functions as well. We recommend you have a look at the full list of features to make the most of it.
2) Add Authorize.Net to WooCommerce with Authorize.Net Payment Gateway by PledgedPlugin
Another way to integrate Authorize.Net with WooCommerce is by using the Authorize.Net Payment Gateway for WooCommerce plugin by PledgedPlugin. This is a fully-fledged tool to accept credit cards from all over the world on your site. In this section, we’ll show you how to use the free version. It also has pro and enterprise plans with many more features that start at 79.99 USD for a single site.
Let’s have a look at how to add Authorize.Net to your WooCommerce store with this plugin step-by-step.
Step 1: Install and Activate
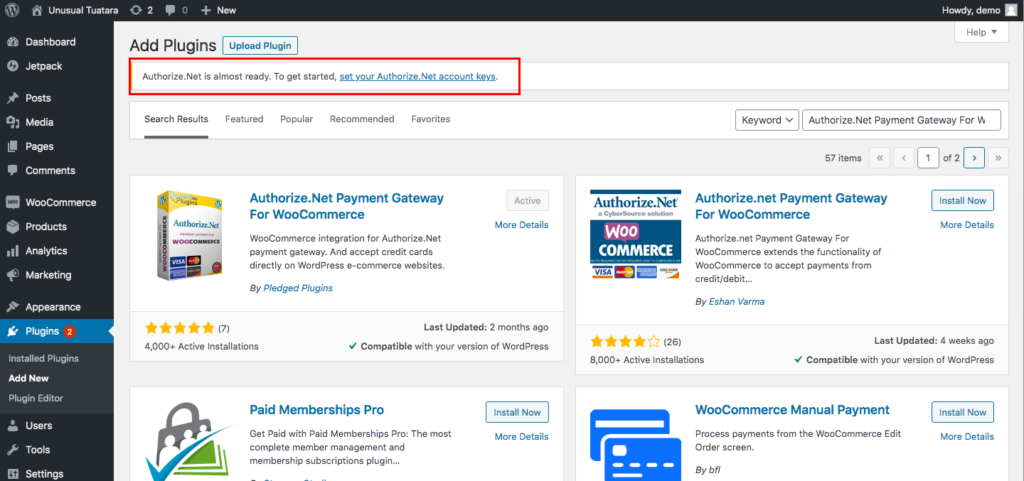
First, let’s install and activate Authorize.Net Payment Gateway for WooCommerce. In your WordPress dashboard, go to Plugins > Add New and type the name. You will see it right at the first result. Click Install Now and then Activate. After that, you will see a message indicating that you need to set your keys.
Step 2: Set up Authorize.Net
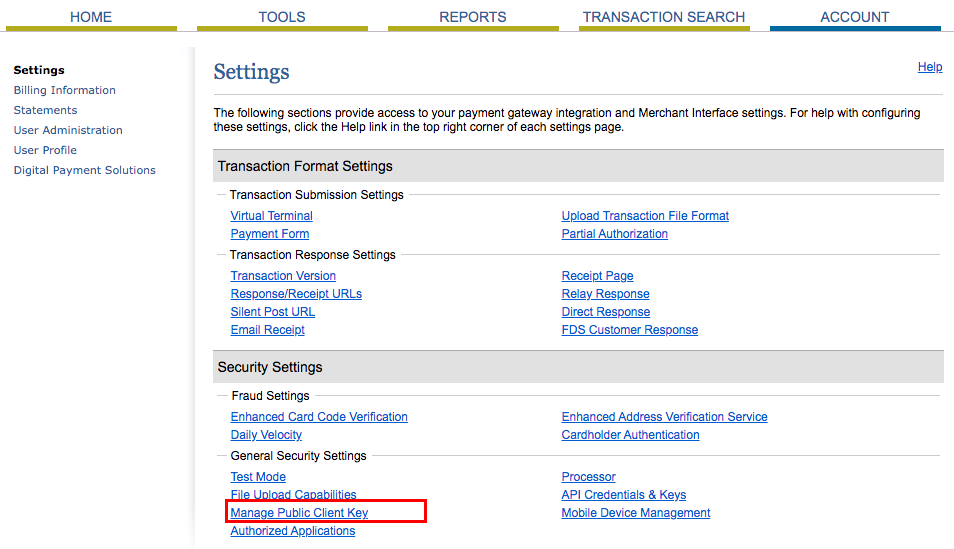
To set up your Authorize.Net account, click the link in the message. Along with the Login ID and Transaction Key that you have copied in the Before You Start step, you will also be asked for your Public Client Key. To get this, go to your Authorize.Net account > Account > Security Settings > Manage Public Client Key.
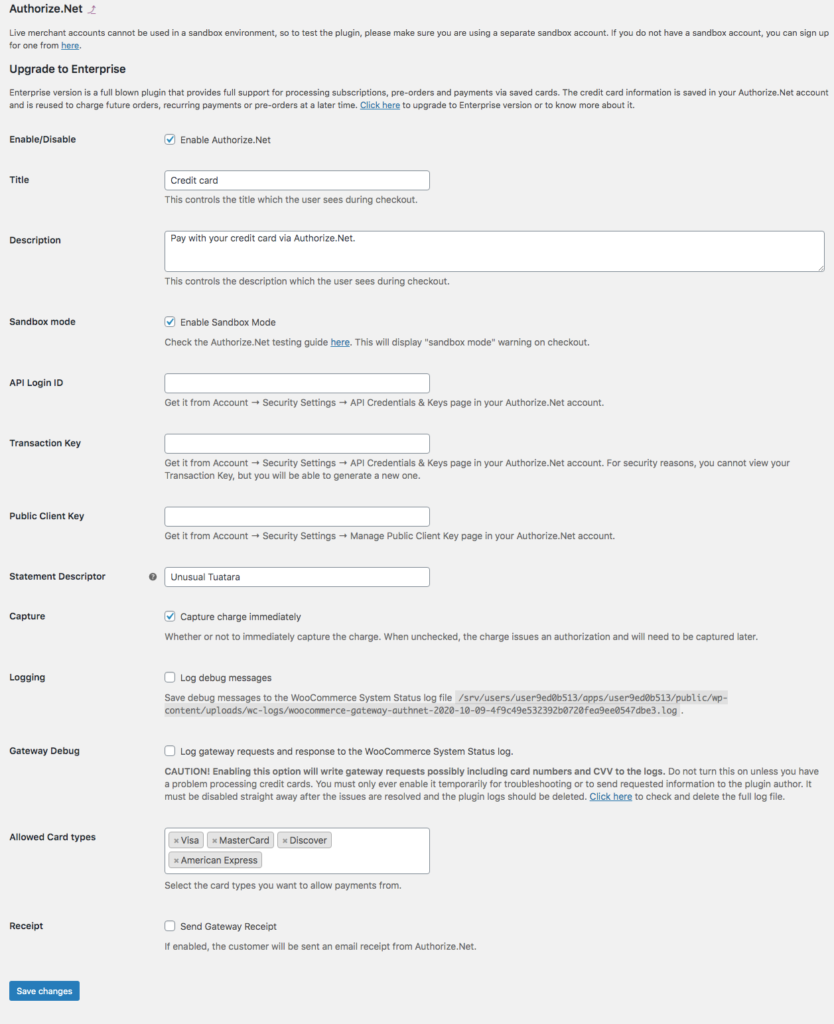
There, you will get a public client-key. After you copy it, it’s time to set up Authorize.Net in your store. So, go back to the plugin settings page in your WordPress dashboard and paste the three items: Login ID, Transaction Key, and Public Client Key.
Make sure you enable Authorize.Net to display customization options. Similarly to the ELEX plugin, you can also customize the card types you accept, choose to capture the charges immediately, send the customers receipts from Authorize.Net, and more. After selecting all the options you want, save the changes.
After finishing the setup, go back to your store to see the results.
3) Use the Authorize.Net by WooCommerce official plugin
Finally, another option to add Authorize.Net payment gateway to WooCommerce is by using the official WooCommerce extension. Authorize.Net by WooCommerce is an excellent choice to accept credit cards and eChecks securely and easily. It is also very straightforward to set up and will provide you with amazing features such as:
- Keeping customers on your site during the whole process
- Automatic refunds process within WooCommerce
- Accepts all major credit and debit cards and eChecks
- Automatically captures payments when order status is marked as “paid”
- Customizable confirmation messages
- Full support for WooCommerce plugins such as Subscriptions, Pre-Orders, and Accept.js
- Allows customers to save payment methods
Authorize.Net by WooCommerce is a premium plugin that costs 79 USD per year.
How to check if Authorize.Net is working?
Any of those three options are great ways to integrate Authorize.Net with your store. Regardless of the plugin you use, it’s always a good idea to make sure that Authorize.Net is working. To do this, you create a product that costs 1 or 2 USD and then go through the checkout process using an incognito window. If on the checkout page you have the option to pay with credit cards via Authorize.Net, it’s all working correctly. If not, clear your cache and try again.
Finally, if after that it still doesn’t work, check each step of the tutorial to make sure that you didn’t skip any of them.
Conclusion
All in all, nowadays most eCommerce stores have international audiences so offering customers several different options to pay is a must. Apart from the variety of options, users value security when it comes to payments. For that Authorize.Net, is an excellent choice. Together with PayPal and Stripe, Authorize.Net is one of the biggest payment gateways that focuses on small and mid-size businesses.
In this guide, you’ve learned how to add Authorize.Net to your WooCommerce store using three different plugins. Each of them will get the job done effectively. But which one is the best for your store? If you have just started an online business or have a small store, then ELEX Authorize.Net Payment Gateway and Authorize.Net Payment Gateway are excellent choices. They both have free options and are quite easy to set up. On the other hand, if you have a big online store and you want more advanced features, the official Authorize.Net by WooCommerce extension, or the premium version of ELEX are your best bets.
If you have any questions, please let us know. We’ll be happy to give you a hand. Finally, if you want to dig deeper and improve your WooCommerce checkout process, have a look at our complete guide to optimize the checkout.
