Do you want to build a dynamic website in WordPress to have a slight edge over other average static websites? Then we have the perfect article for you. Here, we will provide you with a review of the JetEngine plugin for WordPress and show you how to use it to create a dynamic WordPress website.
But before we go through the process of creating a dynamic website, let’s have a look at what a dynamic website exactly is.
What is a Dynamic Website?
A dynamic website is a type of website which provides different contents to the website visitors depending on the user. The contents of a dynamic website are varied according to the viewer’s location, user interaction, and other characteristics. One of the most popular examples of a dynamic website is Google.
Dynamic websites usually have dynamic web pages which are highly customizable. The webpages are generally generated with the help of customizable templates which makes it easier to update them frequently. And since dynamic websites are frequently updated, the content provided to the users is the latest content of the website.
Dynamic Websites vs Static Websites
The major difference between dynamic websites and static websites is the way they display their content. Static websites provide the same content for all types of website visitors and users. Whereas for dynamic websites, the content varies according to the website visitors and users (as mentioned before).
Any changes and updates performed on the static website are done manually. They aren’t frequently updated since their content mostly includes product pages, documentation, services, and so on. Static websites also don’t require a large number of web pages since they contain simple static content.
On the other hand, dynamic websites may contain a large number of complex web pages. The content added to these dynamic web pages is changed frequently in a certain amount of time.
A website can contain both static as well as dynamic web pages too. If you look at our website itself, the QuadLayers blog page is a dynamic web page where the contents are updated automatically to provide you with new content. Alternatively, the review post that you are reading is a static page in which the changes are made only after the post is updated.
JetEngine Plugin for WordPress: Overview
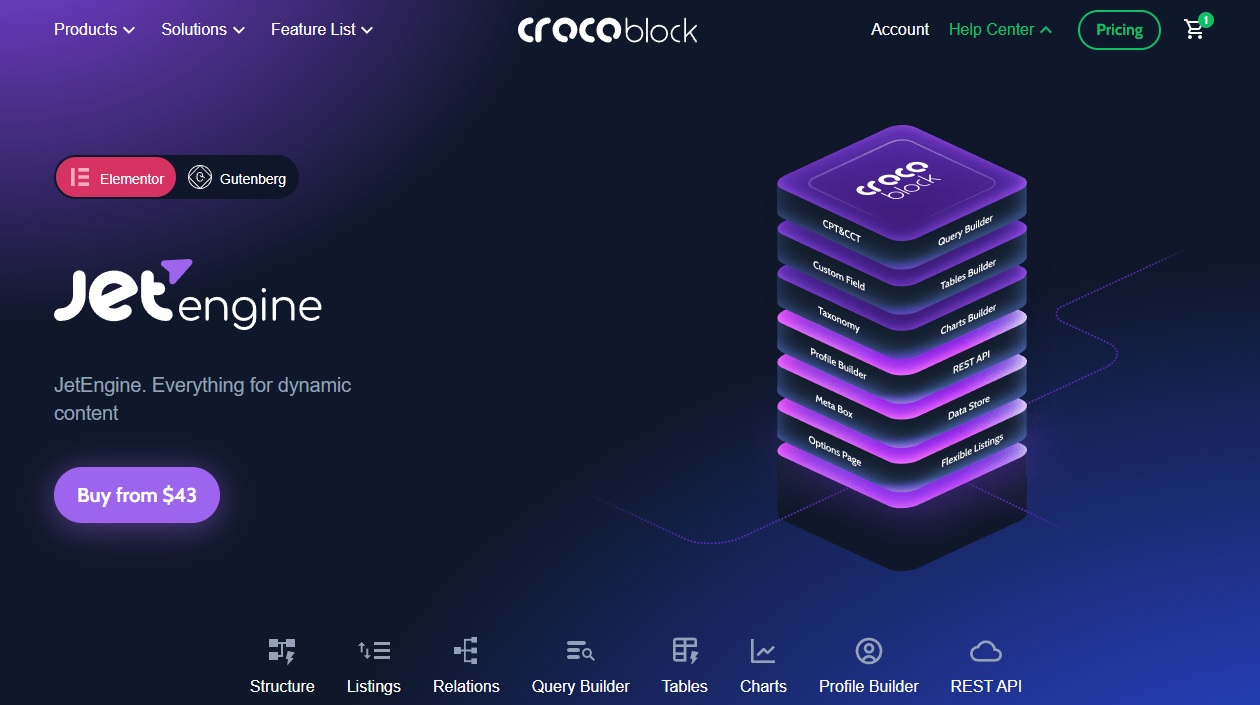
JetEngine is a powerful tool to create advanced dynamic websites. It is fully compatible with the Elementor and Gutenberg and also provides you with 17 dynamic Elementor widgets along with 13 dynamic Gutenberg blocks. You can easily use them to create any type of dynamic website with awesome functionalities.
JetEngine also comes with a set of advanced options for your dynamic website structure which includes custom post type, content type, fields, meta boxes, and so on. Similarly, you also get extensive listing functionalities with this plugin that can be helpful to develop listing items and add multiple listing grid layouts. It even has its own query builder to help you manage your database with a very efficient approach.
Furthermore, JetEngine also comes with table and chart builders that enable you to showcase various details on your dynamic website in a presentable way. Similarly, a profile builder is also included with the plugin with its own profile menu widgets, frontend posts submissions, and visibility modules.
Key Features:
- Dynamic Elementor widgets and Gutenberg blocks
- Custom post type, content type, metadata, and meta fields
- Query builder for efficient management of databases
- Advanced content visibility with conditional logic and dynamic functions and tags
- Inbuilt builders for queries, tables, charts, profiles, and forms
- Rest API endpoint management for CCT
- Shortcode generators, skin management, and glossary options
Pricing
The JetEngine plugin starts at 43 USD per year. It includes 1 site license along with 1 year of product updates and support.
JetEngine Plugin for WordPress: How to use it?
Now that you have a basic understanding of the JetEngine plugin, let’s go through the process of using it.
We will use the premium version of the plugin which is available on their official website for this tutorial. So you need to purchase the plugin and get the license key before you add it to your website. After you download the plugin zip file from your account, you can install it to create your dynamic WordPress website.
1. Install and Activate the Plugin
Since this is the plugin’s premium version, you’ll have to install it manually. So, go to Plugins > Add New from your WordPress dashboard and click on Upload Plugin.
Now, click on Choose File to select the JetEngine plugin zip file you downloaded after purchasing. Then, click on Install Now once the plugin is uploaded.
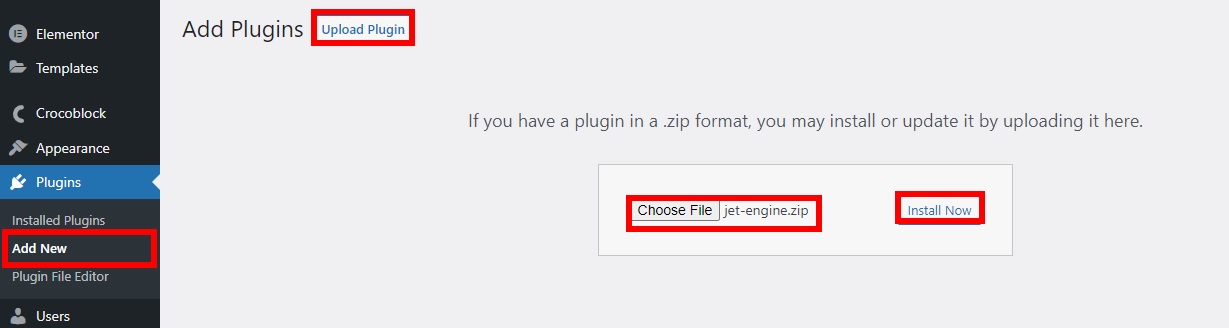
After the installation is complete, go ahead and Activate it.
If you need any help with installing the plugin, feel free to look at our complete guide on how to install a WordPress plugin manually.
2. Configure the JetEngine Plugin Settings
Now that you have activated the JetPlugin plugin, you need to activate the license key for it as well. A menu item named CrocoBlock will be provided on your WordPress dashboard after the plugin is activated. So go to CrocoBlock > License from your WordPress dashboard and click on Activate License.
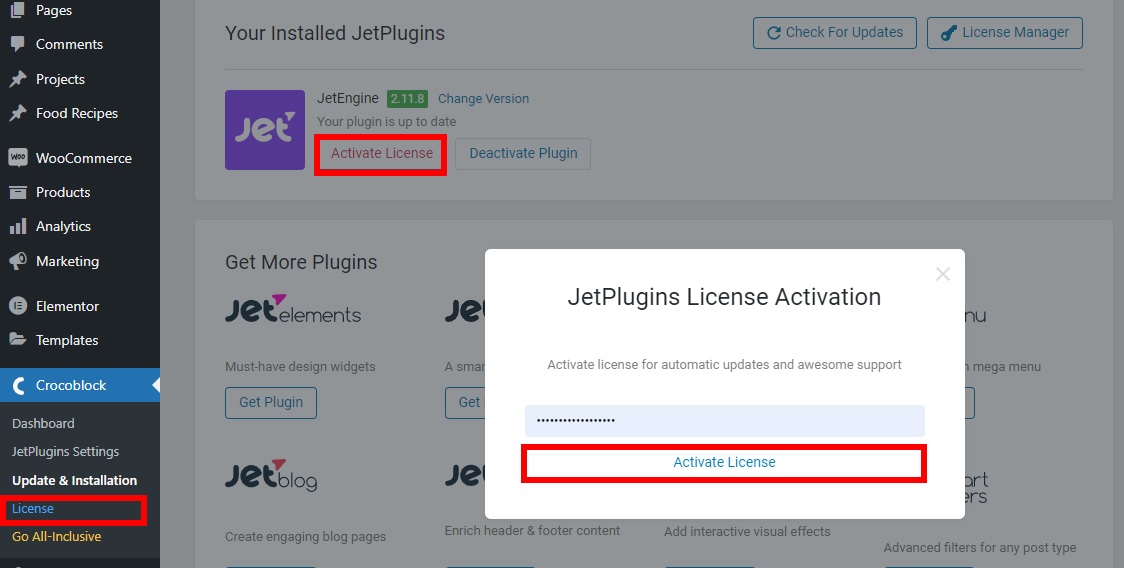
A new popup will appear where you need to enter the license key for the plugin. Finally, click on Activate License. This will activate the plugin license for you.
To confirm whether the license is activated or not, you can further click on License Manager to view the license details.

3. Create your Dynamic Website
After the license key is activated, you can start building your dynamic website with the JetEngine plugin. It has all the options that you’ll ever need for your dynamic website. All of which can be accessed through your dashboard itself.
Just open the JetEngine menu from your WordPress dashboard. Here, you can see all the functionalities that the plugin has provided for you to create your dynamic website.
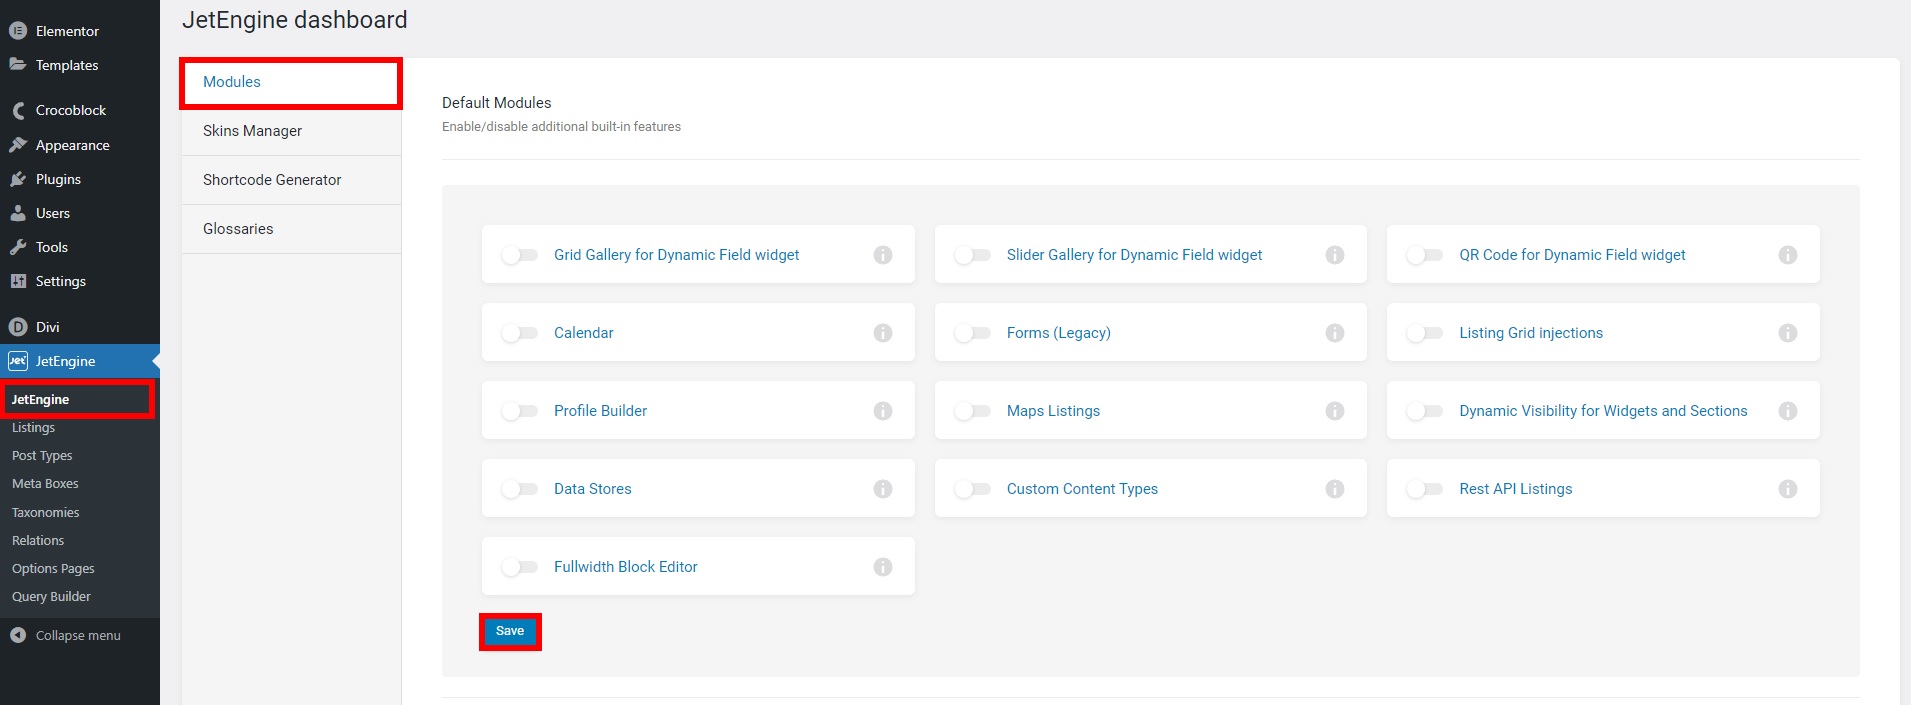
3.1. JetEngine Modules
From the main JetEngine dashboard, you can edit the modules, skin manager, shortcodes, and glossaries required for your website.
Under the Modules, you can enable or disable the built-in features provided by the plugin. They include features such as grid gallery, slider gallery, QR code for dynamic field widget, dynamic visibility for widgets and sections, custom content types, and so on.
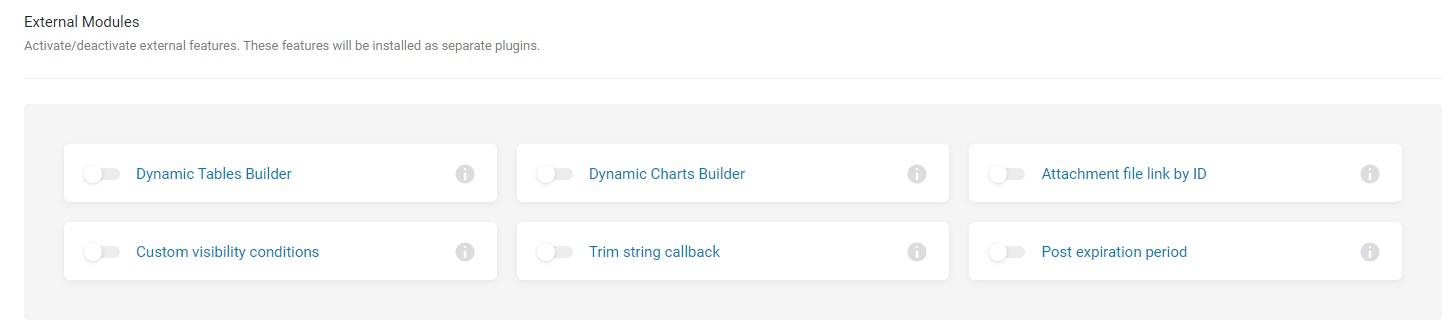
You can also find some additional modules that you can activate or deactivate just below them. But they will be installed on your website as a separate plugin. They are dynamic tables builder, dynamic charts builder, attachment file link by ID, custom visibility conditions, trim string callback, and post-expiration period.
Don’t forget to Save the changes after you activate or deactivate the features.
Now that you have set it all up, let’s start by building a custom post type for your dynamic website.
3.2. Create a Custom Post Type
To create a custom post type, go to JetEngine > Post Types from your WordPress dashboard and click on Add New.
Then, you have to enter the name of the new custom post type first. We will name it “Food Recipies” just for this demo. The slug will be entered automatically.
However, you will need to enter the labels for your new post type by yourself. Just enter the labels as needed for your website and click on Add Post Type.
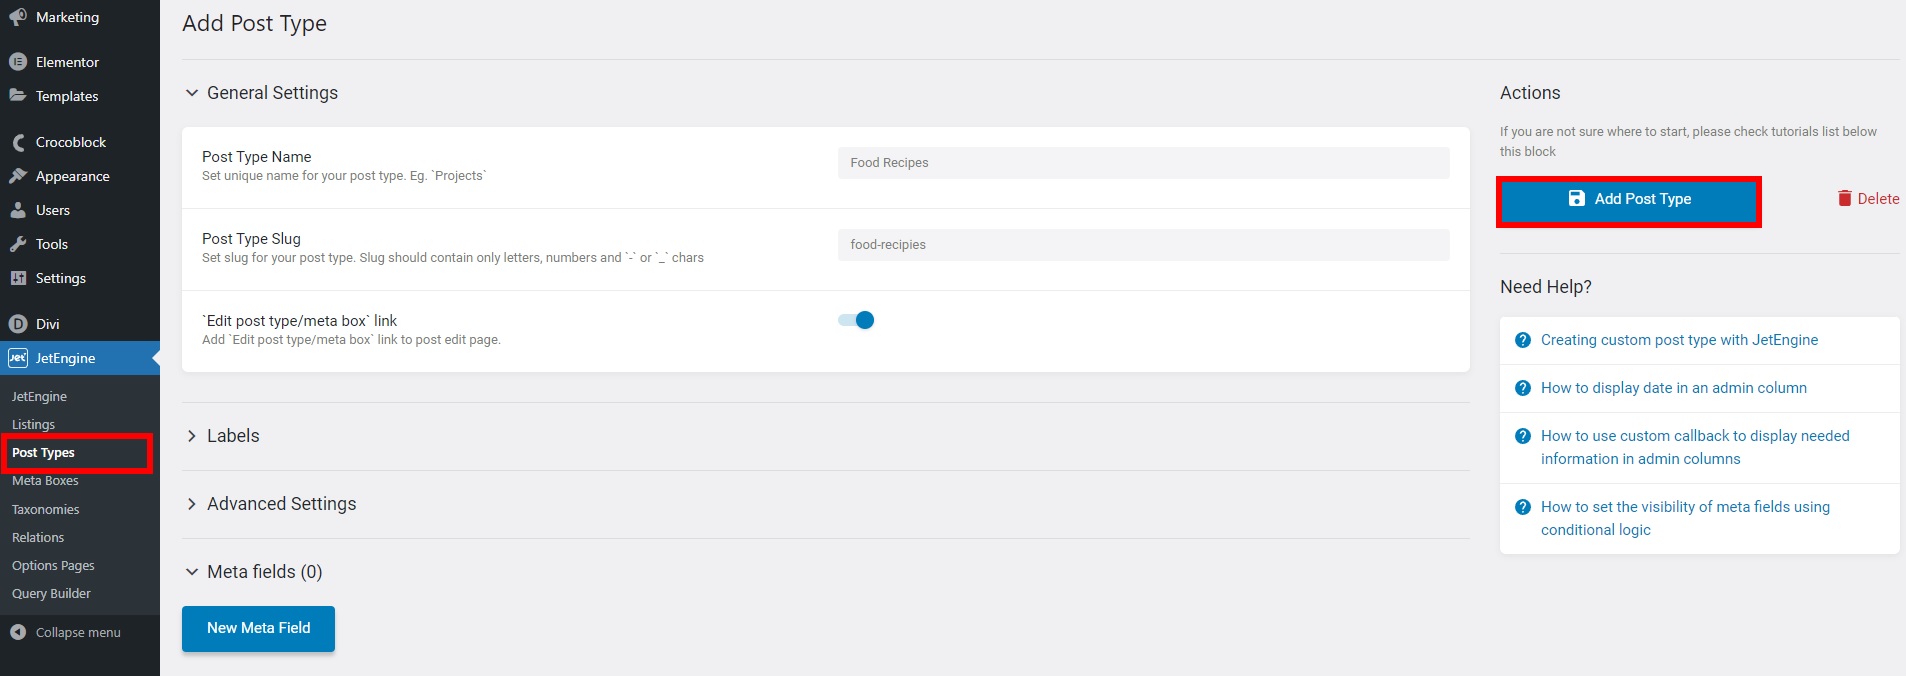
A new post type will be added to your WordPress dashboard for the entered post type. You can start adding the posts for it from here. In our case, we’ll add some food recipes.
3.3. Add Meta Box
You also need meta boxes for the custom post type that you just created for your website. To add the meta box, go to JetEngine > Meta Boxes and click on Add New.
Now, go ahead and enter the meta box title in the general settings along with other necessary details. Just make sure that you add your newly created post type on the Enable For Post Types option.
After that, you can also add some meta fields for the meta boxes here. This will help you add dynamic content for your content post types when we later add them to listings.
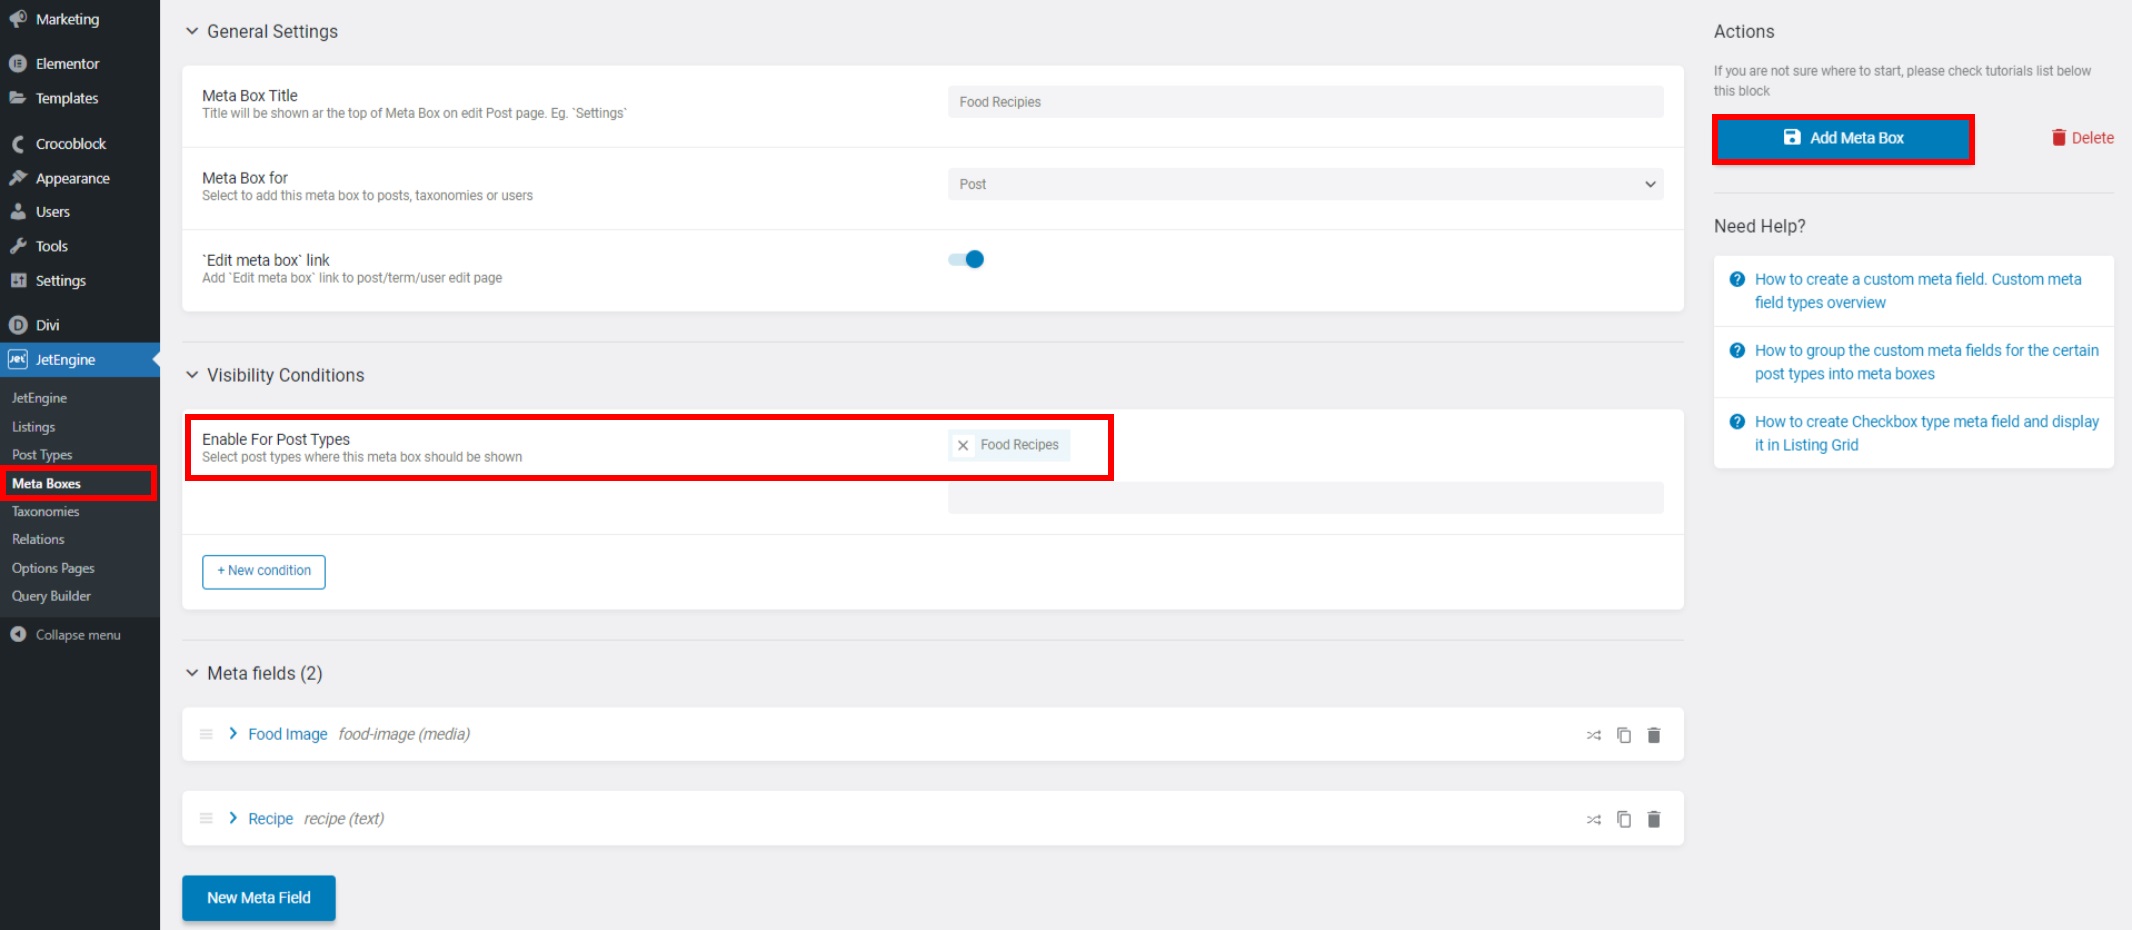
Finally, click on Add Meta Box.
3.4. Setup Dynamic Listing
Now that the post type has been included in the meta box, you’ll need to set up dynamic listings for it as well.
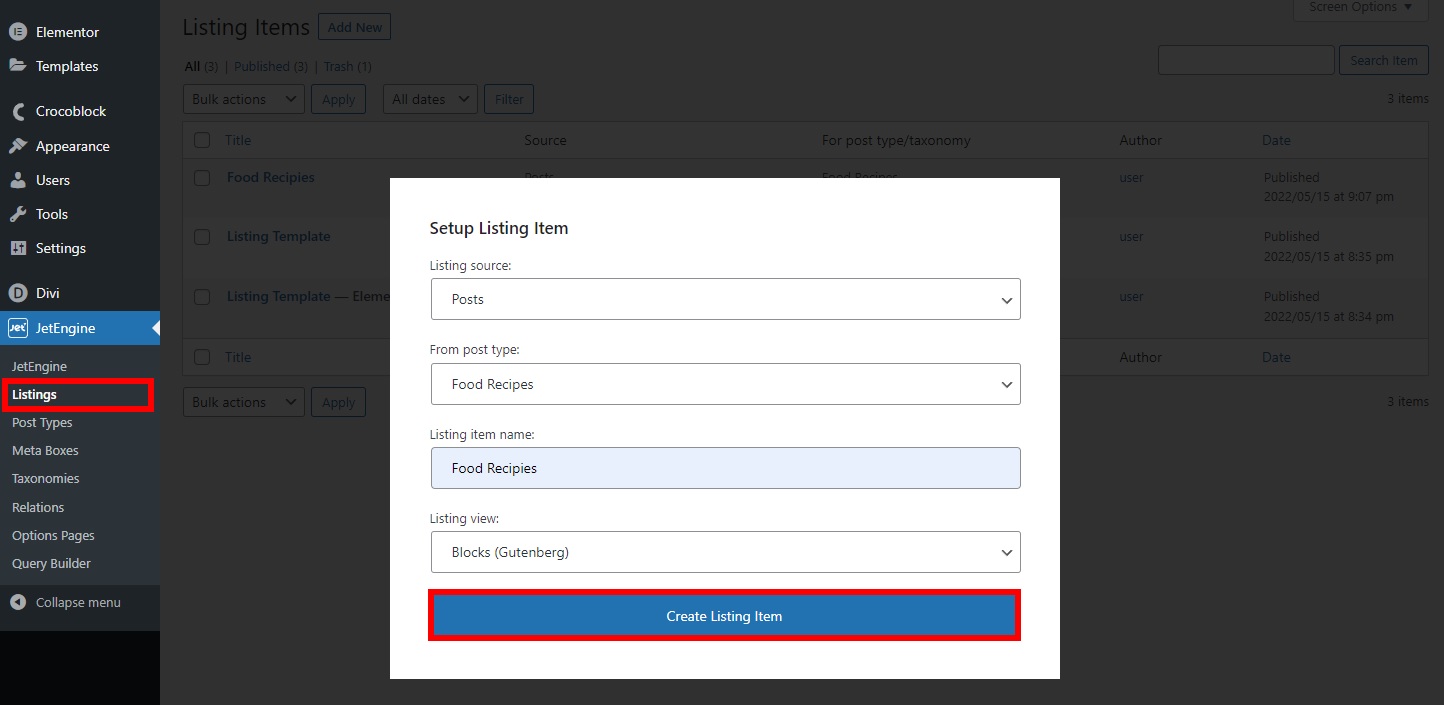
For this, open your WordPress dashboard once again and go to JetEngine > Listings. Again, click on Add new.
Here, you will have to select the listing source, post type, item new, and listing view. Then, click on Create Listing item after you add these details. We have used the Gutenberg view for this step.
Now, we’ll add the dynamic blocks that the plugin offer on this particular listing. We’ve just added the dynamic image and dynamic link for the listing. But you can use some more dynamic blocks according to the needs of your website.
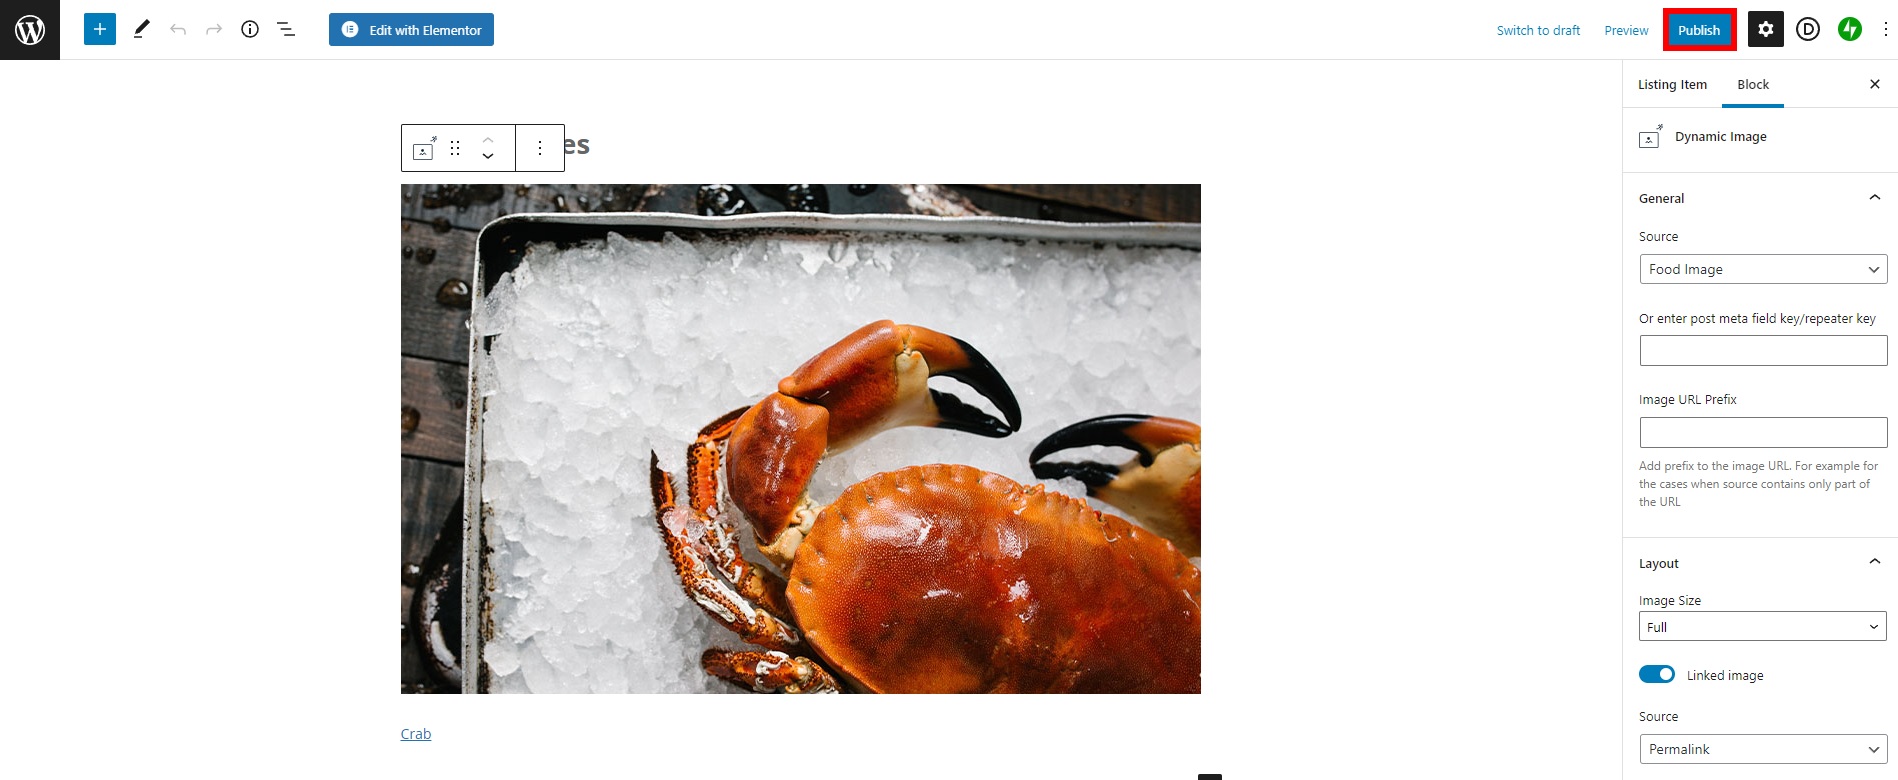
Once you make all the necessary changes, Publish the listing.
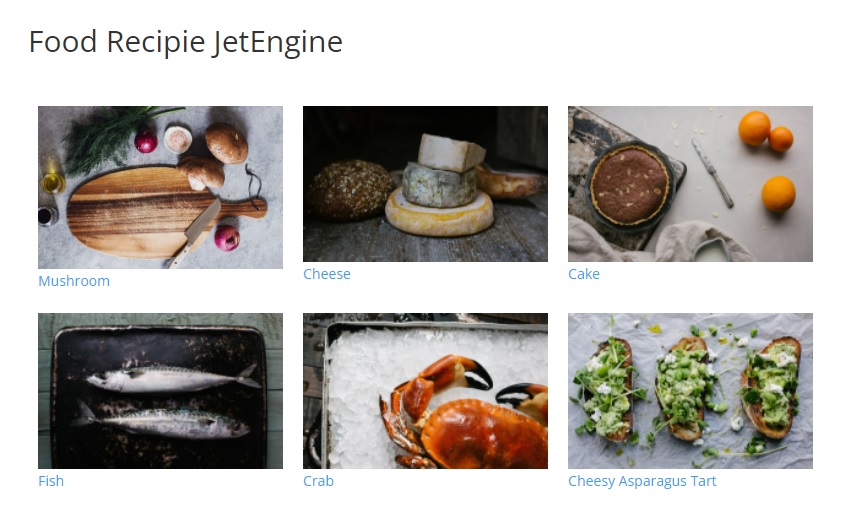
3.5. Display the Listing
Displaying the listing on your website is pretty straightforward with the help of the JetEngine plugin. All you have to do is edit the page where you want to display your listing with Elementor.
Then, search for the Listing Grid Widget in the page builder and select the listing that you want to display under the Listing label in the General settings.
If you want to edit it further, you can customize the style and advanced options of the widget as well.

Once you make all the necessary changes, Publish the page.
You will see your new blog listing on the front end of your website when you preview the page.
That’s it! We have shown you how to create a basic blog website for food recipes using the dynamic capabilities of the JetEngine plugin. However, this is just the tip of the iceberg on what the plugin can do. You can easily create a larger and more complex website using the similar processes and the extensive features and elements provided by the JetEngine plugin.
JetEngine Plugin: Final Verdict
This brings us to the end of our review on the JetEngine plugin. It is an exceptional tool to build the exact website that you want by adding dynamic content to it. The plugin also has loads of features and elements for you to help you build a completely advanced dynamic website.
Furthermore, the compatibility with Elementor and Gutenberg also comes in handy for you while you are creating or customizing the web pages of your website. You can make maximum use of their widgets and blocks on your website respectively. And with such a feature-rich package, its starting price of 43 USD is also well justified.
However, the only downside of this plugin is that the framework isn’t as lightweight as most plugins. But that can be easily forgiven considering what the plugin has to offer to you along with its immense performance capabilities.
All in all, we highly recommend you to use the JetEngine plugin if you want to build a dynamic website.
So what do you think about JetEngine? Are you willing to use it? Please let us know in the comments.
In addition, here are some more of our posts that you might find interesting:
