How to add and edit custom order status in WooCommerce
Do you want to add and edit custom order status in WooCommerce? They can be very useful to give better clarity about the order statuses of your customers.
By default, WordPress and WooCommerce don’t let you add custom order status. But with the help of codes, we can add them to your online store and edit them in no time. However, let’s have a look at why you might need to add or edit custom order status in WooCommerce before we start the process.
Why Add and Edit Custom Order Status in WooCommerce?
Proper order status usage is very important to ensure the purchase process on any online store. In an eCommerce website, there can be several steps that customers must go through to complete a purchase. Of course, these additional steps will result in fewer sales.
Alternately, the fewer order status we need to handle, the better sales rate an eCommerce store will have. On top of that, it will also make things easier and simpler to manage the overall website.
However, we will need at least two types of order statuses in all the cases. The first type of order status is needed when the user places an order successfully. It can be set to pending payment, processing, or on hold.
Similarly, we also need another order status that resembles that the order is completed. Here, the customer may have made a payment and received the product. But if the order is not completed due to any unfortunate event, it may even be set as failed, canceled, or refunded.
So altogether, we have the following default order statuses available in WooCommerce which we can use freely:
- Pending payment
- Failed
- Processing
- Completed
- On hold
- Canceled
- Refunded
These order statuses are quite adequate for any eCommerce website. They’re even more than enough for what the average website can use.
But if these default statuses are still not enough for you, you’ll definitely have to create some custom statuses for your online store. Adding them to your website will surely give your customers a clearer understanding of the status of their WooCommerce orders. For example, if you want an order status to specifically inform the customers that their order is an awaiting call, you will need to add a custom WooCommerce order status.
How to create a WooCommerce Custom Order Status?
WooCommerce orders are treated as a special custom post type. Therefore, it has a post_status value attached to it on the wp_posts table of the database in the same way as any other post type.
So, in order to include our custom order status in the available status list, we need to use the register_post_status() WP inbuilt function.
But before we proceed, please make sure that you create a child theme programmatically or by using one of the child theme plugins to make these changes. This ensures that the customizations that you make to the theme files won’t be altered when you update your WordPress theme. Similarly, we would also remind you to backup your WordPress website so that you can restore your website if any unnecessary modifications are made by accident.
1. Access the functions.php file
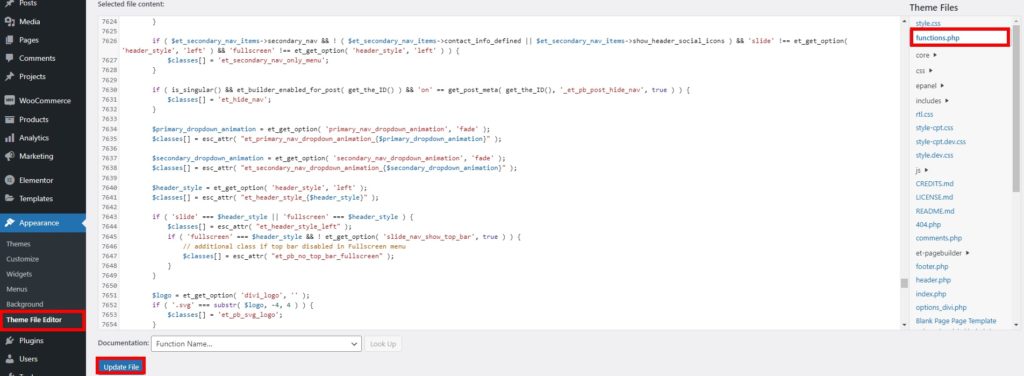
To create and edit a custom order status in WooCommerce, you’ll need to access the theme function file first. First, go to Appearance > Theme File Editor from your WordPress dashboard. Then, select the “funtions.php” file from the theme files on the right side of your screen.
2. Add the codes to the functions.php file
Now, copy and paste the following script on the functions.php file of your child theme. This will create a new custom order status named “Waiting call”.
// Register new status
function register_wait_call_order_status() {
register_post_status( 'wc-waiting-call', array(
'label'                     => 'Waiting call',
'public'                    => true,
'show_in_admin_status_list' => true,
'show_in_admin_all_list'    => true,
'exclude_from_search'       => false,
'label_count'               => _n_noop( 'Waiting call (%s)', 'Waiting call (%s)' )
) );
}
// Add custom status to order status list
function add_wait_call_to_order_statuses( $order_statuses ) {
$new_order_statuses = array();
foreach ( $order_statuses as $key => $status ) {
$new_order_statuses[ $key ] = $status;
if ( 'wc-on-hold' === $key ) {
$new_order_statuses['wc-waiting-call'] = 'Waiting call';
}
}
return $new_order_statuses;
}
add_action( 'init', 'register_wait_call_order_status' );
add_filter( 'wc_order_statuses', 'add_wait_call_to_order_statuses' );
Note that we are using a couple of hooks here. The first one is wp_init() and it is used to register our new status. Once the status is registered, this function is not needed anymore, you can remove this hook and its function callback after done.
And the second one is wc_order_statuses() filter hook, which includes the new order status in the available list. So can be used when attaching it to an order from the WooCommerce admin dashboard.
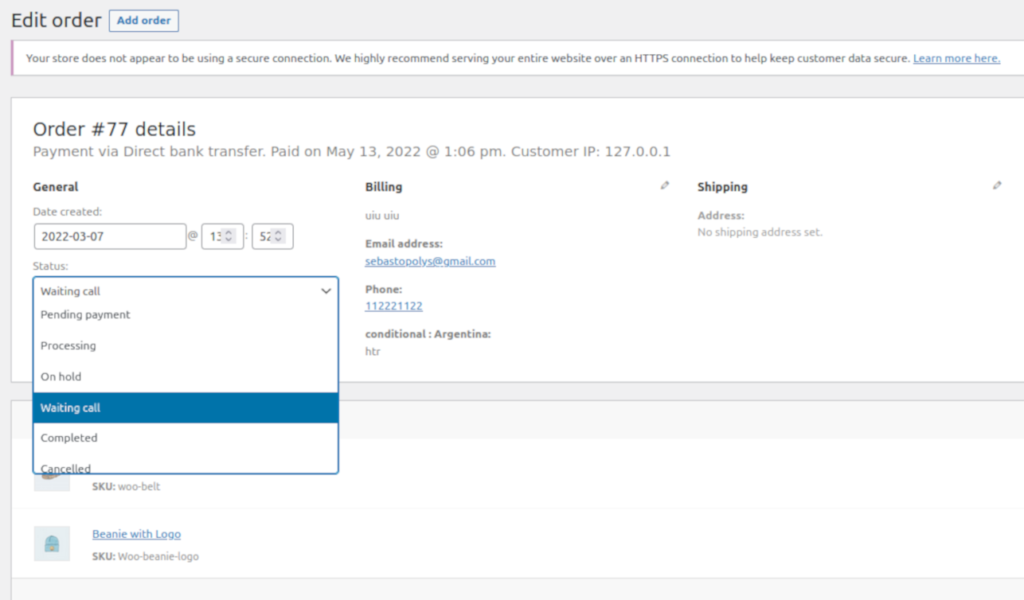
You can see the new custom order status when you edit any of the orders from WooCommerce > Orders from your WordPress dashboard. Then, click on the status option and the “Waiting Call” order status will be displayed in the dropdown menu.

Edit an existing order status on WooCommerce
We can also use the same filter hook seen on the previous sample script wc_order_statuses() to change the name of the existing order status.
The following sample code will edit two order stats: “processing” and “completed”, changing them to “in progress” and “delivered”:
function QuadLayers_rename_status( $order_statuses ) {
foreach ( $order_statuses as $key => $status ) {
if ( 'wc-processing' === $key ) {
$order_statuses['wc-processing'] = _x( 'In progress', 'Order status', 'woocommerce' );
}
if ( 'wc-completed' === $key ) {
$order_statuses['wc-completed'] = _x( 'Delivered', 'Order status', 'woocommerce' );
}
}
return $order_statuses;
}
add_filter( 'wc_order_statuses', 'QuadLayers_rename_status' );
Don’t forget to Update the file after you add the codes to it.
That’s it! This is how you can edit an existing or custom order status on your WooCommerce website.
Remove an order status in WooCommerce
Again, the wc_order_statuses() will be useful to remove a specific order status. In this case, we are removing the “refunded” order status.
Use the following script in order to remove an existing order status. This will work for both default order statuses and for custom ones.
function QuadLayers_remove_status( $statuses ) {
if( isset( $statuses['wc-refunded'] ) ){
unset( $statuses['wc-refunded'] );
}
return $statuses;
}
add_filter( 'wc_order_statuses', 'QuadLayers_remove_status' );
Be aware that if you remove a default WooCommerce order status, this might possibly break integration with some payment gateways.
That’s it! This is how you add and edit custom order status in WooCommerce.
Bonus: Change Order Status Automatically in WooCommerce
We have shown you the different ways to add and edit the custom order status in WooCommerce. However, you can change the order status automatically in WooCommerce if it’s needed on your website as well. It can be very useful for you since you won’t have to manually change every order status on your website by yourself
And similar to the above steps, changing the order status automatically can also be done using the set of code snippets. All you have to do is add the following set of codes to your functions.php file from Appearance > Theme File Editor on your WordPress dashboard.
1. Change all Order Status after Purchase
You can use the following code to change all the order statuses after purchase. This will change the order status to “On hold” instead of “Processing” when a purchase is made.
function   QuadLayers_change_order_status( $order_id ) {
                if ( ! $order_id ) {return;}
                $order = wc_get_order( $order_id );
                if( 'processing'== $order->get_status() ) {
                    $order->update_status( 'wc-on-hold' );
                }
}
add_action('woocommerce_thankyou','QuadLayers_change_order_status');
The update_status() hook is used here to trigger the change in the order status.
2. Update Order Status from a Returning Customer
If you want to change the order status of the purchases only if the customer has previously made a purchase from your website. you can do so as well. With the help of the following code snippet, the order status will be changed to “Completed” only if the customer has made a purchase previously on your website.
function QuadLayers_order_status_returning( $order_id ) {
        // Get this customer orders
         $user_id = wp_get_current_user();
        $customer_orders = [];
        foreach ( wc_get_is_paid_statuses() as $paid_status ) {
            $customer_orders += wc_get_orders( [
                'type'        => 'shop_order',
                'limit'       => - 1,
                'customer_id' => $user_id->ID,
                'status'      => $paid_status,
            ] );
        }
            # previous order exists
            if(count($customer_orders)>0){
                     if ( ! $order_id ) {return;}
                     $order = wc_get_order( $order_id );
                     if( 'processing'== $order->get_status() ) {
                         $order->update_status( 'wc-completed' );
                     }
            }
}
add_action( 'woocommerce_thankyou', 'QuadLayers_order_status_returning' );
This can help you improve security in your store and also create a better shopping experience for your returning customers.
As you can see, these are a few tiny tweaks that you can make to change the order status automatically. If you need any further details about it, please feel free to have a look at our article on how to change order status automatically in WooCommerce.
Conclusion
These are some of the various ways to add and edit the custom order status in WooCommerce with the help of codes. They can be even further modified to edit and remove even the default existing WooCommerce order statuses. However, you only need to add new custom order statuses or edit the existing ones if the default order statuses aren’t enough for you and the needs of your customers.
It is very easy to add and edit a custom order status on your online store. But you do need to have a basic understanding of how to use WooCommerce hooks. Similarly, if you want to learn more about WooCommerce orders, we even have detailed guides on how to test, repeat, delete, and even autocomplete orders in WooCommerce.
In addition, we have also provided you with a short guide to changing the order status automatically in WooCommerce as a bonus. This can help you in increasing the shopping experience of your customers as well as the admin. It can also help you save a lot of time as a store owner as all the order statuses will be changed automatically depending on the conditions set on your website.
So have you tried to edit and add the order statuses on your website? Please let us know in the comments.
In the meantime, feel free to have a look at some more of our posts that might be helpful for you:


Thanks for this. I have a question. I am using this on our site, but even though this line of code exists:
‘show_in_admin_status_list’ => true,
and
‘label_count’ => _n_noop( ‘Waiting call (%s)’, ‘Waiting call (%s)’ )
The new status doesn’t appear on the order page along with the other order status:
All (16,336) | Mine (4) | Trash (2) | Pending payment (1) | Processing (23) | On hold (122) | Completed (15,976) | Cancelled (62) | Refunded (30) | Failed (122)
Do you know why? How can I make it appear?
One other thing. When I change the order status, it appears in the order notes on the right hand side of the “edit order” screen, but the order status remains “on hold” instead of changing to my new custom order status on the orders page at /wp-admin/edit.php?post_type=shop_order
Hi,
Great article!
Do you have a code snippet which also adds the new order status to the dropdown in the orders page? So it is also possible to change it from there in the bulk actions dropdown?