How to create a child theme in WordPress (Programmatically and plugin)
Do you want to customize your site’s design and make an impression on your visitors? In this guide, we will show you how to create a child theme in WordPress both with a bit of coding and with plugins.
Customization is a strong factor in your website’s design. You want to make sure you do everything you can to help your website stand out. And while you can use a WordPress theme with a design that suits your needs, you can do much better if you add a bit of flavor to the default settings. Whether it’s changing a few background settings or setting up a mega menu for your site.
However, customizing your website can be quite a task, especially if you’re changing a design that has worked well for you. This is why if you want to customize your WordPress theme, we highly recommend you use a child theme. And that’s what today’s tutorial brings you: a beginner-friendly guide on how to create a child theme in WordPress.
What’s a child theme?
Simply put, a child theme is an additional theme you create that inherits the design and look of an existing parent theme. The child theme also inherits all the functions and features of the parent theme, which you can also modify.
But if it has the same design and functions as the parent theme, why do you need a child theme? There are certain advantages of creating child themes in WordPress. For one, you can keep customization from the parent theme separated and customize them individually. For example, you can make changes to the child theme’s code and this customization will remain separate from the parent theme, so none of the files in the parent themes are affected.
Moreover, a key advantage of using a child theme is that you can keep all your customizations even after updating the parent theme. A huge problem with customizing your parent theme is that, when you update the theme, those modifications are lost. So, with a child theme, regardless of whether you change styles, templates, or functions, the modifications you make to the theme files remain saved even after your updates.
Developers can also use child themes to create newer theme designs quickly. Using child themes, they don’t have to start from scratch, and they can choose to modify the parent themes to fit their theme designs too.
Benefits of child themes
So to summarize, if you want better flexibility for your theme customizations, using a child theme is an excellent idea. Some of the main benefits when using child themes are:
- Any customization you make to the child theme stays separated from the parent and thus isn’t reverted or lost after updates.
- There’s no risk of accidentally breaking your main theme or its files.
- Developers can use child themes and parent themes to save development time by creating flexible theme designs and theme frameworks.
- Child themes are very lightweight, and you can always revert any changes by simply disabling or removing the child theme.
Now that we’ve explained why you should consider using a child theme, let’s have a look at how you can create a child theme in WordPress.
How to create a child theme in WordPress
There are 2 main ways to create a child theme in WordPress:
- Using a plugin
- Programmatically
Both methods have their pros and cons so use the one that best suits your skills and needs.
1) Create a Child theme using a WordPress Plugin
Creating a child theme using a plugin is the easiest and most beginner-friendly way. All you have to do is install a plugin, click a few buttons here and there, and you’re good to go. And there’s a huge number of child theme plugins out there that are very easy to use.
For this guide, we’ll use the Child Theme Generator plugin. If you want to have a look at other options, we recommend you check out our list of the best WordPress Child Theme plugins.
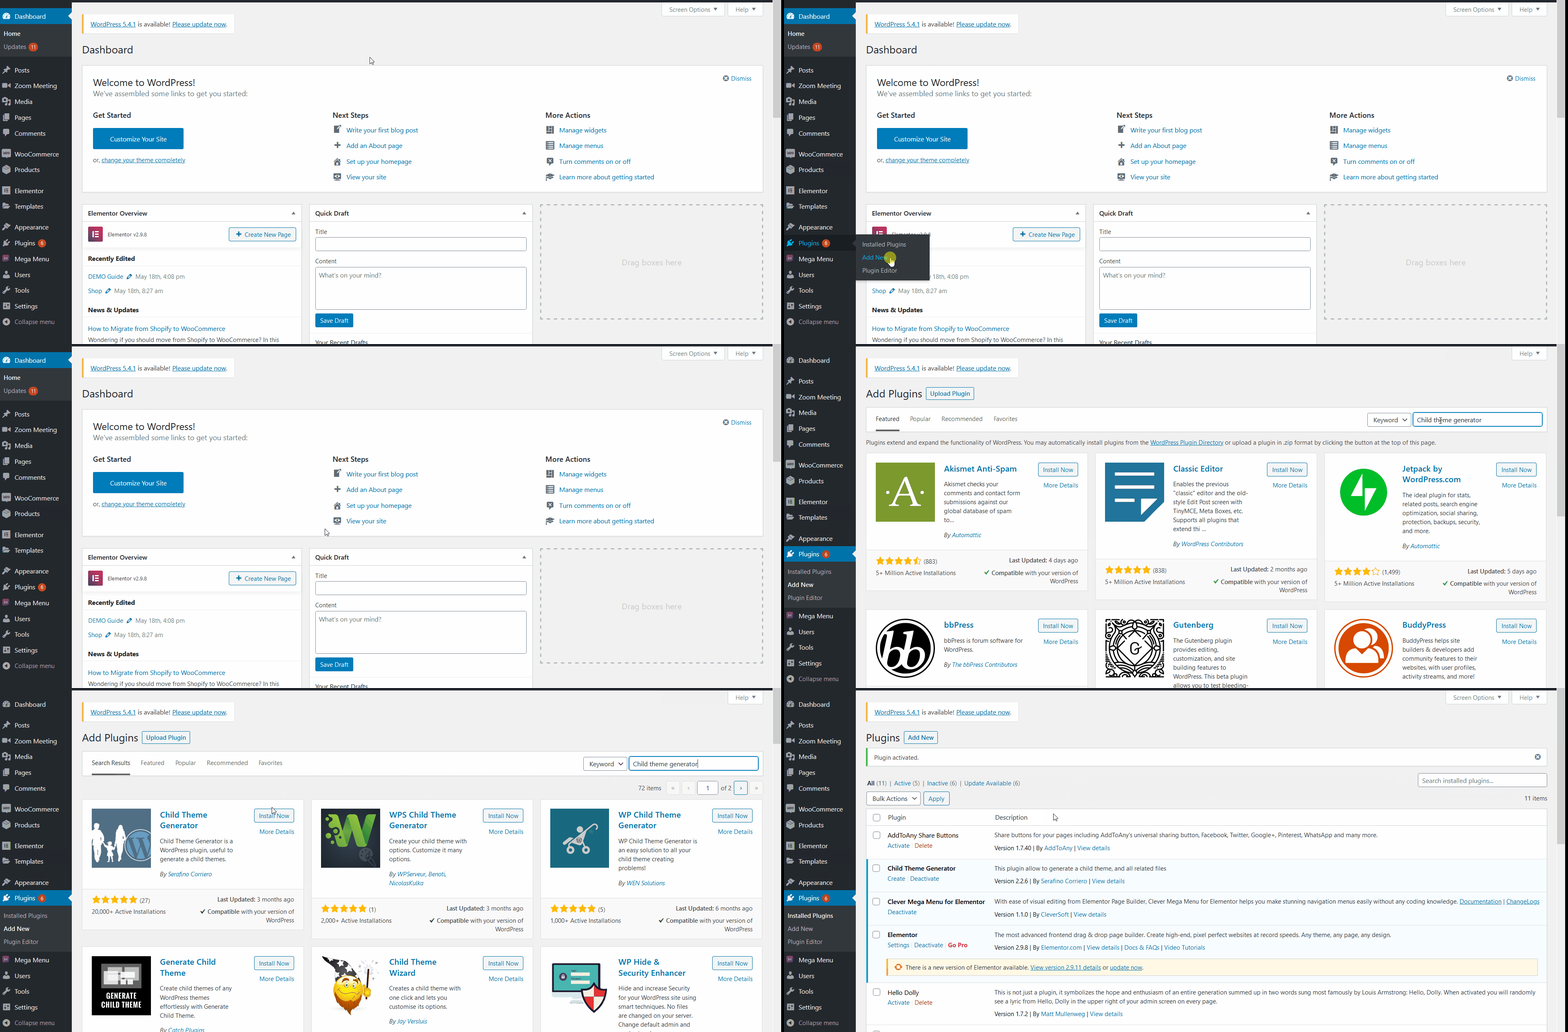
After deciding which add-on you prefer, you need to install it. So, open your WP Admin Dashboard, hover over Plugins, and click Add New. Then, use the search bar on the top right to search for whichever plugin you’re about to install. We’re going to install Child Theme Generator.
Then, Install the plugin you want. Once the installation finishes, press Activate. Alternatively, you can also activate/deactivate your plugins by going to Plugins > Installed Plugins in your sidebar.
How to create a child theme with the Child Theme Generator plugin
Once you install and activate the plugin, open the plugin’s interface by clicking on Settings > Child-Theme Gen.
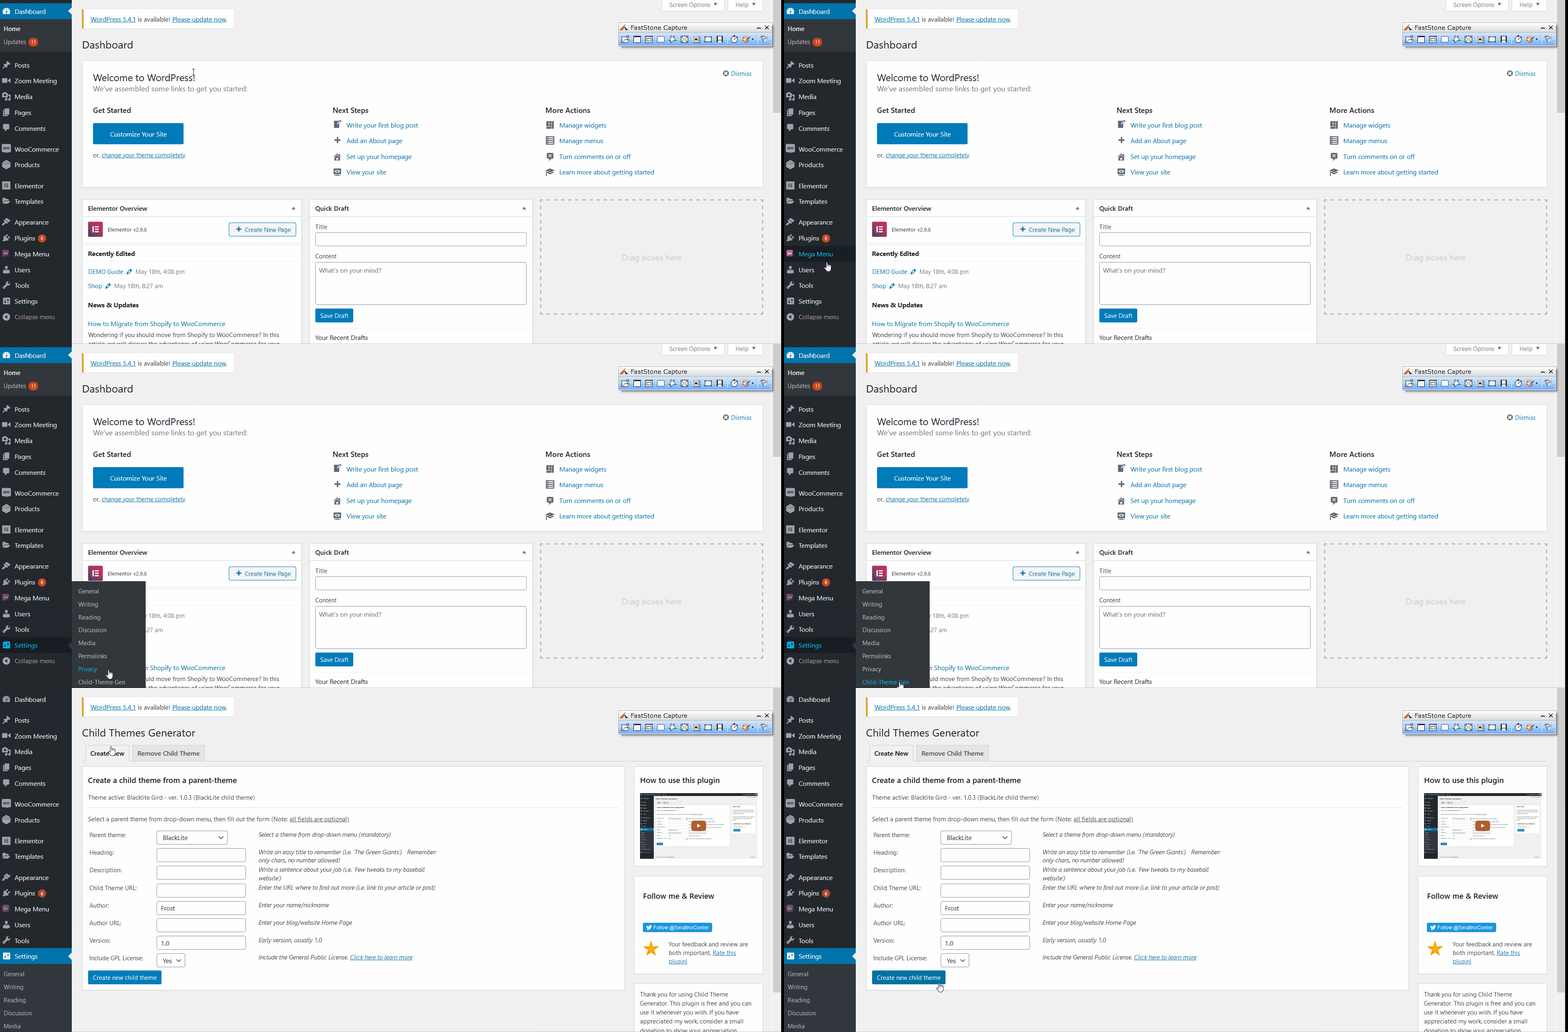
Then, under the Create New tab, you can fill in various details about your child theme.
Simply, choose what theme you want as your parent theme, add your theme heading, description, child theme URL, author, and other theme details. Here, you can also choose to add a GNU GPL license along with your theme files.
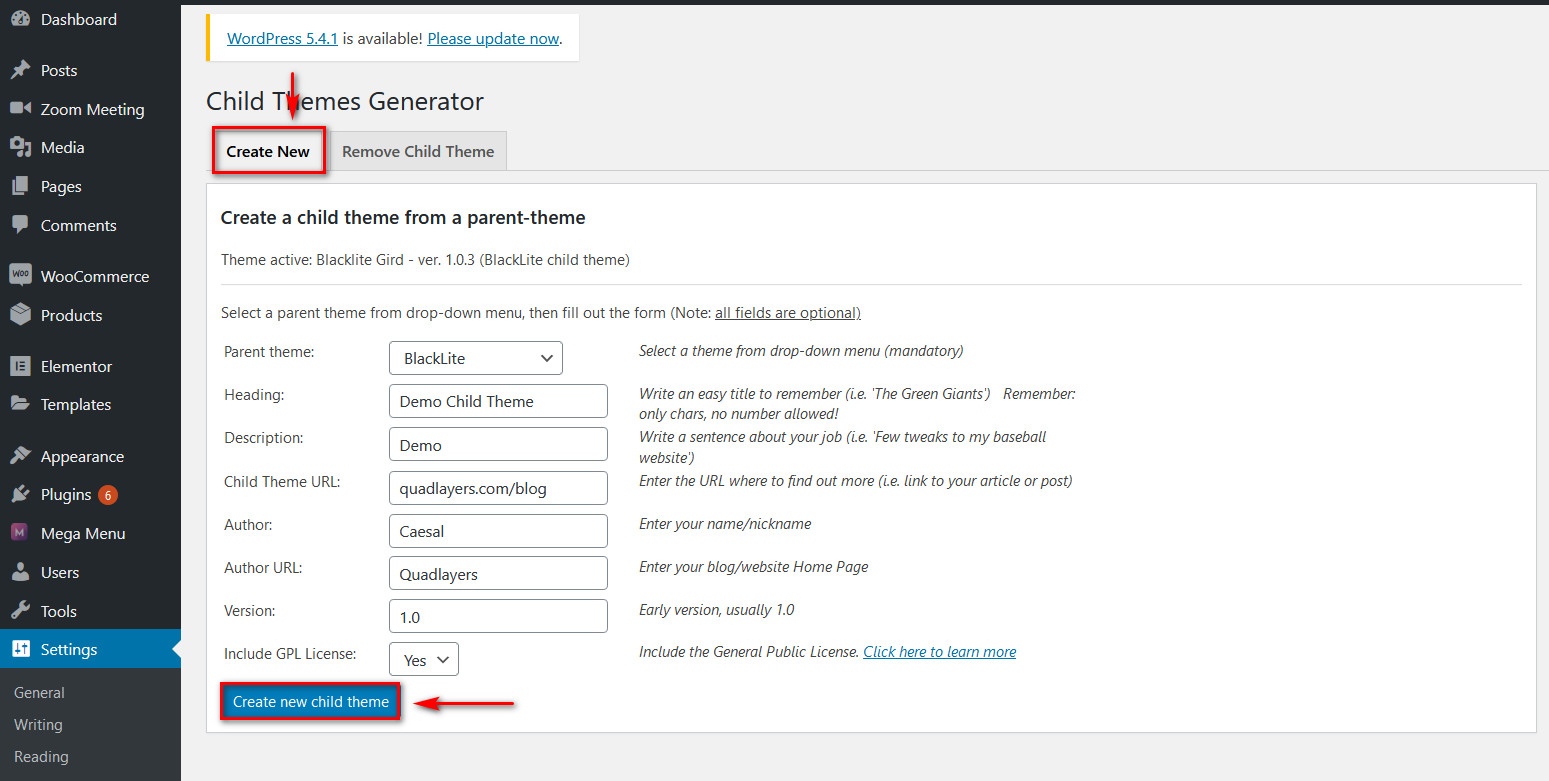
Once you’re done, click Create a new child theme and a child theme will be created based on your input details.
Then, you can change or activate it by going to Appearance > Themes, selecting your newly created child theme, and activating it.
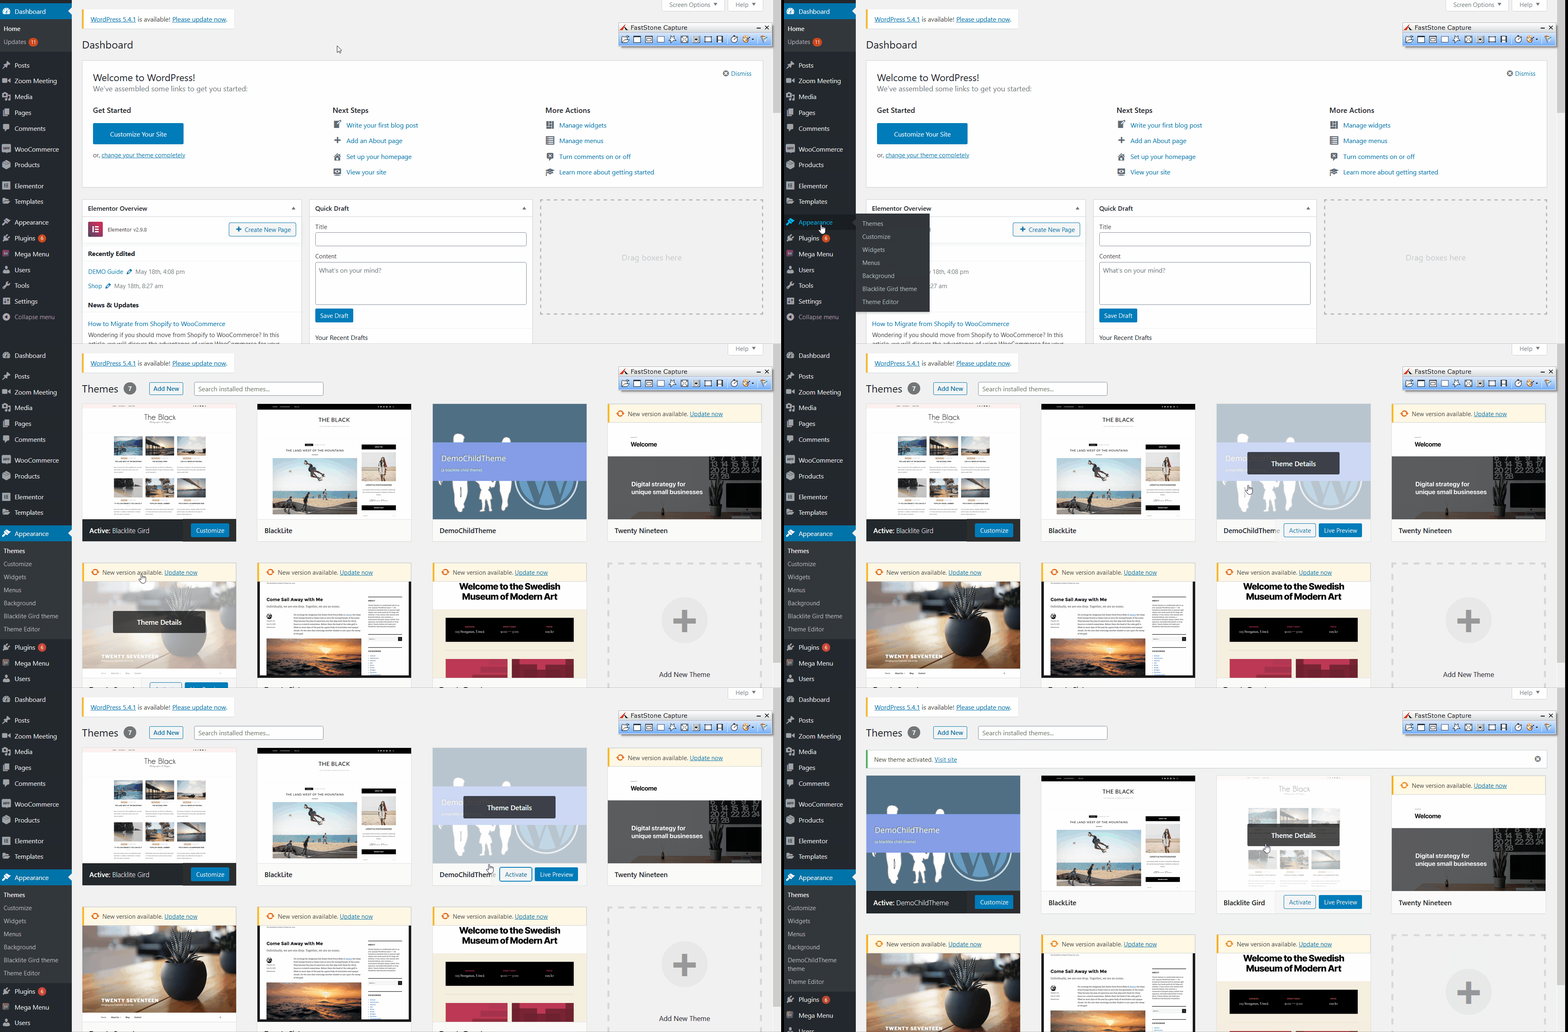
That’s it! You’ve just created your child theme! Now you can customize it and make all the changes you want.
Now, let’s have a look at how you can create a child theme programmatically without using a plugin.
2) Create a Child theme programmatically
If you don’t want to install any plugins, you can create a WordPress child theme programmatically. This requires a bit of coding, but it’s still quite easy even for beginners. All you need to do is create your child theme’s folder and create a couple of files inside it.
Activate the parent theme
So, first, you have to activate the parent theme that you want to create a child theme from on your website.
Then, you need to use your website’s web hosting control panel and access your server folders. You will have to use your panel’s file manager or FTP client to open your site’s theme folder. This is under public_html/wp-content/themes.
Steps
Once you’ve located the theme’s folder, follow these easy steps:
1) Create a folder inside the themes directory with the name of your child theme. For now, we’ll be using Demo Child Theme. You can also use the name of your parent theme, followed by a child suffix, to make it easier to manage. For example, Flash-Child or Blacklite-Child.
2) Then, create a style.css file and copy the following code inside the style.CSS file.
/*
Theme Name: Demo Child theme
Template: Blacklite
Theme URL: Quadlayers.com/blog
Description: Demo Child Theme
Theme Author: Quadlayers
Author URL: Qualayers.com
Version: 1.0.0
*/
This is called a stylesheet. Remember to change this information for your child theme. Simply add the information after the colons for each line of the code. The most important parts here are the Theme Name that needs to be unique, and the name of the template you’re using as you have to designate which parent theme you’re using.
3) Next, create a file named Functions.php inside the child theme folder and copy the following code:
<?php
add_action( 'wp_enqueue_scripts', 'enqueue_parent_styles' );
function enqueue_parent_styles() {
wp_enqueue_style( 'parent-style', get_template_directory_uri().'/style.css' );
}
?>
4) Save both files and then go to your Dashboard > Appearance > Themes. You will see a new child theme with the description you inserted in your Style.CSS folder!
And that’s how you create a child theme in WordPress programmatically. Now, let’s see how to customize it.
How to customize your WordPress Child Theme?
In this section, we’ll have a look at what you can do to customize the look of your child theme on a deeper level. For one, let’s change the font settings and background color using a bit of CSS.
Customize your Theme CSS
First, go to Appearance > Customize to open your Theme customizer. Then, click Additional CSS on the sidebar menu.
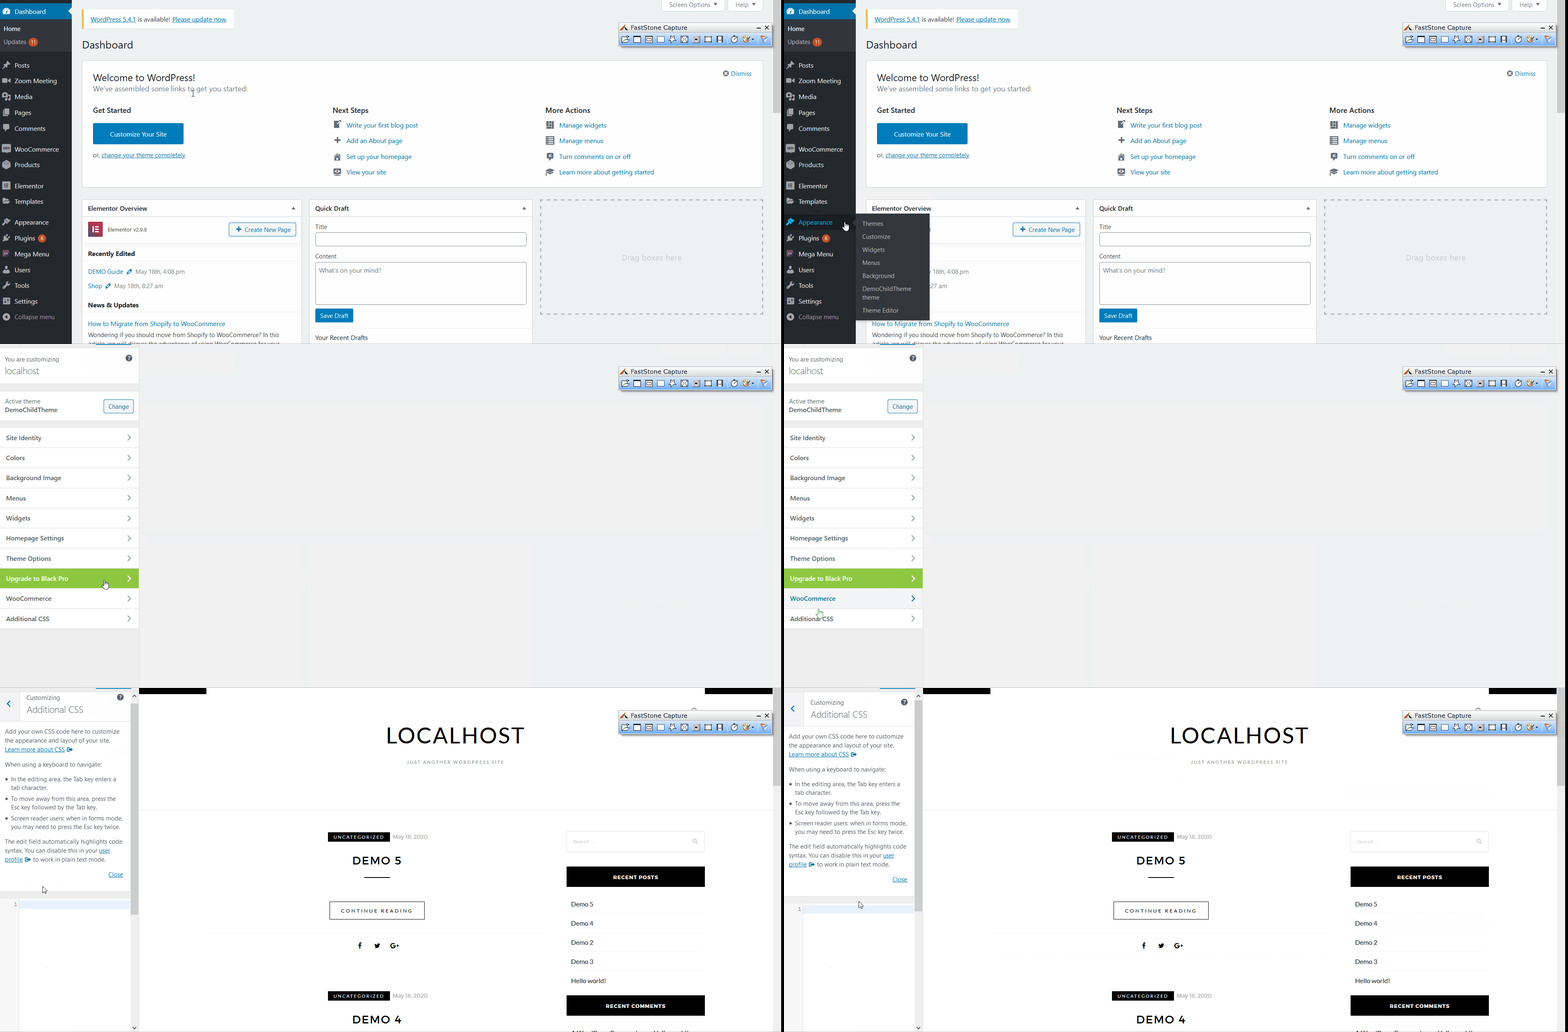
Here, you can add some CSS codes that will overwrite your theme settings directly. For example, you can add this little code:
p {
color: grey;
}
p {
font-family: Helvetica;
font-size: 18px;
}
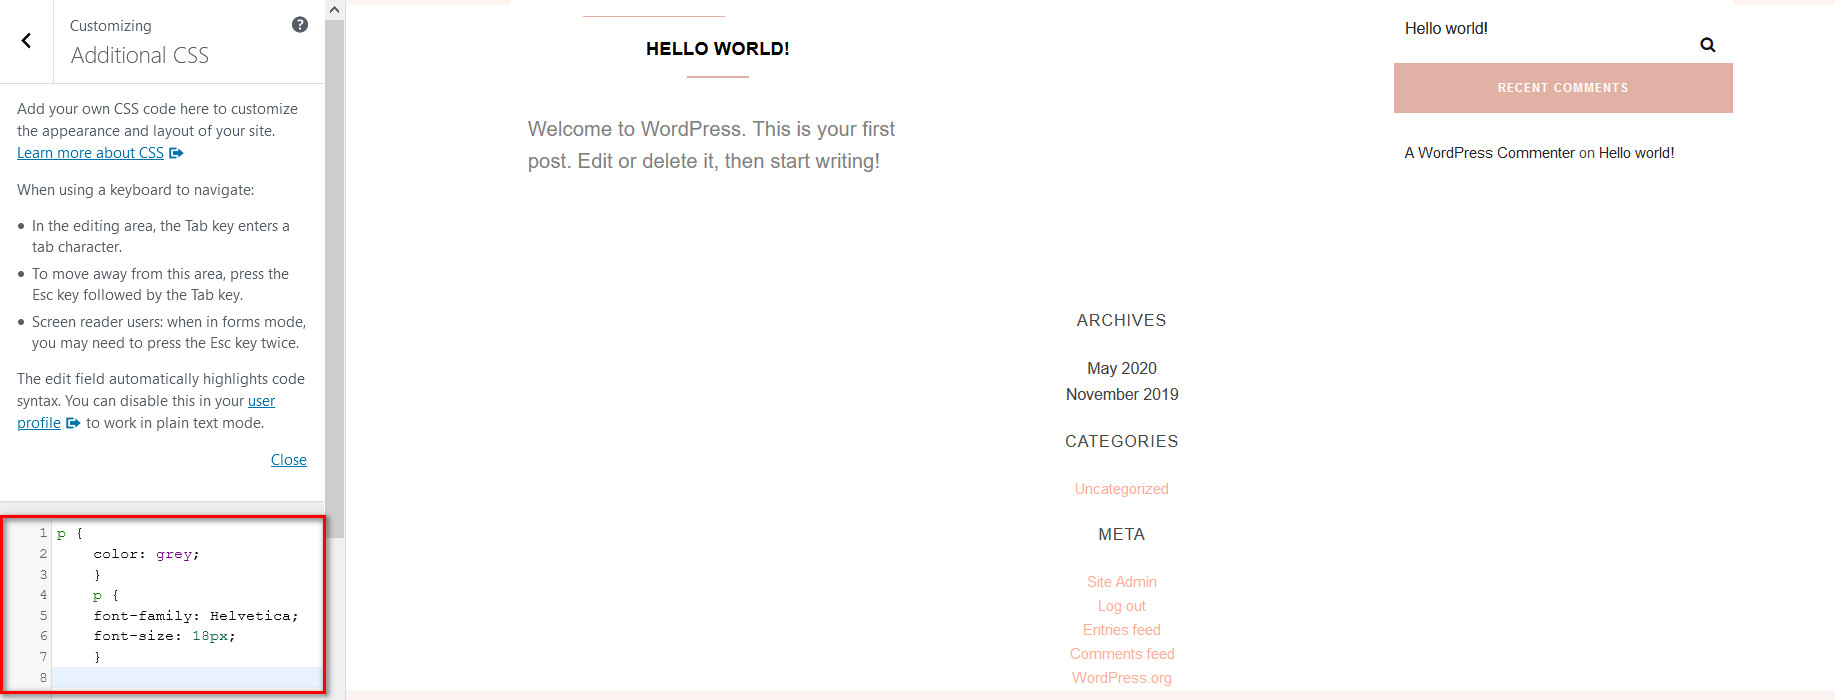
And as you insert that little snippet of code, you will see the changes on the Live customizer. We need a bit more color so let’s change the background color of your site’s widget bar:
.widget {
background: #00FFFF;
padding: 25px;
}

Now, let’s add an extra line of code to remove the “Powered by WordPress” copyright footer:
.site-info { display: none; }
And there we go, you have customized your child theme with a bit of CSS. This is just scratching the surface of these modifications. There’s a lot more you can do.
Customize your Theme Functions.php file
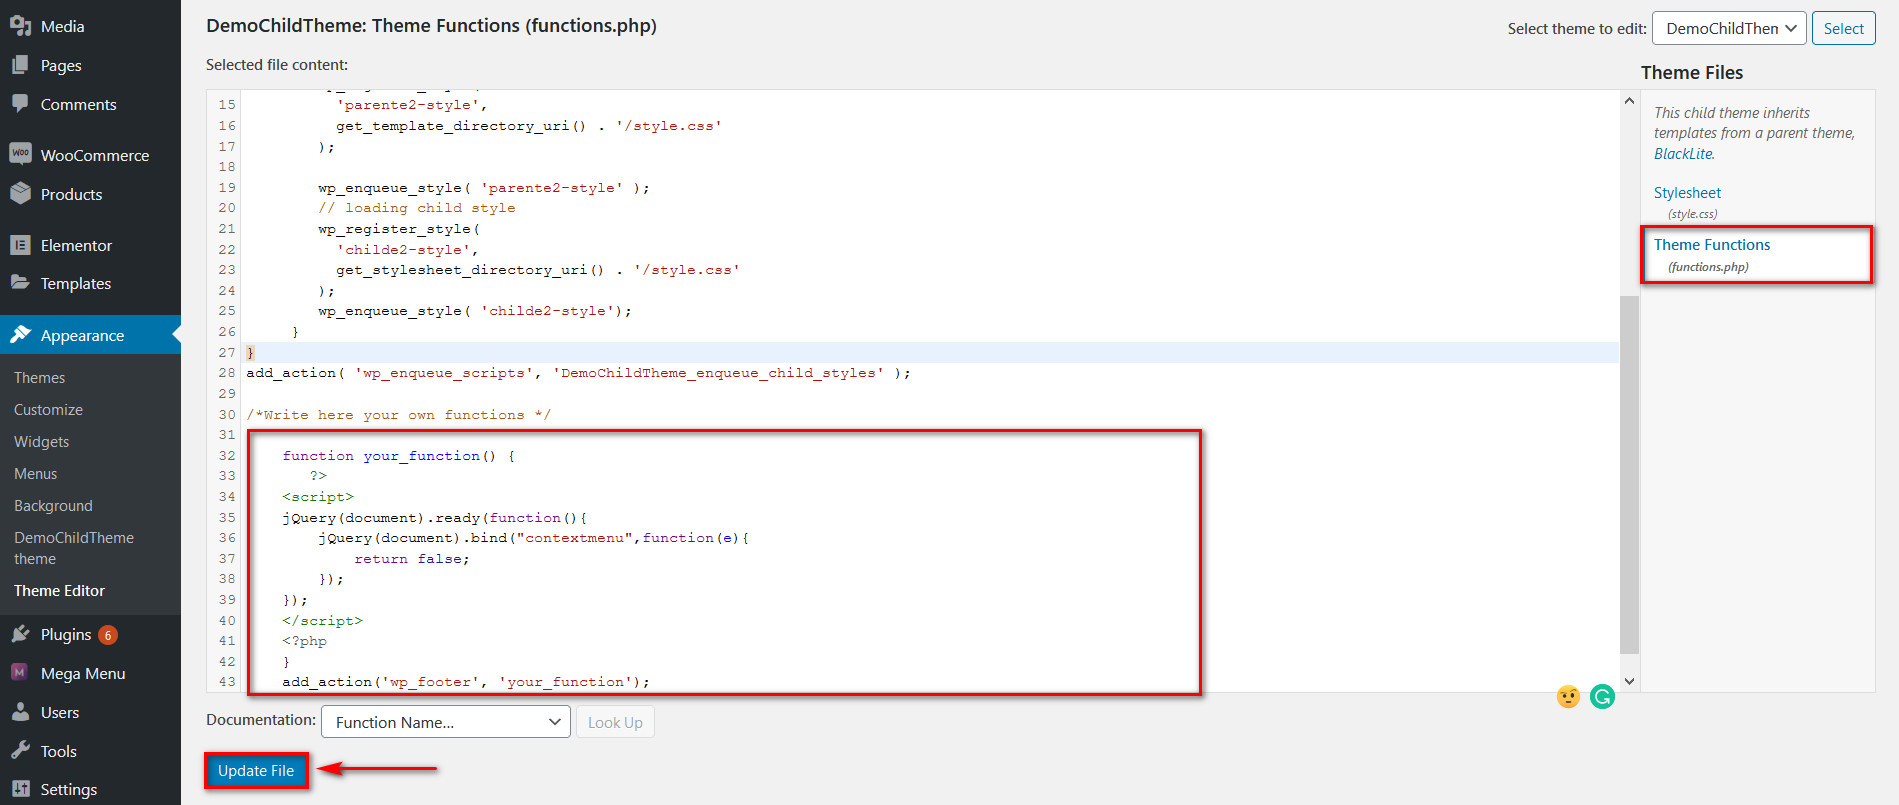
You can directly customize your theme files by going to Appearance > Theme editor. Then, click on your Functions.php file to add custom functions to your theme.
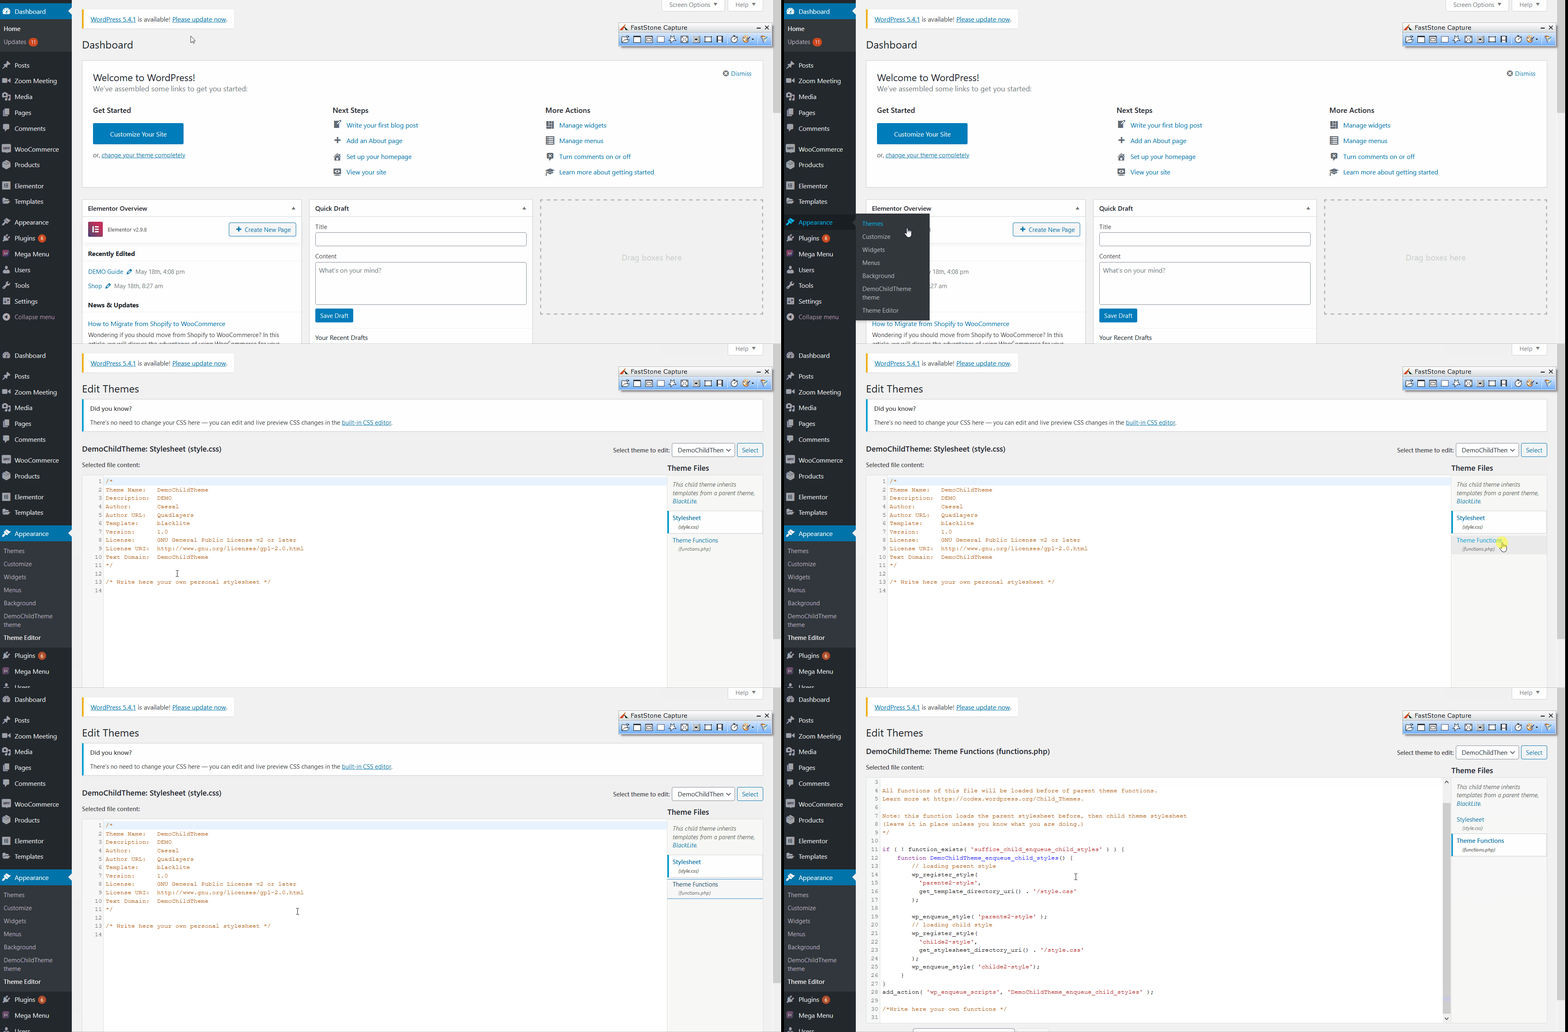
For example, to disable right-clicking on your website, add these lines of code to your Functions.php file:
function your_function() {
?>
<script>
jQuery(document).ready(function(){
jQuery(document).bind("contextmenu",function(e){
return false;
});
});
</script>
<?php
}
add_action('wp_footer', 'your_function');
Then, click Update File.
Finally, if you mess up something, you can simply delete your child theme, create a new one, and then start from scratch without affecting your parent theme.
Conclusion
All in all, creating and customizing child themes opens a whole new avenue of theme modifications for every kind of WordPress user. The best thing about it is the flexibility it provides as you can revert anything that could have messed up your theme. Additionally, all your customizations stay separated from the parent theme and aren’t lost after the updates. So we highly encourage you to create a child theme and play around with it to improve your site.
This may sound complicated but it’s not. All it takes is adding a bit of code to your theme files and managing a couple of folders.
However, not all users might find it easy to create and build child themes programmatically, especially beginners. If that’s your case, you can use a plugin to create your theme. If you run into issues at any point, feel free to leave us a comment, and we’ll get right to it.
Finally, if you want to customize your theme, even more, you can check out our guides on how to edit footers and how to customize headers in WordPress.

You have mentioned good points for knowledge. I would like to add some short methods for creating a wordpress child theme. Check them below:
Step1: Set up a new folder
Step2: Create a style.css file
Step3: Add the required information
Step4: Enqueue the parent and child theme stylesheets
Step5: Activate the child theme
Step6: Customize the child theme
Step7: Update and maintain your child theme
These are some short points.
I have read your blog on the benefit of child theme in WordPress. It was very interesting and helpful but I can add some extra points in your article. Here some extra points:
1.Keeping Changes After Updates. One of the biggest problems with modifying a theme is when updates occur.
2.Keeping Original Safe.
3.No FTP Required.
4.Faster Development.
These are some extra points to add to your article. Readers if you are confused about your web and App development , you can get a free consultation at Alakmalak technologies.Visit our site for more information.