
How to add WooCommerce products (programmatically and admin panel)
Are you setting up your online store and want to create products? Here, we’ll show you a complete guide on how to add products in WooCommerce both from the admin panel and programmatically. You’ll learn how to add simple, variable, grouped, and external products. But that’s not all. We’ll also show you how to add products in bulk, related products, and products with featured images.
Introduction to WooCommerce Products
Before we start, we first need to understand what a product is and its main components. A WooCommerce product is something physical or digital that you sell in an online store. Additionally, some special features differentiate products from blog posts and other pages on a WordPress site.
WooCommerce products have a lot of information attached to it such as images, title, featured image, description, price, variations, available stock, and others. Additionally, there are different product types. These are tags that are attached to the products and define how they will be handled during the sale process, making it much easier for both customers and store owners.
WooCommerce Products types
There are 4 types of products in WooCommerce: simple, variable, grouped, and external/affiliate. Additionally, simple and variable products can be downloadable or virtual.
1) Simple products
This is the most common product type that every store sells. It’s a unique product that doesn’t have any variation or option. For example, a one-size-fits-all t-shirt.
2) Variable products
Variable products have some kind of variation such as color, size, type, and so on. They can have different SKU, prices, or stock for each available option. For example, a t-shirt available in different colors and sizes.
3) Grouped products
As the name suggests, a grouped product is a set of related products that you can sell by unit but that are grouped in a pack. For example, a cutlery set that includes forks, knives, and spoons.
4) External/affiliate products
Mainly used for external or affiliate marketing, these are products that are listed on your site but are sold on some other website.
Downloadable and virtual products
Virtual products
Virtual products can’t be delivered physically so all the delivery functions in WooCommerce are disabled. Examples of virtual products are chat support, personal webinars, or account activations on some other platform.
Downloadable products
As its name suggests, this is something that you can download. Downloadable products enable additional fields where you can attach a downloadable file to the product. This way, customers can get a link to download with the order notification email. This is perfect to deliver any kind of file such as e-books, image galleries, software, and so on. Now that we better understand all the types of products in WooCommerce, let’s see how to add products to our store.
How to add products in WooCommerce
There are 2 main ways to create products in WooCommerce:
- Programmatically
- From the admin panel
In this guide, we’re going to show you both methods step-by-step. Below, you will find an index of the content so you can go directly to the section you’re interested in.
- How to add products programmatically in WooCommerce?
- Create a plugin to add products in WooCommerce programmatically
- The Hook
- How to add multiple products programmatically
- Add products with featured images programmatically
- How to add variable products programmatically
- Add more information to the products programmatically
- How to add products from the admin panel in WooCommerce?
- Methods to add products from the WooCommerce dashboard
- Product Editor Page
- Meta Boxes and Product Data Meta Box
- How to add related products from the WooCommerce dashboard
- How to add products in bulk from the WooCommerce admin panel
1. How to add products programmatically in WooCommerce
In this section, you’re going to learn how to code your custom solution and create products programmatically. Even though you can follow this guide if you’re a beginner, some programming skills would be helpful. There are many PHP scripts to add products programmatically but most of them lack validation. So you need to change the snippets adding your validation logic.
When I first tried to follow those tutorials, I had the same issue every time. The products were added at any given time, sometimes when I was reloading a page or navigating to another one. As a result, I ended with more than 45 products and without the solution I wanted. So to avoid all these conflicts related to the exact moment we add a product, we’ve found a simple and effective solution.
We’ve created a custom plugin to add our products. This way, we can control when we add a product with a developer-friendly testing environment and without having to deal with complex validation functions.
Create a plugin to add products in WooCommerce programmatically
Even though this may sound complicated, don’t worry if you don’t have coding skills. It’s just a simple plugin with only two files.
1) First, create a folder on your desktop and open your favorite code editor or a simple text editor.
2) Then, create two files in the folder:
QuadLayers_add_product // folder__quadlayers_add_product.php // file__class_quadlayers_add_product.php // file
We’ve named our folder QuadLayers_add_product but you can use another name as long as you change the content of the files to match it.
3) Now, paste the following code in the quadlayers_add_product.php file:
/*** @link https://quadlayers.com/* @since 1.0.0* @package QuadLayers Add Product to WooCommerce* Plugin Name: QuadLayers Add Products* Plugin URI: https://quadlayers.com/* Description: Adding products programmatically to WooCommerce * Name: Store Vendor Total* Version: 1.0.0* Author: Sebastopolys* Author URI: https://quadlayers.com/* License: GPL-2.0+* License URI: http://www.gnu.org/licenses/gpl-2.0.txt* Text Domain: quadlayers_ap*/if(!defined('ABSPATH')){die('-1');}function QuadLayers_init(){require plugin_dir_path( __FILE__).'class_quadlayers_add_product.php';$run = new QuadLayers_class;}QuadLayers_init();
This file won’t do much. It’s just a gateway entrance to the plugin. It simply calls the other file and runs it.
4) After pasting the code, save the changes.
5) Then, open the class_quadlayers_add_product.php file and paste the following into it:
class QuadLayers_class{ public function __construct(){add_action(wp_head,array($this,'quadlayers_add_product'));}public function quadlayers_add_product(){echo ' This works…';}}
6) Now, pack both files in a .zip file and install it on your WordPress website.
7) If everything went fine, you will see your new plugin in the WordPress dashboard plugins list. Turn it on and check if you can see “This works…” at the top of the page. If you see it, you’re good to continue to the next step.
The hook
If you are familiar with WordPress development, you probably know that now you need some kind of hook to add your WooCommerce products. We are going to use the WP activated_plugin() to make sure that we only add the products once when we activate the plugin. This is important because if you deactivate and activate the plugin, the product will be duplicated. However, this is a dev-mode plugin and you can improve it in many ways by adding your custom logic.
If you’re not sure how hooks work, check out our guide on how to use hooks. And if you want to know more about checkout hooks, have a look at our tutorial to customize the WooCommerce checkout page with hooks.
So now, let’s add the magic hook to the file and some more code to the quadlayers_add_product() function:
class QuadLayers_class{public function __construct(){add_action('activated_plugin',array($this,'quadlayers_add_product'));}public function quadlayers_add_product(){$post_id = wp_insert_post( array('post_title' => 'Great product!','post_content' => 'Hey, this is our new product','post_status' => 'publish','post_type' => "product",) );wp_set_object_terms( $post_id, 'simple', 'product_type' );}}
That’s it! Activate the plugin or reload the page if it wasn’t activated and you’ll find a new product on the product listing page.
How to add multiple products programmatically in WooCommerce
If you have a look at the code, you will see that products are stored as arrays. To create multiple products programmatically, you can build a multi-dimensional array that contains as many products as you want. This way, you can add thousands of products at one time, matching the data format you have with the correct syntax of PHP arrays.
You can loop through the array with a for() statement to add as many products as there are in the array. For example, the following script will add three different products:
public function quadlayers_add_product(){ $product_array=array( array( 'post_title' => 'This is the first product', 'post_content' => 'Description of the first product', 'post_status' => 'draft', 'post_type' => "product",), array( 'post_title' => 'Second product title', 'post_content' => 'Description of second product', 'post_status' => 'draft', 'post_type' => "product"), array( 'post_title' => 'Title of third product', 'post_content' => 'Description of the third product', 'post_status' => 'draft', 'post_type' => "product") );for ($i=0; $i < count($product_array); $i++) { $post_id = wp_insert_post( $product_array[$i] ); wp_set_object_terms( $post_id, 'simple', 'product_type' ); }
With that code, you are only adding a title, description, and status to each product. But what if you need to add some more information? To do that, you can use the update_post_meta() function from the WordPress database API. So let’s take it a step further and add more information to the products.
Here, we’ll include product type, price, featured, stock, stock status, and SKU:
public function quadlayers_add_product(){ $product_1=array( 'post_title' => 'This is the first product!', 'post_content' => 'Description of the first product', 'post_status' => 'draft', 'post_type' => "product",);$post_id = wp_insert_post( $product_1 ); wp_set_object_terms( $post_id, 'simple', 'product_type' ); update_post_meta( $post_id, '_price', '156' ); update_post_meta( $post_id, '_featured', 'yes' ); update_post_meta( $post_id, '_stock', '23' ); update_post_meta( $post_id, '_stock_status', 'instock'); update_post_meta( $post_id, '_sku', 'jk01' ); }
Keep in mind that the SKU should be unique. If you try to add a product with the same SKU twice, you’ll get an error. There are more meta fields you can use. Check the WooCommerce documentation to find the full list.
How to create products with featured images programmatically in WooCommerce
To add featured images to the products, first, you need to upload the image to the media library. If that’s not possible, there are some other ways to add images to the media library programmatically.
For example, you can upload images in bulk to the library and get their ids in your function. Featured image is one of the meta values available in the insert_post() function, so you can add featured images with the following code:
update_post_meta( $post_id, '_thumbnail_id', '13' ); Where 13 is the id of the image uploaded to the media library.
You can also add your product ids to the main array to upload several products as follows:
$product_array=array(
array(
'post_title' => 'This is the first product',
'post_content' => 'Description of the first product',
'post_status' => 'draft',
'post_type' => "product",
'_thumbnail_id' =>13),
array(
'post_title' => 'Second product title',
'post_content' => 'Description of second product',
'post_status' => 'draft',
'post_type' => "product",
'_thumbnail_id' =>22),
array(
'post_title' => 'Title of third product',
'post_content' => 'Description of the third product',
'post_status' => 'draft',
'post_type' => "product",
'_thumbnail_id' =>11)
);
To locate the image ids, check the URL in your browser when you open them. You can also check the image ids in the media library dashboard. Finally, to upload images in bulk, you can also retrieve all the image IDs from the wp_postmeta table of the database querying _thumbnail_id meta name, and integrate them with your function.
Add variable products programmatically
To create variable products programmatically in WooCommerce, you just need to change the second parameter of the wp_set_object_terms() function:
wp_set_object_terms( $post_id, 'variable', 'product_type' );Similarly, you can define a product as grouped or external.
Add more information to the products programmatically
Once you’re familiar with update_post_meta() you will be able to easily add WooCommerce products programmatically with all their information. These are some more of the available meta values to add or edit products:
update_post_meta( $post_id, '_visibility', 'visible' );
update_post_meta( $post_id, '_stock_status', 'instock');
update_post_meta( $post_id, 'total_sales', '0' );
update_post_meta( $post_id, '_downloadable', 'no' );
update_post_meta( $post_id, '_virtual', 'yes' );
update_post_meta( $post_id, '_regular_price', '' );
update_post_meta( $post_id, '_sale_price', '' );
update_post_meta( $post_id, '_purchase_note', '' );
update_post_meta( $post_id, '_featured', 'no' );
update_post_meta( $post_id, '_weight', '' );
update_post_meta( $post_id, '_length', '' );
update_post_meta( $post_id, '_width', '' );
update_post_meta( $post_id, '_height', '' );
update_post_meta( $post_id, '_sku', '' );
update_post_meta( $post_id, '_product_attributes', array() );
update_post_meta( $post_id, '_sale_price_dates_from', '' );
update_post_meta( $post_id, '_sale_price_dates_to', '' );
update_post_meta( $post_id, '_price', '' );
update_post_meta( $post_id, '_sold_individually', '' );
update_post_meta( $post_id, '_manage_stock', 'no' );
update_post_meta( $post_id, '_backorders', 'no' );
And that’s the end of the first section. By now, you should be able to add products programmatically to your WooCommerce store. However, if you don’t feel comfortable with that method, have a look at the following section where you’ll learn to add products from the admin panel.
2. How to add products from the admin panel in WooCommerce
Adding WooCommerce products programmatically to your store is the preferred way for most developers. But don’t worry if that’s not your case. Here, we’ll show you how to add products from the admin panel. The WooCommerce admin panel offers several ways to upload products. Each method has pros and cons and will be more or less comfortable depending on the situation. Regardless of which one you use, all of them will help you add products to your online store.
Adding Products from the WooCommerce dashboard
The fastest way to add a product if you are on the website backend dashboard is from the Products tab. When you hover the mouse over Products, you will see some options that show up. Click Add new to enter the product editor page. 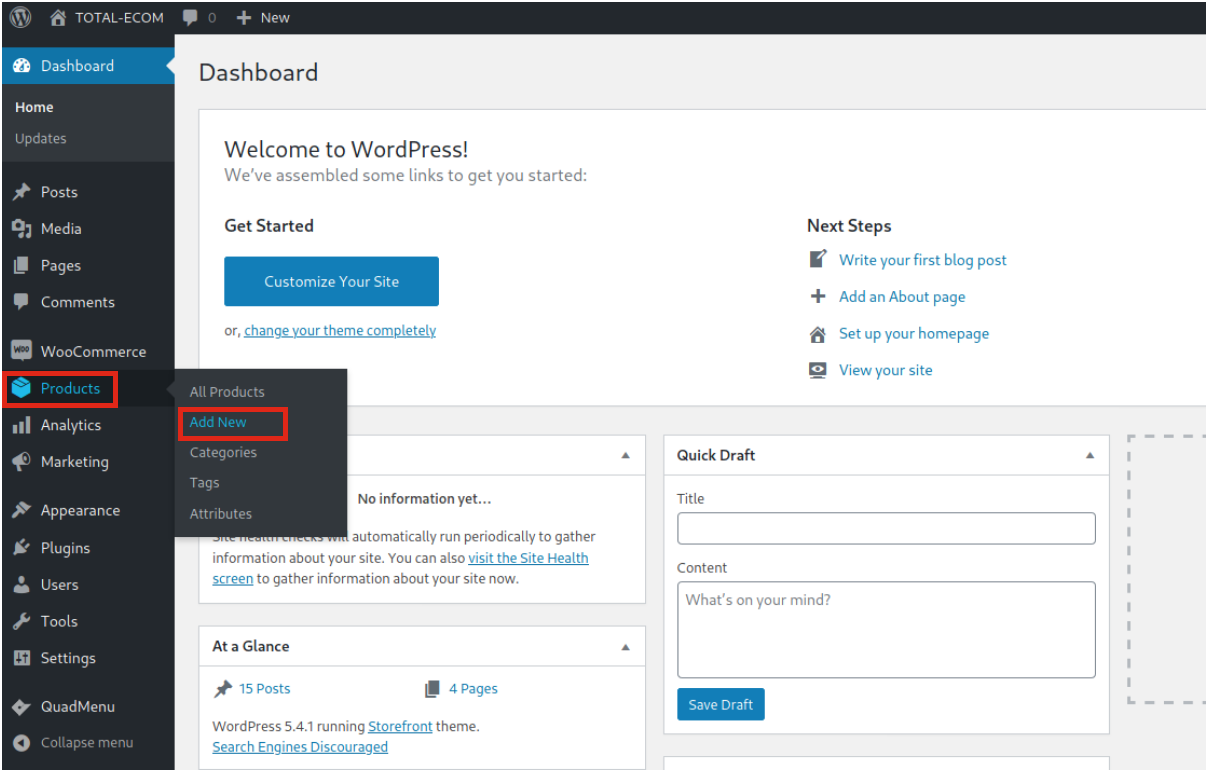
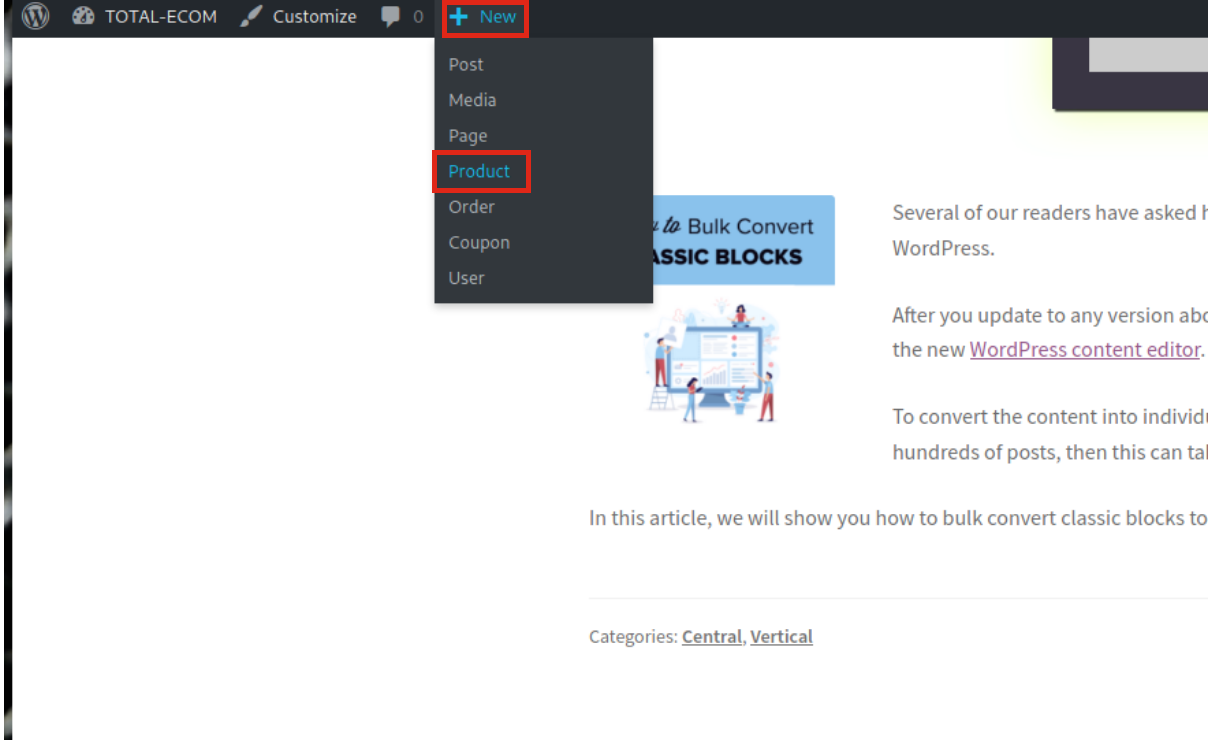
On the front end, you can find another shortcut for publishing products with one click. When you’re logged in, you’ll see a + New button in the top toolbar. Hover your mouse and you’ll see that it displays a dropdown where you can select Products. Similarly, you can use the same button to create posts, pages, coupons, or any type of content.
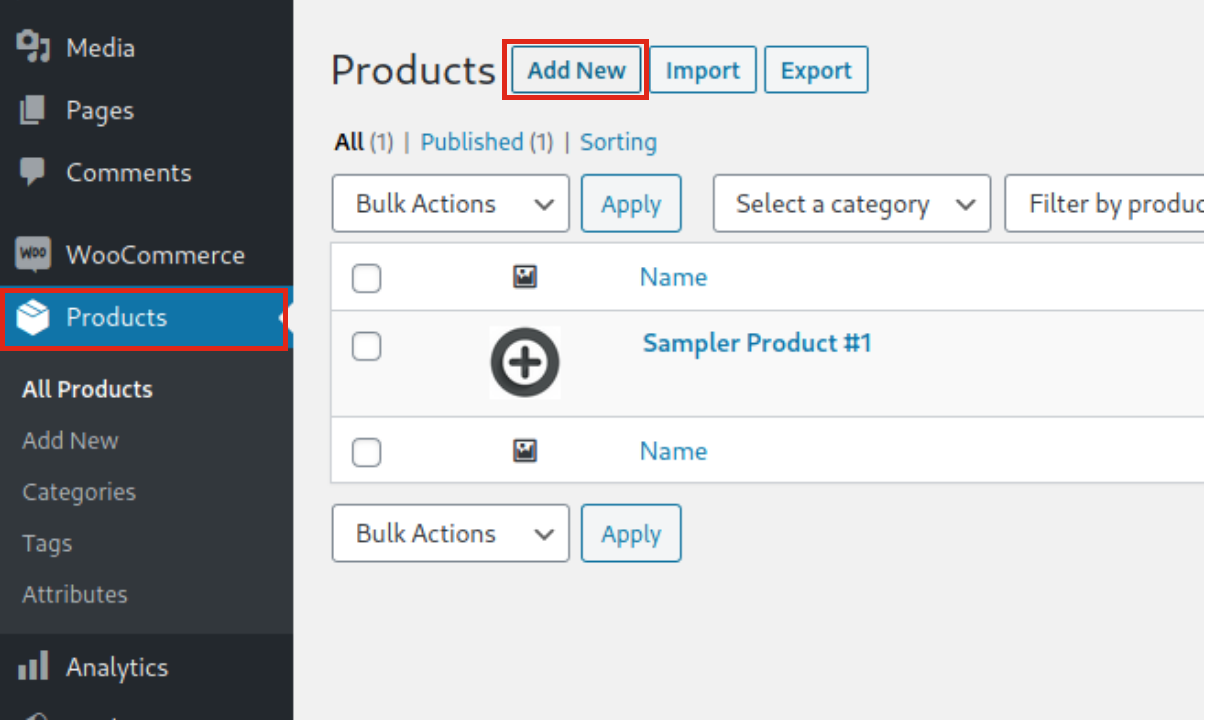
 You can also add products from the Product list page by clicking the Add New button.
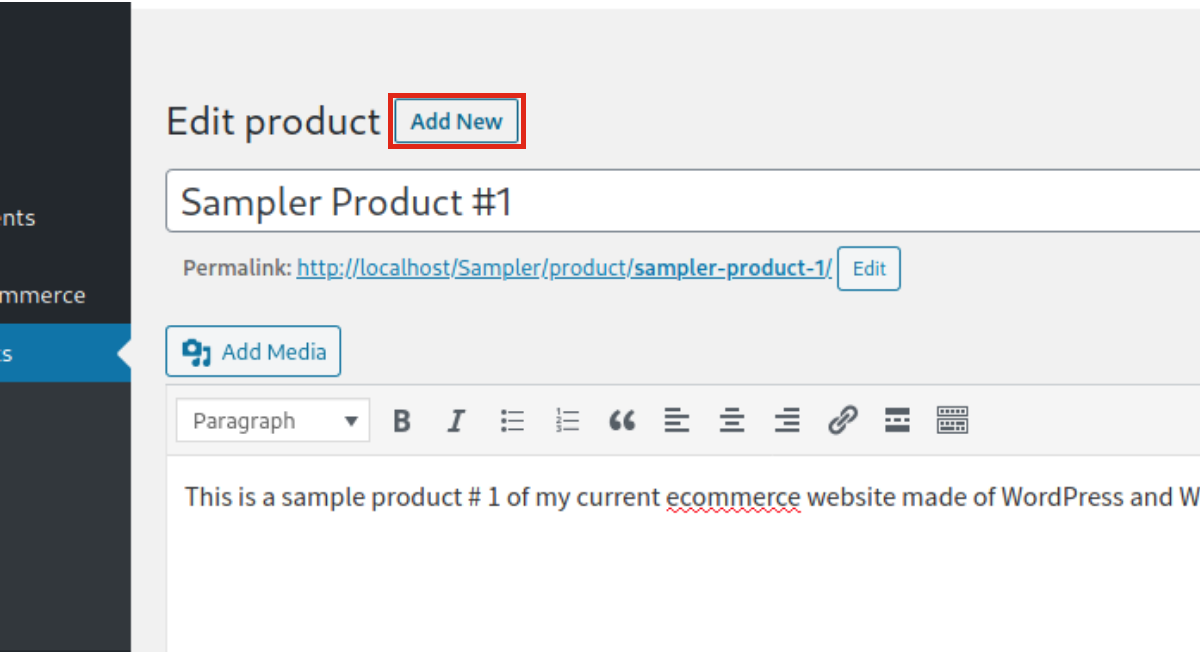
 And you can also do the same when editing an existing product from the editor page.
 These are four different ways to do the same so when you click any of these “add new” buttons the final result is the same. It redirects you to the product editor page.
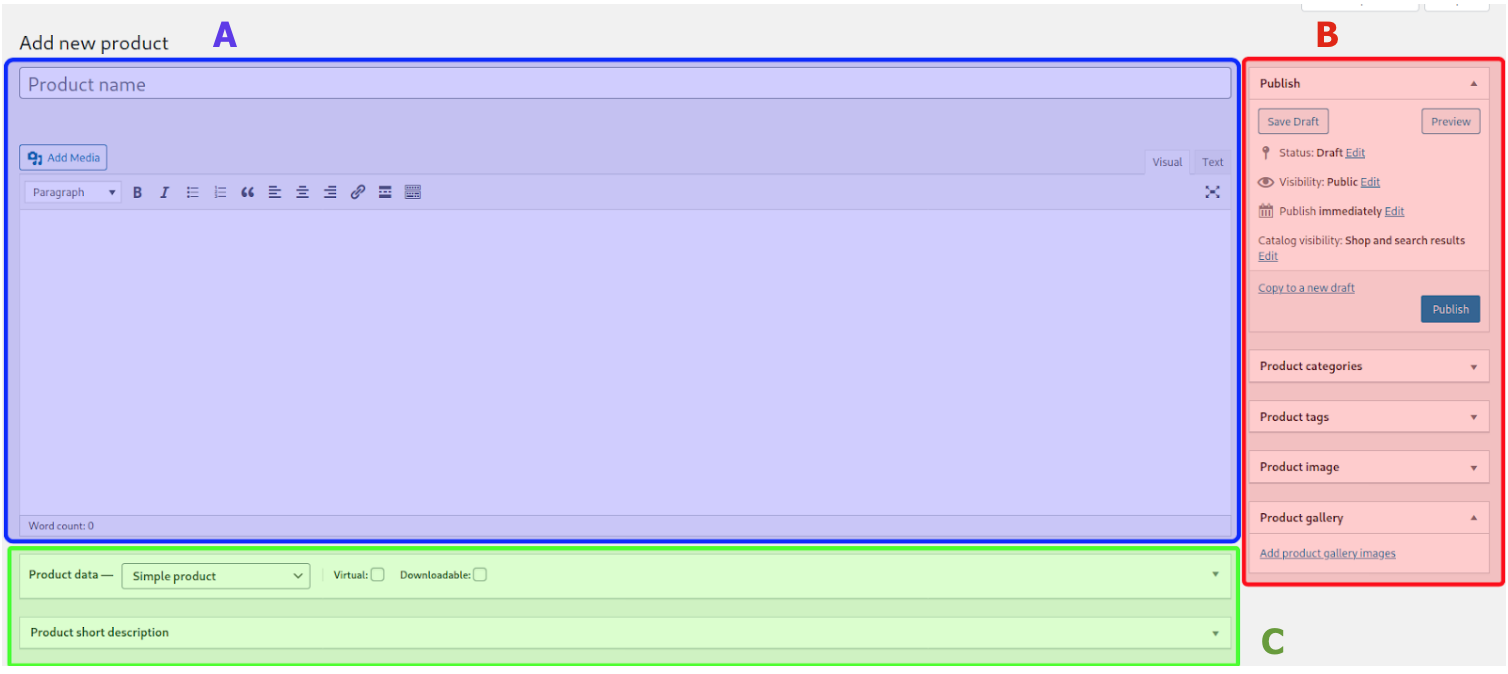
The Product Editor Page
Now let’s have a look at the product editor page, the screen you will see when you create new products or edit an existing one. The product editor has three sections:
- A) Content
- B) Sidebar
- C) Meta Boxes
 Let’s take a closer look at each of them.
A) Content
The product name is the title of the product and will be used for the slug in the URL. Below the title, you will see the main editor box where you can add a description of the product, include images, multimedia content such as videos or polls, links, banners, and more. Between the title and the product editor box, there’s a toolbar with the same elements you find in the posts.
B) Sidebar
Here, some tabs display important information about the product. The first tab allows you to set status, visibility, and publish fields, which are the same settings you can find in posts or pages. One important option here is Catalog Visibility. There, you can specify in which shop pages the product will be listed on and you can also mark a product as featured. Finally, you can add taxonomies for the product (categories, tags, or any other custom taxonomy), a featured image, and a gallery.
C) Meta Boxes
Below the content editor, you can find the meta boxes. You will see the one that comes with WooCommerce by default but there can be more depending on your website configuration, plugins, and themes installed since many of them add meta boxes. Similar to sidebar options, you can open or close each tab-meta box. This is quite useful when you are dealing with many meta boxes.
As we mentioned, there can be many meta boxes but here we’ll describe the main ones that come by default with WooCommerce: Product Data Meta Box and Short Description Meta Box.
Product Data Meta Box
The Product Data Meta Box has several sections. Let’s have a look at each of them: 
General Tab
In the general tab, which is the default tab of this meta box, you must enter relevant information about the product. First, choose the type of product: simple, variable, grouped, or external, and if it’s virtual or downloadable.  Then, set a price and lower price if you are offering a discount.
Inventory
Additionally, the inventory section will help you manage your stock. You can set stock availability and other settings such as allowing single purchases, backorders, or low stock alerts.
Shipping
You can store more information about the product in the Shipping section. This section is important for physical products as you can enter data about the dimensions and weight. This information will be used in some of the product pages and backend.
Attributes
In this section, you can set attributes for your products such as colors, sizes, and so on. These will be used for variable products or as filters on your site.
Advanced
In the Advanced tab, you can add a note to your customers after they purchase a product, set a menu position for your product if you use a custom order, and enable reviews.
Short Description Meta Box
This default meta box has quite a self-explanatory name. The short description will be used in some of the WooCommerce pages, orders, and product listings. Remember that many plugins and themes display their meta boxes too so you may have more meta boxes here besides the ones that WooCommerce includes by default.
How to add related products in WooCommerce from the dashboard
Now, let’s see how to link products so that they’re displayed with related products on some WooCommerce pages.
Linked Products
The Linked Products section allows you to promote products to your shoppers and increase your sales. There are two ways to set related products: up-sells and cross-sells. You can find both settings in the product data meta box > Linked products tab. 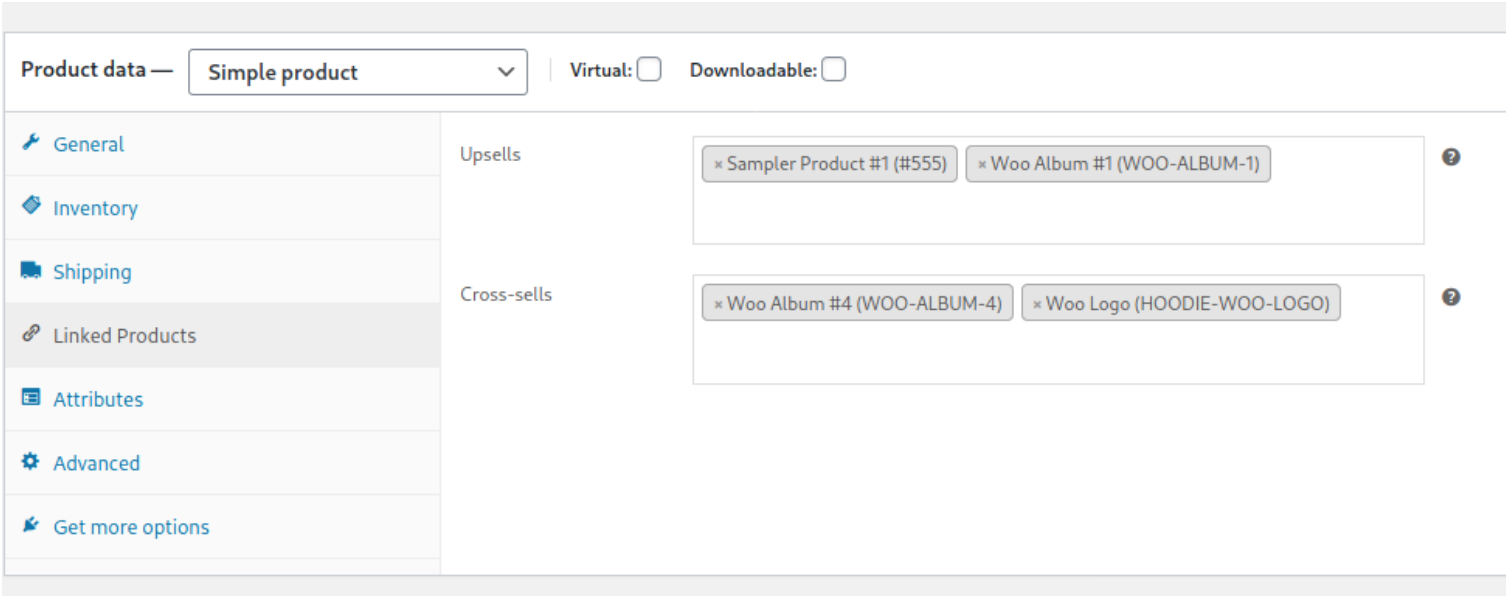
- Up-sells: These are related products displayed on the products page. For example, if you’re renting a car, they may offer you premium insurance or an upgrade to a more expensive car.
- Cross-sells: They’re products related to the cart content. For example, if there’s a tent in the cart, you may want to display a sleeping bag or a torch.
These two functionalities are pretty easy to use. Just enter the name of the products you want to link using the search box for each setting. 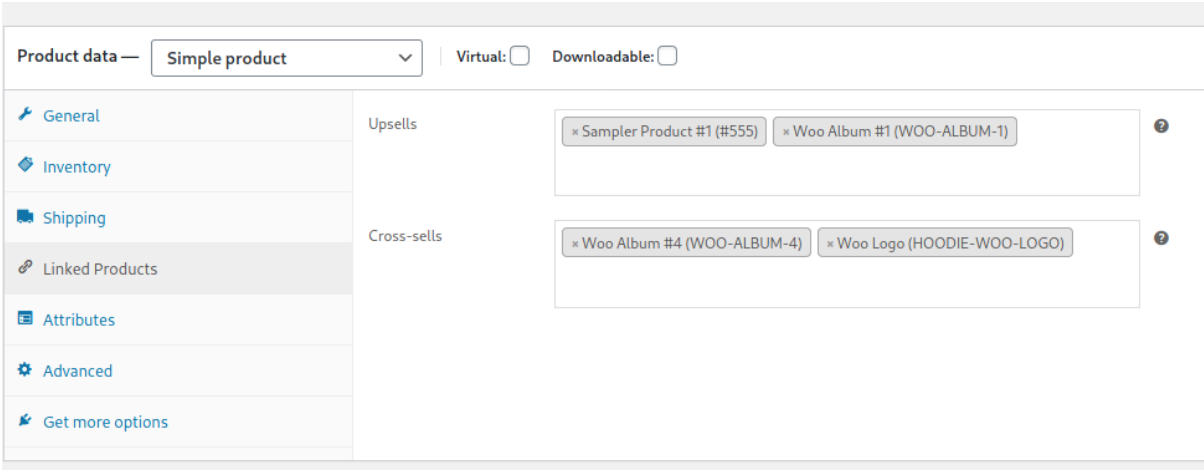
If instead of adding related products you want to hide them, have a look at our guide to remove related products in WooCommerce.
How to add products in bulk from the WooCommerce admin panel
So far, you’ve learned how to add a product in WooCommerce with the product editor. Even though the process is pretty straightforward, it can be time-consuming for big stores with a large number of products. The solution for that is to add the products in bulk. To do this, you can use a plugin or use the WooCommerce pre-built feature to import products in bulk.
Some tools enhance the bulk upload and edit feature but most of them are paid. If you want to give them a go, we recommend the official WooCommerce extension.
However, the default import function in WooCommerce works great with CSV files and will allow you to add products in bulk easily and effectively. To start with the process, first, you need a .csv file with a list of the products you want to import. This file needs to have a certain format so download the sample .csv file from the WP dashboard.
1) Export sample CSV file
So the first thing you need to do is go to the Products page and click the Export button at top of the page. A pop-up box will appear. 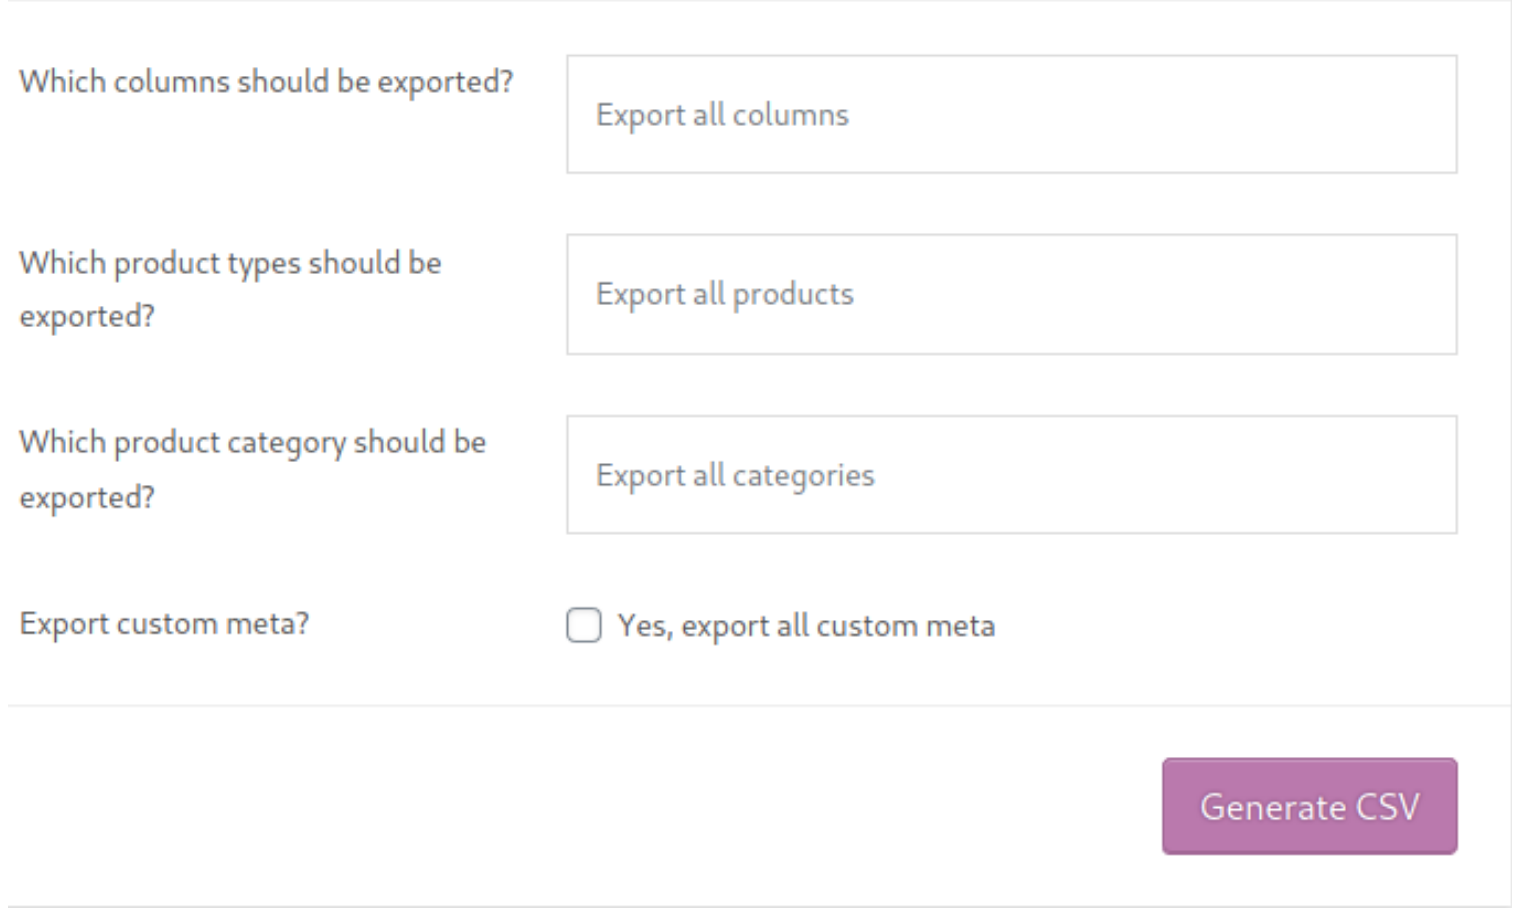 Select which columns, product types, and categories you want to export, decide whether you want to export metadata attached to products or not (i.e. information related to theme or plugin), and then press Generate CSV. After that, download the file and open it with your favorite document editor for .csv files. You will see how products are stored in this file. Have a look at it because your file will have to follow the same structure.
Now that you have a sample file, create a new CSV document, or edit the existing one matching with the required format.
For a more detailed guide on how to export products in WooCommerce, check out this tutorial.
2) Import CSV file
Once you have your CSV file ready with all your products, you can upload it from the WooCommerce dashboard > Product, using the Import option. Double-check the document to make sure that there are no errors before uploading the file. When you’re ready, click the Import button and you’ll see this screen. 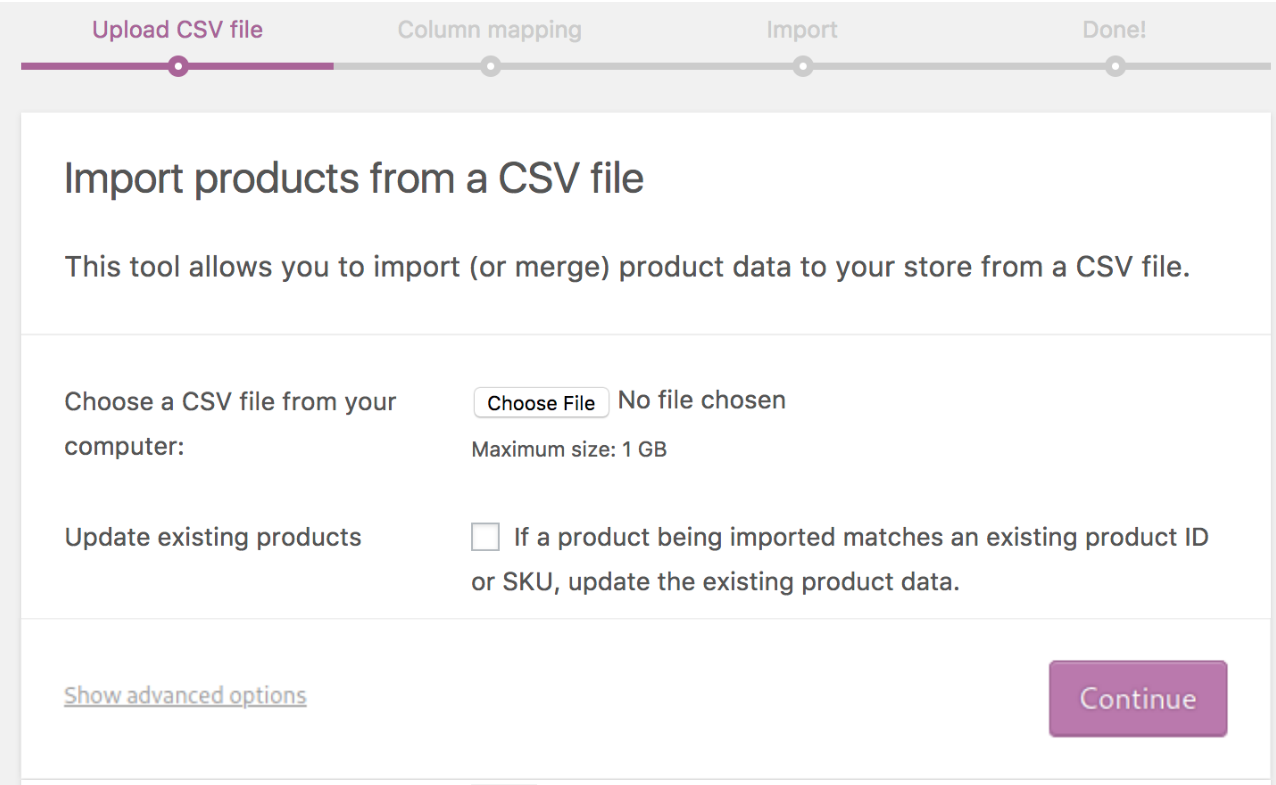 Click Choose file, browse your .csv file, and then hit Continue. You’ll go to the next form, where you can select the information you want to import. Then it’ll start importing the products. The process usually takes a few minutes but it depends on the number of items in the file.
For more information on how to import products, have a look at this step-by-step guide.
3) Edit products in bulk
Now that you’ve uploaded all your products, you may want to edit them. You could do this editing one by one but you can also do it in bulk. As mentioned before, several paid plugins offer bulk edit features. Most of them work well but they’re also expensive. But don’t worry. If you don’t want to spend any money, we have a free solution for you. You can use the WooCommerce default import/export feature to make bulk edit to your products. Here’s how to do it.
A) Bulk edit in CSV file
One option is to make your bulk modifications directly on your CSV file and then upload it again to WooCommerce. All the changes in the CSV file will be automatically reflected in the WooCommerce products.
To do that, simply repeat the steps we descrIbed to import the CSV file but on the screen to select the file you want to import, check the Update existing products checkbox. This will update only the products that match by ID or SKU.
B) Bulk edit in WC products page
You can also edit products in bulk from the products page in the WooCommerce dashboard. Below Add new, there are buttons to import and export products that you can use to filter the products list. You can filter by selecting a category, product type, or stock status to start editing.
If you don’t have many products, you can also check each product manually. So simply select all the products in the new filtered list, switch Bulk actions to Edit from the dropdown, and then click Apply. On the next screen, you will be able to edit taxonomies, price, status, enable or disable comments, visibility, and more information about all the listed products in one click. 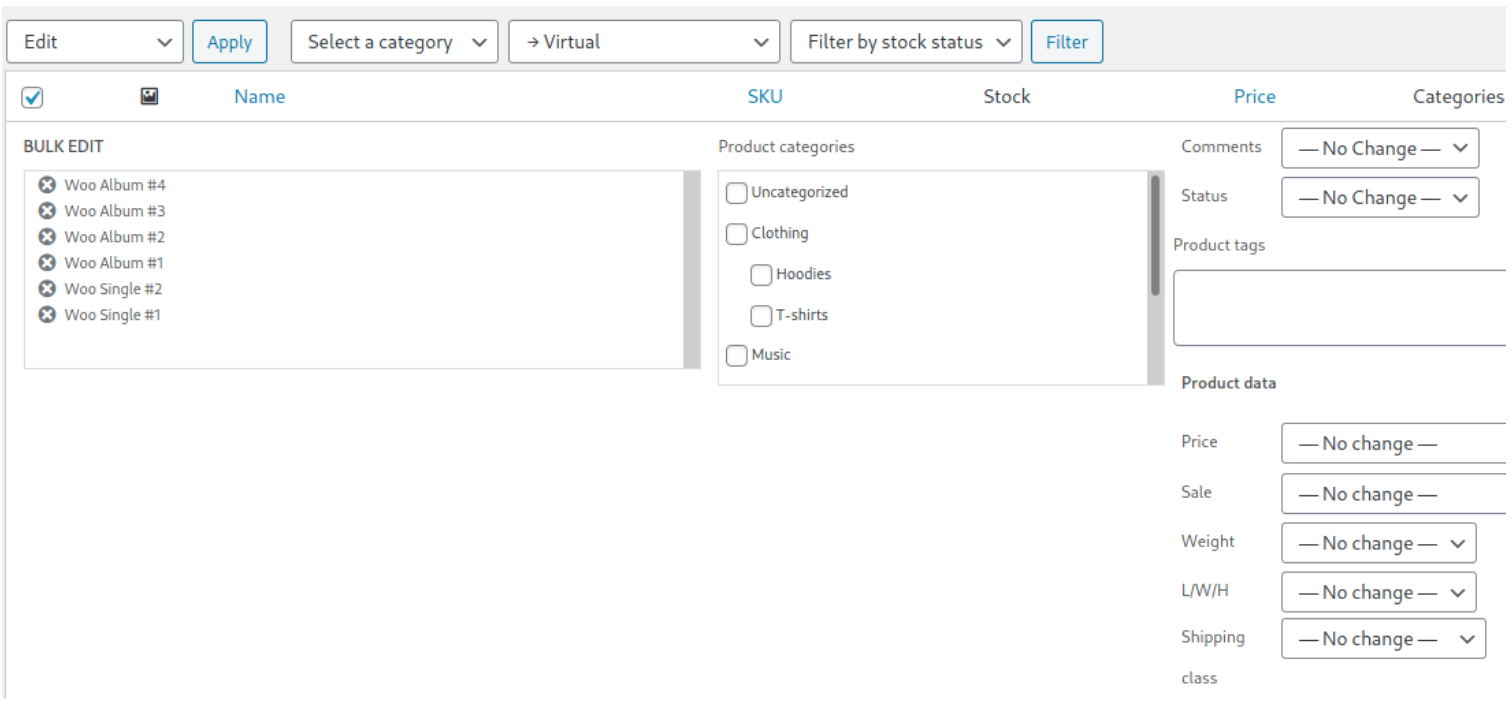 Additionally, you can remove specific posts from the bulk editor by clicking the X icon next to the titles. Once you make all the changes, don’t forget to hit Save.
For more information on how to import products in WooCommerce, have a look at our full guide.
Conclusion
All in all, you have learned more about the different types of products and the different methods to add products in WooCommerce both programmatically and from the admin panel.
By now, you should also know how to add and edit products in bulk and how to add related products, very useful for up-selling and cross-selling. If you want to know more about product attributes, you can check out our guide on how to create default product attributes. Additionally, you have learned how to add multiple products at once, variable products, and products with featured images programmatically with a bit of coding.
Once you add all the products to your online store, you need to customize it and optimize it. You’ll also be able to create and set up coupons to increase your sales. Additionally, we recommend you take some measures to prevent spam and fake orders that risk you losing a lot of money. You can also add product filters to help your shoppers find what they’re looking for.
Finally, if you’re looking for more customizations for your shop page, we recommend you have a look at our tutorial to edit the shop page programmatically to find some inspiration. If you have any questions, feel free to leave a comment below and we’ll do our best to help you out.

Hi, thanks for the great tutorial for adding products programmatically unfortunaly I didn’t get this to work at first then I noticed the class QuadLayers_class{ was written with () in the hook code. When deleting this I got it to work.
Thanks for your feedback. You’re right, we’ve just updated the code and deleted the ()
good article
Thanks
Hey. Thanks for the great tutorial. What do I have to do to add custom (global or not) attributes or categories to my products, when importing them programmatically? All available columns are described here (but I don’t know to add them to the Meta-Data). Are they handles as meta-data at all?
https://docs.woocommerce.com/document/product-csv-import-suite-column-header-reference/#section-3
Thanks a lot.
Hi there
I believe you need to create a custom taxonomy at first, so you can use it later when uploading.
Check this link–>> https://developer.wordpress.org/plugins/taxonomies/working-with-custom-taxonomies/
B.Regards
Hi Guys!
Thanks a lot for your work on this.
When I install the plugin all code of quadlayers_add_product.php file is showing on the top my site.
What am I doing wrong?
Thank you for your help.
Regards
Hey caparicio.
You must have some errors in your code.
Maybe something is wrong in the header of the file (the commented part /* */) so WP isn’t recognizing your script as a plugin.
Check step by step if you made some mistake.
Cheers !
I am experiencing the same problem as Caparicio. I followed the instructions step by step (a couple time actually). I tried wrapping the contents of each file in and got a fatal error because “class_quadlayers_add_product.php” could not be found, so I added __ to the class name in the first file and now I don’t get the fatal error but nothing happens. Maybe Caparicio found a solution?
Ok once I wrapped the code in the PHP tags the code runs. I never got the first version that echos ‘this work’ to complete but I moved on and am now able to upload products. Any tips for uploading variations? (not just variable products but the variations of those products). Seems like uploading thousands of products isn’t very useful if you can’t add variations for things like size and color.
Hey Shelly, thanks for passing by.
You will need to extend the code with your own to support variations.
Check this link -> https://stackoverflow.com/questions/47518280/create-programmatically-a-woocommerce-product-variation-with-new-attribute-value/47766413
Hi, Thank for share.
I have a question
How to update _excerpt
I use: update_post_meta( $post_id, ‘_excerpt’, ‘Excerpt demo’ );
Not work.
Hi, I need add default values to Name and File Url in WooCommerce(Downloadable files), what should I do?