
How to Customize WooCommerce Shop Page – The Complete Guide
Looking for different ways to edit your shop page? You’ve come to the right place. In this guide, you will learn different methods to customize your WooCommerce Shop Page step-by-step: manually, using page builders, and plugins.
The shop page is where you display your products so it’s one of the most important pages in your store. That’s why it should have an attractive and user-friendly design.
The shop page is a pre-designed component of your store and doesn’t have a built-in tool to change its look and feel. However, that doesn’t mean you can’t change it at all. In this guide, you will learn how to customize the WooCommerce shop page using three different methods.
What is the WooCommerce Shop Page and Why Should you Customize It?
A shop page, as defined by WooCommerce, is “a placeholder for a post-type archive for products”. Simply put, it’s the page where you display your products so it’s vital for the success of your business. Before going into how you can edit it, let’s have a look at why you should customize the WooCommerce shop page.
Now, imagine you walk into a store to buy something. What determines your satisfaction with the shopping process? One of the most important things is how the products are arranged and how easily you can find what you’re looking for. We live in an interconnected world thanks to the Internet. And, especially in the time of the global pandemic, shopping has shifted from physical to online stores. It is expected that in the next 20 years, around 95% of all purchases will be online.
People shop online because it’s easier and faster (or at least it should be). So how you arrange your products on the WooCommerce shop page and how you display them to your customers can make a big difference. Not only to your conversions and revenue but also to the reputation of your shop.
Benefits of Shop Page customization
All in all, customizing the WooCommerce Shop page has several benefits:
- Stand out from competitors. Most stores have the same shop page, so you’ll stand out if you customize yours
- Improve customer experience
- Increase conversion rates and sales
- SEO improvements. Apart from editing its design, you can edit the shop page and add content that your customers will find on Google
Now that we better understand why you should customize the shop page, let’s focus on the following question. How can you make a good impression on your customers when they reach your shop page? The key is to have an attractive and user-friendly design that makes the buying process easy. That’s easier said than done.
However, in this guide, we’ll show you how to gain full control and edit your WooCommerce shop page.
How to Customize WooCommerce Shop Page
In this section, we’ll show you how to customize the shop page using three different methods:
- Programmatically
- With a page builder
- With plugins
1) Customizing the WooCommerce Shop Page Programmatically
First, let’s see how to customize your WooCommerce shop page without relying on a page builder or a plugin. The greatest advantage of this method is that you won’t add any third-party apps to your site. Even though this shouldn’t take more than a few minutes because we won’t do any difficult coding, it’s better if you have some basic coding skills.
Step 1: Create a child theme
If you haven’t created a child theme for your theme up to this point, it’s high time you had one. We recommend a child theme because if you make changes to your theme and then update it, the new files will replace the old ones and you’ll lose the changes.
However, you can avoid that by customizing your theme from the child theme. You can create a child theme using different methods. You can use a child theme plugin or code it yourself. For more information about both methods, check out our guide on how to create a child theme in WordPress.
Step 2: Create the folder structure in your child theme
Now, we’ll use an FTP client to change the website files. If you don’t have an FTP account, we recommend FileZilla software but you can use any client you like. After creating your child theme, go to your site files and follow this route: /wp-content/themes/your-theme.
Let’s say, you have created a child theme for the Twenty Twenty theme. The folder name should be something like twentytwenty-child-theme. Then, click it and create a folder called WooCommerce. After that, create a file called archive-product.php, which is the shop page template file. You’ve created a WooCommerce shop page in your store but it’s blank so now you have to add some content.
Step 3: Create content for your shop page
Keep in mind that whatever you write in the text editor of the archive-product.php will appear on the shop page, and your customers will see it. Here you can use some coding to work your magic with your shop page. However, if you’re not sure how to do it, go to the next step.
Step 4: Create a shop page template
Instead of creating a WooCommerce shop page from scratch, you can use an existing template and adapt it. For this, go back to the parent theme and look for the single.php or the index.php file. If you see either of the two, copy it and paste it into the WooCommerce folder you have created in Step 2. If you see both files, copy single.php. Then, delete the archive-product.php file and change the name of the file you have just pasted here to archive-product.php.
With this, we’re going to use the post template file as your shop page but it’ll look like a product page. However, this isn’t ideal. You want your WooCommerce shop page to look like a shop page, not a product page. To customize it, we’ll use some shortcodes.
Step 5: Customize the shop page using shortcodes
First, divide products into columns or rows. For example, if you want to display your products in 2 columns of 6 products max, you need to paste the following code into the archive-product.php file:
[products limit="6" columns="2"]
If you’re not sure how to do it, follow these steps:
- Open the archive-product.php file
- Delete the text between <main id=“main” class=“site-main” role=“main”> and </main><!– #main –>. Please note that you should not remove these two lines of code but only what’s between them
- Add this line of code to the space left by what you’ve just deleted:
<?php echo do_shortcode (‘[
products limit="6" columns="2"]’) ?> - Save the changes
- Congratulations! You’ve just built a new WooCommerce shop page!
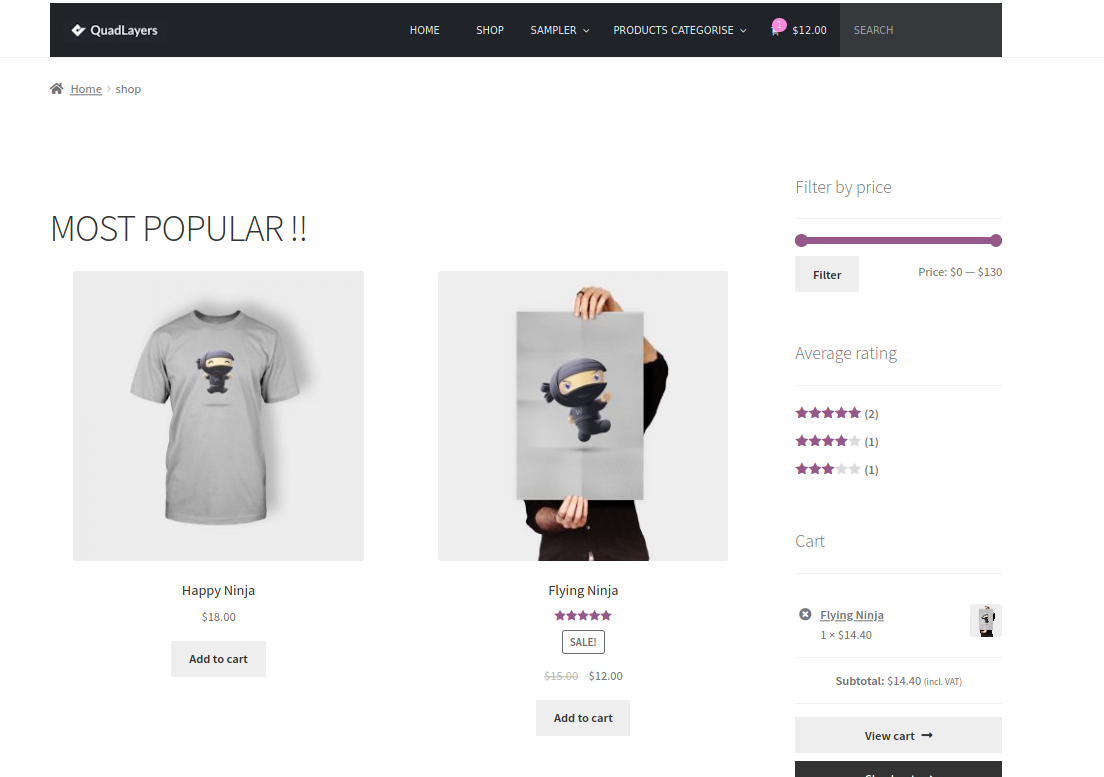
Display Most Popular Products
Let’s have a look at another example of what you can do to programmatically customize your shop page in WooCommerce. Let’s say you want to display your most popular products. For that we’ll use the following shortcode:
[products orderby="popularity"]
Locate the archive-product.php file of your file theme and paste the following code:
do_action('woocommerce_before_shop_loop');
echo '<h1>MOST POPULAR !!</h1>';
do_shortcode('[products orderby="popularity" class="m-popular" columns="2" limit="2"]'); do_action('woocommerce_after_shop_loop');
As you can see, we’ll display two products in a single two-column row (columns=”2″ limit=”2″), but you can adjust these numbers to whatever works best for you.
Similarly, you can display top-rated products, best-selling products, and much more. We recommend you play around and customize the shop page using shortcodes or via coding to give it the perfect look and feel for your business.
For more ideas about how to customize your store with a bit of coding, check out our guide on how to edit the WooCommerce shop page programmatically.
2) Customize the WooCommerce Shop Page with Page Builder
Although the previous method saves you some time, it may be difficult for people without coding skills. That’s why here we’ll show an easier way to get the trick done without having to modify your theme’s files. In this section, you’ll learn how to customize the WooCommerce shop page using your page builder. With page builders, you can change the shop page design, layout, product types, and products to display.
On top of that, you won’t need to write any code or modify the theme files. Regardless of whether you’re using Elementor, Visual Composer, Divi, or any other page builder, this method is compatible with all of them.
NOTE: You won’t need to write any line of code but it’d help if you’re familiar with WooCommerce shortcodes. Our shortcodes guide is a good starting point. Now, let’s have a look at how to customize your shop page using a page builder. To do this, there are two main steps:
- Create a page to display your products with a page builder
- Make that page your shop page
Step 1: Create a listing page with page builder and fill it with content
I assume you’re all familiar with page builder, so here we won’t explain to you how to use it. In this guide, we’ll use Elementor as our page builder. The first thing you need to do is create a new page:
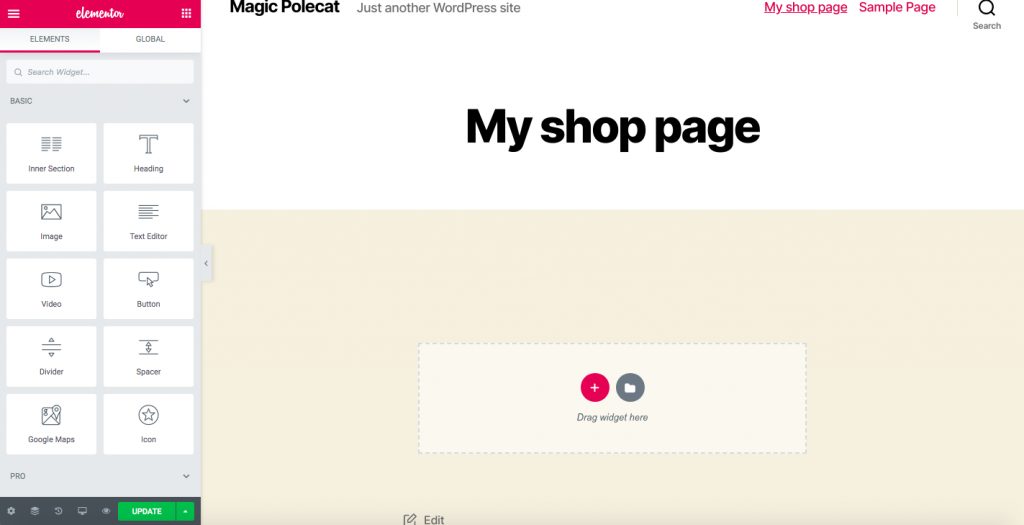
Normally, in your WooCommerce shop, you would display featured, best-selling, and new arrival products. Here, we’ll create a shop page with featured and best-selling products.

Now, let’s add some content to the page. To do this, we’ll use some WooCommerce shortcodes. There are many shortcodes that you can use depending on the categories of products you want to display. These are some of the ones that will come in handy:
-
[
featured_products] -
[
best_selling_products] -
[
top_rated_products] -
[
sale_products] -
[
product_table] -
[
recent_products] -
[
products]
Following our example, we’ll add featured products to our shop page using the shortcode. To do this:
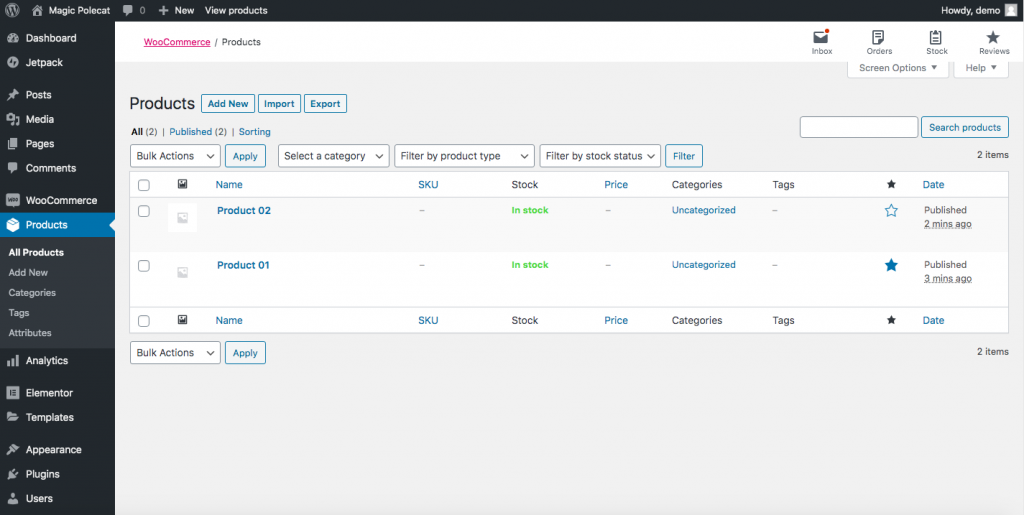
- Go to your WordPress admin dashboard > Products page. Select your featured products by clicking the star icon on the right.
- From the editing page, drag the Text Editor down below the Featured Products.
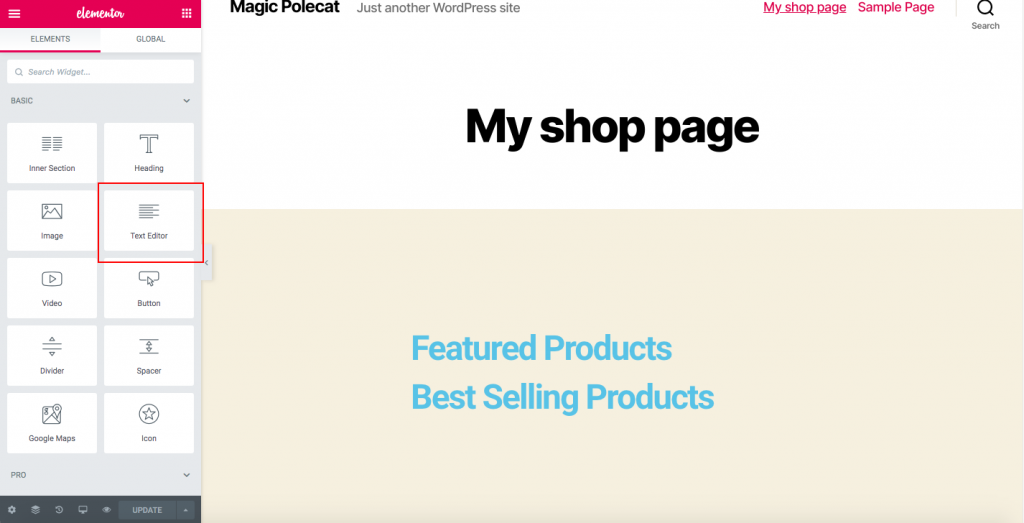
- Copy the
[
featured_products]shortcode and paste it there.
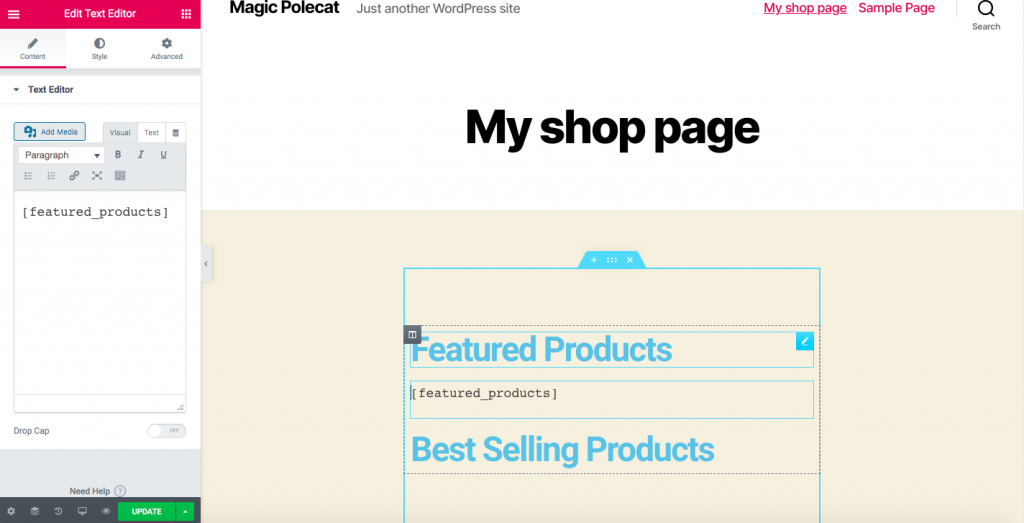
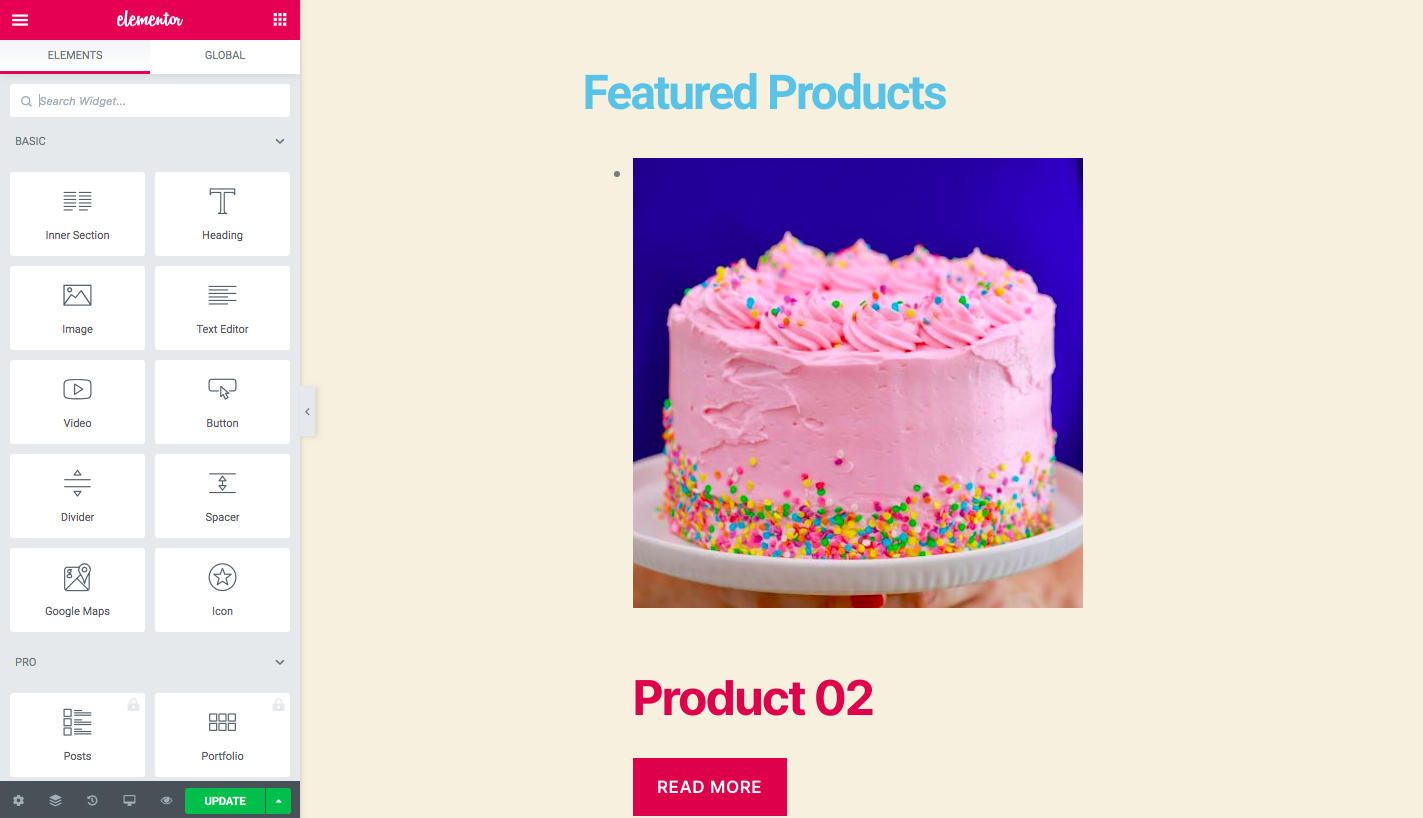
- Click Update, and your products will be displayed, as shown below:
Just like that, for Best Sellers, you can use the
[best_selling_products]
shortcode, for products recently published you’ll use
[recent_products]
and so on. It’s up to you to decide what type of products you want to display on the shop page. Please also note that there are shortcode attributes that you may need to:
- Set the number of columns
- Limit the number of products displayed
For example, if you want to display 2 columns of 6 products max, you’ll use something like this:
[products limit="6" columns="2"]
Shortcodes are very powerful and pretty easy to use. So we recommend you check out our guide about WooCommerce shortcodes to make the most of them.
Step 2: Make the newly created page your Shop Page
After you’ve created the new page, you need to make it your WooCommerce shop page. To do this, we recommend you install a child theme. If you haven’t created one yet, we recommend using any of these child theme plugins that you like. Here, we’ll continue assuming you’ve installed and created a child theme.
- Get the URL of your newly created page
- Go to the WordPress dashboard
- Click Appearance > Theme Editor, and then click I understand if you see a pop-up
- After that, you will be taken to a page where you will be able to access the Theme Function files on the right
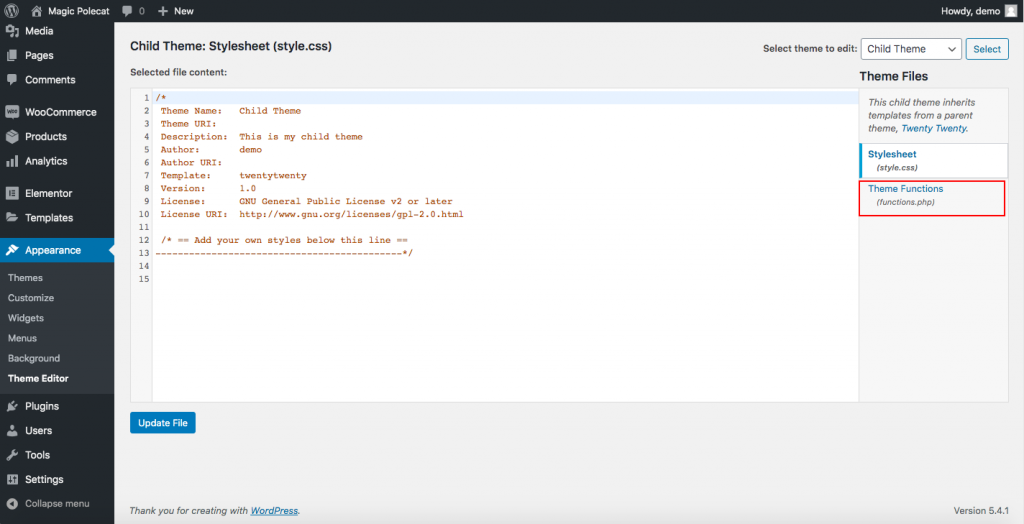
- Click the functions.php file, and paste this code at the end of it:
add_action('template_redirect', 'quadlayers_redirect_woo_pages');function quadlayers_redirect_woo_pages()
{
    if (function_exists('is_shop') && is_shop()) {
        wp_redirect('https://www.quadlayers.com/shop/');
        exit;
    }
}
IMPORTANT: Please copy and paste the code as it is without deleting anything, and remember to replace your URL within the wp_redirect(‘[yourURL]’) Then, update the file and that’s it! You have just created a customized WooCommerce shop page.
3) Customize WooCommerce Shop Page with Plugins
In this section, you’ll learn how to customize the shop page in WooCommerce using plugins. Some of the best ones out there are:
- WooCustomizer
- WooCommerce Product Table by WC Product Table (Free and premium)
- WooCommerce Product Table by Barn2 (Premium)
- JetWooBuilder
In this section, we’ll show you how to edit the shop page using both free and premium tools.
3.1) WooCustomizer
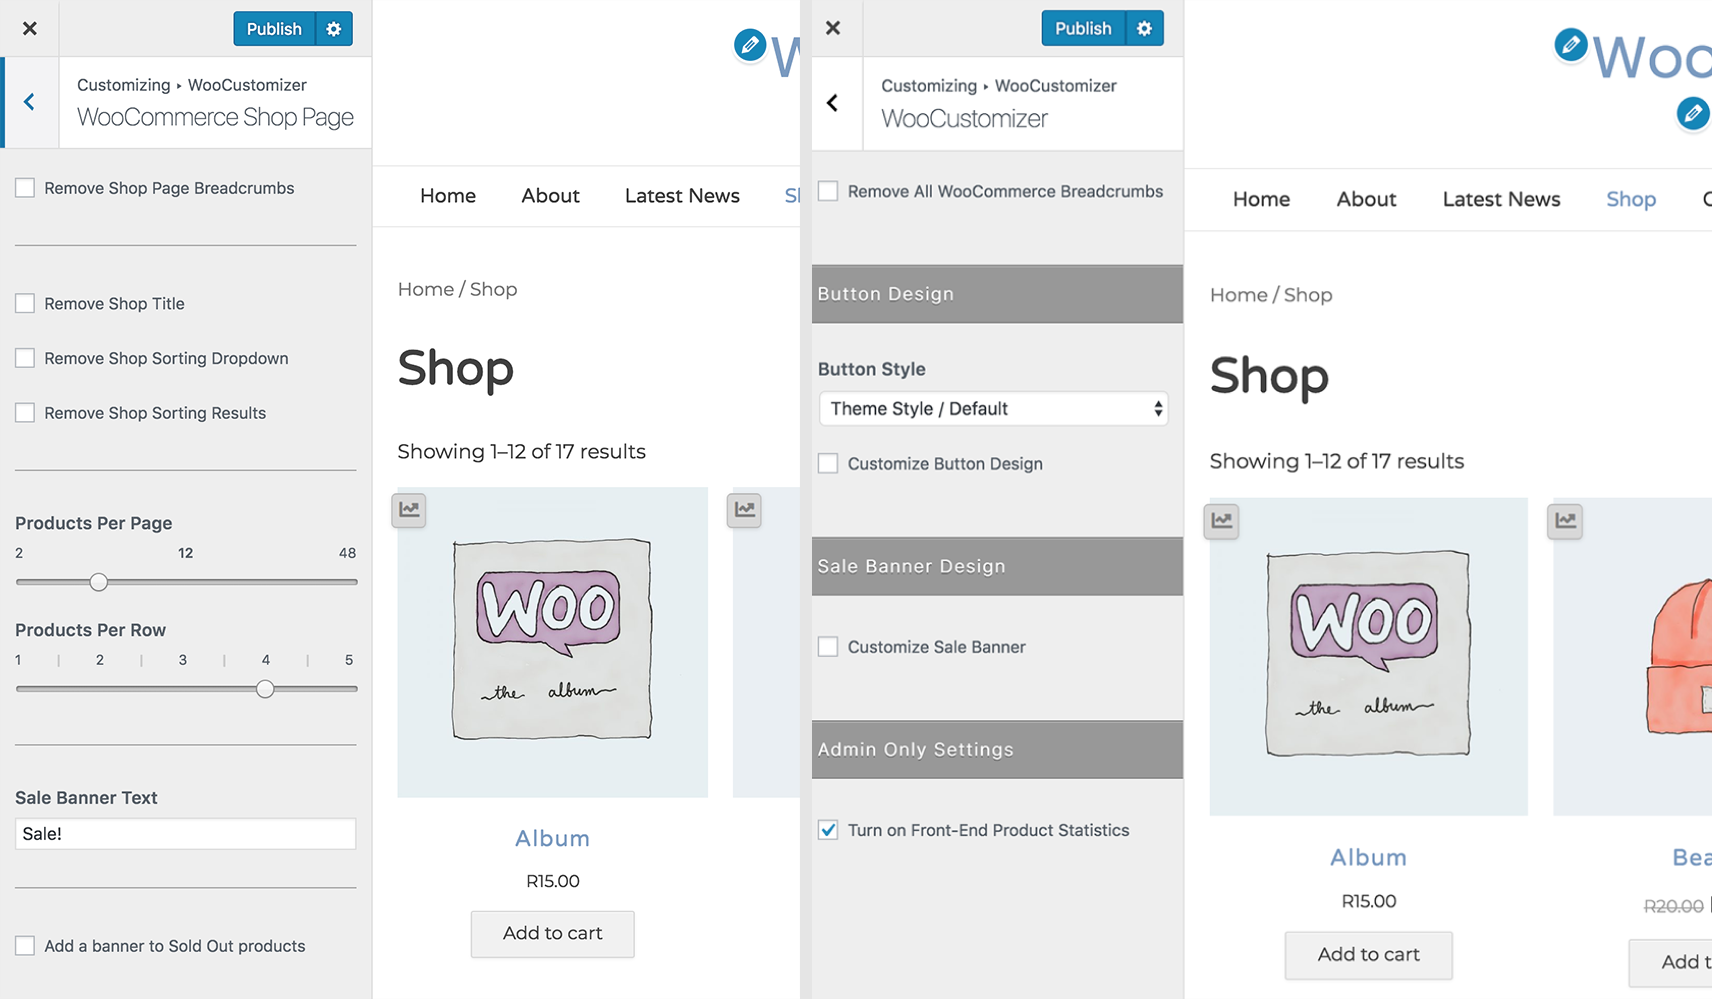
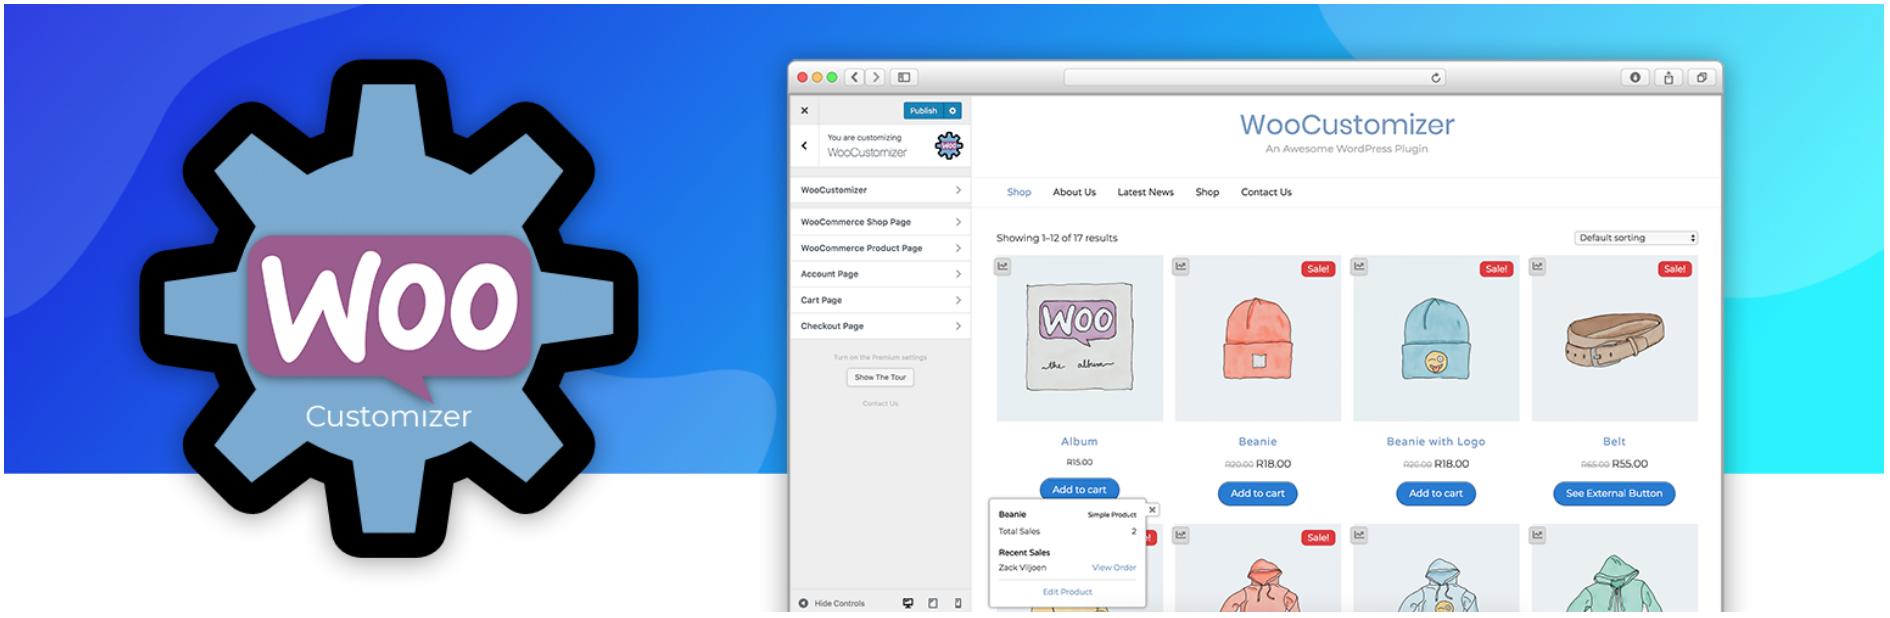 WooCustomizer is an excellent plugin to customize the WooCommerce shop page. It allows you to edit your product, cart, user account, and checkout pages in a few clicks. This plugin has a lot of features and lets you personalize your whole WooCommerce store. Focusing on the shop page customization options, with WooCustomizer you can:
- Edit shop pages with more than 20 settings to choose from
- Remove or edit elements from the WooCommerce Shop, archive, and product pages
- Delete WooCommerce breadcrumbs from shop and product pages
- Remove or edit shop page elements such as the coupons section on the cart page, or the text for the cart coupons drop-down
- Add an AJAX product search bar and a product quick view pop-up on your shop pages
- Customize the number of products per row and page on the shop pages
- Change the number of columns displayed on the shop and archive pages
- Add product quick view to let customers view the products from the shop page
- Edit the shop page and archive sale banners
- And much more
 It’s worth noting that WooCustomizer doesn’t override your WooCommerce pages or templates. It simply adds extra styling options on your theme on the elements you choose to edit. Even though WooCustomizer has lots of features to edit your WooCommerce shop page, it’s also quite easy to use. This tool is versatile and will give you more control over your store without the need to code anything.
Finally, WoooCustomizer is a freemium tool. It has a free version with basic features and 3 premium plans with more advanced functionalities that start at 29 USD per year.
3.2) WooCommerce Product Table Lite by WC Product Table
WooCommerce Product Table (WCPT) is an excellent plugin that allows you to easily create product table layouts. With a rating of 4.9 out of 5 and more than 5,000 active installations, it’s one of the top tools to edit the shop page in WooCommerce.
WC Product Table is a freemium tool. It has a free version with basic functionalities and a pro plan that includes more powerful features and costs 49 USD per year. Here we’ll show you how to use the lite version and then give you some tips for the pro plan.
Step 1: Create a WCPT on any page
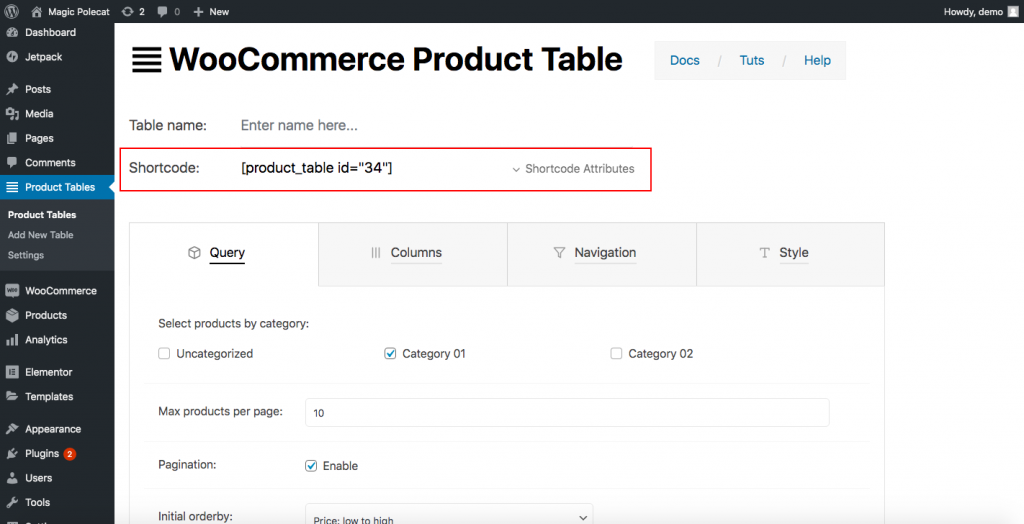
First, you need to download and activate the plugin. After that, you will see Product Tables on your dashboard sidebar. Click it, press Add New Table and you will be taken to a page where you can create a table.
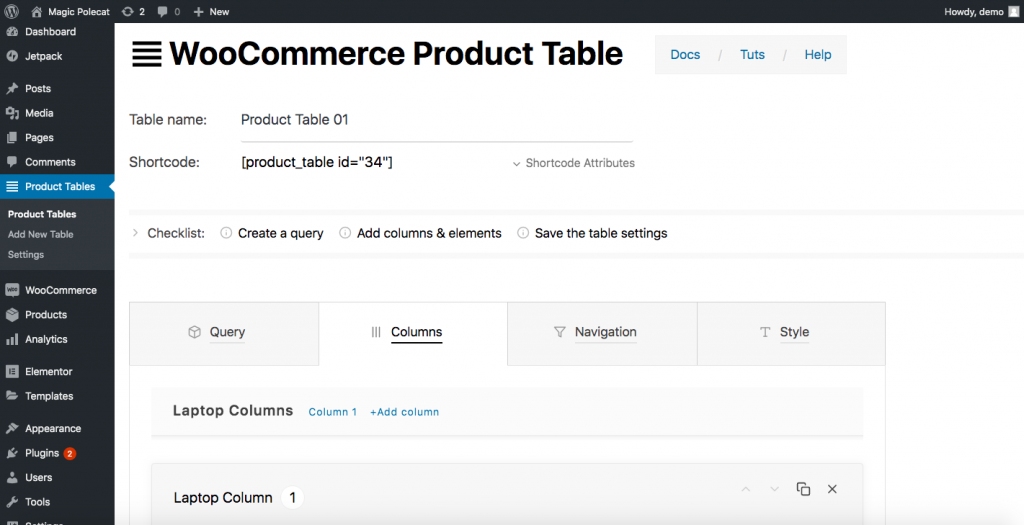
As you can see, you will need to specify:
- Table name: In our example, we called it Product Table 01
- Product Category: Under the Query tab, you will see the categories you have. Select one for your table
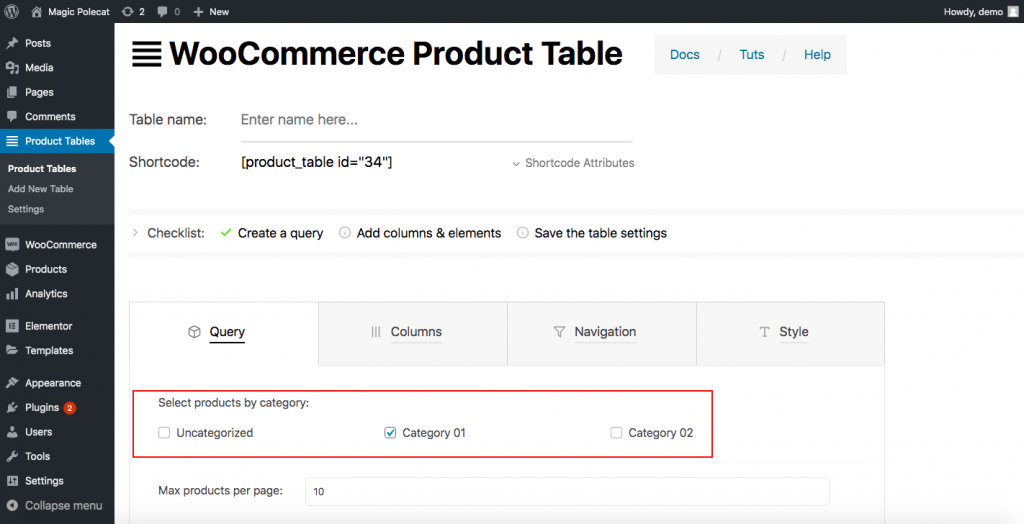
- Column Information: Next, go to the Columns tab. Here you’ll have to draw the table you want. You will have to decide how many columns you want and then design each one. WC Product Table gives you options not only for laptops but also for phone and tablet columns. So you can specify all the options you want for each type of device, including heading, cell template, and design (font, alignment, font color, background color, and more.)
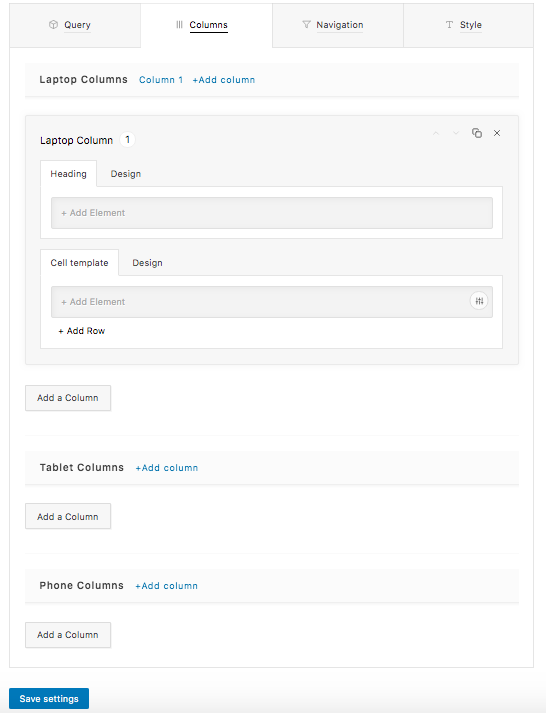
Once you’ve created the columns you want, click Save Settings, and you’re all set.
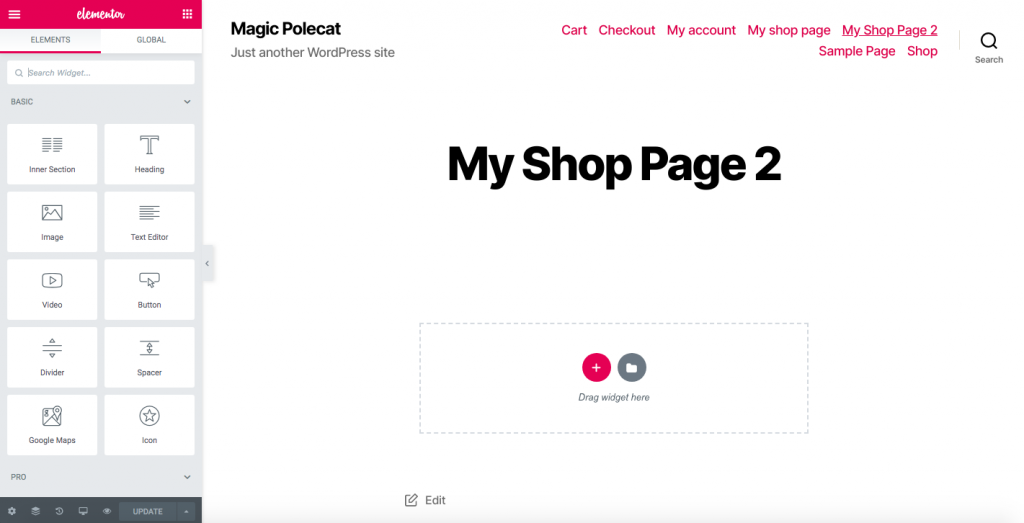
Step 2: Paste your table on a new page
Using a shortcode, you can display the table you created in Step 1 anywhere you want. Simply copy the shortcode:
Now, let’s display the table on a new page using the shortcode. At this point, we can assume that you are familiar with creating a new page. So using a page builder, click Pages > Add New and give it a name. For example, My Shop Page 2. If you are using Elementor, you will see something like this:
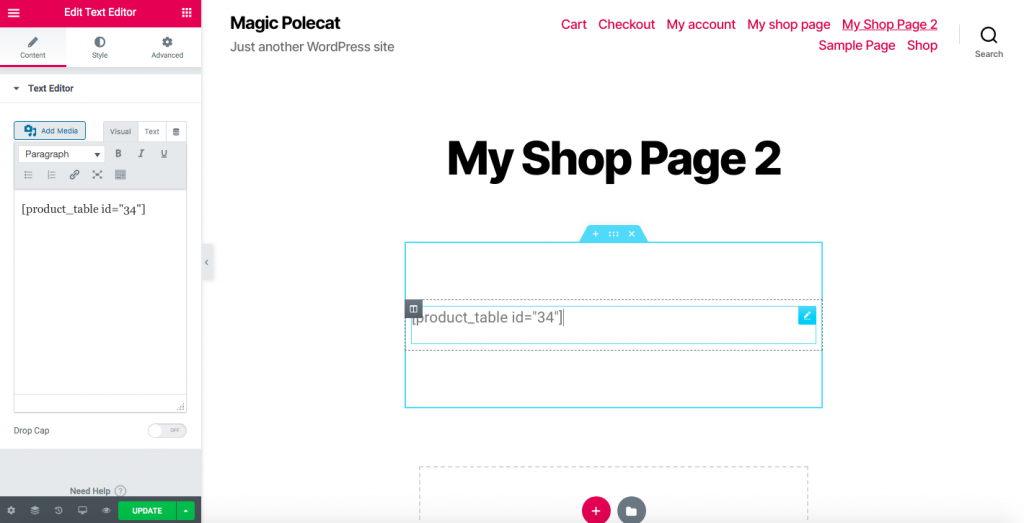
Drag the Text Editor down and paste the shortcode you just copied there.
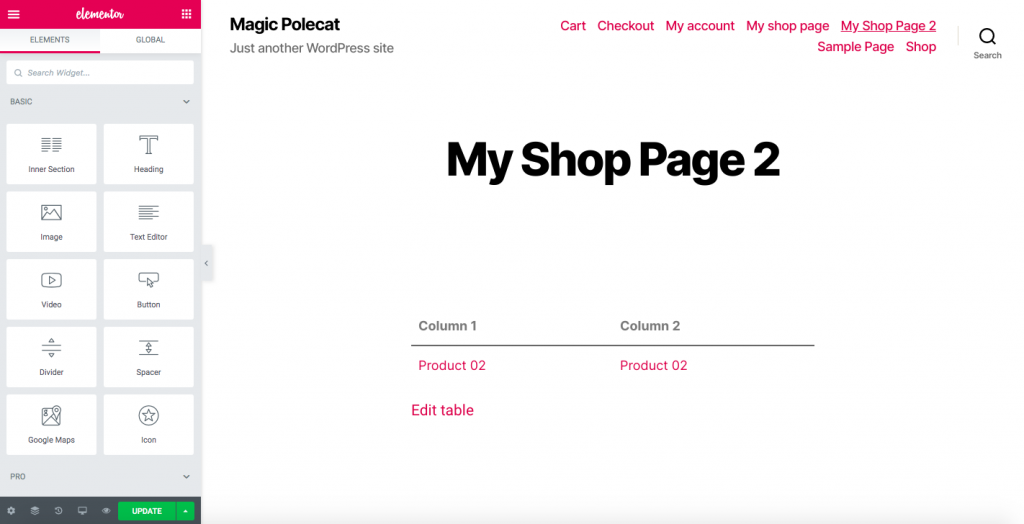
Now you will have a page with a product table style.
Step 3: Redirect customers to your new shop page
To redirect your customers to the new shop page, you’ll need a redirect plugin. This tool will redirect customers from the default WooCommerce shop page to the new page you have created in Step 2. Most of these plugins are single-purpose and very easy to use. Here we’ll use Redirection, one of the most popular redirect plugins, but any similar tool will do the job.

After activating the plugin, go to Tools > Redirection, and you will see this message: 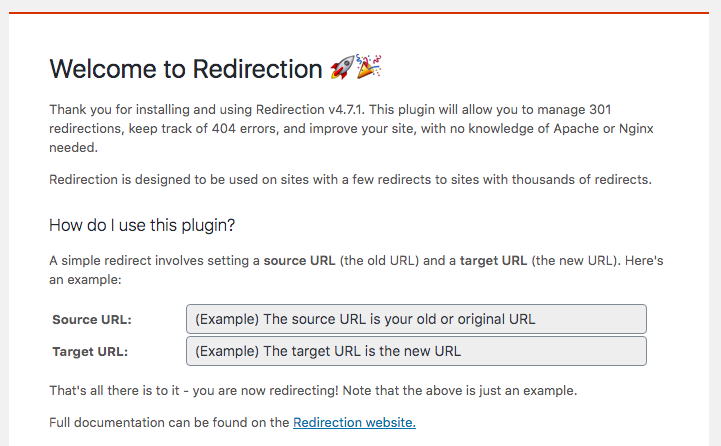
- In the Source URL, paste the link of the default shop page
- In the Target URL, paste the link of your newly built shop page
- Then click Start Setup
- That’s it! That’s how you customize your WooCommerce shop page with a free plugin!
NOTE: Please note that using this method may affect your SEO results as search engines usually don’t favor redirect principles.
PRO-TIP
If you don’t want to affect your SEO, you can use the pro version of the WooCommerce Product Table plugin. Apart from having more advanced functionalities, it also comes with the Archive Override feature.
With this functionality, you can replace the default WooCommerce grids with your product tables not only on the shop page but also on any archive pages such as attribute, category, tag, and search. To activate this feature, go to WP Dashboard > Product Tables > Settings > Archive Override. 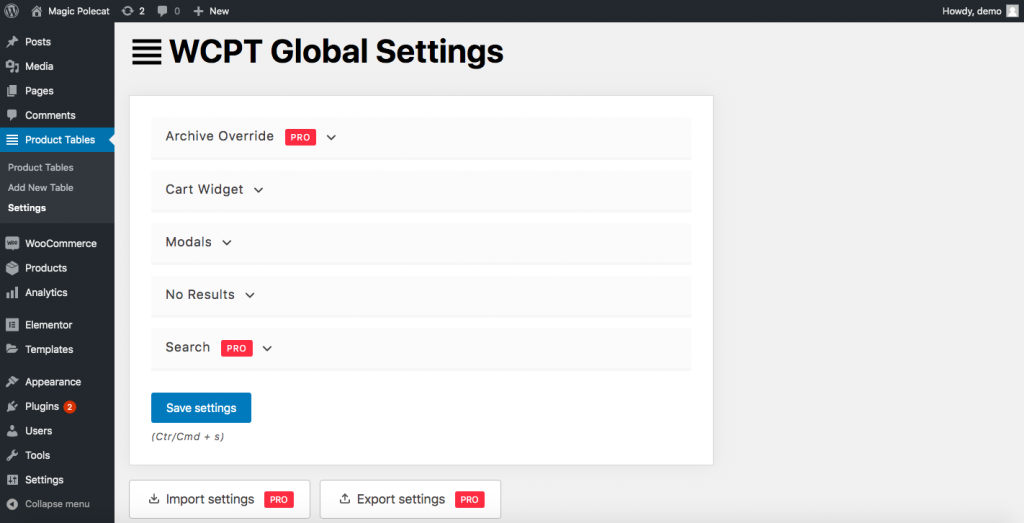
3.3) WooCommerce Product Table by Barn2
Another excellent option to edit the shop page is the WooCommerce Product Table plugin by Barn2. It’s a premium tool that starts at 89 USD per year and is very easy to use. This add-on assists you in listing your products in a table layout and then inserting them on the Shop page. With this method, you will be able to transform the default design of the shop page into a table.
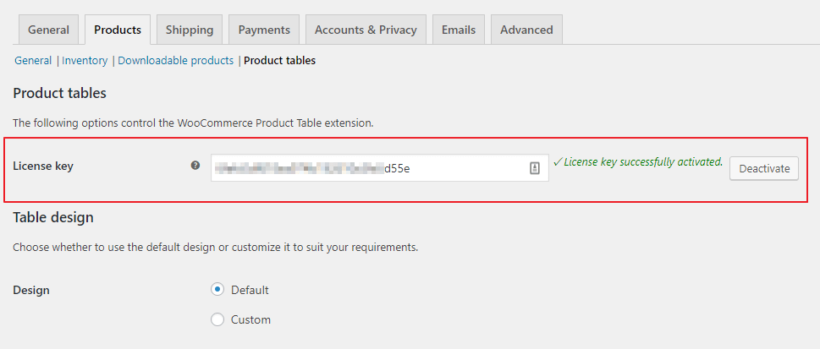
Step 1
First, install and activate the WooCommerce Product Table plugin. Then, go to the WooCommerce tab and click Settings > Products. Under the Products tab, you will see the Product tables section. Here, enter the plugin’s license key that you got upon purchasing the plugin.
Step 2
- First, add product tables to the given shop page and category pages
- Go back to the settings page of the plugin > Table display, and choose the location for your product table layout

- Tick Shop page
- Then, tick Product category archives if you want to display product tables on all the product category pages, product tax archives, and search results
- Save the changes
Step 3
Make changes to the tables as you want. The settings page of the WooCommerce Product Table is very intuitive. Unlike WC Product Table by WC Product Table, the Barn2 tool doesn’t ask you to create and configure each column which makes it easier to use.
3.4) JetWooBuilder
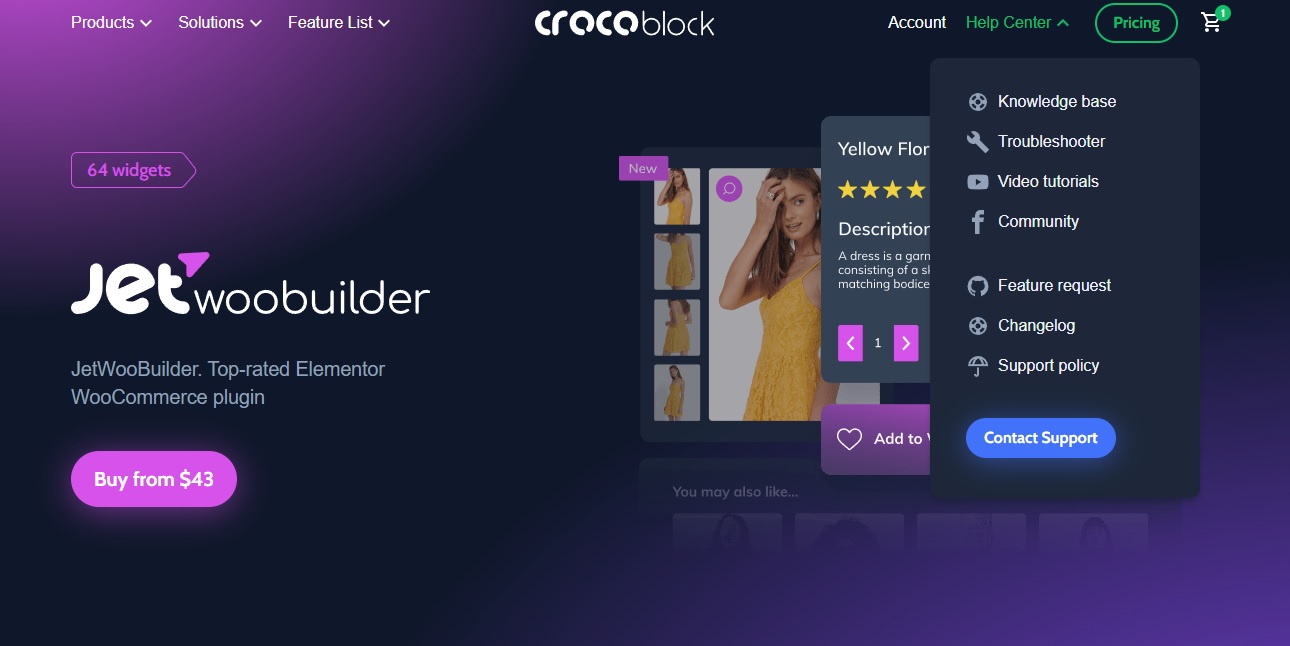
JetWooBuilder is another one of the best plugins if you want to customize shop pages. It is a plugin developed to create a unique shop page template with ease. The plugin even has dedicated widgets, custom templates, layout switchers, shop-specific pages, carousel types, and category cards to help you customize your shop page.
It is a premium plugin and its price starts from 43 USD per year. This includes 1 site license with 1 year of support and updates. You can download it from the official plugin page and get the license key from here.
Let’s look at the brief steps on how to use the plugin to customize the shop page as well.
Step 1: Activate License Key
After you install and activate the plugin, you need to activate the license key by opening Crocoblock > License from your WordPress dashboard.

Then, enter your license key on the popup and click on Activate License
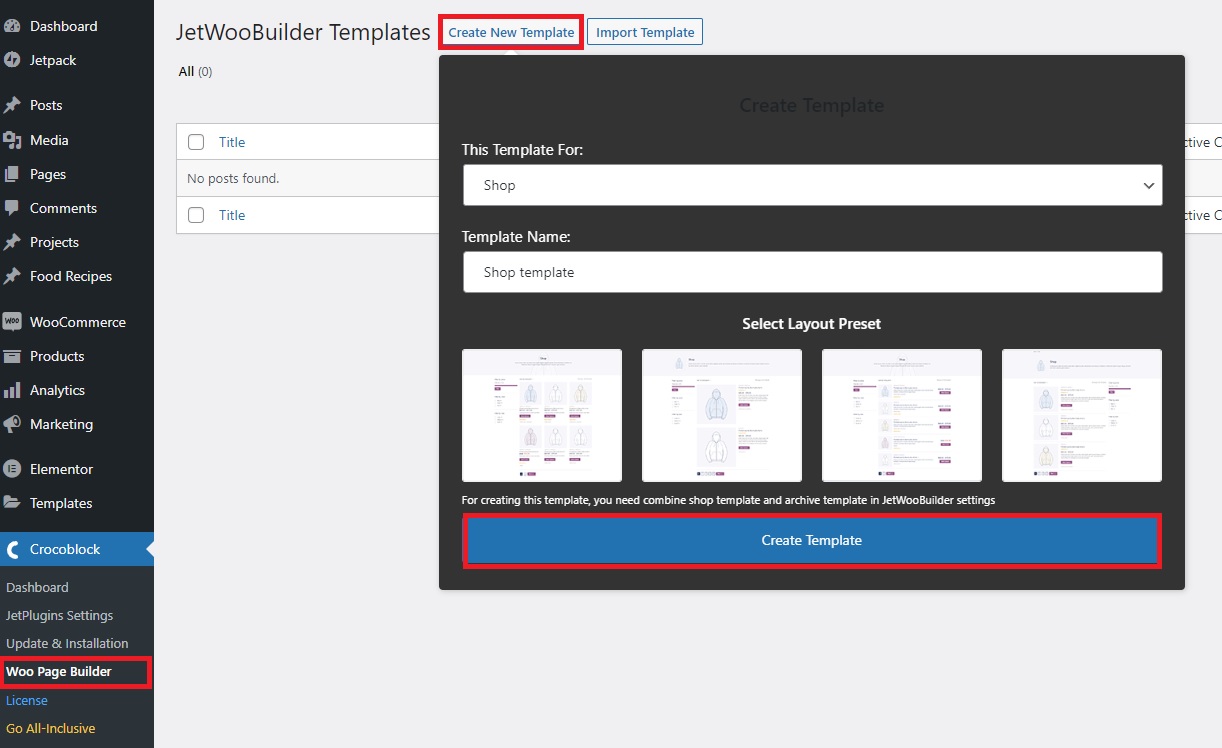
Step 2: Create a Shop Page Template
After the license is activated, you need to go to Crocoblock > Woo Page Builder and click on Create New Template.
Here, select the template for the Shop page and enter the template name. Then, click on Create Template.
Step 3: Customize the Shop Template
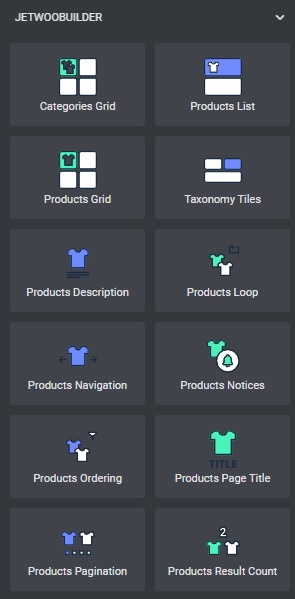
Now, you can customize the shop page with the help of the Elementor page builder. All the available JetWooBuilder widgets can be seen in the widget column on the right side of your screen. Just add them to your shop page template and customize them according to the needs of your website.
Once you have made all the changes to the shop page, Publish the template.
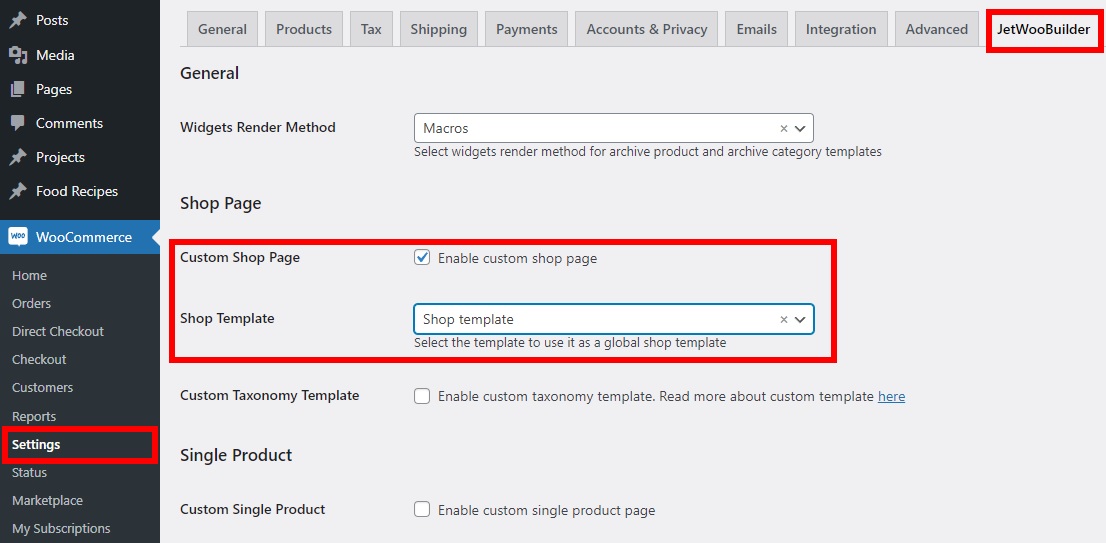
Step 4: Assign Template to Default Shop Page
Now, you have to assign the shop page template that you have just created and customized as the default shop page. For this, go to WooCommerce > Settings and open the JetWooBuilder tab.
Under the Shop Page section, check the option for Custom Shop Page. Then, select the Shop Template that you just created from the dropdown menu and click on Save changes.
That’s it! This is how you customize the WooCommerce shop page with the JetWoobuilder plugin.
Bonus: How to fix the WooCommerce shop page blank issue
The blank shop page is one of the most common issues in WooCommerce. There are many reasons why the shop page doesn’t show any products but here we’ll show you how to fix the most common problems.
- Shop page configuration: Go to WooCommerce > Settings > Products and make sure that you’re using the correct page under the Shop page
- Plugin compatibility: Your plugins may cause conflicts making the Shop page appears blank. To fix it, deactivate all your plugins and check which one is causing the problem
- Permalinks: Go to Settings > Permalinks and save to update the permalinks
- Catalog Visibility: Make sure that the catalog visibility is set correctly. Go to WooCommerce > Products and ensure that the products aren’t set as hidden
For more information about these problems, check out our guide on how to fix the WooCommerce shop page empty issue.
Bonus 2: Display Categories on the Shop Page
Displaying categories on the Shop Page allows you to better organize your products and helps users find what they’re looking for. There are three ways to display categories on the Shop Page. In this section, we’ll show you how to do it using the default options in WooCommerce.
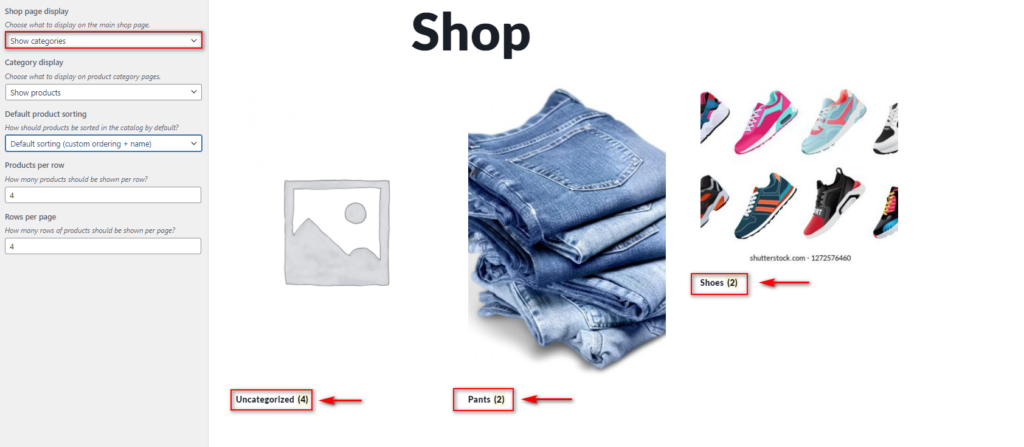
First, in your dashboard, head to Appearance > Customize and then go to WooCommerce > Product Catalog on the Customizer sidebar. Then, use the Shop Page Display and select whether you want to Show Categories or Show Categories and Products.
Additionally, you can use the Category Display option to show/hide Product Subcategories and Products on your Product Category pages. You can preview your changes in real time and once you finish, click Publish to save the changes.
This method is to apply but doesn’t provide you with much control. For alternative methods that give you more flexibility, check out our guide on how to display categories on your WooCommerce Shop page.
First Steps
Before carrying out any of the three customizing methods, we highly recommend you use a child theme. You can either use a plugin or create it programmatically. A child theme inherits all the design elements of the parent theme, so you have a copy of that theme making it safer. Why? Because if you directly edit the parent theme’s files, all your changes will be overridden when you update the theme.
With a child theme, you can change its files without losing any data after an update. What is more, a wise site owner would never mess with the original theme files. Apart from that, keep in mind that the shop page is a pre-set page of WooCommerce, so it’s compatible with all WordPress themes. However, since we recommend using child themes in two of the three methods, there could be compatibility issues. If that’s the case, you can have a look at the WooCommerce documentation for third-party issues.
Conclusion
All in all, the design of the shop page and how you show your products can have a great impact on your conversions. In WooCommerce, the shop page is pre-built and although there are some options to edit its layout, they’re pretty limited.
So customizing it using any of the three methods described in this guide will make you stand out from the crowd. Additionally, it’ll better represent your business and will show professionalism to your customers. We’ve shown you how to customize the shop page using three different methods:
- Manually
- With page builders
- With plugins
All of them have their pros and cons but they’ll all get the job done so use the one that best suits your needs and skills. If you don’t have coding skills, you can edit the shop page with your page builders or with plugins. We recommend WooCustomizer as it’s easy to use, provides you with a lot of features to optimize your store, and has a free version.
Finally, if you have a strong presence in social media, you should consider connecting Facebook Shop to WooCommerce. This way, you will be able to upload your product catalog to Facebook so users can view products and go directly to your site’s checkout page to complete the purchase. If you want to customize other sections of your store, check out some of these guides:
- How to customize My Account Page in WooCommerce
- Customize the Add to Cart button in WooCommerce
- How to edit the WooCommerce Checkout (Coding & Plugins)
- Edit the My Account Page in WooCommerce
- How to Customize the WooCommerce Product Page in Divi
Now it’s your time to make the most out of it and optimize your WooCoommerce shop page. Have you tried any of these methods? Which one is your favorite? Please let us know what you think of them and let us know if you have any questions!

Muy buena info me soluciono un problema muy grande muchas gracias
Gracias Andres!
1st – I have a styles.css or functions.php / I don’t have a “theme functions.
When I drop the code in & change it to my website shop page, I get the following error code:
Your PHP code changes were rolled back due to an error on line 31 of file wp-content/themes/VLOGCHILD/functions.php. Please fix and try saving again.
syntax error, unexpected end of file
Hello Jennifer
I’m afraid you should contact your hosting provider to access PHP error logs and the rollback code feature, as is not a WordPress feature
Kind regards
@Jennifer, I had the same exact issue, it was because one of the lines in the code lines were commented where it shouldn’t be, make sure except for the commented words everything else isn’t commented.
Thanks for the comment, Hashim! To make the explanation more clear, we’ve removed the commented part from the code and added some notes.
Hopefully, it’s easier to follow now.
hi how are you?
im looking for the best way to create feature boxes with icons (Main category) for my main shop page.
once you select any of the main categories it goes to subcategory page made up of smaller icons
from there you can select with basic category you need ..
Example – Cleaning store
step 1) Shop page ** 4 or 6 feature boxes with icons and text (main category)
step 2) selecting any of the main categories goes to Sub Categories (many smaller icons)
step 3 ) by selecting on the sub category this will take you to the products page
Step 4) select the product allowing you to view the individual product page
this is a link were you can find the idea im referring to
https://www.wpbeginner.com/wp-tutorials/how-to-add-feature-boxes-with-icons-in-wordpress/
but as i need this style in woocommerce shop page.
Hello mate,
Not sure if I understand your question but you can include the styles in the functions.php and then filter by the WooCommerce function is_shop()
if(is_shop())
Kind regards
add_action(‘template_redirect’, ‘bc_010101_redirect_woo_pages’); function bc_010101_redirect_woo_pages() { if (is_shop()) { (‘) wp_redirect(‘http://localhost/wordpress/my-shop-page/’); exit; } }
The above code is wrong (or missing should I say).
Here is the right one:
P.S. I don’t even know PHP 🙂
Hi Liam, thanks for the heads up. We’ve updated the post and the code.
I used the divi theme to build a small shop on an existing site and for some reason, the products I showcase display properly, but then then all my products show up at the bottom of the page – yet, they don’t show up on my page when I’m building it. Any idea as to how to remove the automatic products that were added to my page? Thanks
Hi Kara, sorry, I don’t really understand the issue. Do you have a screenshot to show us?
Thanks for the information, very clear explanation
Thank you Jessie
Hi. How i can customize my shop page.
KIndly help me.
Hi there, you have all the information and different options in the post.
Hi there, I can’t believe I haven’t run across your article in the 1 year I have learned Woocommerce and Googling everywhere for any tutorials about Woocommerce.
This is such a comprehensive article, I’ve never seen a complete guide like this. Kudos!
Thanks Caesar, we’re glad you liked the guide
Thank You
mi tema no trae detalle de producto que hago hay algún plugin??
GREAT POST
Thanks