
How to connect WooCommerce to Facebook Shop: The Full Guide
Do you want to add your products to Facebook and have an additional sales channel? In this guide, we’ll show you how to easily connect WooCommerce to Facebook Shop step-by-step.
What’s Facebook Shop?
Facebook Shop is a platform that allows businesses to set up an online store and sell their products through Facebook or Instagram. Businesses can create a catalog with the products they want to market as well as customize the shop visuals to match the look and feel of their brands. On top of that, companies can promote their products via Facebook and Instagram ads and stories. Facebook Shop is 100% free and the best part is that you can connect it to your WooCommerce store.
Why integrate WooCommerce with Facebook Shop?
Integrating WooCommerce to Facebook Shop is an excellent way to increase your sales. With this tool, you can facilitate the purchase process while enhancing the user experience. This also generates more engagement, which helps you transform that shopper into a loyal customer. But that’s not all. Adding WooCommerce products to Facebook Shop offers many other benefits such as:
- Analyze the performance and results of ad campaigns
- Automatic integration of products and categories
- Reach a massive audience
- Help build better customer relationships thanks to the reach and closeness
- It allows you to easily sell the products via Facebook Pages
Now, let’s take a look at a few WordPress and WooCommerce plugins that make this integration simple.
Plugins to connect WooCommerce to Facebook Shop
There are several plugins to connect WooCommerce to Facebook Shop. Some of the best ones are:
- Facebook for WooCommerce by Facebook
- Pixel you site
- StoreYa’s Shop to Facebook for WooCommerce
- Social Commerce for WooCommerce
Let’s have a closer look at what each of them has to offer.
1) Facebook for WooCommerce by Facebook
This is a free plugin developed by Facebook that allows you to connect your WooCommerce store to Facebook Shop. Let’s have a look at how to install it and set it up step-by-step.
1.1 – Install the Facebook Pixel on your website
Setting up the Facebook Pixel will allow you to optimize your ads strategy because it will show you the users’ behavior. With that information, you can enhance the reach by showing customers the most appropriate ads according to their interests after they visited your website. You can also increase your sales by configuring automatic bids that show ads to the type of Facebook user most likely to perform the action that interests your brand. Facebook for WooCommerce allows you to analyze in real-time when users:
- See your content
- Search on your page
- Add an item to their cart or wish list
- Start a payment
- Add payment information
- Make a purchase
- Complete a registration
Your ads will reach users on any device so they’ll help you get new followers. On top of that, the ads adapt to the purchase process of each shopper (for example, ads that remind the user of the products that are in an abandoned cart) and reach new customers for your website and Facebook Shop. Additionally, with the Facebook Pixel, you can create custom audiences based on user actions and audiences similar to your best customers.
Remember that setting up your Facebook Shop will also allow you to integrate with Instagram Shop, increasing sales points, and conversion opportunities.
To learn how to add Facebook Pixel to your site, check out our step-by-step guide. Finally, keep in mind that if you have a Pixel installed on your website, you must delete it before installing another one.
1.2 – Synchronize your store on Facebook
By connecting your WooCommerce store to Facebook, you can upload your product catalog and create carousel ads, attracting more customers. What’s more, users will be able to view and select products. When they choose what they want, they will be redirected to the checkout page of your website to complete the purchase. And the best part is that the dynamic ads will be updated with the changes in your stock. If you don’t have a catalog you can only use one, but you can include an unlimited number of products in it.
1.3 – Enable Facebook Messenger
Facebook Messenger Chat is a great tool that allows you to enhance the purchasing experience of your users by interacting with them before, during, and after the conversion process. Besides, you can chat with your clients on your website and continue the conversation via Messenger after they left.
Additionally, one big advantage of Facebook Messenger Chat is that if you don’t want to integrate Facebook for WooCommerce with your site, you can simply add this functionality and enable a live customer chat. If you want to add Facebook Messenger Chat to your website, you can follow our step-by-step guide.
1.4 – How to activate and set up the plugin
Finally, to activate and set up your Facebook Shop for WooCommerce, follow these steps:
- Download the plugin
- Go to your website, click on the Plugins tab, and then on Choose file. Select facebook-pixel-for-woocommerce-<pixel ID>.zip and upload the plugin
- Click Install Now
- Click Activate Plugin
- Go to the WooCommerce section on your website
- Click on Settings
- Then, click Integrations
- Choose Facebook for WooCommerce
- Press Get started. This option will redirect you to your Facebook Page
- You’ll have three options here. Click on Choose a Facebook Page and then select the page. After that, press the Next button
- As you’ve already install Facebook Pixel, you’ll go to the next step. Click the Import product option to add the products to your shop, and then click Finish
- That’s it. You’ve integrated Facebook Shop with WooCommerce!
Now when a user clicks on a product and then the Check out on the website button, it will be redirected to your site’s checkout page. 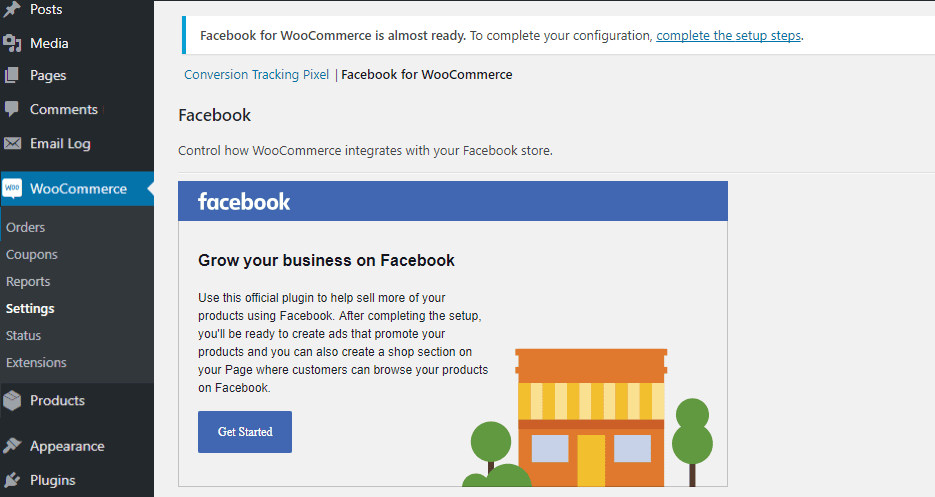
2) Pixel your site
This is a WordPress tag manager that works well with Facebook Shop for WooCommerce. It implements a basic version of the Facebook Pixel and enables Facebook Messenger on your site. Additionally, it has tons of features but some of the main ones are:
- Implement Google Analytics, Google Ads, and Pinterest Tag (more to come)
- Insert custom scripts with a head & footer option
- Track actions and data with the Global Events: content details, clicks, embedded video views, searches, form submit, comments, downloads, AdSense clicks
- Configure your events using various triggers: URL contains or equals, clicks, mouse over, and page scroll
- Set WooCommerce tracking, with Facebook DPA support, Google Analytics Enhanced Ecommerce, Google Ads Remarketing, and Pinterest e-commerce specific events
- Run dynamic ads
- When Facebook for WooCommerce is activated, PixelYourSite will use its ID logic. This way, when it detects the Facebook for WooCommerce plugin, it makes sure your Facebook pixel is not inserted twice
All in all, Pixel your Site is an excellent addition to Facebook for WooCommerce because it provides you with extra tracking tools.
3) StoreYa’s Shop to Facebook for WooCommerce
StoreYa’s Shop is an interesting plugin that allows you to easily create a Facebook store and connect WooCommerce to Facebook Shop. The best part is that you don’t need any coding or design skills and you can customize your Facebook store to give the look and feel of your business. Additionally, it comes with a feature that allows you to import your WooCommerce products with one click.
Some of its main features are:
- Fully customization so your Facebook shop fits with the look and feel of your brand
- Automatically import all of your social network activities from Twitter, Pinterest, Instagram, and YouTube onto Facebook
- With the Group Deal tool, you can create special deals for specific users and have them invite their friends. This way, you can sell more and attract fans to your Facebook page
- Add a Like button to your online shop and increase your Facebook fan base
- Twitter and YouTube tabs tool to show a feed of your tweets and display your YouTube channel
- Import your WooCommerce store to Facebook
This plugin has a free version with basic features and premium plans that start at 9.99 USD per month.
4) Social Commerce for WooCommerce
This freemium plugin is a great solution to integrate WooCommerce with Facebook Shop and easily import all your products without installing the Facebook Pixel. Some of its top functionalities are:
- Change the colors of your Facebook shop
- Change the language of your store
- Autosync your catalog: You can set time on a daily, weekly, or monthly basis to automatically sync your catalog with the Facebook Shop
- Upload a custom-designed banner to your Facebook shop to attract more customers. It will give you a small area where you can promote special offers or new products, for example
- Make your store is accessible from any iOS or Android device. After the implementation, your customer will be able to purchase products from Facebook Native IN-APP Browser
Social Commerce has a free version that allows you to update up to 36 products and premium plans with more features that start at 11 USD per month.
How to create a Facebook Shop catalog and connect it to WooCommerce?
Now that we’ve analyzed the plugins, let’s have a look at the next step. You need to create a Facebook shop catalog and synchronize it with WooCommerce. The process is pretty simple so just follow these steps:
- In your Facebook account, go to the Catalog manager and select Create a catalog
- Then, Select the correct catalog type from your inventory. You can choose E-Commerce, Travel, Real Estate, or Cars. Then click Next.
- How do you want to add your inventory to the catalog? You can add them manually but if you have your inventory hosted on WooCommerce, select the Connect eCommerce platform option
- Choose the business to which the catalog belongs in the drop-down menu. This is the business that you have set up in Business Manager. You can also choose Personal, but you will have fewer ways to use a personal catalog unless you connect it with a business
- Enter a name for the catalog
- Finally, press Create and that’s it! You’ve created a Facebook Shop catalog and synchronized it with WooCommerce!
Promote Facebook Shop products with dynamic ads
Once you’ve connected WooCommerce to Facebook Shop and created your catalog, you can take it a step further and promote your products with dynamic ads. Facebook dynamic ads are an excellent retargeting tool to automatically show products to users who showed interest in your business.
These ads are pretty easy to set up and can help you increase your sales. So, if you have a large Facebook audience, dynamic ads can be a great means to boost your sales.
How to create Facebook dynamic ads?
So, once you’ve finished synchronizing WooCommerce with Facebook Shop, you can create dynamic ads to promote your products. Additionally, you’ll need to install Facebook Pixel and connect it with your catalog. After that, simply follow these steps:
- Go to Ads Manager > Create
- Create your campaign and on the marketing objective page, go to Conversion > Promote a product catalog
- Then, choose the catalog that has the products you want to promote and click Continue
- Select the product
- After that, it’s time to configure the ad. You’ll need to select the audience, placement, budget, and schedule for your ad. Then, press Continue
- Chose the format you want for the ad and Facebook Page (carousel or single image)
- Time to get creative. Write the copy for your ad and use the + button to insert dynamic elements
- Then, add a clear call-to-action (CTA) button to increase conversions. You can also include a unique deep link to each item in the ad
- Finally, check your ad and confirm the changes
- That’s it! You’ve created your dynamic ad to promote your WooCommerce products on Facebook!
Dynamic ads can help you increase your sales enormously if used smartly. However, not all businesses and audiences are the same, so we recommend you play around with these ads and find out if they’re a good fit for your products. For more information about dynamic ads, you can check the Facebook business center page.
Facebook Shop and WooCommerce are not syncing. How to fix it?
There could be several reasons why your Facebook Shop doesn’t sync with WooCommerce. If that’s your case, we recommend you contact their support team. However, if you don’t want to wait for their answer, here we’ll show you how to fix the most common problems.
-
Refresh the auto-sync
- Go to your WordPress Dashboard > WooCommerce > Settings > Integration tab. There you’ll see Facebook for WooCommerce settings
- If you see a Facebook extension error, you have to reset your API link. To do that, simply click the button and follow the steps on the screen
- That’s it! Facebook Shop for WooCommerce should be sync now
- Additionally, you can go to the Advanced Settings and change the auto-sync timing
-
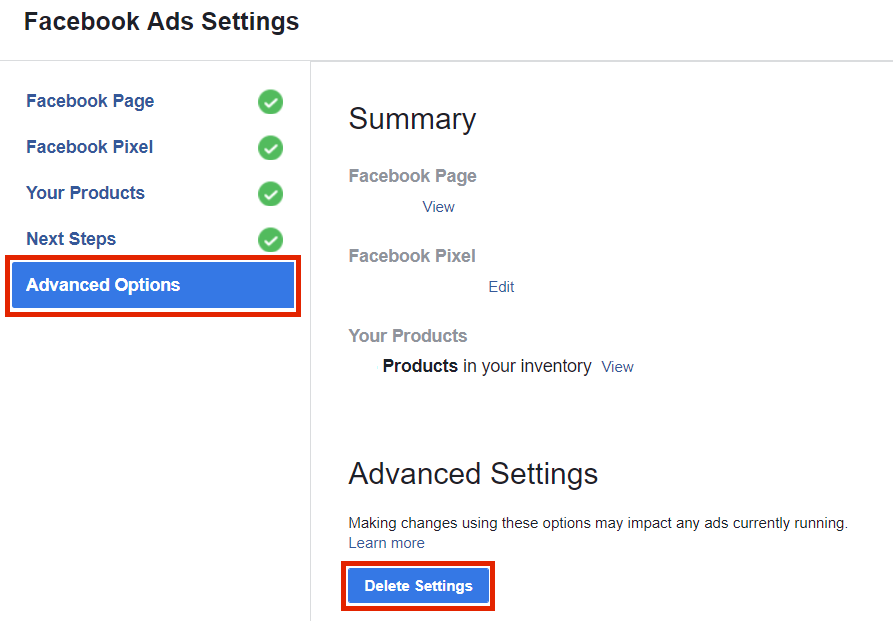
Reset your Facebook Shop configuration
Sometimes there are problems during the configuration. Even if you uninstall and reinstall the plugin, it will still go back to your previous configuration so you need to reset the Facebook Shop configuration. To do that you have to:
- In your WordPress dashboard, go to WooCommerce > Settings > Integration tab and click on Facebook for WooCommerce to go to the configuration page
- Click Settings (or Reconfigure for older versions) and you’ll see a pop-up
- Go to Advanced Options and click Delete Settings under Advanced Settings
- That’s it! You’ve just reset your Facebook Shop for WooCommerce configuration
 These are just two of the most common issues but there can be many other problems. So, if Facebook for WooCommerce stopped working and you can’t fix it, have a look at our complete guide on how to fix issues with Facebook for WooCommerce.
Alternatively, if you’re facing problems with Instagram Shop, check out this guide to help you fix all the issues when Instagram Catalog isn’t working.
Conclusion
To sum up, if you add your WooCommerce store to Facebook Shop, you can improve your sales process and enhance user experience. You’ll be able to analyze the performance of ad campaigns as well as synchronize products and categories to sell the products via Facebook Pages.
The easiest way to do this is by using a plugin that will help you synchronize your store with Facebook Shop in a matter of minutes. We also recommend you integrate Facebook Pixel with your site to make the most of your campaigns and unleash the full potential of Facebook Ads.
You can do this manually or using plugins. In this guide, we show you how to easily add Facebook Pixel to WordPress step-by-step. Additionally, you can also make the most of Facebook by automatically posting your blog content there. You can do that by following our step-by-step guide: How to auto-post from WordPress to Facebook.
Finally, if you have a WooCommerce store and want to customize the shop page, we recommend you check out our complete guide on how to customize the WooCommerce Shop Page.
Are you ready to boost your sales and make the best of your brand? Which tool do you prefer? Leave a comment below and tell us more about your experiences!

I didn’t know about woocommerce before coming on this blog, it has excessive information on Facebook woocommerce. thanks and keep posting like this underrated topics.
Thanks mate
Amazing article. Thank you! Helped me a lot.
Maybe someone can help me with one thing: May Facebook shop ignores my woocommerce shop categories. I am also not able to create collections to categorize my articles.
Any idea? thank you, Alex
Hello, I connected my woocommerce site to Facebook which displays the products well but I would like to change the currency which is currently in US dollar to display them in Euro. How to do?
Thank you for this! It is very helpful. Do you know if it’s possible (somehow) to select which specific products in my Woocommerce store can sync with my Facebook shop or am I always required to sync my entire catalog? I have been researching and testing things, but so far nothing :-/
I do believe all of the ideas you’ve offered in your post.
They’re very convincing and will definitely work. Nonetheless, the
posts are very quick for novices. May you please prolong them a little from next time?
Thank you for the post.
Hi there, thanks a lot for your feedback! We’ll keep it in mind for future guides and explain each step a bit more.
Let us know if you need help connecting Facebook Shop with WooCommerce.
Best
Thanks for keeping this upto-date. It’s been a great help
thanks, we’re glad to be helpful
Thanks a lot for the epic post!
thanks Dennis!
hi there is it possible to list slected products from woocommerce to fb shop
You can decide which products you add to the Shop. You can find more info about it here
Very helpful!
Glad to hear that, Ralph!
Hurrah! After all I got a web site from where I know how to actually take valuable information regarding my study and knowledge.
Thanks Augustina
I was looking for this kind of thing for a client. Finally got the solution. Thanks for sharing such a worthy article.
Great, thanks Ataul
Very impressed with your blog. Thanks and keep sharing such good posts.
Thank you, Varshil
Reading this in 2022, Surely gonna applied this. Thank you
Thanks for sharing the post
Thanks and keep sharing such good posts.
Thanks for sharing. Really loved the post and idea to sell when having woo-commerce store.
Thank you for this! It is very helpful.
Thank you for the information.
I do not know whether it’s just me or if everyone else
experiencing problems with your blog. It appears as if some of the written text in your posts are running off the screen. Can someone else please comment
and let me know if this is happening to them too?
This could be a problem with my internet browser because I’ve had
this happen previously. Thanks
Hi, sorry for the issue you are facing. We could not reproduce this issue on our end. Seems like this is a local issue. Might be because of your browser, as you pointed out. You can try with a different browser or clear the browser cache to see if it works for you.