While you are using the self-hosted WordPress (WordPress.org) as your content management system, you may face errors along the way. One of the most common ones is the maximum execution time exceeded error. If that’s your case, we have got you covered. In this post, we are going to show you how to fix the maximum execution time exceeded error in WordPress and get your site back online.
Introduction
If you have a website, you will end up facing some problems sooner or later. Most people think they need to hire a developer or freelancer when encountering these types of issues. However, the good news is that you can fix many of them without any help even if you don’t have technical skills. Also, fixing them and moving forward is exciting, and you will learn something new.
The maximum execution time exceeded is a very basic error in WordPress, and you don’t need to rely on anyone to fix it. In this guide, you will learn how to solve this issue and get your site back online in less than 10 minutes! Before we start with the step-by-step guide, let’s better understand what this error is.
What’s the WordPress Maximum Execution Time Exceeded Error?
As you know, WordPress’ main scripting language is PHP. To keep your server optimized, servers add a limited timeframe to the PHP execution process. Even though that time depends on your web hosting company, it’s usually between 30 and 60 seconds. So, what happens when a script takes more than the set timeframe to execute? There’s a maximum execution time exceeded error.
Most times, this will happen when you update the WordPress core, themes, or plugins files. As a result, you won’t be able to complete the update.  Now that we better understand the error, let’s see how you can fix it.
How to Fix the Maximum Execution Time Exceeded Error in WordPress?
There are several methods to fix the maximum execution time exceeded error in WordPress.
- Disable active themes and plugins.
- Edit .htaccess file.
- Edit PHP.ini file.
- Contact your hosting company.
Let’s have a look at each method. NOTE: Some of these methods require editing some core files. So, to keep your website data safe, we recommend you generate a complete backup before making any changes. If you’re not sure how to do it, check out our guide on how to back up a WordPress site.
1) Disable Active Themes and Plugins
Sometimes, themes and plugins cause the maximum execution time exceeded error. So, one possible solution is to disable them. If you’ve got locked out of your WordPress admin area and can’t access the backend, you will need to disable every active plugin and theme of your blog. If a specific plugin or theme caused this issue, you will get your website back online after disabling them.
To do that, you can use an FTP client and an FTP account. If you don’t have an FTP account, log in to the cPanel of your hosting, and there you will see a section to create one.  You will need to add:
- Username.
- Password.
- Directory.
- Quota.
 After entering all the details, click the Create FTP Account button. You have successfully created an FTP account to manage your website’s file manager. Now, let’s disable the active theme and plugins. With an FTP client like FileZilla and the account credentials, you will be able to access the backend of your file manager. Then, go to the wp-content folder. That’s where all the plugins and themes of your site are stored.
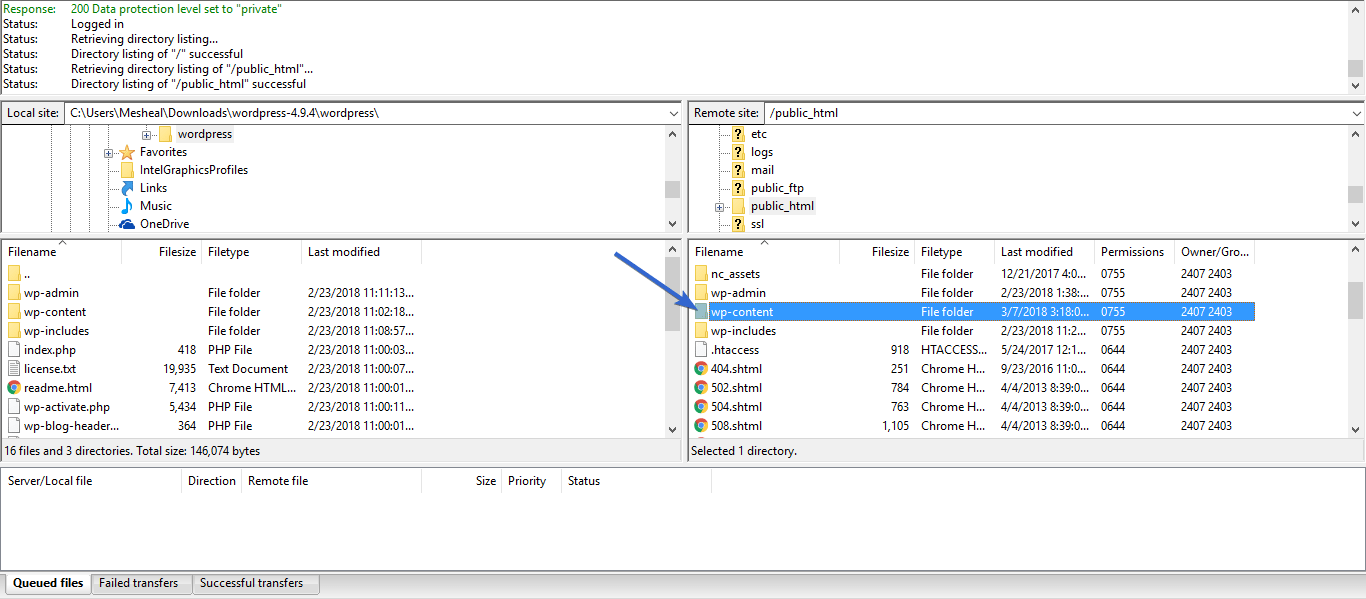
Deactivate Plugins
To deactivate the plugins, you will need to rename the plugins folder to something else. For example, you can rename it to plugins_OLD.
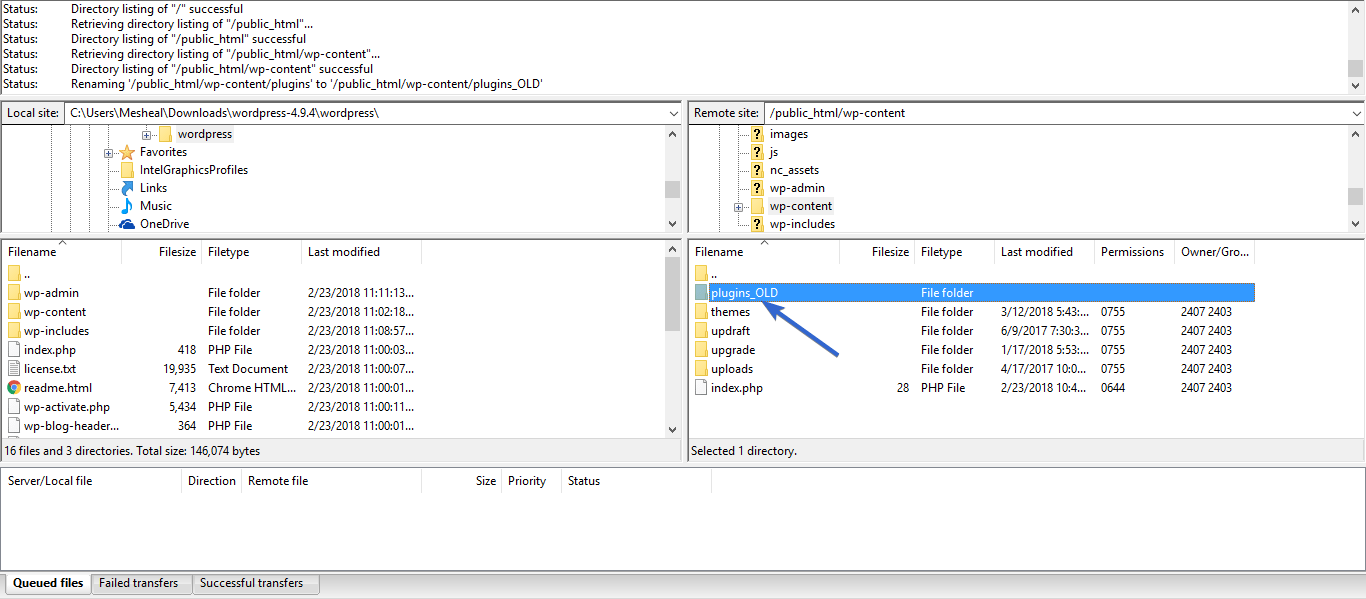 Check your website from the front end. If the error is still there, it means that none of the active plugins are causing the maximum execution time exceeded issue. If the error stops, you have one or more faulty plugins on your server. Finding the faulty one by inspecting the code can take a lot of time. Instead, you can do the following.
First, rename the plugins_OLD folder to plugins again. Then, log in to your WordPress backend and go to the Plugins section. All the plugins should be deactivated.
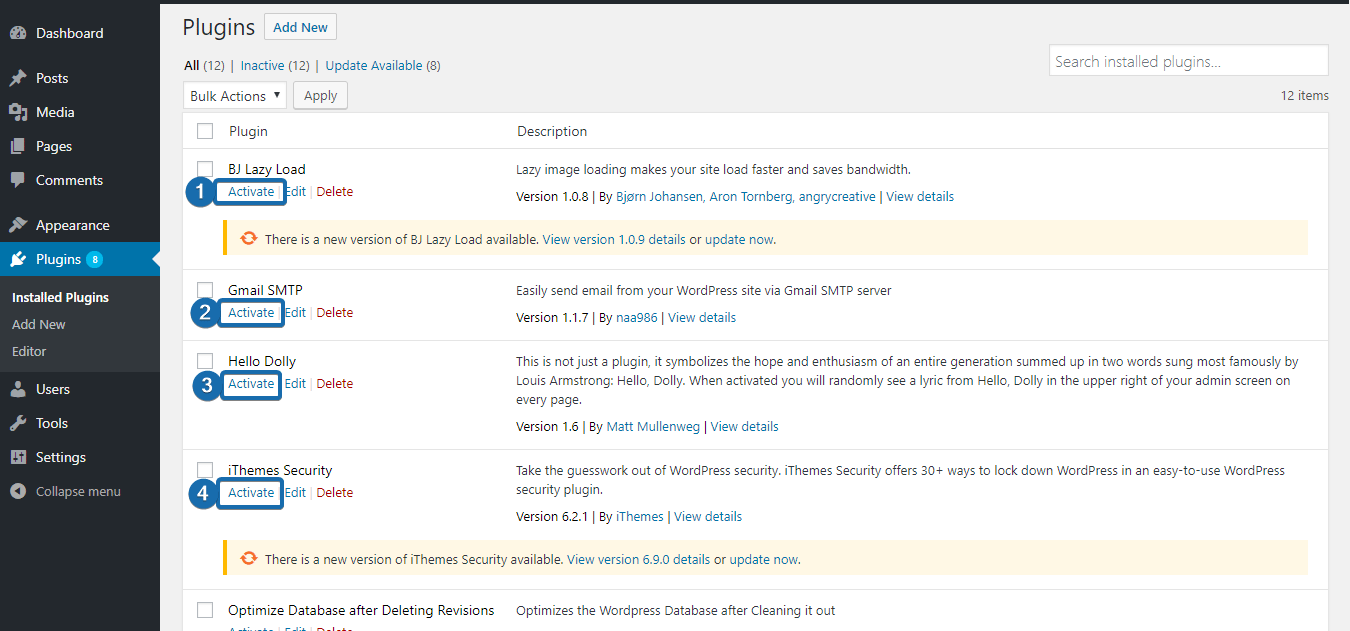
Activate the plugins one by one to check which one is the faulty one. After activating the faulty plugin, the website will get the same maximum execution time exceeded error. Similarly, you can disable the theme activated on your blog.
Deactivate Theme
For example, let’s say that you activated the MyThemeShop theme on your site. Go to the /wp-content/themes/ folder using the FTP client, and rename the folder to something else. 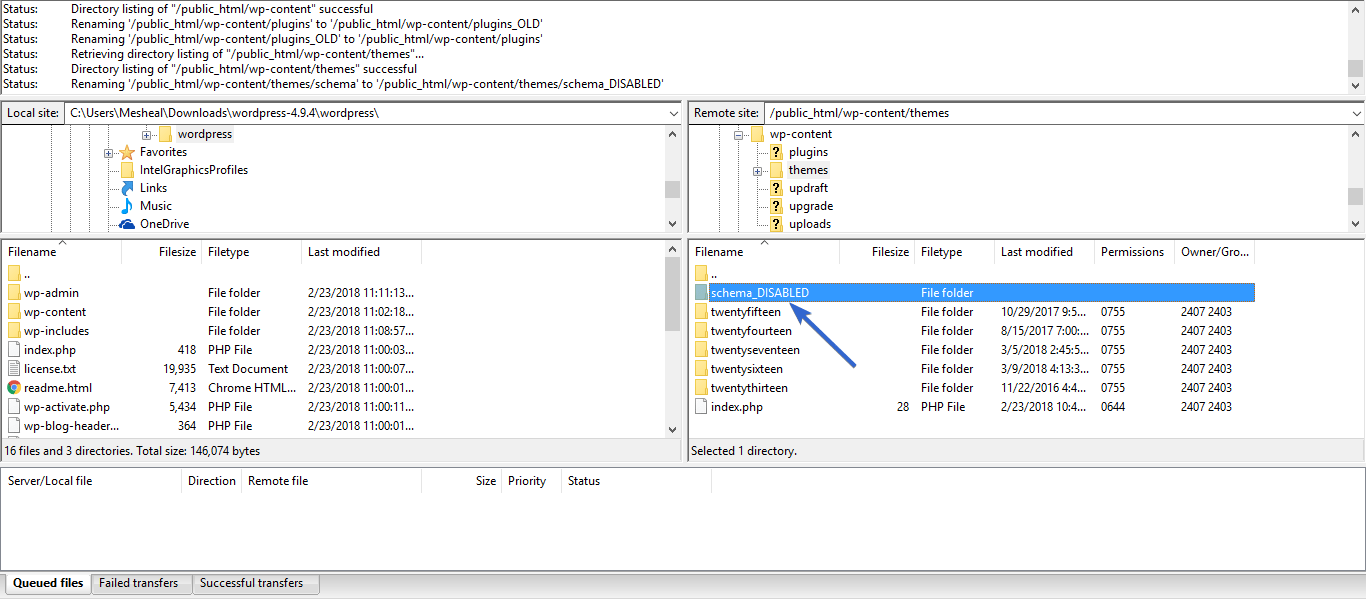
Once you have renamed the theme, your site will automatically use the default WordPress theme. You will need to check the website from the front end then. If the error is still there, something else is causing it. If it’s not, you have a faulty theme. You can rename it back to the previous state and activate it from the WordPress admin area. Now, let’s have a look at other ways to fix the maximum execution time exceeded error by increasing the max execution time.
2) htaccess file
Using the FTP client, go to the WordPress root folder. You will see the .htaccess file there. If you have installed WordPress on your primary domain, the htaccess file will be under the public_html folder. If you have installed WordPress on any subdirectory, you will see the same on that specific directory.
NOTE: Make sure you enable the hidden files.
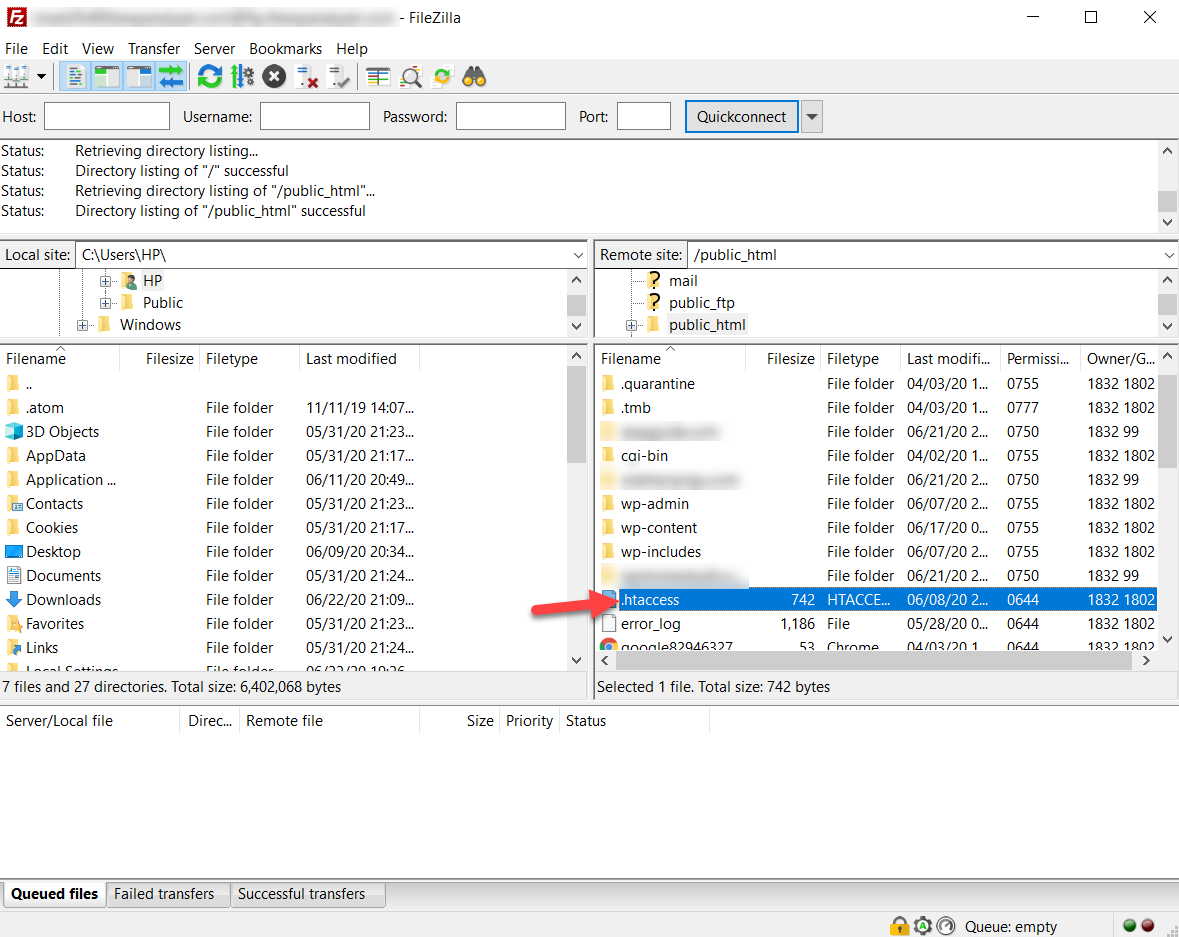
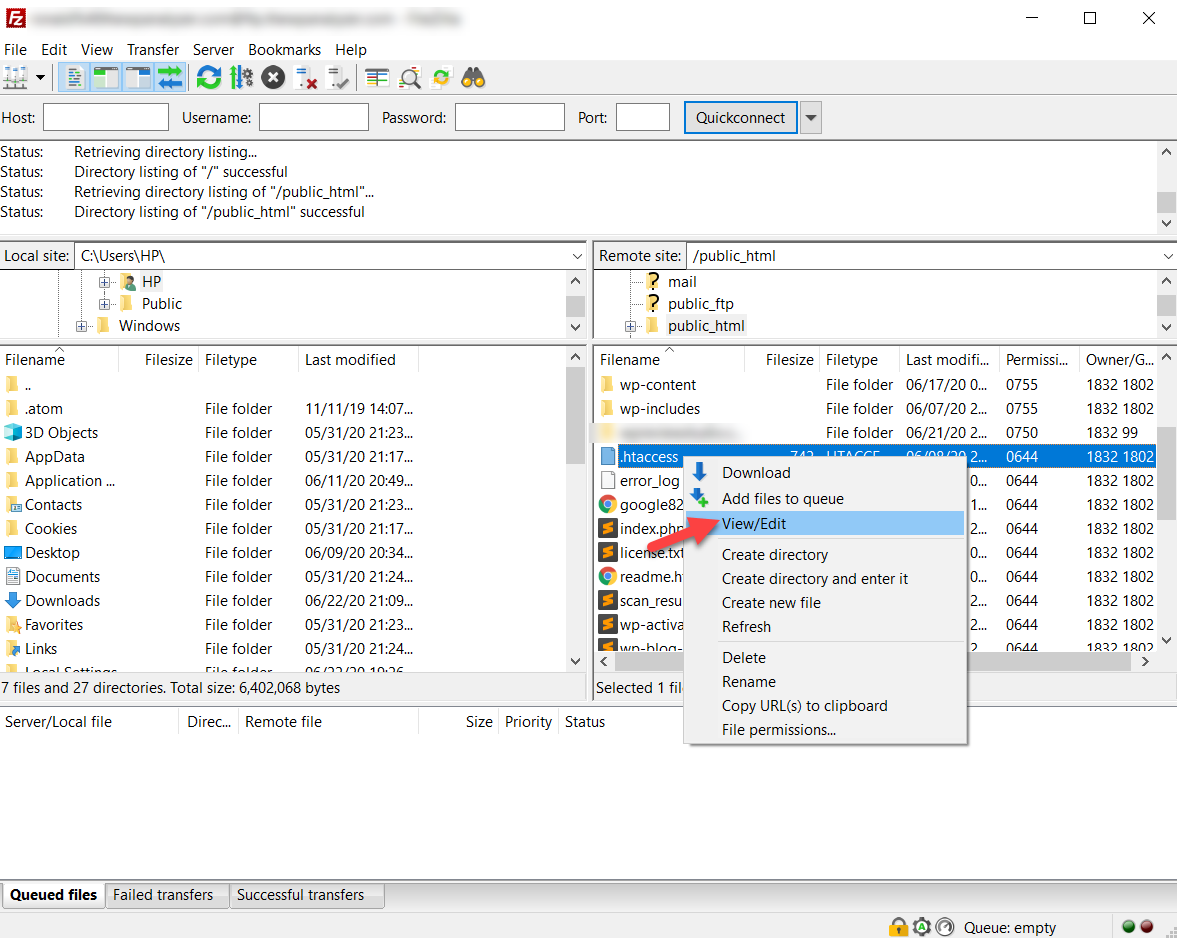
Then, select the htaccess file, right-click on it, and select the View/Edit option.
The file will open in your text editor. Now, you need to increase the maximum execution time. To do that, copy the code below and paste it into the htaccess file. Then save the changes.
php_value max_execution_time 300
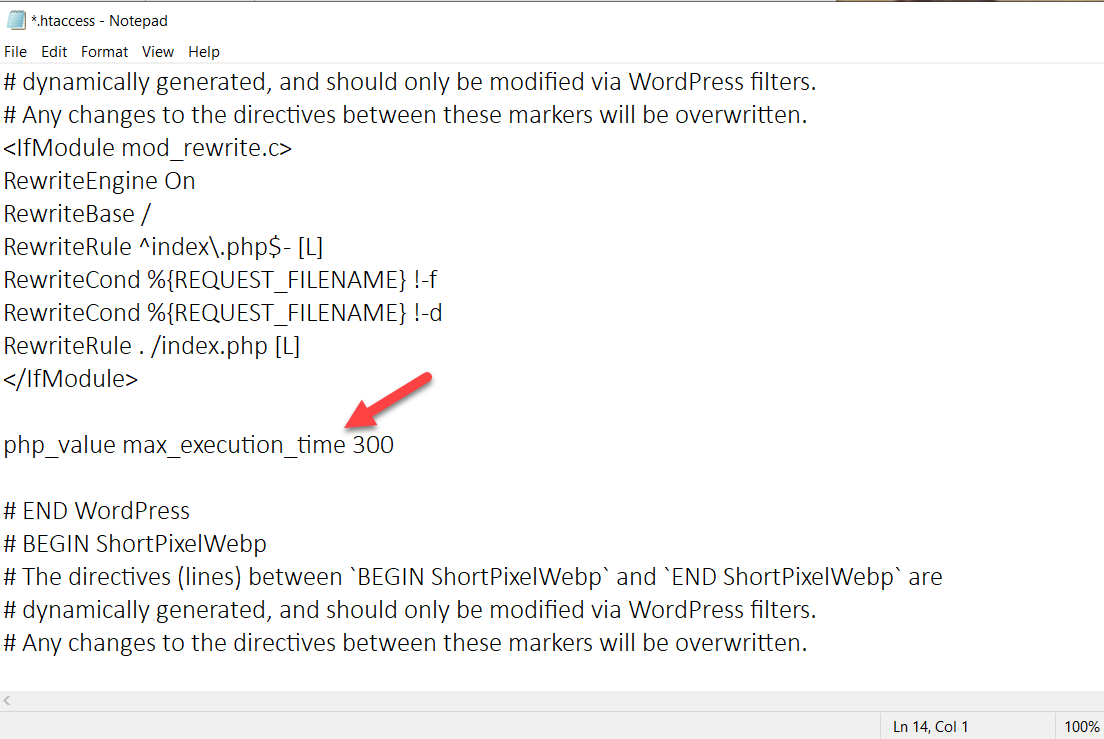 Once you have saved the file, upload it back to the server. If you take a closer look at the code, we are telling the server to increase the maximum execution time to PHP scripts to 300 seconds. You can change that value to 120 seconds or whatever you want. If you still have issues with the server, you can try increasing the value even more.
Make sure that you save the modifications after changing the values. If you have access to your WordPress backend, you will be able to edit the htaccess file without using an FTP client. SEO plugins like Yoast and Rank Math allow you to edit the htaccess, robots.txt files through their settings page.
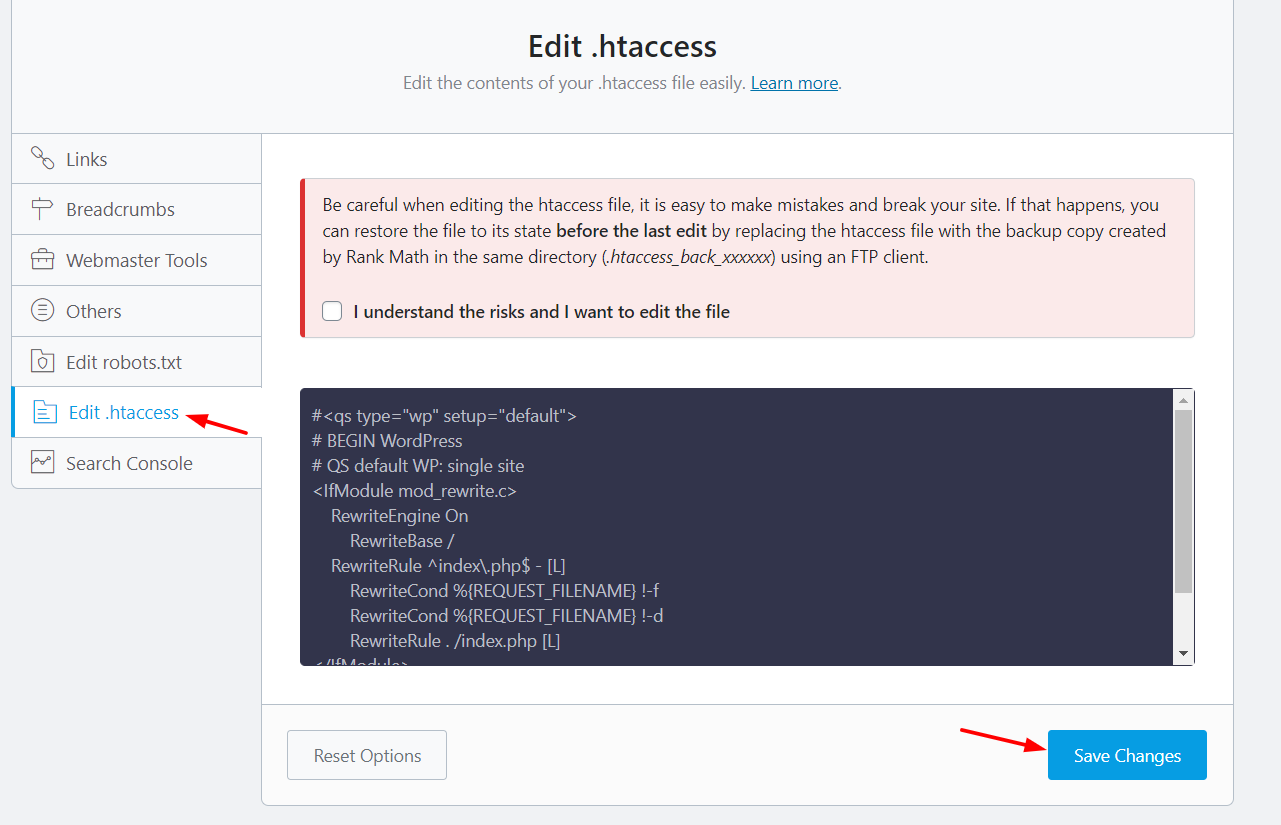
So if your SEO plugin has features like that and you have access to the WordPress admin area, you can skip the FTP method.
3) php.ini file
Another option to increase the max execution time and fix the maximum execution time exceeded error in WordPress is to edit the php.ini file. To do this, go to the public_html folder or wherever you have installed WordPress. There, you will see a file called php.ini. If you don’t find a file like that, create a new one and paste the below code to the file.
max_execution_time = 60
Then, save it. If you have edited the existing php.ini file, update the file and then check the website from the frontend. If the maximum execution time exceeded error persists, try a higher value to fix it.
4) Contact Your Hosting Company
Finally, if you don’t feel comfortable with any of the previous methods, another straightforward way of fixing the max execution time exceeded error is to contact your hosting company. Most WordPress hosting companies offer support via tickets, live chat, or even phone calls. So, you can contact your web hosting’s support team through your preferred channel and let them know about the issue.
Conclusion
In conclusion, web servers have a limited timeframe to execute PHP scripts. So, when the script takes longer to execute, there’s a maximum execution time exceeded error. The good news is that fixing that issue is pretty simple and you don’t need to hire a developer. There are four methods to solve this issue. You can:
- Disable active themes and plugins
- Increase max execution time
- Edit the .htaccess file
- Edit the PHP.ini file
- Contact your hosting company
Simply choose the one that best suits your needs and skills. So, now you know how to fix maximum execution time exceeded error. For more guides to solve errors in WordPress have a look at these posts:
- How to Fix the “Link You Followed Has Expired” Error in WordPress
- WordPress Update Failed Error: How to Fix it
We hope you have found this guide helpful, please share it on social media. Have you tried any of these methods to fix this issue? How did you solve it? Let us know in the comments section below.
