Scale your business with our modular plugins.
Home » Blog » How to Create a Form in WordPress Without Plugins

How to Create a Form in WordPress Without Plugins

how to create a form in wordpress without plugins
October 28, 2025||By sajan

Do you want to create a form in WordPress without using plugins? Forms are some of the most essential and used elements of a website, and there are several advantages of creating one without using plugins.

First, let’s see why you need to create a form in WordPress without plugins.

Why Create a Form in WordPress Without Plugins

There are many WordPress form plugins that you can use to create a form. But creating a form in WordPress without using plugins can be beneficial for several reasons:

  • Simplicity and lightweight: You avoid the additional overhead of installing and maintaining plugins when you create a form without them. A simple form created with custom code can be lighter and more efficient than one built with a plugin.
  • Customization: Building a form from scratch gives you complete control over its design and functionality. You can tailor the form to match your website’s specific needs and customize it accordingly.
  • Learning experience: Building a form without plugins can be a valuable learning experience for developers or users looking to improve their coding skills. You gain an understanding of the underlying mechanisms of form handling and data processing.
  • Reduced dependency: You reduce your website’s reliance on external code by avoiding plugins. This can be useful if you want to minimize potential security risks or conflicts arising from using multiple plugins.
  • Performance: Custom-coded forms can improve your website’s performance and speed, as they are lighter than plugins. These custom forms include only the features you need, without the additional functionality provided by plugins you may not use.
  • Flexibility: Custom forms offer greater flexibility for integrating with other parts of your website or custom post types. You can extend the form’s functionality based on your unique requirements.
    Most plugins provide similar options using shortcodes. However, with custom-coded forms, you can add them to specific locations on the website, allowing you to display them as desired.

Who Needs a WordPress Form?

WordPress forms are essential for nearly every type of website. Here’s who can benefit from adding forms:

  • Bloggers – Collect guest post submissions, feedback, or newsletter sign-ups
  • Business owners – Capture leads, accept service requests, or provide quotes
  • eCommerce stores – Handle support requests, product inquiries, or return forms
  • Freelancers and agencies – Let clients request projects, book consultations, or send files
  • Course or membership sites – Manage registrations, quizzes, and user-generated content
  • NonprofitsAccept donations, volunteer applications, or event sign-ups
  • Portfolio websites – Allow potential clients to get in touch or request pricing

No matter what type of site you run, forms make communication easier and more secure — without the need to display your email address.

How to Create a Form in WordPress Without Plugins

There are many types of forms that you can create in WordPress without using the plugins. But a contact form is one of the most essential and popular. In this tutorial, we will show you how to create a contact form.

Before we begin, we assume you have a basic understanding of programming, as we will be using scripting languages and markup languages such as HTML and PHP. If you don’t have the required knowledge, we recommend asking a programmer for assistance in creating a form.

To create a contact form in WordPress, you must first create a contact page. So let’s start with that.

1) Create a Page for the Form

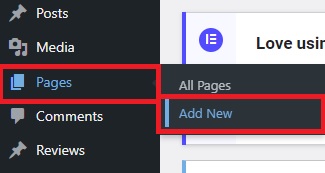
Go to Pages > Add New from your WordPress dashboard.

This will open the page editor, where you can enter the page title and any additional description, in addition to the actual contact form. However, if a form is all you need on this page, we can proceed with creating it directly.

2) Add HTML Code for Form in the Editor

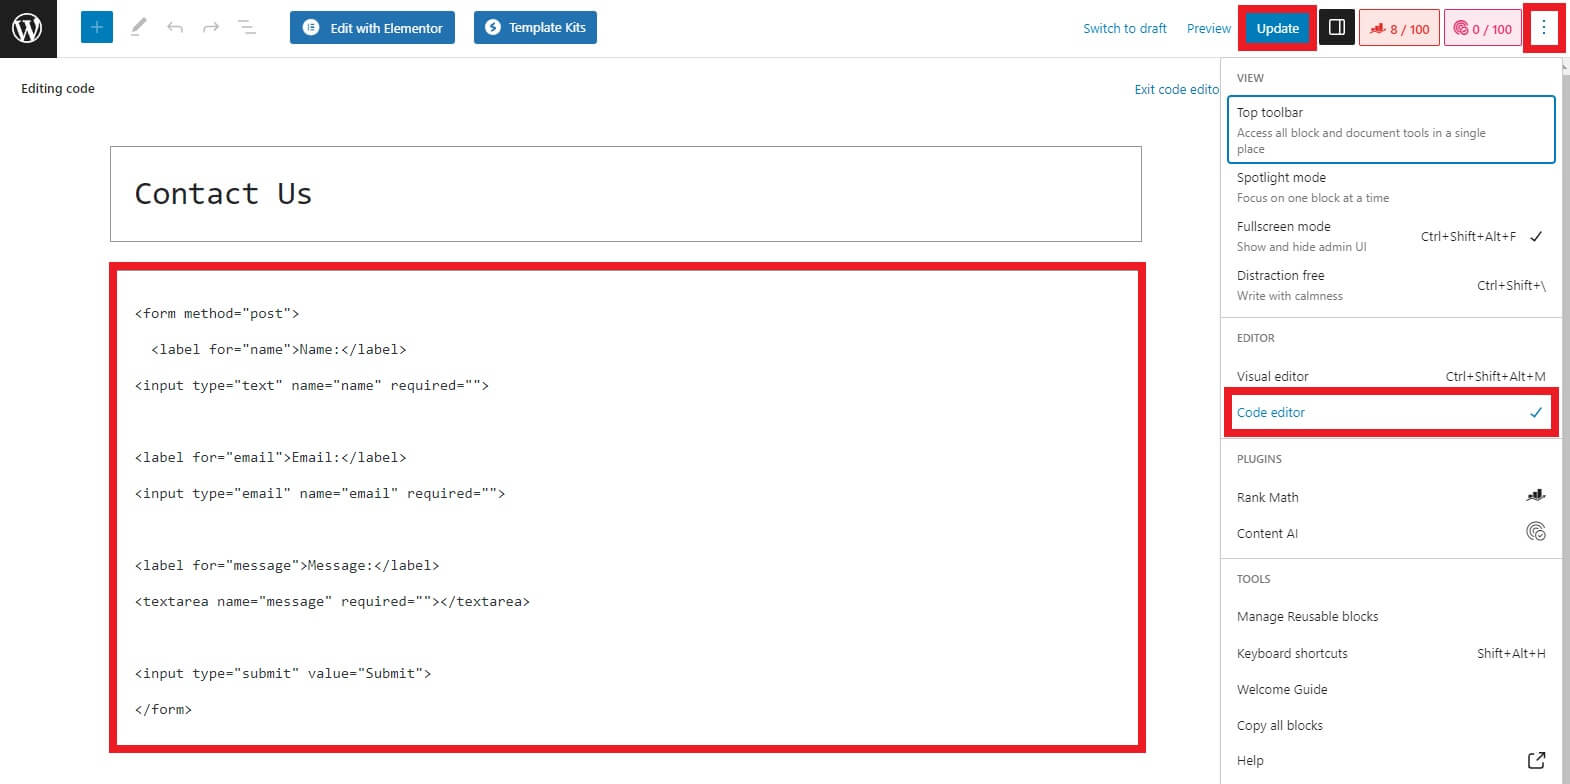
Now, go to your Code editor by clicking on the Options (three vertical dots) > Code editor from the top left of your screen. Then, add an HTML code for the form in the editor. You can add the necessary form fields based on the following code.

<form method="post">
  <label for="name">Name:</label>
<input type="text" name="name" required="">

<label for="email">Email:</label>
<input type="email" name="email" required="">

<label for="message">Message:</label>
<textarea name="message" required=""></textarea>

<input type="submit" value="Submit">
</form>

This code will help you create a simple contact form in WordPress. But you can easily modify it to make the form you want on your WordPress website.

After you have added all the necessary form fields to the code, click Publish or Update to save the changes on the contact page.

html code create a form in wordpress

If you preview the page, you can see the form you just created. However, to make the form functional and extract data from it, you must also handle form submissions. So we have to create a database for the form submissions after this.

form preview page create a form in wordpress

3) Create a Database Table for Form Submission

To create a database for form submissions, you can use a database management tool like phpMyAdmin. You can access it by logging into your cPanel. If you don’t have the necessary credentials, we recommend that you contact your hosting service or the site owner.

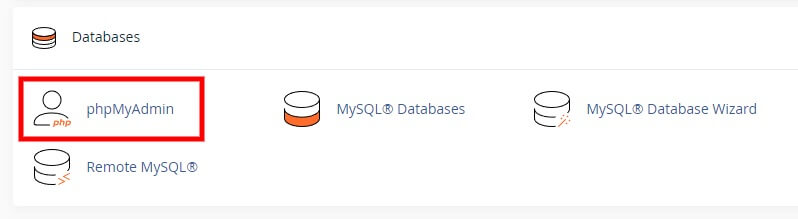
Now, scroll down to the Database section and click on phpMyAdmin. This will open the phpMyAdmin dashboard, where you can view all the databases associated with your website.

Expand the table of your website database and scroll to the bottom of the page, where you can create a new database table. Here, enter the table name as “wp_contact_form_submission” and click on Go to create the new table.
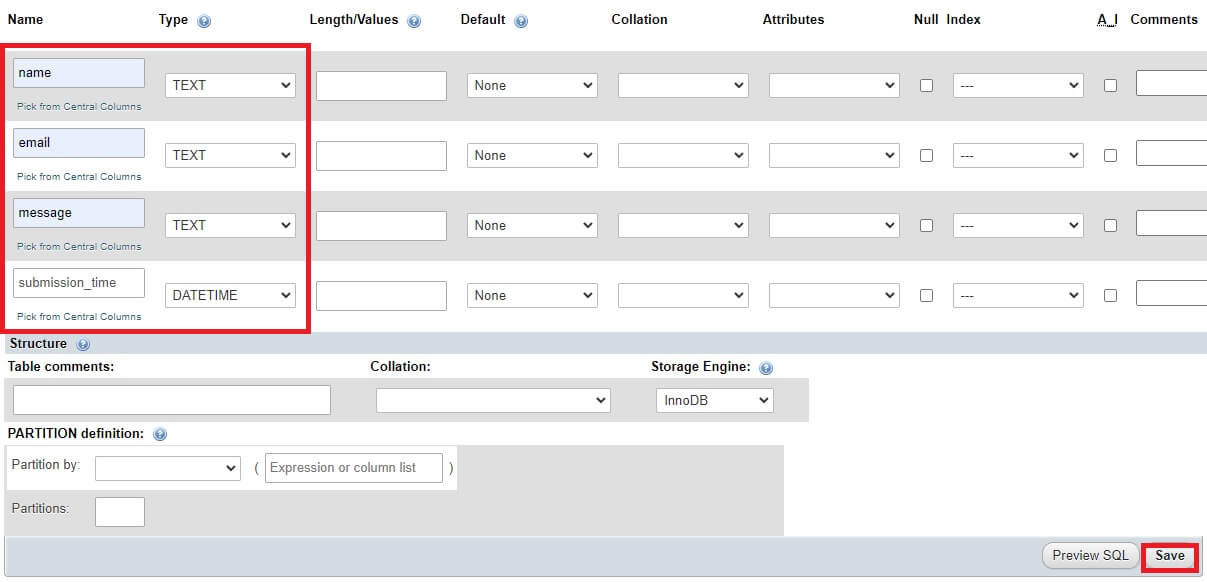
Then, enter the form fields in the table’s columns, along with their corresponding types. According to the form that we just created, we’ll be adding the following column names and types:

  • name: TEXT
  • email: TEXT
  • message: TEXT
  • submission_time: DATETIME

Finally, click Save to save the changes to the database table.

We’ve named the database table based on the contact form we created. You can change the table’s name to match the form you initially made. Similarly, if you have used different form fields, you can add the columns accordingly.

4) Add Code to Handle Form Submissions

After creating the database, you still need to add code to handle form submissions in the theme functions file of your website.

However, we recommend backing up your website before continuing, as we will be editing some of the website’s core files. Any unintended changes may lead to further issues on your website. You can look at our detailed guide on how to backup a WordPress website if you need any help.

4.1) Access the Theme Functions File

Go to Appearance > Theme File Editor from your WordPress dashboard to access the theme functions file. You will find all the core theme files of your website here. Then select the Theme Functions (functions.php) file on the right side of your screen, where we will add the code.

form submission code page create a form in wordpress

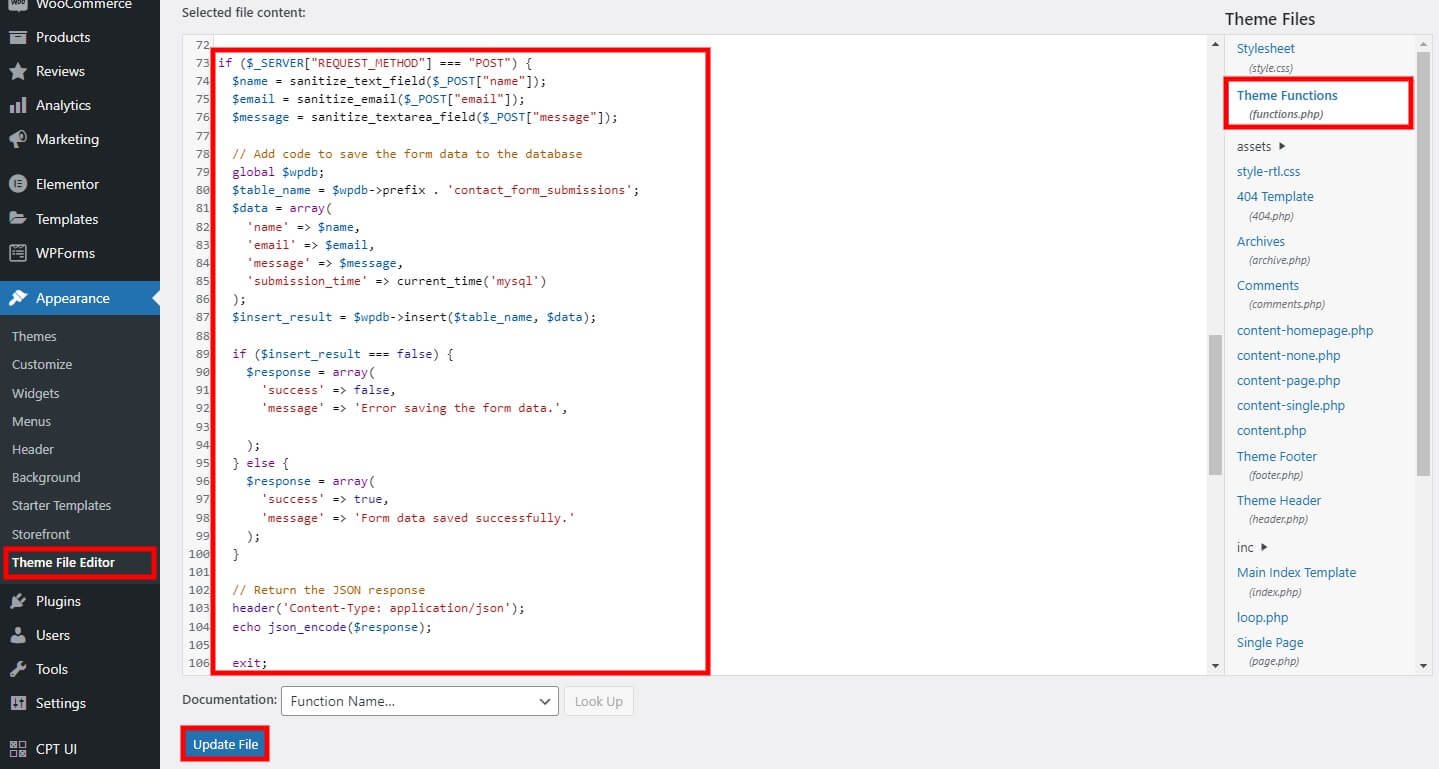
4.2) Add the Code to the Theme File Editor

You can use the following to handle the form submission on your website. Add the following code to the end of the editor.

if ($_SERVER["REQUEST_METHOD"] === "POST") {
  $name = sanitize_text_field($_POST["name"]);
  $email = sanitize_email($_POST["email"]);
  $message = sanitize_textarea_field($_POST["message"]);

  // Add code to save the form data to the database
  global $wpdb;
  $table_name = $wpdb->prefix . 'contact_form_submissions';
  $data = array(
    'name' => $name,
    'email' => $email,
    'message' => $message,
    'submission_time' => current_time('mysql')
  );
  $insert_result = $wpdb->insert($table_name, $data);

  if ($insert_result === false) {
    $response = array(
      'success' => false,
      'message' => 'Error saving the form data.',
    );
  } else {
    $response = array(
      'success' => true,
      'message' => 'Form data saved successfully.'
    );
  }

  // Return the JSON response
  header('Content-Type: application/json');
  echo json_encode($response);
  exit;
}

This code will store the entered form data from the form to the form submission database table we just created. We’ve also included a JSON response to ensure that you’ve added the correct database table names and fields to your form when editing the code. You can remove it after the form data is successfully stored in the database.

Simply click ‘Update File’ after making all necessary code changes.

5) Display Form Submissions on your Dashboard

After the form data is stored in the database, you can create your dashboard menu to view the form submissions. We will also include code to display it.

You can add the following code to the theme functions file (funtions.php), just like in the previous step.

function display_contact_form_submissions_page() {
  global $wpdb;
  $table_name = $wpdb->prefix . 'contact_form_submissions';
  $form_data = $wpdb->get_results("SELECT * FROM $table_name WHERE name <> '' AND email <> '' AND message <> '' ORDER BY submission_time DESC", ARRAY_A);

  ?>
  <div class="wrap">
    <h1>Contact Form Submissions</h1>
    <table class="wp-list-table widefat fixed striped">
      <thead>
        <tr>
          <th>Name</th>
          <th>Email</th>
          <th>Message</th>
          <th>Submission Time</th>
        </tr>
      </thead>
      <tbody>
        <?php foreach ($form_data as $data) : ?>
          <tr>
            <td><?php echo esc_html($data['name']); ?></td>
            <td><?php echo esc_html($data['email']); ?></td>
            <td><?php echo esc_html($data['message']); ?></td>
            <td><?php echo esc_html($data['submission_time']); ?></td>
          </tr>
        <?php endforeach; ?>
      </tbody>
    </table>
  </div>
<?php }

function register_contact_form_submissions_page() {
  add_menu_page(
    'Contact Form Submissions',
    'Form Submissions',
    'manage_options',
    'contact_form_submissions',
    'display_contact_form_submissions_page',
    'dashicons-feedback'
  );
}
add_action('admin_menu', 'register_contact_form_submissions_page');

Once again, click ‘Update File’ after you paste and edit the code according to the form and database table you created.
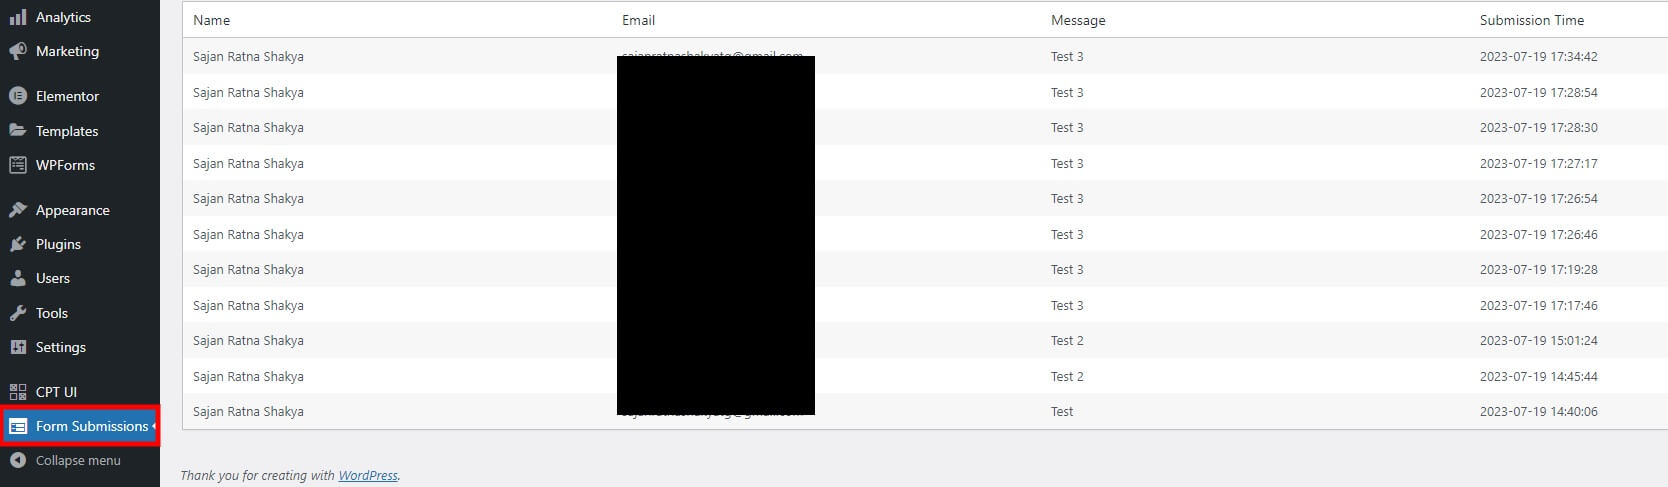
Now, if you go to your WordPress dashboard, you will be able to see a “Contact Form Submissions” menu. This will display all the form submissions of the form you initially created.

display form submissions page create a form in wordpress

Debug Options to Display Form Submissions

If you cannot see the form data, we recommend you add a code for debug output and SQL query on the code. You can add the codes var_dump($form_data); and var_dump($wpdb->last_query); respectively after the query.

So the code may look something like this:

function display_contact_form_submissions_page() {
  global $wpdb;
  $table_name = $wpdb->prefix . 'wp_contact_form_submissions';
  $form_data = $wpdb->get_results("SELECT * FROM $table_name ORDER BY submission_time DESC", ARRAY_A);

  var_dump($form_data); // Debug output
  var_dump($wpdb->last_query); // Debug SQL query

  ?>
  <!-- Rest of the code... -->
  <?php
}

Based on the debug report, you can edit the code further to ensure the form data is displayed correctly. But you can also go through the points in the next section to ensure there hasn’t been any error in the code you used.

Essential Considerations for Creating an Efficient Custom Form

Here are some factors to consider when editing the code to create your custom form. They can be helpful if you come across any errors during the process.

  • Check the database: Ensure that the form data is saved correctly in the correct table. For this tutorial, it’s the ‘wp_contact_form_submissions’ table.
  • Check for errors: Review your PHP error logs or enable error reporting to identify issues with form submission or data display. Errors may provide clues about what might be going wrong.
  • Check the form submission process: Ensure the form data is submitted correctly and that the PHP code for saving it executes without errors. Check if the form data is being passed correctly to the PHP code when the form is submitted.
  • Verify table name: Double-check that the table name used in the ‘display_contact_form_submissions_page()’ function matches the actual table name in the database. Ensure it is ‘wp_contact_form_submissions’ or adjust the table name according to your database table.
  • Clear Cache: If you are using any caching plugins or server-side caching, clear the cache to ensure you view the latest data.
  • Permissions: Make sure the user role you are logged in to has the ‘manage_options’ capability to access the custom admin page. This capability allows administrators to access the page by default.

We have provided a set of codes to help you create a contact form in WordPress. However, you must edit the code if you want to make any other form or an alternative form with different data fields. The above points can also help create your custom form on WordPress.

Common WordPress Form Issues and How to Fix Them

Here are some of the most common problems users face with WordPress forms — and how to resolve them:

  • Form not sending emails: Incorrect email settings or a missing SMTP plugin are often the cause. Install a plugin like WP Mail SMTP and configure it with your email provider to ensure deliverability.
  • Form submissions going to spam: Use a professional domain-based email (like [email protected]) and configure SPF, DKIM, and DMARC settings. Adding SMTP also helps reduce spam flagging.
  • Form not displaying correctly: This can happen due to theme or plugin conflicts. Switch to a default theme like Twenty Twenty-Four to test. Also, clear your site and browser cache.
  • Submit button not working: Usually caused by JavaScript errors or AJAX issues. Check the browser console for errors and disable conflicting plugins.
  • Spam form submissions: Activate Google reCAPTCHA or Honeypot fields available in most form plugins to block bots.
  • Form entries not saving: Ensure that the plugin stores entries or is connected to a storage method. Some free plugins do not save submissions unless configured.

Best Free WordPress Form Builder Plugins

If you don’t need to use code for the forms and require a simple solution, consider the free form builder plugins available on the market. There are multiple options available that will help you create any forms with ease. Some popular ones are listed below.

1. WPForms Lite

WPForms

WPForms Lite is one of the most beginner-friendly form plugins for WordPress. It features a simple drag-and-drop builder that lets users create contact, feedback, or newsletter sign-up forms without writing any code.

The plugin includes pre-designed templates to expedite form creation and integrates seamlessly with popular email marketing tools. WPForms Lite includes spam protection via reCAPTCHA and instant email notifications for new entries.

Although it offers a premium version with advanced features, the free version is more than sufficient for basic form-building needs. It also works seamlessly with both the block and classic editors. You can embed forms using shortcodes or directly with blocks, making it highly flexible for all users.

WPForms Lite is ideal for beginners who need reliable form functionality with a simple user interface.

Features

  • Drag-and-drop form builder to create contact forms, subscription forms, and other custom forms without coding.
  • A selection of ready-made form templates to speed up form creation for typical use cases.
  • Built-in spam protection, including CAPTCHA support and anti-spam honeypots.
  • Mobile-responsive forms that adapt to users on all devices.
  • Basic email notifications and confirmations after form submission.

Pros

  • Extremely beginner-friendly—excellent for users new to WordPress forms.
  • Fast setup with pre-built templates and a clean interface.
  • The free version covers most simple contact form needs without extra expense.
  • Lightweight plugin that adds minimal overhead to your site.

Cons

  • Entry management (viewing and exporting submissions) and advanced fields are locked behind the premium version.
  • Not all integrations (CRM, marketing, and advanced payment) are available in the free version.

2. Forminator

Forminator

Forminator by WPMU DEV is a powerful free plugin that offers advanced form-building features with an intuitive interface. It supports not just contact forms, but also polls, quizzes, payment forms, and calculations.

The drag-and-drop builder is easy to use, and it comes with built-in templates to help you get started quickly. Forminator stands out by allowing you to collect payments through PayPal and Stripe in the free version — a rare feature among free form plugins.

It also includes spam protection using Honeypot and reCAPTCHA. Developers can take advantage of hooks and advanced settings, while beginners enjoy a clean UI and live previews. You can embed forms using shortcodes or blocks.

For those who want more than just contact forms, Forminator is one of the most feature-rich free form plugins available in the WordPress repository.

Features

  • Drag-and-drop form builder to create forms, polls, quizzes, and calculators.
  • Includes built-in payment integrations with Stripe and PayPal, even in the free version.
  • Supports conditional logic, multi-step forms, and repeatable fields.
  • Offers spam protection via honeypot and reCAPTCHA, and GDPR compliance options.
  • Integrates with popular marketing tools and CRM platforms.

Pros

  • Feature-rich free version with payment and advanced form options.
  • Suitable for creating interactive content, such as quizzes and calculators.
  • Modern interface that works well with both block and classic editors.
  • Integrates smoothly with third-party services for automation.

Cons

  • Some advanced features, like recurring payments and PDF generation, are premium only.
  • It can feel slightly overwhelming for beginners due to its wide feature set.

3. Fluent Forms

Fluent Forms

Fluent Forms is a lightweight yet powerful WordPress form builder with a generous free plan. It features a fast drag-and-drop interface and provides pre-built templates for various form types such as contact, newsletter, feedback, and support forms.

Fluent Forms supports conditional logic, spam filtering, and email notifications right out of the box. The UI is modern and performance-optimized, so forms load quickly and don’t slow down your site.

The plugin integrates easily with other tools and offers AJAX submission for a smooth user experience. It also includes responsive design settings so your forms look great on all devices. Fluent Forms is ideal for users who want more control and flexibility while maintaining a lightweight and easy-to-use interface.

Features

  • Drag-and-drop form builder with multi-column layout and over 25 ready-made input fields.
  • Smart conditional logic, conversational form mode, and file/image upload support.
  • Payments integration and form scheduling/restriction for advanced workflows.
  • Spam protection with reCAPTCHA, hCaptcha, and other anti-spam tools.
  • High-performance design: the core plugin loads minimal CSS/JS to keep sites fast.

Pros

  • Rich free version offering many features typically locked behind paywalls.
  • Very beginner-friendly while still extending to advanced features such as forms, quizzes, and payments.
  • Works seamlessly with the block editor and modern WordPress themes.
  • Lightweight and optimized for performance, helping maintain good page speeds.

Cons

  • Some premium features like recurring payments, advanced PDF generation, and full CRM integrations are only available in the paid version.
  • The wide feature set may feel overwhelming to users who only need a simple contact form.

4. Ninja Forms

Ninja Forms

Ninja Forms is a flexible form builder that caters to both beginners and advanced users. Its free version comes with a clean drag-and-drop editor, making it easy to build contact forms, quote requests, and other form types without coding.

The plugin integrates well with the WordPress dashboard and supports reusable fields, custom messages, and spam filters. While the plugin offers premium add-ons for features like conditional logic and CRM integration, the free version still meets essential needs.

You can display forms using shortcodes or blocks, and styling them is straightforward with built-in classes or custom CSS. Ninja Forms is best suited for users who want a modular, scalable form solution that they can expand as their site grows.

Features

  • Drag-and-drop form builder with 24+ free fields and unlimited submissions.
  • Built-in tools for calculations, file uploads, and conditional logic.
  • Unlimited email notifications, customizable success messages, and spam protection.
  • Advanced data handling, including export to CSV, submission management, and GDPR compliance.
  • Modular architecture with over 40 official add-ons for payments, CRMs, and marketing integrations.

Pros

  • The free core version is robust and includes many advanced features right out of the box.
  • Suitable for both beginners and developers thanks to its no-code, extendable workflows.
  • Scalable via add-ons, so you pay only for the features you need.
  • Strong data control—submissions stored locally and privacy tools built in.

Cons

  • Many premium features require separate paid add-ons, which can add up.
  • The breadth of functionality creates a learning curve for first-time users.

Frequently Asked Questions

Now, we will examine some frequently asked questions and their answers regarding this topic.

What is the easiest way to create a form in WordPress?

The easiest way is to use a form plugin, such as WPForms, Forminator, or Contact Form 7. These plugins offer drag-and-drop builders and ready-made templates to create contact, feedback, or registration forms quickly.

Can I add a form in WordPress without using a plugin?

Yes, you can add a basic form using HTML code in the block editor, but it won’t have features like validation, spam protection, or email notifications. For dynamic forms, a plugin is recommended.

Which is the best free form plugin for WordPress?

Some of the best free plugins include WPForms Lite, Forminator, and Fluent Forms. Each has beginner-friendly features, templates, and spam protection.

How do I display a form on a page or post?

Most form plugins generate a shortcode after you create a form. You can copy and paste this shortcode into any WordPress page, post, or widget.

Why is my form not sending emails?

This often happens due to incorrect email settings or a lack of SMTP configuration. Using an SMTP plugin, such as WP Mail SMTP, can resolve most email delivery issues.

Can I create multi-step or conversational forms in WordPress?

Yes, plugins like WPForms, Forminator, and Fluent Forms support multi-step forms, which improve the user experience and reduce form abandonment.

How do I enable file uploads in a form?

Most advanced form plugins allow you to add a file upload field. Just drag the field into your form builder and set file size or type limits if needed.

Are WordPress forms GDPR compliant?

Many plugins offer GDPR-ready features such as consent checkboxes, data storage control, and anonymization. Ensure you enable these options in accordance with your site’s legal requirements.

Conclusion

This is how you create a form in WordPress without using plugins. You can also create forms using plugins. However, creating a custom-coded form has several advantages if you have a basic understanding of programming.

You can easily create a form using the basic code set we’ve included in this tutorial. To summarize, here are the basic steps to build an effective one:

  • Add the code for the form to the page editor
  • Create a database for form submissions
  • Add necessary code to handle form submissions and display them

We hope you can now confidently create a form on your website using the codes mentioned in this tutorial. You can edit them to include additional form fields as needed. If you encounter any issues, we’ve even added some debug options and considerations for building custom code on WordPress.

Have you ever tried creating a form in WordPress without using a plugin?

Do let us know in the comments below.

2 comments

  • Hi, and thanks for this great breakdown. I’m trying to follow along for an even simpler form I’ve created but I’m getting an error at Step 4.2.

    The front end of the form is fine, and I’ve styled it how I want. But when attempting to save the input to the database, I’m running into several issues.

    Can you explain to me why the name of the table in phpMyAdmin is wp_[name] but in the code for Step 4.2 it’s just [name]? As well, the “prefix” listed here is wpdb, not just wp_. So these things seem incongruous.

    When I use the code as you’ve listed it here, I get “ERROR: Undefined array key “message””

    If I adjust the code to remove the e-mail field and update the prefix to “sisform” I get “ERROR: Call to a member function insert() on null” and an additional note saying, “ERROR: Attempt to read property “prefix” on null”.

    If I keep the prefix as it’s shown in the code here but just remove the e-mail field I don’t need, I’m again getting, “ERROR: Undefined array key “message””

    I’m using WP Code Snippets to implement this. Any thoughts on what might be the issue?

    • Hey Sairah,

      This is an old article so the codes might not work with the latest version of WordPress. We will fix it after testing the code. If you are looking to create a form, I would recommend using a plugin like WPForms, Contact Form 7 or Formidable Forms. When you use a form plugin, you do not need to deal with any coding or any other hassle.

Leave your comment

Log into your account
Forgot your password?