
How to Remove Robots.txt from WordPress
Do you want to remove robots.txt from WordPress? The robots.txt file is essential to block search engine bots from indexing certain pages of your website. But if it is not configured correctly, this may cause problems for your site, so you may need to remove it.
So before we dive in with the process of removing it, you need to have a clearer understanding of the robots.txt file and why you may need to remove it.
What is Robots.txt?
The robots.txt is a file of your WordPress website which contains the guidelines for the search engine bots on which areas or pages of your website should be indexed and crawled. It also informs the search engines using specific rules and instructions on whether the pages and sections of your website should be indexed.
If we consider a real-world example, Google’s web crawlers, also known as Googlebot, regularly analyze websites to keep their page index up to date. These web crawlers follow the instructions outlined in the robots.txt file while scanning the website. Then, they index and crawl the pages and areas of your website according to the guidelines mentioned in the robots.txt file.
In the same way, the search engines engine bots of all the other well-known web crawlers index and crawl your website using the robots.txt file. The file is handy for restricting bots from accessing certain website areas, pages, or directories. But at the same time, you may benefit by removing or disabling the robots.txt file from your WordPress website in some cases.
Why Should You Remove Robots.txt from WordPress?
There are many reasons to consider removing or disabling the robots.txt file from your WordPress website. Here are a few of them:
- Unintended restrictions: The robots.txt file may sometimes contain rules that unintentionally restrict search engine crawlers from accessing essential pages or sections of your website. This can negatively impact your site’s visibility in search engine results and affect your site’s ranking.
- Development or staging sites: If you have a development or staging site for testing purposes, you may not want search engines to index these sites. So if you remove the robots.txt file, you can ensure that the search engine crawlers won’t index or display these sites in search results. This allows you to focus on testing and refining your site during the early development and testing process without the risk of it being visible to the users publicly.
- Enhanced indexing: Search engine crawlers can freely access and index your website’s pages and content when you remove the robots.txt file. So they can discover and include a wider range of your site’s content in their index. This can be beneficial if you want to ensure maximum visibility and discoverability of your website’s content.
- Plugin Conflicts: Conflicts between specific plugins of your WordPress website and the robots.txt file may sometimes lead to unexpected issues or errors. So removing the robots.txt file can help resolve such conflicts and ensure the smooth functioning of your WordPress site.
However, it’s important to note that removing the robots.txt file is not a decision to be taken lightly and isn’t usually recommended. Consider the implications and consult with an expert before you continue if you’re unsure about its impact on your website’s SEO performance.
How to Remove Robots.txt from WordPress
You can remove or disable the robots.txt file from WordPress in 2 major ways:
- Using FTP client
- cPanel
We’ll go through these methods in detail with a step-by-step guide to removing robots.txt from WordPress. Both ways are similar to each other. But you must access the FTP or the cPanel of your website first.
Note: Before you remove the robots.txt file from your website, please make sure that you make a copy of it. Then, you can upload the original file to your website again if you make any unintentional changes during the procedure, which may lead to errors or bugs.
1. Remove Robots.txt using FTP Client
Using an FTP client to remove robots.txt from your WordPress website is easy. You can access FTP for WordPress using an FTP client like FileZilla or Cyberduck. Then, you can start editing the files of your website using it.
We will use the FTP client FileZilla for this tutorial which you can download and install to your computer from their website. But you are free to use any FTP client that you like. The steps are almost identical to one another.
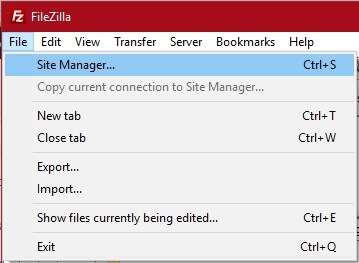
After you install the FTP client, you have to connect your website to the FTP client. So open the FileZilla application on your computer and go to File > Site Manager from the top left corner of the menu bar. You can also use the keyboard shortcut Ctrl+S on your keyboard to access the site manager.
Then, click on New Site and enter the name of your website under My Sites.

Now, open the General tab on the right side of your screen, where you’ll need to enter the credentials to connect your site with the FTP client. If you don’t have the required credentials, you can ask your hosting provider for it.
After you enter the credentials, click on Connect.

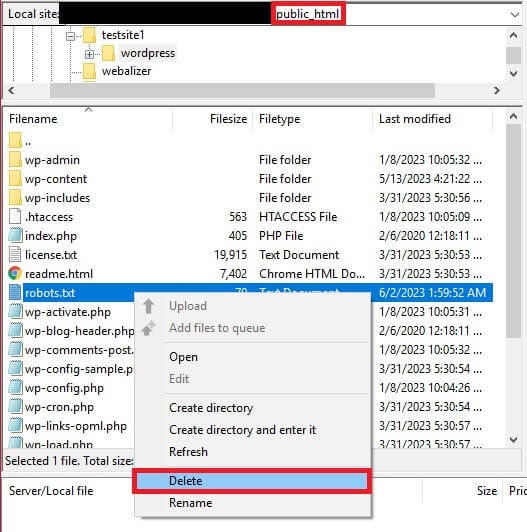
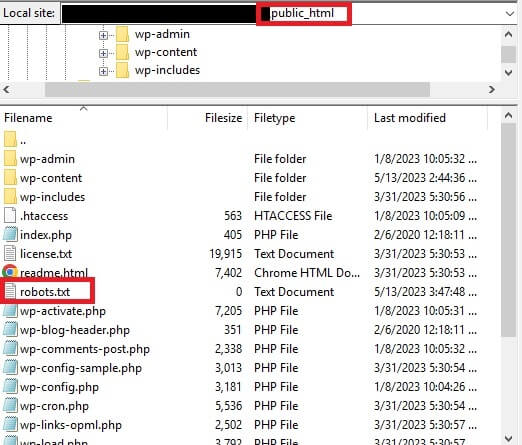
You will now have access to your website’s file directory from where you can remove the robust.txt file of your WordPress website. The robots.txt file is in your website’s root directory, also called the “public_html” folder. You can navigate to it using Filezilla Explorer.
Once you find the robots.txt file, right-click on the file and select Delete.
That’s it! You have successfully removed the robots.txt file from your WordPress website.
2. Remove Robots.txt from cPanel
If you want a more direct approach to manually removing the robots.txt file from your WordPress website, you can use the cPanel. All you have to do is log in to your cPanel account using the link provided by your hosting provider. Again, you can contact your hosting provider if you don’t have the necessary credentials and details.
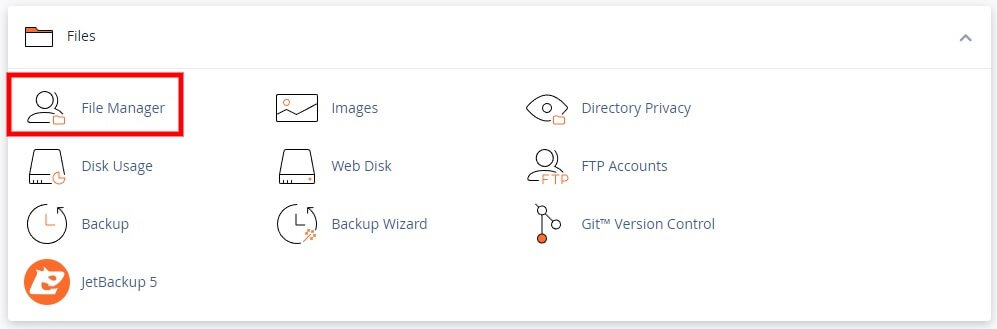
After logging in to the cPanel, scroll to the Files section and click on File Manager. You can now access all the files of your WordPress website.
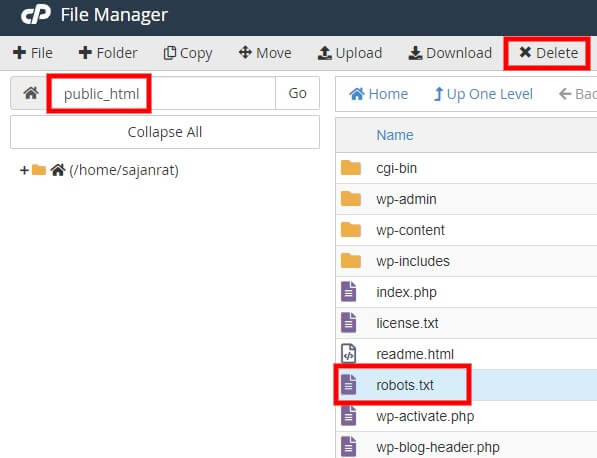
Then, navigate to the root directory or “public_html” folder since the robots.txt file is here. Now, select the robots.txt file and click Delete on the file manager’s menu bar.
Great! Your robots.txt file is now removed from your WordPress website.
How to Disable Robots.txt in WordPress?
The above-mentioned approaches can help you remove the robots.txt file from your WordPress website. But it isn’t usually recommended as the file is very important for your SEO. So if you want a safer option, you can disable the robots.txt file in your WordPress website.
As a result, the robots.txt file will be present in your website file directory even if there won’t be any restrictions for the search engine bots to crawl and index your website. There are several ways to disable the robots.txt file in WordPress. You can do so directly from the WordPress dashboard or edit the file manually using a plugin, FTP, or cPanel.
1. Disable Robots.txt from WordPress Dashboard
It’s straightforward to disable the robots.txt file from your WordPress dashboard. All you have to do is go to Settings > Reading from your WordPress dashboard, uncheck the Search Engine Visibility option, and save the changes.
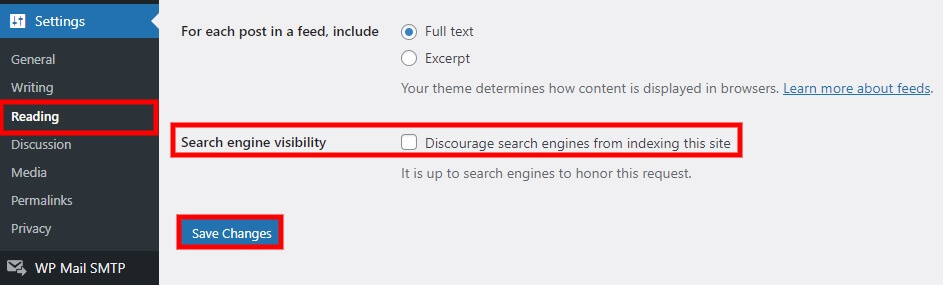 This will remove all the contents of the robots.txt file in your WordPress website and change it to:
User-agent: *
Disallow:
Therefore, this will prevent the search engines from indexing your website. But the decision to honor this request lies with search engines.
2. Disable Robots.txt Using a Plugin
You can also edit and disable the robots.txt file using a plugin if you already use an SEO plugin from your WordPress website. This can save a lot of time if you don’t want the search engine bots to index your site using the robots.txt file.
Several WordPress SEO plugins allow you to edit and disable the robots.txt file. But we will be using the Rank Math SEO plugin for this demonstration.
It has a very straightforward interface for editing the robots.txt file. This will make it very easy to edit and remove the contents of the robots.txt file of your WordPress website to deactivate it.
![]()
If you want to use any other SEO plugin, you can do so. The steps are very similar to each plugin. So you have to install and activate the plugin before you start using it.
2.1. Install and Activate the Plugin
To install the plugin, go to Plugins > Add New from your WordPress dashboard and search for the keywords of the plugin. As soon as it is displayed on the search results, click Install Now.
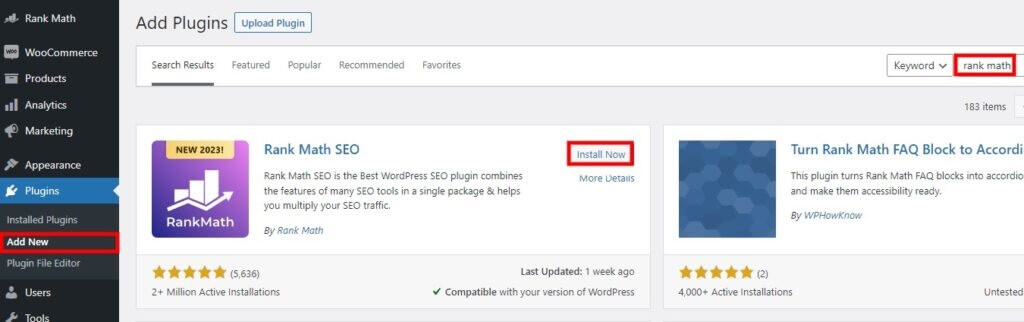
The installation will be completed in just a few seconds. Then, click on Activate to activate the plugin.
You can also manually upload and install the plugin if you want to use any premium SEO plugins. Please look at our guide on manually installing a WordPress plugin if you need help.
2.2. Edit and Disable Robots.txt File
After you activate the plugin, go to Rank Math > General Settings from your WordPress dashboard and open the Edit robots.txt file tab. This will allow you to edit the codes and instructions you want to include in your robots.txt file. The plugin has even provided a text editor here to add or remove the codes and instructions on your robots.txt file.
![]()
If you have edited this file before, you may see several instructions here depending on the pages you don’t want the search engine bots to crawl and index. On the other hand, if this is the default robots.txt file that WordPress created, you will see the following details:
User-agent: *
Disallow: /wp-admin/
Allow: /wp-admin/admin-ajax.php
Here, all you have to do is remove all the additional codes in the robots.txt file and leave the file with the following instructions:
User-agent: *
Disallow:
After you add the above instruction, click on Save Changes.
That’s it! You have successfully disabled the robots.txt file using a plugin.
3. Disable Robots.txt Using FTP Client or cPanel
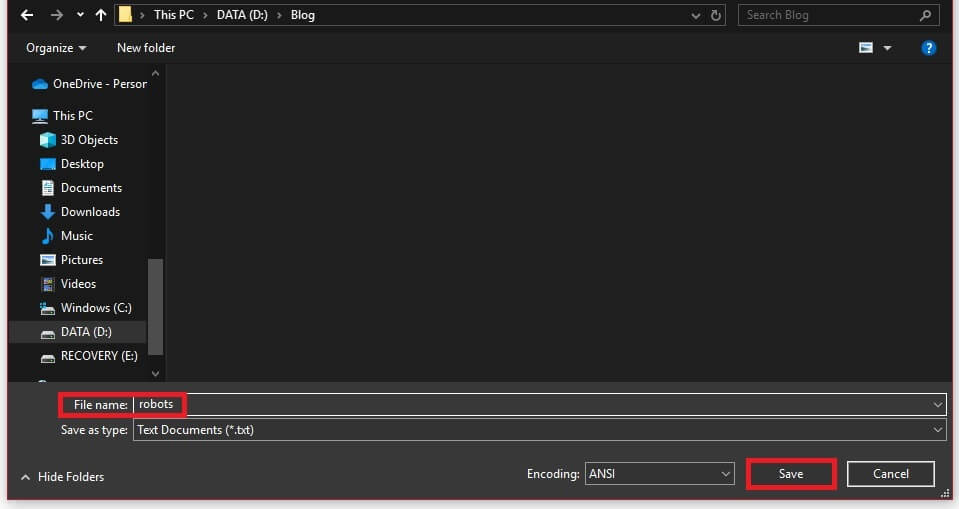
The robots.txt file can also be disabled using an FTP client or cPanel. For this approach, you don’t have to remove any contents of the robots.txt file from your WordPress website. However, you need to create a new robots.txt file using any text editor and include just the following instructions:
User-agent: *
Disallow:
Make sure that you save the file as “robots.txt.”
Now all you have to do is upload and replace the newly created robots.txt file with the older one using an FTP client or cPanel.
If you want to use FTP, you can first connect your website with the FTP client using the steps mentioned in this guide. Then, upload the new robots.txt file to the root directory or the “public_html” folder.
Similarly, if you want to use cPanel to disable the robots.txt file, you can first log in to your cPanel account and open the file directory. You can follow the steps from the section “Remove Robots.txt from cPanel” of this guide. Then, navigate to the “public_html” folder and upload the newly created robots.txt file here.

If you need help editing this file, look at our detailed guide on editing robots.txt in WordPress.
Conclusion
These are the various methods with which you can disable or remove the robots.txt file from your WordPress website. It can be handy if issues are created on your website due to the robots.txt file. Removing it can also benefit you if your website is in the developing stage or if you want advanced indexing altogether.
But to summarize, you can completely remove the robots.txt file from your WordPress website using two major ways:
- Using FTP client
- cPanel
Both these approaches are very effective in removing the robots.txt file from your website. But since this isn’t usually recommended, you can also disable it if you want to stay safer. You can disable it using the WordPress dashboard or edit it using a plugin, FTP, or cPanel.
So can you remove or disable the robots.txt file now? Do let us know if you have ever tried it.
In the meantime, here are some more guides that can help you customize or improve your WordPress website:
