How to Add Privacy Policy to WooCommerce
When running a WooCommerce store that handles customer data, you need to have a privacy policy page and mention how you process the data. Thankfully, creating a privacy policy page is a cakewalk. To help you, this article will show you how to add a privacy policy to WooCommerce.
What is a Privacy Policy?
A privacy policy is a document that informs people how your online store or personal blog collects data from the customer and how it will be stored and processed. Most websites published this privacy policy document and link it to the footer or header to ensure that the website visitors can easily access it. But it’s also a common practice for some eCommerce websites to mention it on their checkout page.
Even we at QuadLayers have added the link to our privacy policy on the footer of our website.

When running a website, you might collect different information from users and share this with third-party apps or services (Google AdSense, Google Analytics). If you do so, a privacy policy page must include it as well and disclose everything related to the customer data.
But to understand the privacy policy better, let’s have a look at what to include on a privacy policy page as well.
What to Include in Privacy Policy?
When creating your privacy policy page, you should mention all the tools you use to gather customer data. For example, if you are using Google Analytics for tracking your website visitors, you should add it to the page. Similarly, Google AdSense and other display ads will gather customer data and display ads related to their searches.
All that must go on your privacy policy page. On top of that, most businesses will collect cookies to improve the visitor’s experience. It would be best if you mentioned how users could block this and contact the website admin in case of any queries or similar issues.
The main things to include inside your privacy policy are:
- Ads that collect user information
- Things that gather customer information (contact forms, comment forms, cookies)
- How to block cookies and related items that gather customer information
- Link to contact the website admin if the user needs to get personally
- The primary information you collect from your website visitors
You can manually create a privacy policy page containing all these details or use a third-party service.
Why add Privacy Policy in WooCommerce?
As you know, when you run a WooCommerce, you might be handling too much data of your customers. For example, you might be collecting data through forms (payment forms, donation forms, feedback forms, contact forms), comments, or even cookies. So, a privacy policy page is essential in every WooCommerce store.
A privacy policy page is crucial in a WooCommerce installation to comply with the privacy law. It also gives excellent transparency to your customers on the data that your store has on your website. This can also be great to gain the trust of your customers towards your online store.
How to add Privacy Policy to WooCommerce
Now, we will show you different ways to add a privacy policy to your WooCommerce store and display it:
- Configure the privacy policy
- Display the Privacy Page
Let’s go through the steps in more detail.
1. Set up Privacy Policy
You have to set up your privacy policy page first if you want to add it to your online store. The latest version of WordPress CMS comes with an in-built privacy policy page.
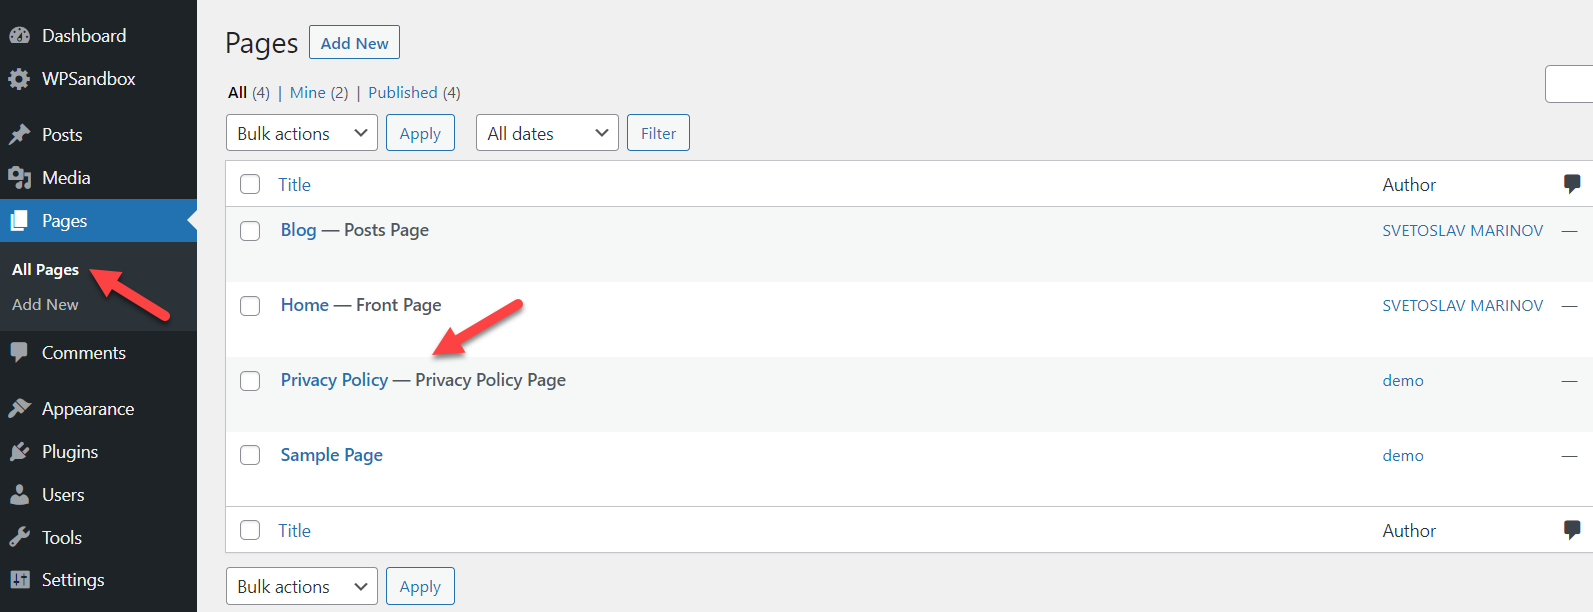
Go to Pages > All Pages from your WordPress dashboard. You will be able to see the Privacy Policy page here. It can also be edited or viewed from this page.
If you wish to make any changes to it, just update the page after you’re done modifying it.
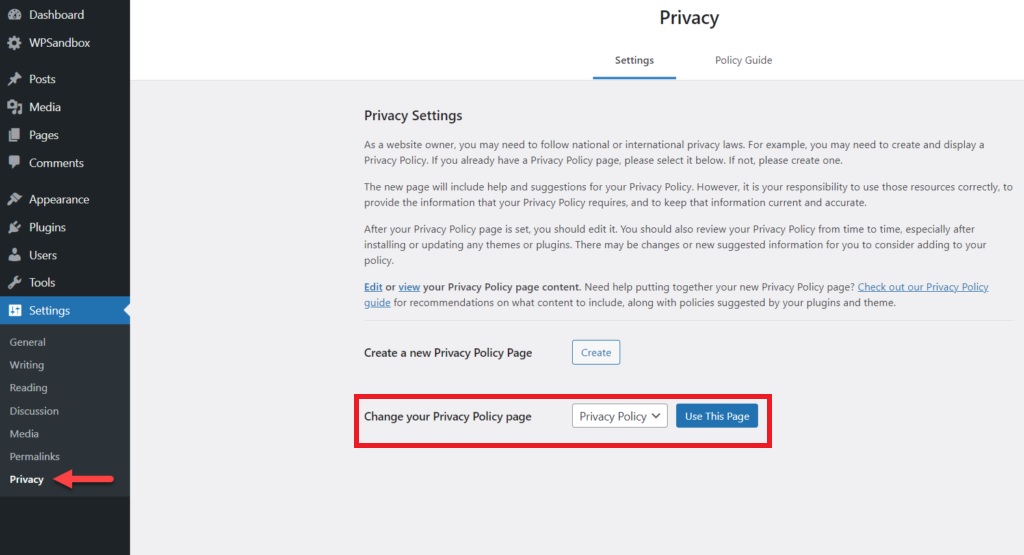
Now, you have to set up that particular page as your privacy policy for your website. To do so, go to Settings > Privacy from your WordPress dashboard. Then, under the Settings tab, you will see an option to modify the privacy page.
Now, set the Change your Privacy Policy page as the Privacy Policy page that you just edited and click on Use This Page. That’s it! you’ve set the privacy policy page for your WooCommerce website.
However, you can also create a new privacy policy page from here if you want an entirely new page for it. Just click on the Create button for Create a new Privacy Policy Page on the Settings tab and start working on your new privacy page.
2. Display the Privacy Page
Once you have created a privacy policy page for your WooCommerce store, you need to display it. You could add it to any of your navigation menus or widget areas. This section will show you how to add the privacy policy page to the website’s header area, checkout page, and footer.
2.1. Display Privacy Policy on Header Menu
When someone lands on a website, the first thing they see might be the header area. Adding essential links and pages to the header menu makes those accessible to everyone without much effort.
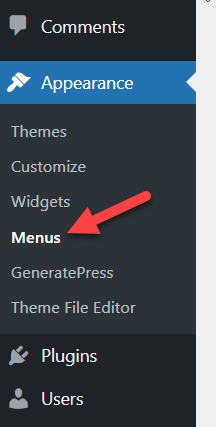
So, the header menu is one of the finest places to add your privacy policy. The very first thing you need to do is create a menu. If you already have a menu, you can skip this step.
Under Appearances, click on the Menus option from your WordPress dashboard.
If you are on a completely new WooCommerce installation, you probably wouldn’t have any menus. So, you need to create one.
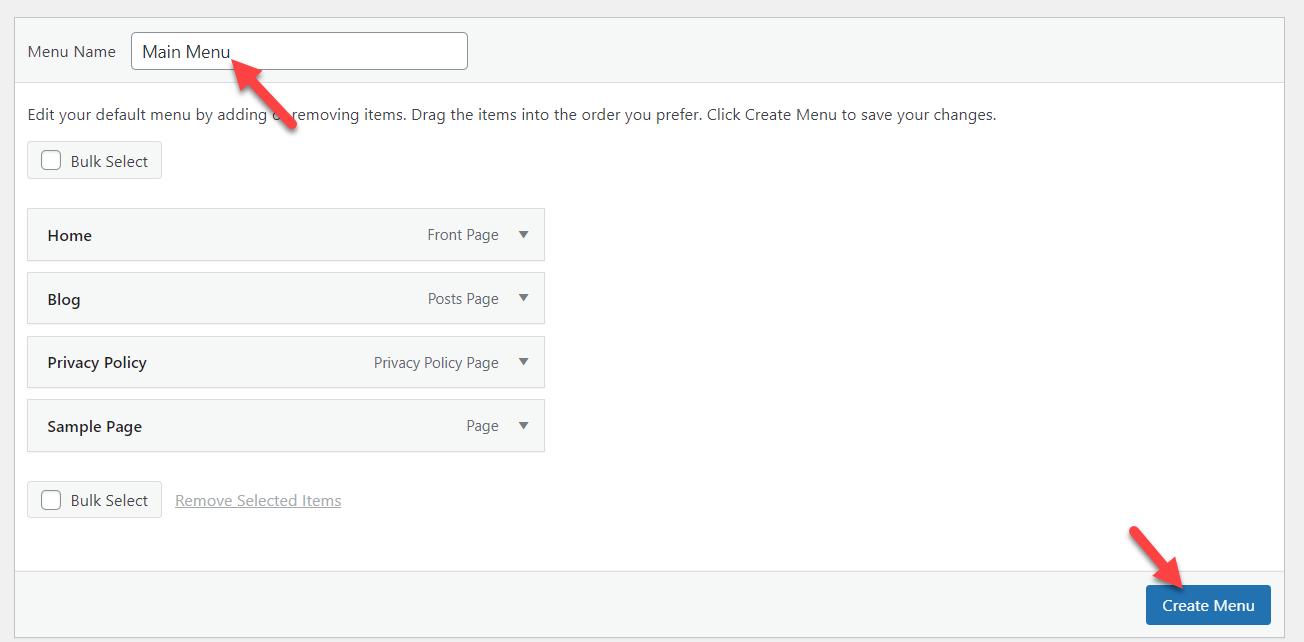
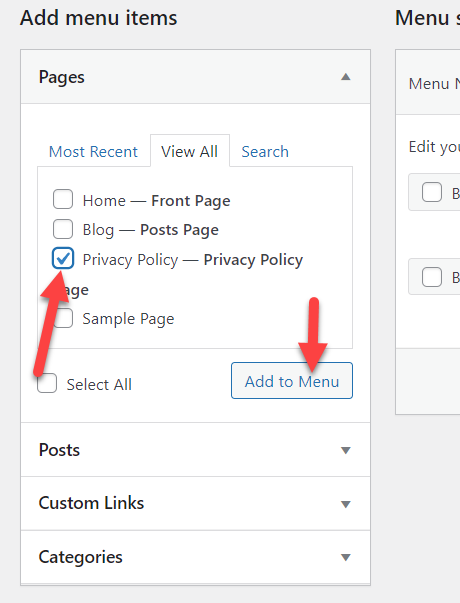
After creating a menu, you can add pages, posts, or custom links. In this case, we will only add the Privacy Policy page to the menu.
Once you have added the page to the menu, choose the display location. Then, save the menu.
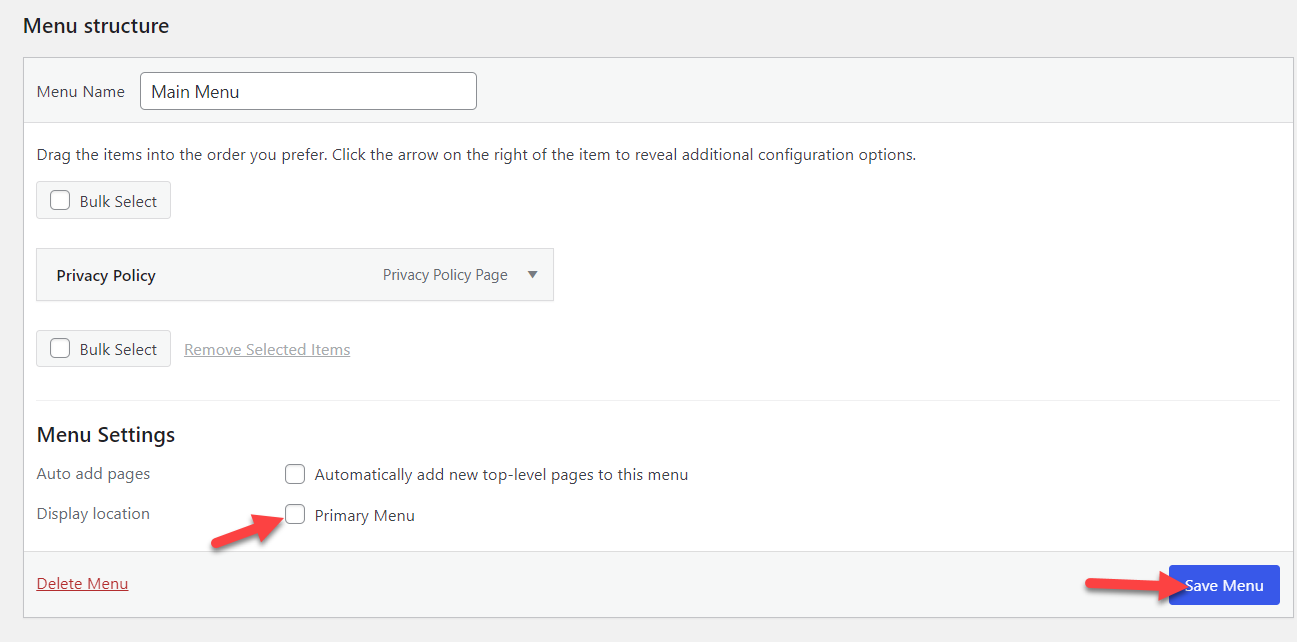
If you check the above screenshot, you can see that we have selected Primary Menu as the display location which is the header position. You will see multiple display locations with other names if you use a different theme on your WooCommerce store.
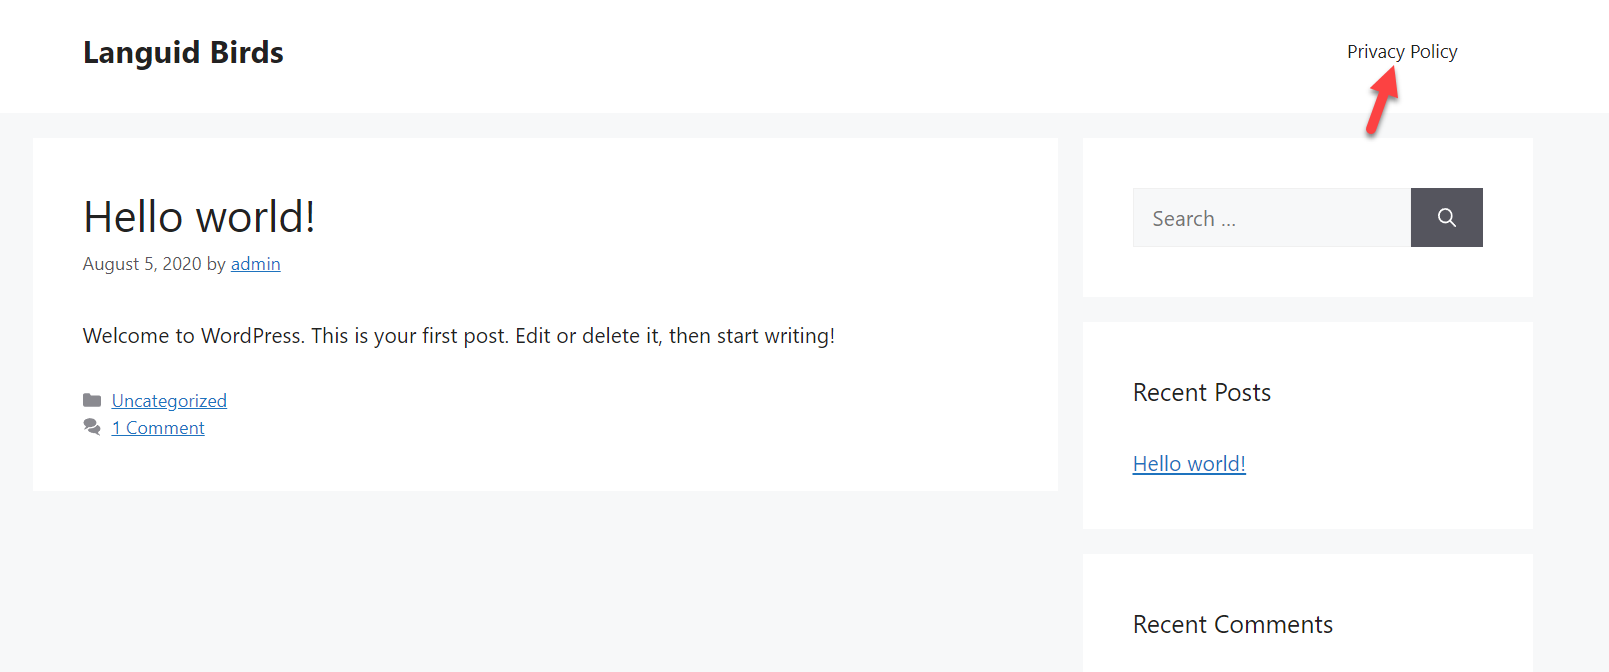
After saving the menu, check the website from the front end and the privacy policy link should be in the header.
When you need to add more items to the header, go back to the menu options, and insert the pages or custom links you want.
2.2. Display Privacy Policy on Checkout
While running a WooCommerce store, the checkout page is one of the essential elements of the site. Placing a link to the privacy policy or displaying the contents of the privacy policy page inside the checkout page will make your website comply with the laws.
This section will show you how to modify the checkout page and display the privacy policy.
You do not need to use third-party plugins or tools to display the privacy policy inside the WooCommerce store. Go to WooCommerce > Settings on your WordPress dashboard and open the Accounts & Privacy tab.
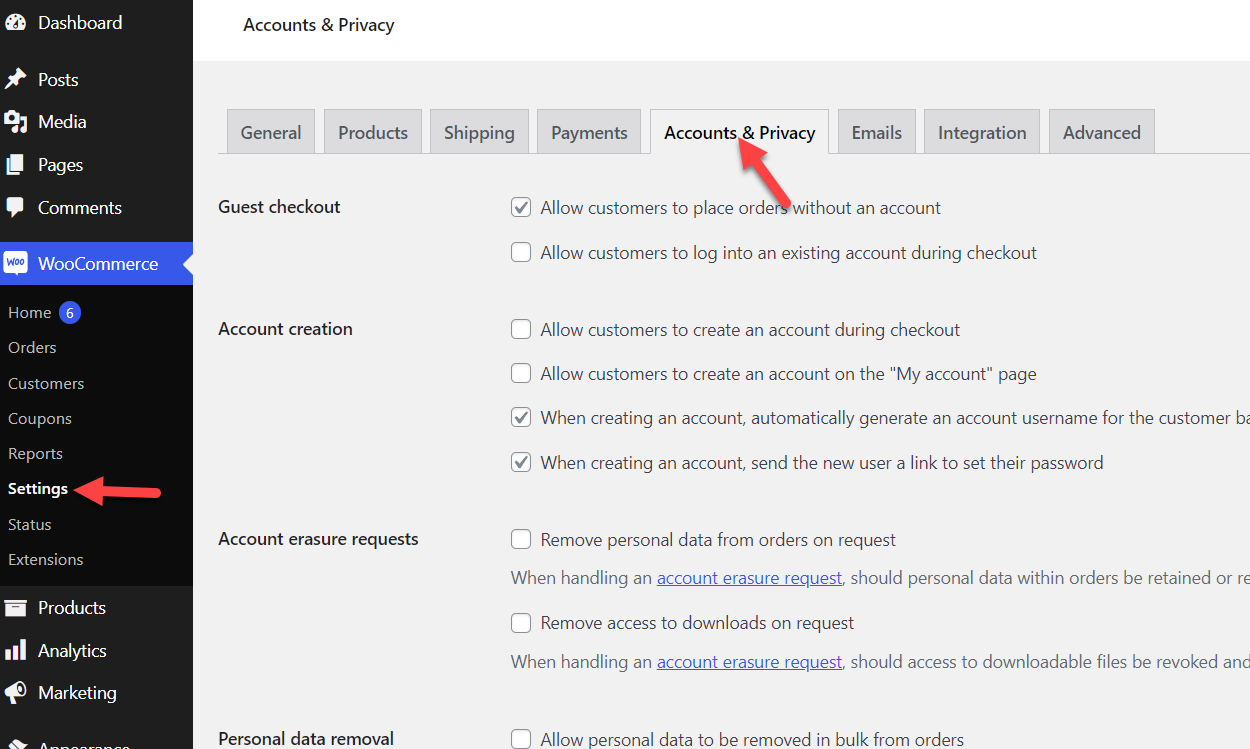
Here, scroll down to the Privacy policy section. You can edit the content as you like now.
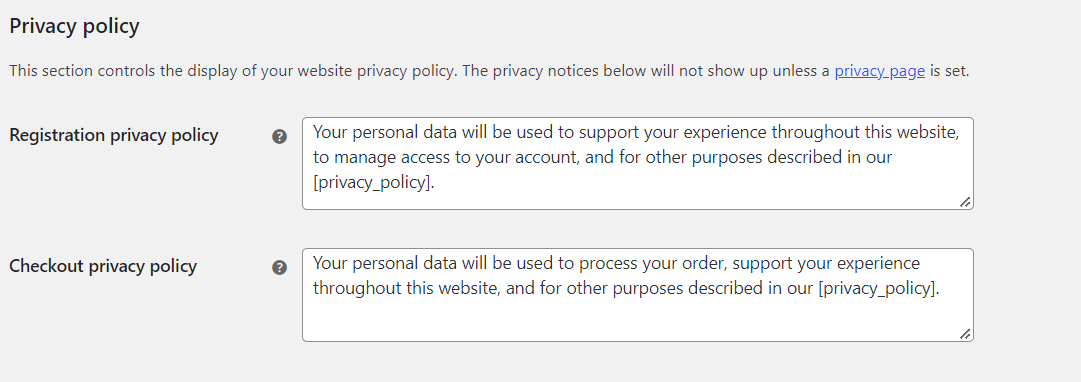
If you have configured a privacy policy page, you can use the [privacy_policy] shortcode to insert a link to the page. Once you have modified the contents according to your preferences, you should save the settings.
From now on, your customers will see the privacy policy on the checkout page.
2.3. Display Privacy Policy with Footer Link
Most customers will be scrolling to the bottom of the website to check the important links such as contact, about, terms of service, and so on. So, adding your privacy policy page link to the website’s footer can be helpful.
2.3.1. Adding Privacy Policy Link to Footer
We will be displaying the privacy policy in the footer link as a widget option. So, you have to go to Appearance > Widgets from your WordPress dashboard first.
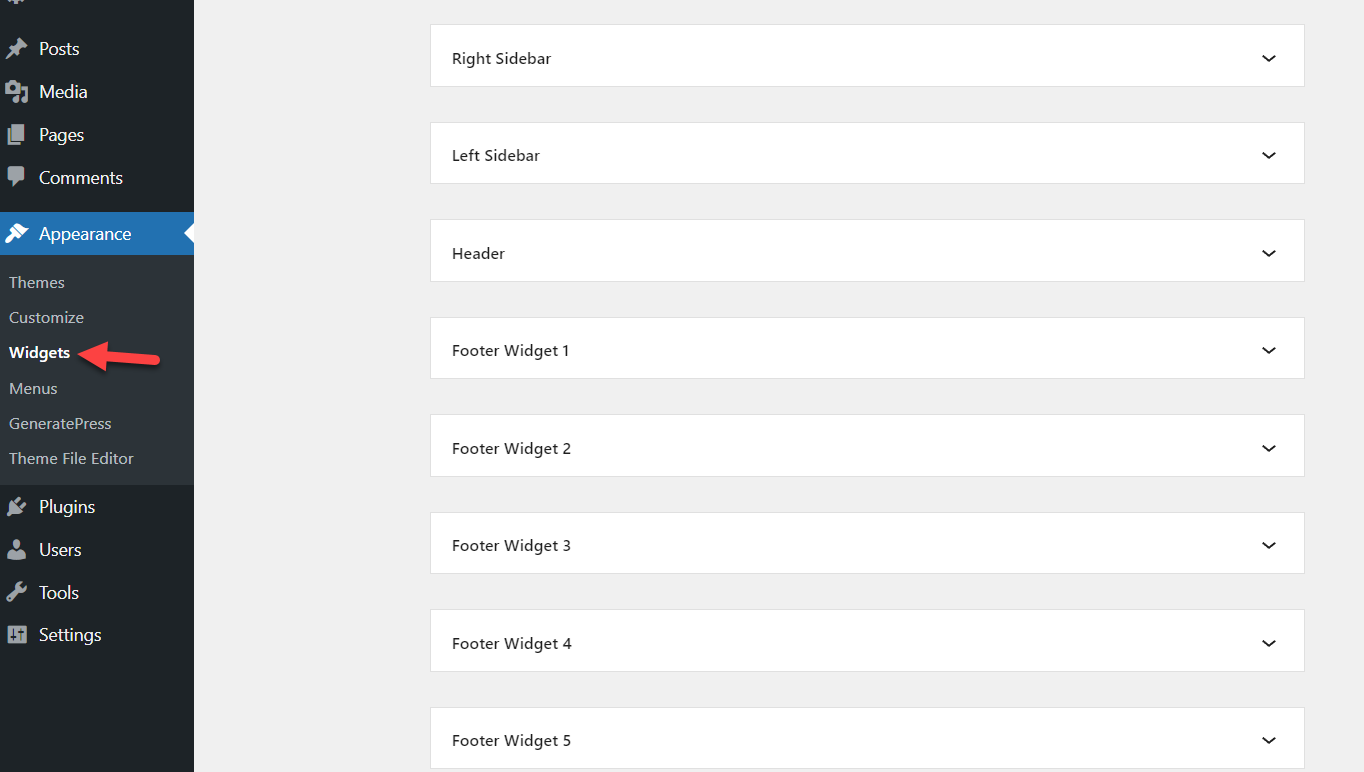
There, you will see all the available widget areas supported by your WordPress theme. In this case, we are using the lite version of GeneratePress. And as you can see, the GeneratePress theme comes with plenty of widget areas to use.
Since we need to display the privacy policy link on the footer, expand the Footer Widget area and add a paragraph block there.
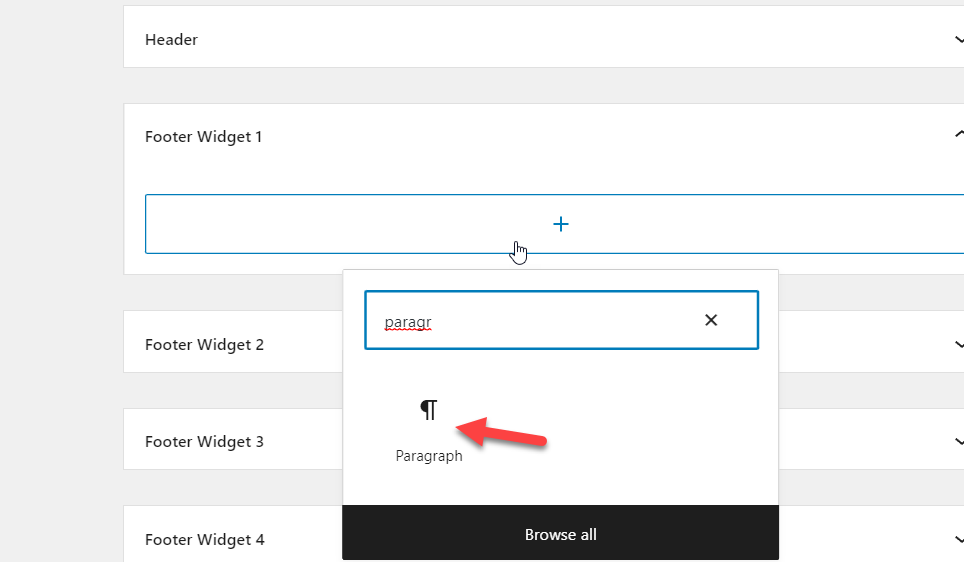
Once you have added the block, feel free to insert texts and links for your privacy policy page. Here, we will show you how to add the privacy policy link to the paragraph block manually.
Just add the block for the anchor text. After selecting the anchor text, you can insert a link for the privacy policy.
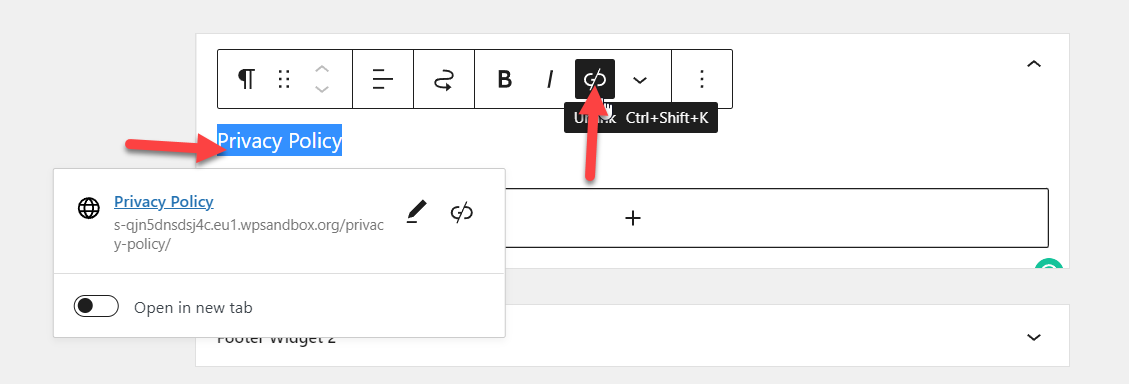
Save the updates and check your website from the front end. You will see a link to the privacy policy page at the bottom.
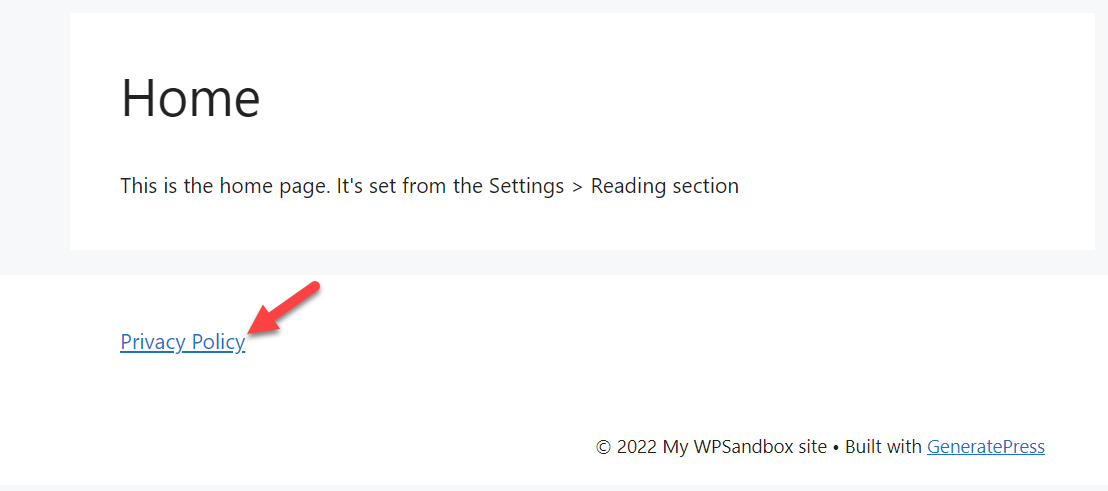
That’s it! This is how you can add the privacy policy link on the footer. But if you want, you can even add the link with the navigation menu
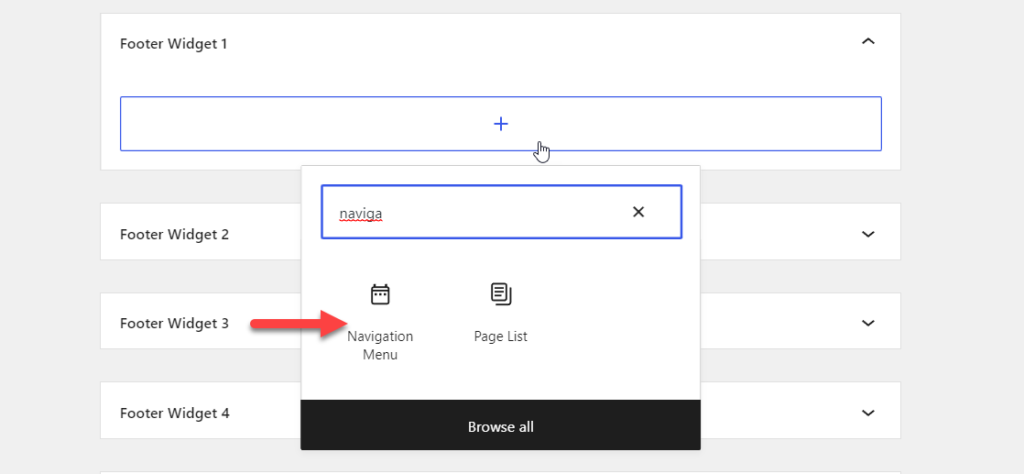
2.3.2. Adding Navigation Menu to Footer
To add the contents of your navigation menu to the footer, just follow these simple steps.
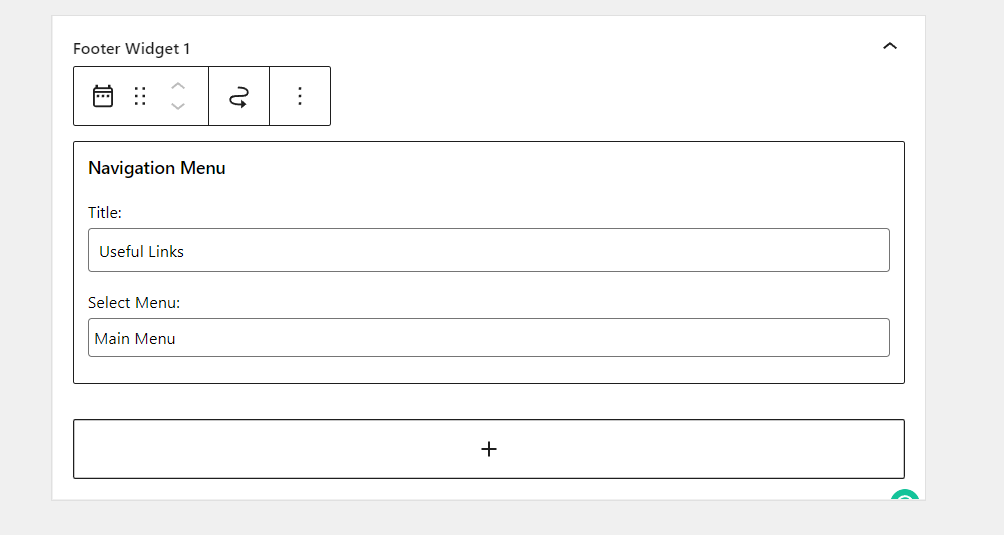
Similar to the previous step, you’ll add the navigation menu as a widget on your footer as well. So go to Appearance > Widgets from your WordPress dashboard once again. Now, when you add a block to the footer widget area, you must search for the Navigation Menu.
You must add a title for the block and choose a navigation menu from the dropdown.
After that, save the options and check your website’s footer from the front end.
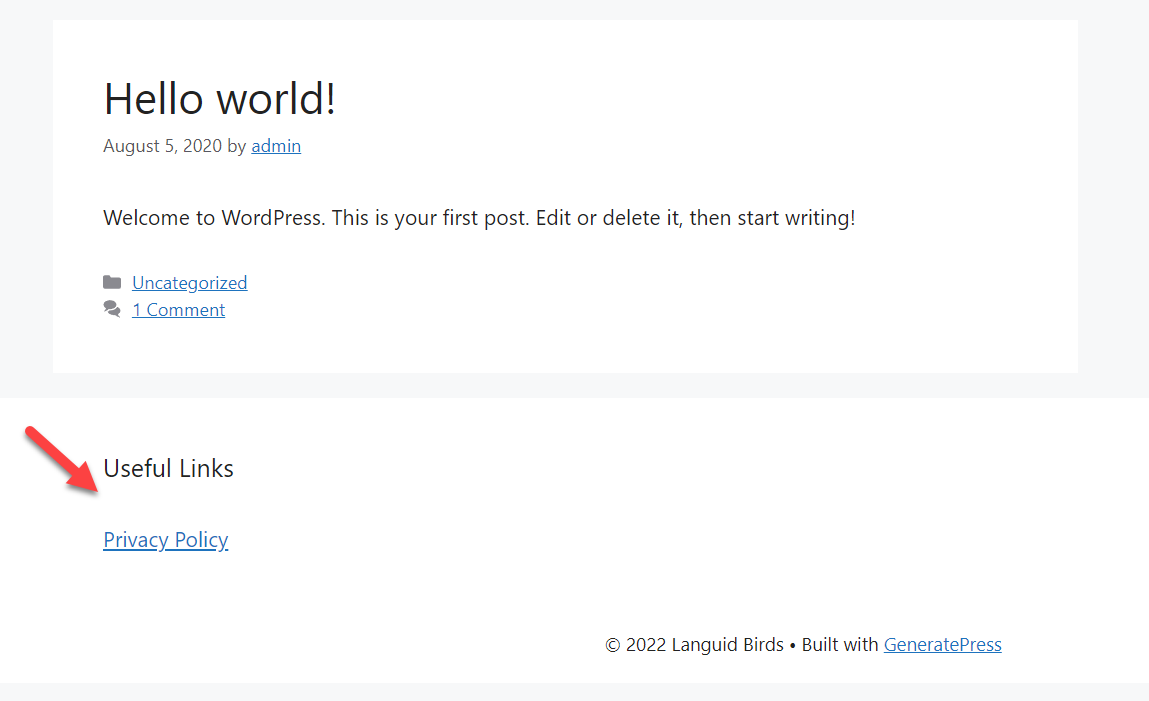
This way, you can add the privacy policy to your website’s footer. Apart from privacy policy, you can add pages like about, contact, advertise, and so on through this method.
Excellent! These are all the possible ways through which you can add and display a privacy policy page in WordPress by default. However, we do have another smart and quick method to create the privacy policy if you are very much short of time.
How to Generate a Free Privacy Policy
You can easily use one of the free websites to generate a custom privacy policy for your WooCommerce if you want a privacy policy page in a very short amount of time.
The first thing you need to do is open this website.

You will see the section for generating a privacy policy on the right-hand side. You have to enter the following details on the Website tab.
- Company name
- Website Name
- Website URL
And then click Next. On the next page, you need to provide what kind of data you will collect from the website visitors under the Additional option.
![]()
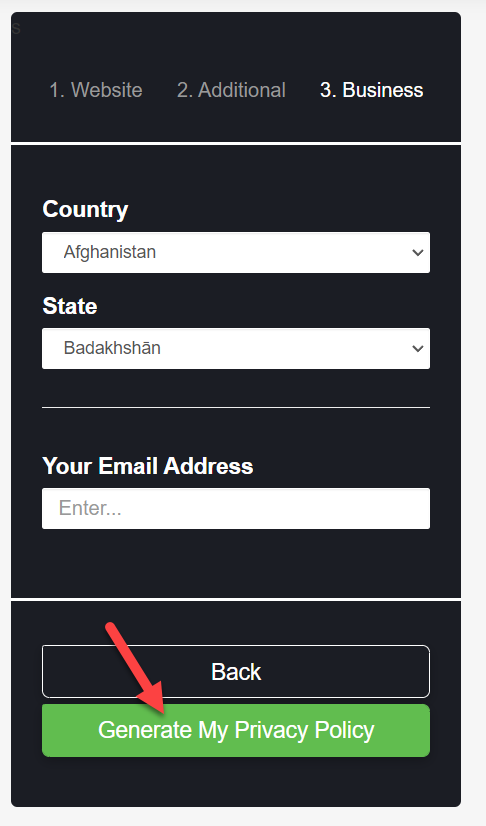
The final step is the Business options. Here, choose the business operating country, state, and email address. Finally, click on Generate My Privacy Policy to create your custom privacy policy page.
The tool will take a few minutes to create a privacy policy. After that, you will see the generated policy on the next page.
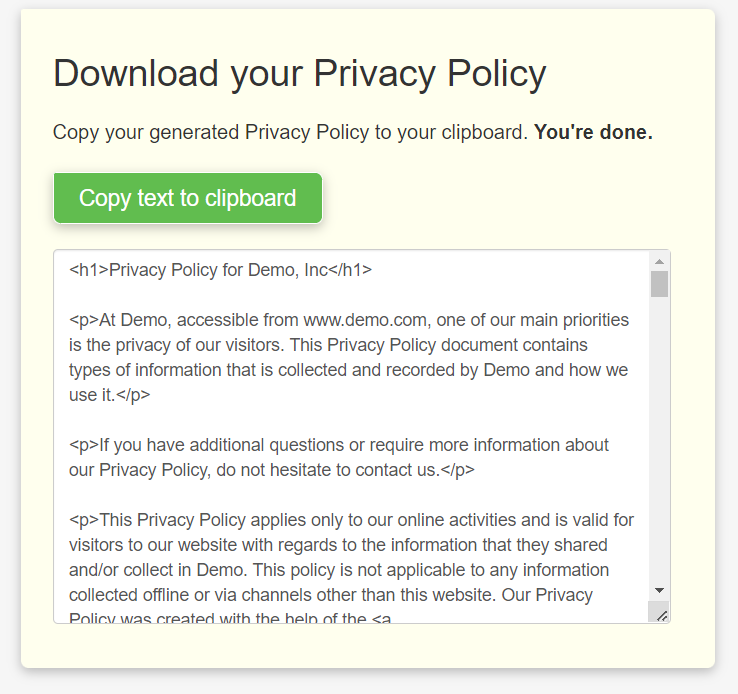
You can download the privacy policy document from there or copy and paste it onto your WordPress page. However, the tool will display the document as HTML by default. So you might need to switch to the text editor before pasting it to the WordPress page.
This way, you can generate a free privacy policy for your WooCommerce website.
Conclusion
Regardless of whether you are running a WooCommerce store or a personal blog, to comply with the laws, you must publish a privacy policy page and mention how you deal with users’ data.
Thankfully, with the help of online privacy policy generators, you can create a privacy policy page in no time. Also, importing the contents to a WordPress page won’t be challenging. To display the privacy policy page, you can use your header, footer, or checkout page. As you can see above, the methods are simple, and you do not need to develop any code.
We hope you have found this article helpful and learned something new. If you did, please share this post with your friends and let them know how to add a privacy policy to WooCommerce. Additionally, you can also go through more WordPress-related tutorials from our blog.
