How to set up WooCommerce on WordPress: A Beginner Friendly Guide!
Do you want to start an online store but don’t know where to start? You’ve come to the right place. In this guide, you’ll learn how to set up WooCommerce on your WordPress site to start your eCommerce business in no time.
Why use WooCommerce?
WooCommerce is the most popular WordPress plugin when it comes to building eCommerce stores. Whether you’re creating giant sprawling online stores or providing freelancing services, WooCommerce has the right tools to help you sell your products and services online. Its sheer number of tools and features also make it one of the best eCommerce tools out there. On top of that, there are thousands of plugins and themes designed for WooCommerce, making it even more attractive for any store.
If WooCommerce’s own service isn’t enough for you, you can enable additional plugins for your needs. Moreover, using WooCommerce themes makes the setup quite an easy task. Its huge range of functionalities focused on eCommerce and its additional support for third-party options make WooCommerce the most flexible tool when it comes to setting up your online business.
The best part is that WooCommerce is completely free and easy to use, so you can start your online store in no time without paying a cent. So if you want to create an online store and start selling your products and services online, WooCommerce is an excellent choice. In this guide, we’ll show you how to set it up and make the most of it.
How to install and set up WooCommerce on WordPress
Let’s start our guide by installing the WooCommerce plugin. We’re going to start by assuming that you’ve already set up your website host and installed WordPress on your servers. This also includes setting up your hosting services. If you want to know more about which hosting company to use, you can look at this post.
Installing and activating the WooCommerce Wizard
First, open your WordPress Admin Dashboard and go to Plugins > Add New. Then, use the search bar on the top right to search for WooCommerce. The plugin will appear in the results, so press Install and then click on the Activate button. 
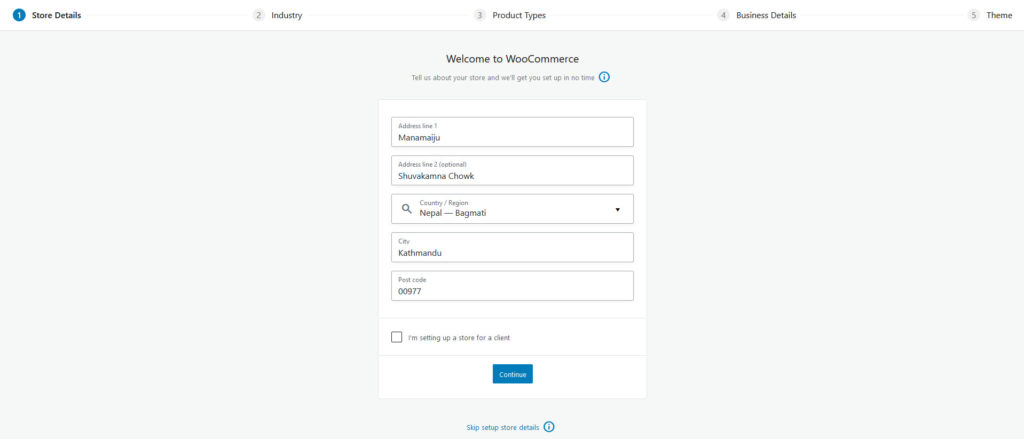
Next, let’s set up your WooCommerce store by adding some important details regarding your business. Click on WooCommerce on your WordPress Admin sidebar, and you’ll be redirected to a new screen where you’ll have to set up your shop.
 First, you’ll need to enter your store’s physical address, country/region, city, and postal code.
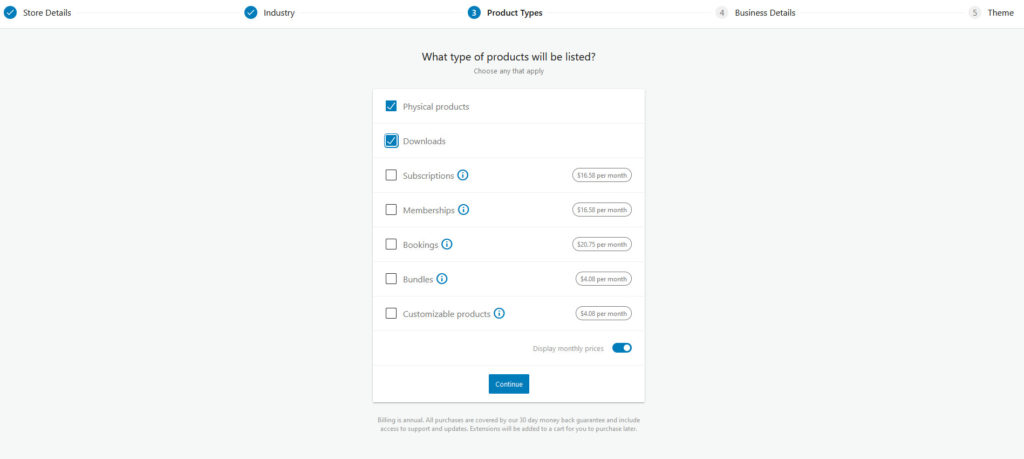
 Then, select the industry your store operates in and the type of products you’ll be selling on your WooCommerce website. Physical products and downloads are free, but memberships, subscriptions, bookings, bundles, and customizable products require an extra fee.
 After that, you’ll be able to include additional details such as how many products you plan to sell and if you own any other platforms where you want to sell your products/services.

Choosing a WooCommerce Theme and Template
Finally, the setup will also ask you if you’d like to use a WooCommerce theme, which we highly recommend. WooCommerce themes allow you to design your website and transform it into an attractive online store with perfect aesthetics to fit your brand and products.

These themes are made specifically for WooCommerce and for different types of WooCommerce stores. Whether you’re building fashion websites, online food stores, a website to sell software or a photography portfolio, there will be plenty of themes that you can choose from. And the best part is that these themes come with additional tools to help you run and manage your store. There are many WooCommerce themes out there. If you’re not sure which one to choose, have a look at our list of the best themes for WooCommerce.
How to Add New Products and Manage them in WooCommerce
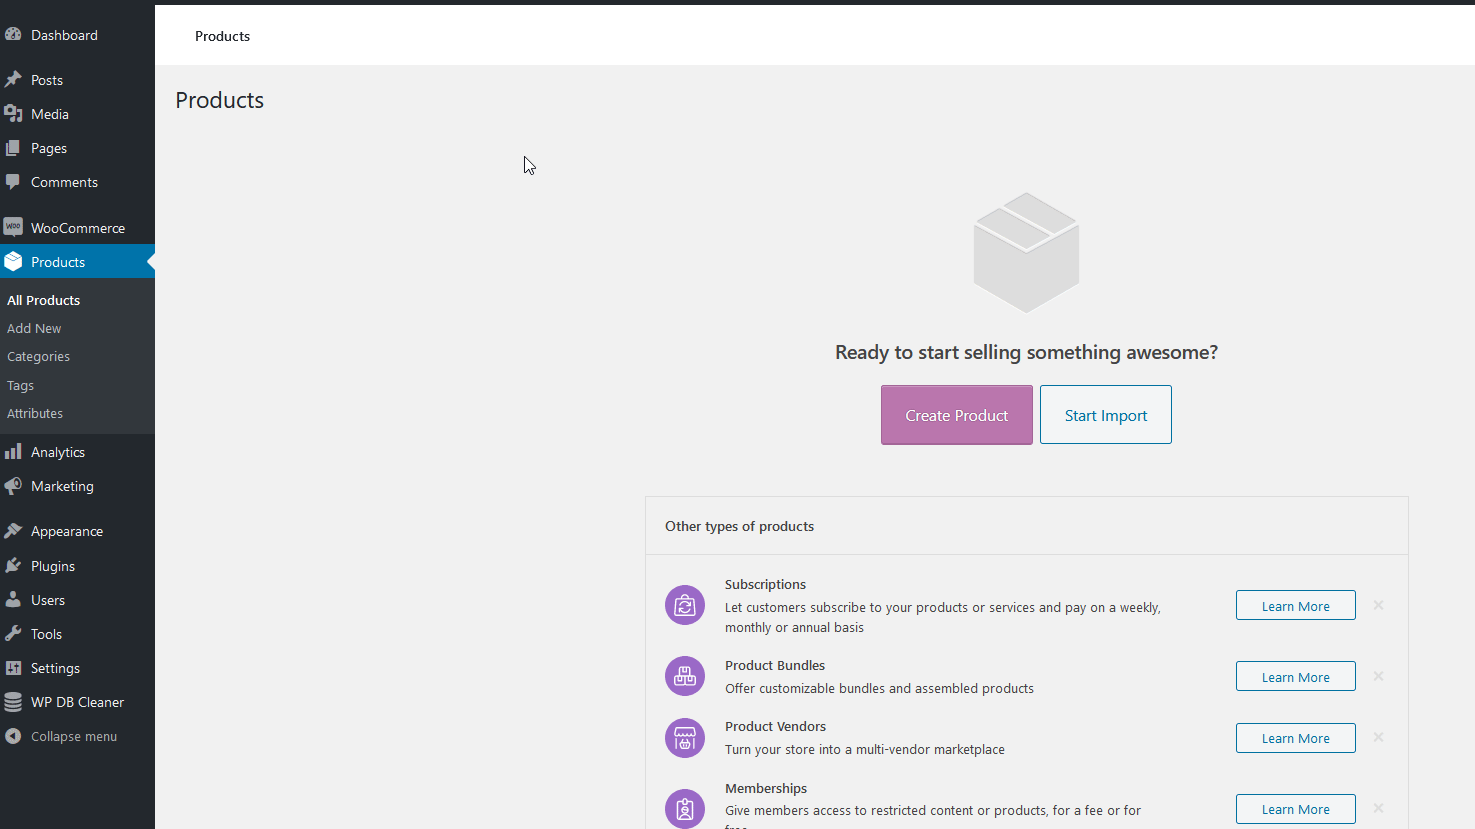
Once you’ve finished the initial setup, it’s time to add your products. To check your list of products, in your WordPress admin dashboard, go to Products.
 To add a new product to your WooCommerce store, click on Add New. You can also import products, but we’ll assume that you’re starting from scratch for this guide.
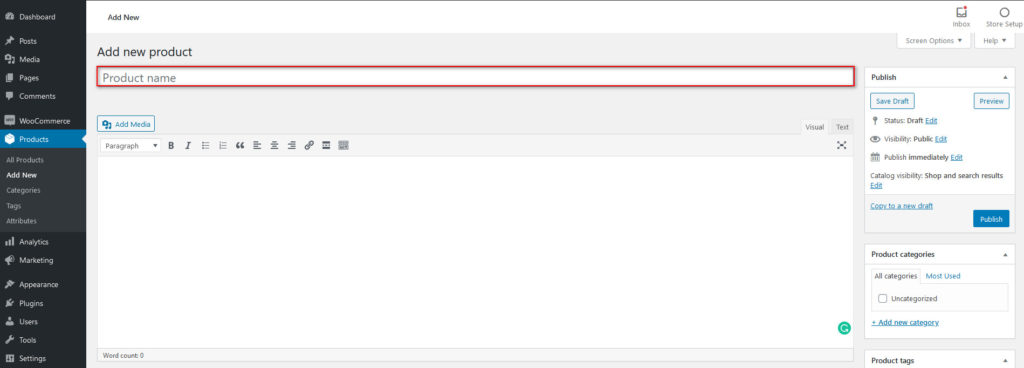
 Now, let’s add some important details that your WooCommerce product will need. You have to give your product a name, and you can also add a short description of it.
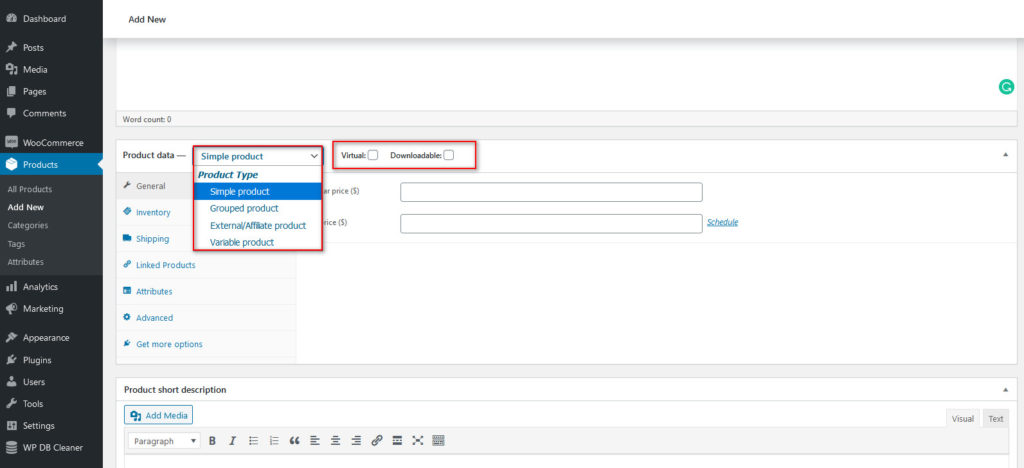
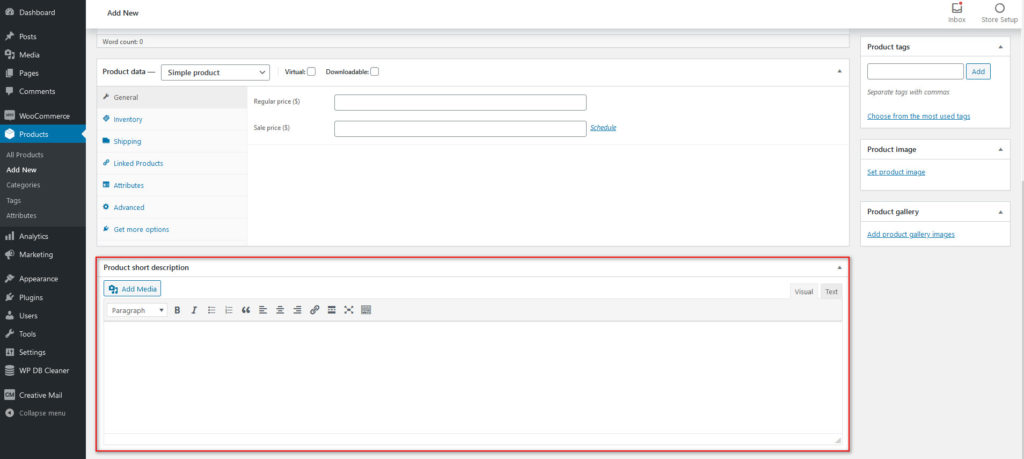 Next, you need to edit key details for your WooCommerce product, such as product type (simple, grouped, variable, or external) and price under the Product Data section. Click on the Dropdown option to select your product type, and then decide if your product will be Virtual, Downloadable, or License by clicking on the right options next to it.
Product Data Tabs
After that, click on the different tabs under Product Data and edit your WooCommerce details accordingly. You can customize the following details under these tabs: 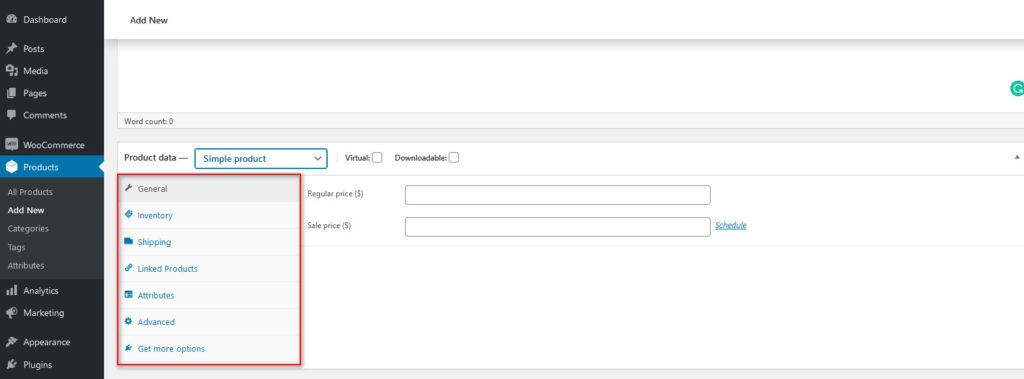
- General: To manage the regular price as well as the sale price for your product. Inventory: Enable stock management features. You can add the SKU (Stock-keeping unit), a unique identifier for each product and service that you sell, and specify if the product is in stock, out of stock, or in backorder.
- Shipping: You can add shipping details to your products, such as weight, dimensions, and shipping class. For more information on how to enable the shipping address in WooCommerce, check out this guide.
- Linked Products: Here, you can add products for cross-selling, up-selling, and bundles.
- Attributes: From this tab, you can include custom attributes and details to your product, such as color, accents, quality, and more. For more information about how to create default attributes, have a look at this post.
- Advanced: You can include a custom note to your customers after they purchase your product/service. You can also enable reviews as well as use the option to show the menu order.
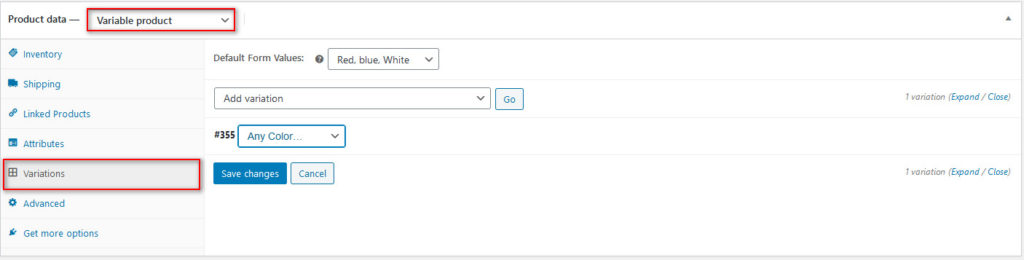
- Variations: This tab will be provided as an option if you choose your product type as a Variable. Here is where you add all the details about your products such as color, sizes, etc. Additionally, you can include custom images, pricing, and other details to each variation. It’s worth noting that you must include a custom attribute on the Attributes tab first to add a variation attribute.
Adding a WooCommerce product
For this demo, we’ll add a product with an image. Give your product a name, choose the Product Data section’s details, click on Set Product Image on the right sidebar, and click Publish. Your new shop item should be ready to be added to your shop. 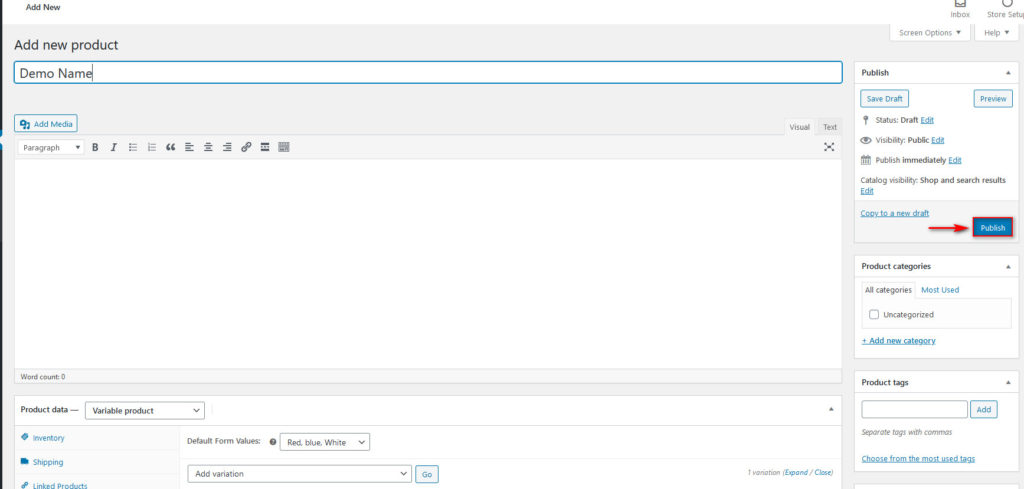 There’s a lot more to adding products than this simple process, so if you want a more in-depth explanation of WooCommerce products, check out this full guide.
Create and customize WooCommerce Store pages
The next step to set up your WooCommerce is to customize your Store pages. This includes your Shop page, Cart page, Checkout, and much more. As online stores need several pages to work, WooCommerce creates several pages for you during the installation:
- Shop: This is where you display your products and services.
- Cart: The shopping cart where customers can have a look and adjust their order before the checkout. If you use a one-page checkout or plugins that simplify the checkout like Direct Checkout, the cart page is displayed directly on the checkout page.
- Checkout: It’s the page where the shoppers enter their details such as name, shipping address, payment method, and so on to finalize their purchase.
- My Account: It’s where users can see their personal information and keep track of their orders.
TThese default pages are a good jumping-off point but we recommend that you customize them to improve shoppers’ experience and boost your sales. Customizing these pages after setting up your WooCommerce theme can take some time, so you can follow our dedicated guides to customize all these individual pages and ensure that all the necessary features are present in all your WooCommerce pages.
- How to customize the WooCommerce Shop page: The Complete guide
- How to customize your WooCommerce My Account page
- Customizing the WooCommerce product page in Elementor
- Edit the WooCommerce Shop page programmatically
- How to customize the WooCommerce checkout
Covering WooCommerce Essentials
Now that you’ve set up WooCommerce on WordPress, let’s have a look at some of the most important sections that you should focus on. Before you start adding more functionalities and customizing your store, you need to understand what you can do with the tools that WooCommerce provides by default. So let’s have a look at some of the most important sections and how you can use them to your maximum advantage.
Reports/Analytics
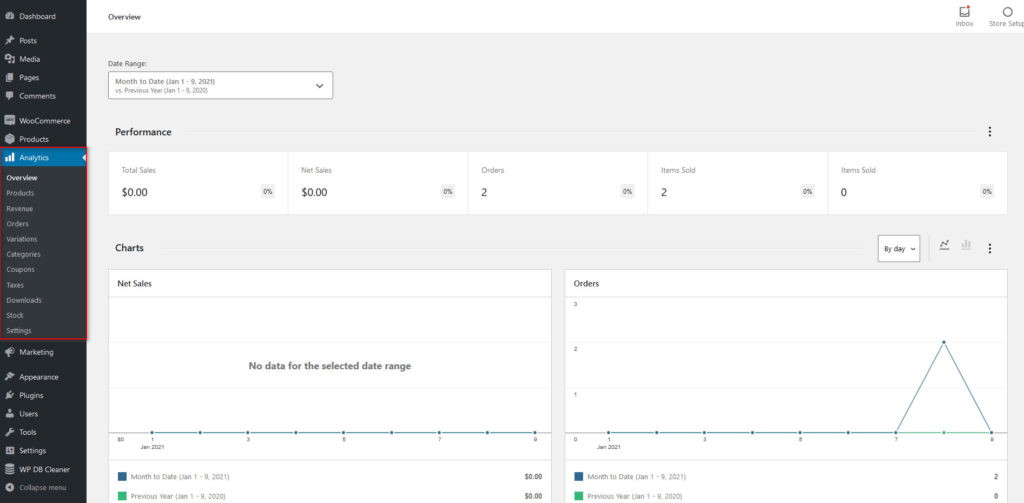 The Reports/Analytics is an essential tab that shows you how your WooCommerce products are selling and how popular your products are amongst your customers. Here you can see how many products you sold, orders, total sales, average revenue per order, and other additional info using clear graphs for easy visualization. Additionally, you can see statistics over specified periods, days, months, or quarters, and even compare the performance over time.
You can also gain additional insight on top items sold, top categories, revenue made, stock available, taxes, and much more. By analyzing this data, you can make the right decisions to grow your business.
Settings
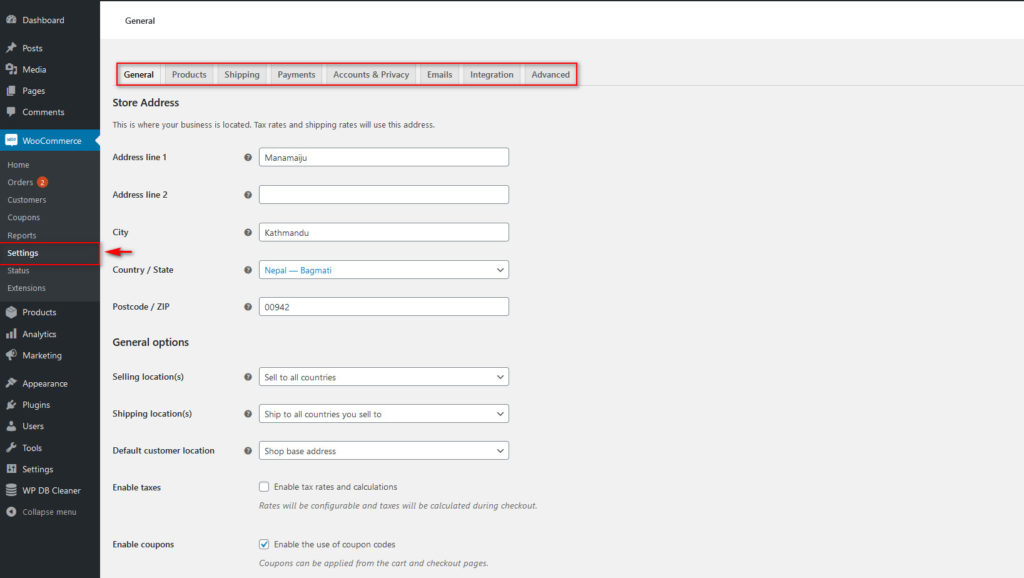 The Settings tab is where you do most of the configuration and personalization of your WooCommerce store, whether it is setting up your product shipping, store address, accounts, payment methods, or email notifications.
On top of that, you can configure currency options, add shipping zones, and set up privacy settings for your customers. If you’re familiar with WooCommerce settings, you can access the Advanced tab to customize and manage WooCommerce pages, checkout endpoints, Account page tabs, and much more.
Orders
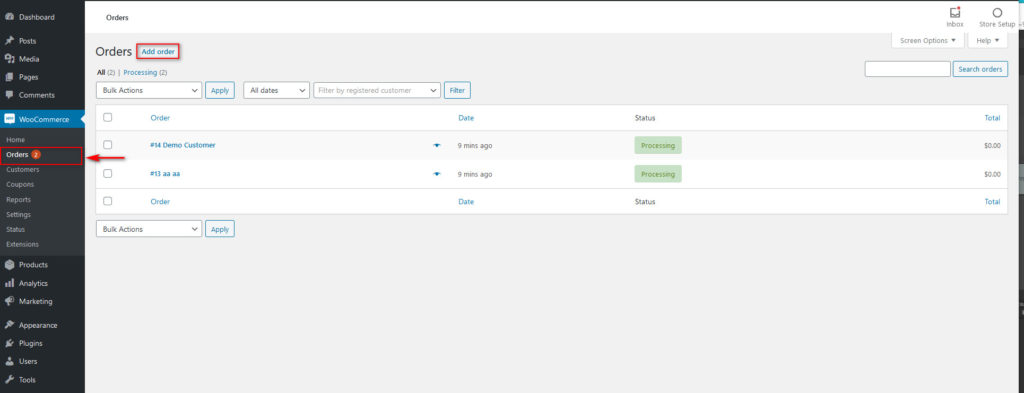 The Orders page is where you can see your customer’s orders. From here you can process them or take additional actions such as sending email invoices or resending new order notifications. You can also add new orders from here manually if needed.
Marketing/Coupons
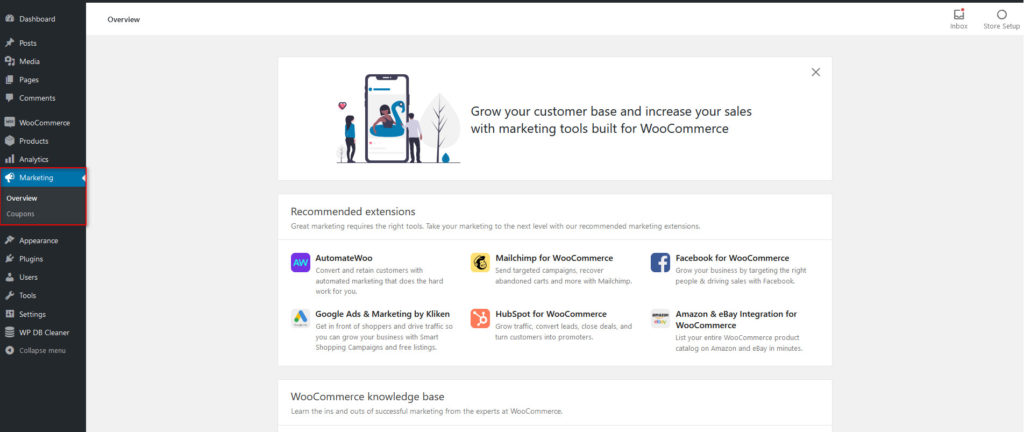 Marketing is an essential part of setting up your WooCommerce website. If you want your business to grow, you need to market your products to the right audience. The Marketing page allows you to set up marketing tools such as MailChimp, Google Ads, AutomateWoo, and others. Using these plugins, you can set up reliable ways to market your products and improve your website’s lead generation for maximum sales.
From this section, you can also create, manage, and track your coupons to see how well they’re performing. These are just some of the most important sections but there are many other things you can do. So after you set up WooCommerce, we recommend you have a look at all the new tabs to have a better understanding of the tools WooCommerce provides to grow your business.
How to add more functionalities to WooCommerce
One great thing about WooCommerce is the ability to use additional plugins and extensions to improve its functionalities. Whether it’s using plugins to customize your checkout page, edit your WooCommerce pages using page builders, or setting up your entire shop on a different social media page, plugins cover a wide range of functions for you and make things a lot more convenient.
For example, you can build email lists, manage stock, autocomplete orders, set up automatic emails, and order responses to your customers, and a lot more. To check out all the available WooCommerce extensions and plugins, you can browse the WordPress plugins repository or go to WooCommerce > Extensions in your WordPress dashboard and look for the optimal tools for your business. 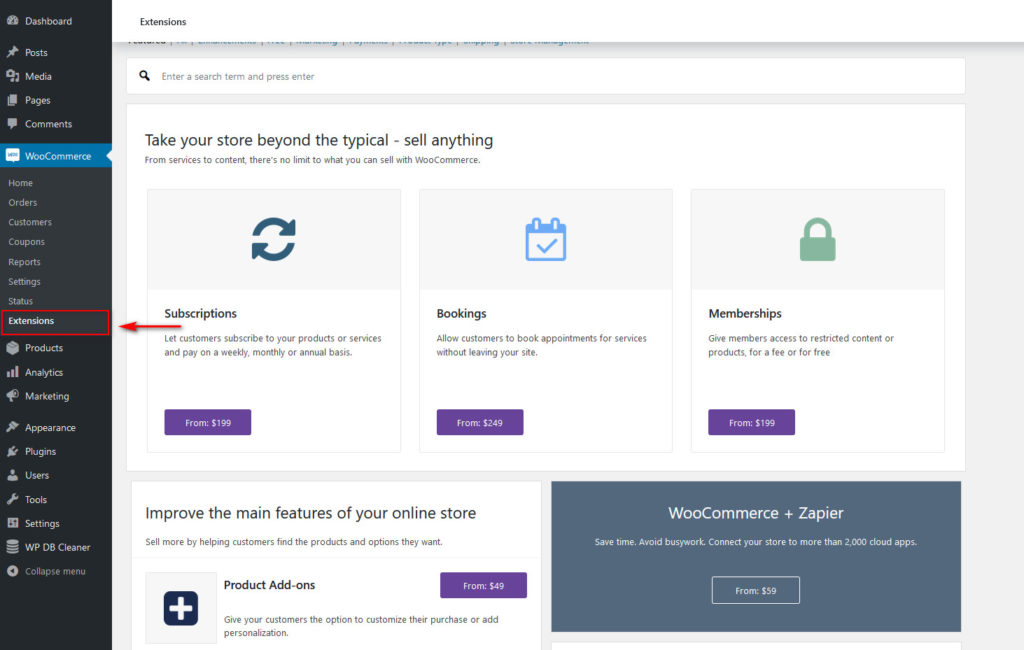 You’ll see that there are many tools out there, so to make your life easier, you can check out our list of the best WooCommerce plugins.
Bonus: What to do when the WooCommerce shop page is empty?
One of the most common issues that shop owners face is that the shop page is blank. There are several reasons why the WooCommerce shop page might be empty. Some of these problems are easy to solve, while others require more complex solutions. Some of the most common causes are:
- Configuration of the Shop Page
- Plugin incompatibility
- Permalinks
- Catalog Visibility
For more information about how to address each of these issues, check out our full guide on how to fix the WooCommerce shop page empty.
Conclusion
In summary, WooCommerce is the best tool out there for those who want to start an online business or want to sell their products and services online. This WordPress plugin is easy to use, free and will help you have your eCommerce store up and running in no time.
In this guide, we’ve shown you how to set up WooCommerce on your WordPress website. While the first few steps are quite simple, there’s a lot more you should do to customize your store and make the most of it.
Let’s quickly summarize the steps you should consider while you’re setting up your WooCommerce store:
- Choose and use a WooCommerce theme that fits your business
- Set up your Products, Shop, and other WooCommerce pages with all the necessary elements
- Customize the pages
- Ensure that your Products have all the necessary details such as name, type, price, and so on
- Find and choose the right WooCommerce plugins for additional functionalities
There’s a lot more to WooCommerce than this guide, so if you need any help, just let us know in the comments below.

I am searching on google how to setup Woocommerce on WordPress and I find your post. And after reading your content, hopefully, now we can setup Woocommerce on WordPress easily. Thank you!