
How to add custom fields to WooCommerce checkout page
Do you want to customize your checkout? In this guide, we’ll show you how to add custom fields to the checkout page in WooCommerce to take your store to the next level.
Why customize the WooCommerce checkout?
In QuadLayers, we have previously seen how to customize the shop page in WooCommerce. Today, we’ll have a look at how to do the same and include custom fields in the checkout. The checkout is one of the most important pages for any online store. It’s where you want to take your shoppers so they complete the purchase and you close the sale. So, to improve your conversion rates and revenue, optimizing the checkout with custom fields is a must.
How is the perfect checkout page? That depends a lot on your business. For example, the checkout for physical products is different from the one for digital products. You choose a one-page or multi-page checkout, display or hide fields, use different colors, and so on. However, the most important thing is that your checkout generates trust in the user, has no distractions, and it’s optimized so the shopper spends as little time as possible.
How to add custom fields to the WooCommerce checkout page?
There are two main ways to add or hide custom fields on the checkout page in WooCommerce:
- With plugins
- Programmatically
If you don’t have coding skills, we recommend you check out these plugins:
- WooCommerce Direct Checkout: It’s an excellent tool to simplify the checkout process and redirect users from the product page to the checkout. It has a free version and premium plans that start at 19 USD.
- WooCommerce Checkout Manager: With more than 90,000 active installations, Checkout Manager is a great plugin to increase your conversion rates. It allows you to add, customize, and delete fields on the checkout page. It’s a freemium tool with a free version and pro plans from 19 USD.

Those checkout plugins are excellent choices and will get the job done smoothly. However, if you don’t want to install any plugins, you can code your solution. In this guide, we’ll focus on how you can add custom fields to the WooCommerce checkout page with some coding. 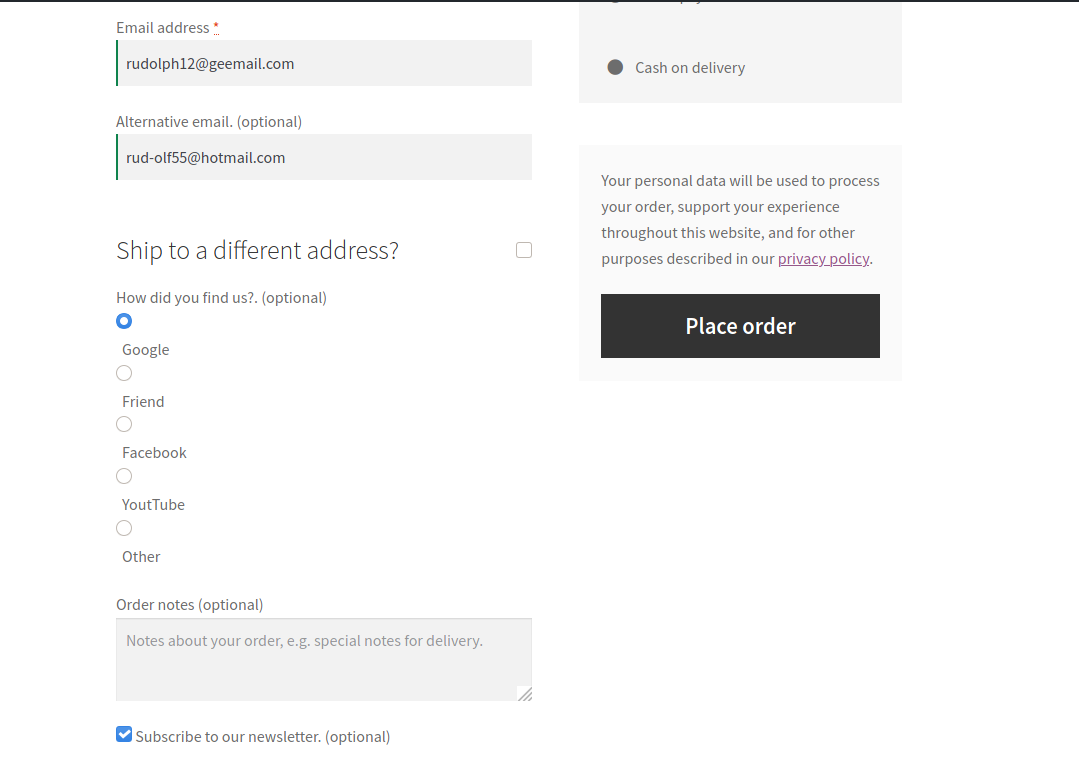
Add custom fields to WooCommerce checkout programmatically
In this section, you will learn how to add custom fields to the WooCommerce checkout page programmatically. We are going to show you how to include:
- Text
- Checkbox
- Radio input types
There are other custom fields that you can add, but please be aware they may need some type of validation. So, in this tutorial, we are going to focus on those 3 types and skip fields that require validation of the entered values. Additionally, we are going to display custom fields in the backend orders list and email templates.
NOTE: Keep in mind that if you want to add other fields to your projects, you must implement a security validation.
So, to add custom fields to the WooCommerce checkout page, there are two options:
- You can code your scripts in a child theme
- Create a custom plugin
To build a more scalable and well-organized solution, we’ll create a custom plugin. Furthermore, unlike the child theme approach, a custom plugin can also be the starting point of further development. However, if you prefer to use a child theme, we recommend you check out this guide.
Add custom fields to WooCommerce checkout with a custom plugin
The custom plugin we’re going to build will have three files.
- Main
- Frontend
- Backend
The main file acts as a gateway entrance to the front-end file, which we are going to use for our front-end scripts. Also, we’ll include the third file, where the backend scripts are. It’s worth noting that this front-end file will be the main base file and should be moved to a low-level hierarchy file (just like our backend file) if you add more classes. So now, let’s see how to add custom fields to the WooCommerce checkout page using a custom plugin.
1. Open your favorite IDE and create a folder with three files:
QuadLayers_checkout_fields /__Classes /__/__class_qlccf_base.php (Frontend file) /__/__class_qlccf_back.php (Backend file) /__QuadLayers_checkout_fields.php (Main file)
2. Main File
The main file is QuadLayers_checkout_fields.php:
<?php
/**
 * @link              https://quadlayers.com/
 * @since             1.0.0
 * Plugin Name:       QuadLayers Checkout custom Fields
 * Plugin URI:        https://quadlayers.com/
 * Description:       Plugin to create custom fields in WooCommerce checkout page, print in backend orders and email templates
 * Version:           1.0.0
 * Author:            Sebastopolys
 * Author URI:        https://quadlayers.com/
 * Text Domain:       qlccf
 */
if(!defined('ABSPATH')){die('-1');}
elseif(!class_exists('run_init')){
	final class run_init{
		public static function run(){
			return include_once plugin_dir_path( __FILE__ ).'classes/class_qlccf_base.php';
		}
	}
	run_init::run();
}
else{
	echo "<h3>ERROR - Existing run_init class in QuadLayers_checkout_fields.php !</h3>";
}
You can change the plugin information, function, and file names and put your own. But we suggest you first copy and paste the scripts without editing anything so you better understand how they work.
3. Front End Class File
The front end file is class_qlccf_base.php. This is where the main class lives, and where you can include an unlimited number of classes and functions. An abstract class cannot be instantiated, so it must be inherited by some other class. Here’s the front end file and a detailed explanation after the code:
<?php
if(!defined('ABSPATH')){die('-1');}
elseif(!class_exists('base_class')){

abstract class base_class{

    public const VERS = '1.1.0';//      <-- Version of the plugin
    public const PREFIX = 'qlccf';//    <-- Plugin prefix
    public const PLDIR =  __DIR__ ;//   <-- Plugin Dir path
    public const PLPAT =  __FILE__ ;//  <-- File Path

    public function add_base_hooks(){
       add_action( 'woocommerce_after_order_notes', array($this,'quadlayers_subscribe_checkout' ));
       add_action('woocommerce_after_checkout_billing_form',array($this,'quadlayers_email_checkout'));
       add_action('woocommerce_before_order_notes', array($this,'quadlayers_radio_checkout'));
       add_action( 'woocommerce_checkout_update_order_meta',array($this, 'quadlayers_save_function' ));
    }
    //insert checkbox in woocommerce checkout - hook: after_order_notes
    public function quadlayers_subscribe_checkout( $checkout ) {
            woocommerce_form_field( 'suscriptor', array(
                'type'	=> 'checkbox',
                //'required' => true,
                'class'	=> array('custom-field form-row-wide'),
                'label'	=> ' Subscribe to our newsletter.'
            ), $checkout->get_value( 'suscriptor' ) );
    }
    // Insert text in checkout woocommerce - hook: after_billing_form
    public function quadlayers_email_checkout($checkout2){
        woocommerce_form_field( 'altmail', array(
            'type'	=> 'email',
            //'required' => true,
            'class'	=> array('custom-field form-row-wide'),
            'label'	=> ' Alternative email.'
        ), $checkout2->get_value( 'altmail' ) );
    }
    // Insert radio custom field in checkout woocommerce - hook: before_order_notes
    public function quadlayers_radio_checkout($checkout3){
        woocommerce_form_field( 'feed', array(
            'type'	=> 'radio',
            //'required' => true,
            'class'	=> array('custom-field form-row-wide'),
            'label'	=> ' How did you find us?.',
                'options' => array(
                    'Google' => 'Google',
                    'Friend' => 'Friend',
                    'Facebook' => 'Facebook',
                    'Youtube' => 'YoutTube',
                    'Other' => 'Other'
                )
        ));
    }
    // save all custom field values
    public function quadlayers_save_function( $order_id ){
        if ( ! empty( $_POST['suscriptor'] ) ) {
            update_post_meta( $order_id, 'suscriptor', sanitize_text_field( $_POST['suscriptor'] ) );
        }
        if ( ! empty( $_POST['altmail'] ) ) {
            update_post_meta( $order_id, 'altmail',sanitize_text_field( $_POST['altmail'] ) );
        }
        if ( ! empty( $_POST['feed'] ) ) {
            update_post_meta( $order_id, 'feed',sanitize_text_field( $_POST['feed'] ) );
        }
    }
}// Include backend class
    include_once(plugin_dir_path( __FILE__ ).'class_qlccf_back.php');
}
else{
	echo "<h3>INITIALIZATION ERROR - Existing base_class class !</h3>";
}
After declaring the class, we define some constants that we can use later. Then, we include all the WooCommerce hooks we are going to use in a single method, which we call add_base_hooks().
Since an abstract class can’t be instantiated, we run this method from our backend file so it runs all the hooks declared here. We use each one of the hooks for a different task, assigning one of the following methods to each of them. I.e this hook: woocommerce_after_order_notes in our add_base_hooks() method runs the quadlayers_subscribe_checkout() method, both defined within base_class class.
Note how we use some of the WordPress and WooCommerce functions: woocommerce_form_field() It outputs a custom field in the WooCommerce checkout form. update_post_meta() This WordPress native function is widely used to update the database metadata of posts, products, and other custom post types. Furthermore, the available input fields types are:
| text | select | radio |
| password | datetime | datetime-local |
| date | month | time |
| week | number | |
| url | tel |
4.The Backend File, class_qlccf_back.php
This is where the qlccf_back_class class inherits base_class previously defined in class_qlccf_base.php file:
<?php
if(!defined('ABSPATH')){die('-1');}
if(!class_exists('qlccf_back_class')):
    class qlccf_back_class extends base_class{

        public function __construct(){
            parent::add_base_hooks();
            if(is_admin()):
                add_filter( 'manage_edit-shop_order_columns', array($this,'qlccf_checkbox'));
                add_filter( 'manage_edit-shop_order_columns', array($this,'qlccf_email'));
                add_action( 'manage_shop_order_posts_custom_column',array($this, 'qlccf_column_content'));
                add_action( 'woocommerce_email_order_meta',array($this,'qlccf_email_template'));
            endif;
        }
        # display custom fields value in backend order list
        public function qlccf_column_content($column){
                global $post;
                if ( 'suscriptor' === $column ) { # Checkbox
                    $order  = wc_get_order( $post->ID );
                    $c_meta = $order->get_meta('suscriptor');
                    if($c_meta==1):$img_url='https://www.sebastopolys.com/wp-content/uploads/2020/07/true-icon.png';
                    else:$img_url='https://www.sebastopolys.com/wp-content/uploads/2020/07/false-icon.png';
                    endif;
                    echo '<img src="'.$img_url.'" style="width:20px;height:20px;margin-left:20px;"/>';
                }
                elseif('altmail' === $column ){ # Alternative mail
                    $order  = wc_get_order( $post->ID );
                    $e_meta = $order->get_meta('altmail');
                    echo $e_meta;
                }
                else{}
        }
        # Set column of checkbox
        public function qlccf_checkbox($columns){
                $columns['suscriptor'] = __( 'Suscriptor');
                return $columns;
        }
        # Set column of alt mail
        public function qlccf_email($columns1){
                $columns1['altmail'] = __( 'Alternative Mail');
                return $columns1;
        }
        # Include Alt Mail field in WC email tamplate
        public function qlccf_email_template($order_obj){
            $is_set = get_post_meta( $order_obj->get_order_number());
                // return if no custom field is set
            if( empty( $is_set ) )
		    return;
	        // ok, we go ahead and echo custom field
            $alt_email = get_post_meta( $order_obj->get_order_number(), 'altmail', true );
            echo '<h2>My custom field</h2><p>Alternative email:'.$alt_email.'</p>';
        }
    }
  $run=new qlccf_back_class;
endif;
In this file, we define a constructor to run the front-end hooks we’ve stated in our other file. Then, we add the hooks needed to display the custom fields in the backend orders list and WooCommerce email templates using a conditional if() and the WordPress function is_admin() to apply it only if the user is in the admin backend screen. The manage_shop_order_posts_custom_column() hook inserts a column in the orders list, so we can display fields in our qlccf_column_content() function.
Once we are hooked in the WooCommerce loop, we check if the field name belongs to one of our custom fields and if it does, we print it. Using a conditional if()else, we can check all of our custom fields in the same function.
After that, we create a checkbox and text custom field columns in the backend orders list. We need to set our custom columns to display our custom WooCommerce fields once a customer completes the checkout process and the order is created.
Finally, in the last method, we use woocommerce_email_order_meta hook to display our custom text field in the admin email template. WordPress & WooCommerce functions used:
wc_get_order(): Gets the current order object with all data attached to it
get_meta(): To get the metadata of the order
get_post_meta(): Gets the values of our custom fields saved in the database
get_order_number(): To get the id number of the current order 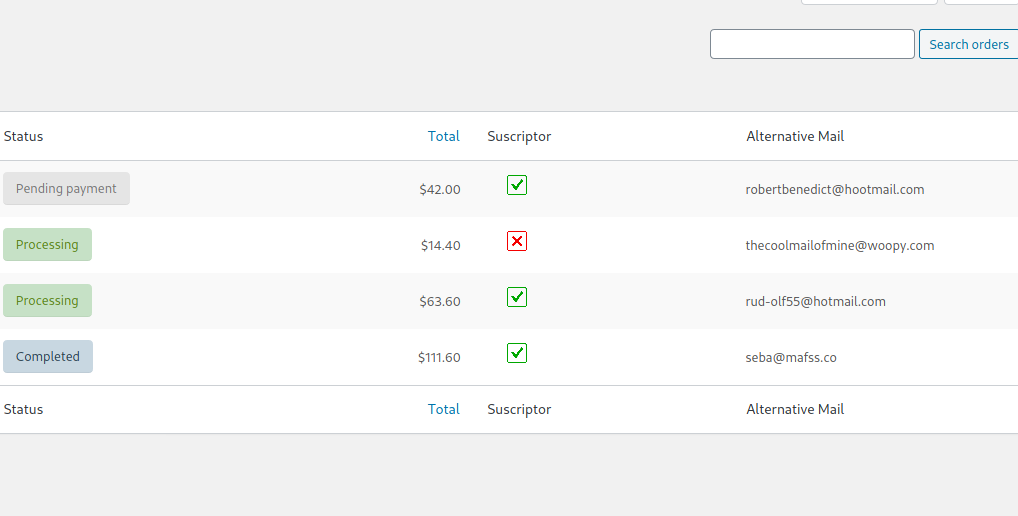
Wrapping up
All in all, customizing the checkout page is a must for any online store. In this guide, we’ve shown you how to add custom fields to the WooCommerce checkout page programmatically with a bit of coding. You have learned how to create a custom plugin step-by-step to optimize the checkout.
Additionally, if you want to customize the checkout page and take it to the next level, we recommend you check out this step-by-step guide.
Have you tried this method? Can you think of ways to improve it? Please share your experiences with us in the comments section below!
If you want to improve your conversions in WooCommerce, we recommend you have a look at these guides:

Thanks very useful, small mistake filenames use _ and path in code is -.
Hello Heiko!
Thank you for your feedback.
I’ve just edited the code with the correct path
Cheers
Hey, tryin it rn
But i got
Cannot modify header information – headers already sent by (output started at
My Bad found the solution 🙂
No problem Erwan. Let us know how that goes.
Where do we out these files
Cannot change the field name.