
How to customize Divi menu with CSS
Do you use Divi and want to make the most of your menu? In this guide, we’ll show you how to customize the Divi menu with CSS to stand out from your competitors and improve customer experience on your site.
With more than 3 million users, Divi is one of the most popular page builders in the market. One of the reasons for that is that it’s extremely flexible and comes with tons of customization options that allow you to give your site a professional look even if you’re a beginner. However, to take your website’s design to the next level, you’ll need to customize the design with CSS scripts. There are many things that you can edit but one of the most important ones is the navigation menu.
Why edit the Divi menu?
The menu navbar is one of the most important elements of any website. It’s at the top of the page so it’s the first element that users see when they load a page. Usually, that menu appears on all the pages of a site making it the element that users see the most.
On top of that, the main function of a menu is to provide visitors with an easy way to navigate and improve user experience. That’s why a well-organized and designed navigation menu can have a great impact on your business.
Even though Divi comes with many tools to edit the menu, adding custom code is the best way. But don’t worry if you don’t know how to code. In this tutorial, we’ll show you how to customize the Divi menu with CSS step-by-step.
How to customize the Divi menu with CSS
In this section, we’ll show you how to edit the Divi menu with CSS to make the most of it. You need to paste the CSS scripts in the WordPress Customizer by going to Appearance > Customize > Additional CSS. Alternatively, you can paste them on the style.css file of your child theme.
NOTE: Before you start:
- Backup: Create a full backup of your site
- Use a child theme: You can create one by following this guide or use any of these plugins
Now let’s see different options to customize the Divi menu with CSS scripts.
1) Change the background color of the navbar
Divi provides you with the option to edit the background color of the menu but applies it to the whole header. If you only want to change the color of the navbar, use this script:
.et_menu_container{background-color:red;}

2) Change menu fonts
Another way to customize the Divi menu is to change the menu fonts. For example, this CSS script will change the font of all the elements of the menu to Lucida Console. This includes dropdowns and any other content displayed in the menu container.
.et_menu_container{font-family: Lucida Console, Courier, monospace;}
Note: The font family is a set of fonts as shown in the above example. You can also choose a single font, but first, you have to upload it to your WordPress installation. To learn more about fonts you can have a look at the following links:
3) Change text color on hover elements
To change the color of the text when you hover over an element, use this code:
#top-menu li a:hover{

color:blue;

}
This will change the color of the navbar links to blue when users hover over them but you can adjust the code and change it to any color you want using hex code or RGBA format.
4) Change dropdowns width
To make sure that every single element of the Divi menu looks good, you can adjust the width of the dropdown. For example, to give the dropdown a width of 500 pixels, use this CSS script:
#top-menu > li > .sub-menu{

width:500px;

}
5) Add a background image to the Divi menu navbar
Apart from little tweaks, you can also make more radical changes. For example, let’s say that you want to customize the Divi menu with CSS by displaying an image as the background of the navbar. To do that, simply copy and paste this code:
.et_menu_container{background-image:url('http://localhost/Sampler/wp-content/uploads/2020/10/gift4.png');background-size:cover;}

Note that we are using a previously uploaded image. Simply upload your own image and replace the image URL with the one you want to use.
Alternatively, you can also use an image from an external URL but we strongly recommend you upload an image to the media library of your website. This way, you ensure that you have full control over the image, and there is no risk of losing it if the image owner decides to delete it.
Finally, note that we are using the property so that the image covers the whole available space. There are some other options such as repeat, auto, contain, and so on so choose the one that you like. For more complex options regarding how the image prints on your site, check out this site.
How to apply CSS to a single element
The above examples edit all the elements in the menu navbar but that’s not the only way to customize the Divi menu using CSS code. You can also apply the CSS scripts to a single element. However, before we jump into that, let’s better understand how CSS works and how we create the scripts.
A CSS single line is called a rule, which is composed of a selector, a property, and a value.
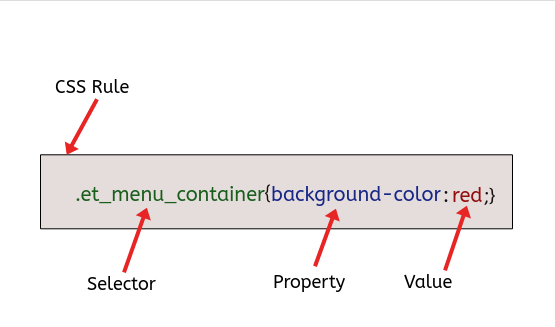
Since property and value have self-explanatory names, we’ll focus on the selector.
The selector is a code that points to the element that is modified by the property and value. Selectors can refer to many or single elements.
When we don’t specify a single element, CSS applies the rule to all the “child” elements of it. This follows the inheritance principle of CSS that states this behavior.
Apply CSS to single elements
To apply CSS to single elements, you need to use the browser console and pick the specific selector for that element. To do that, go to the page that you want to edit and right-click or press F12 to open the browser console.
You will see something like this:
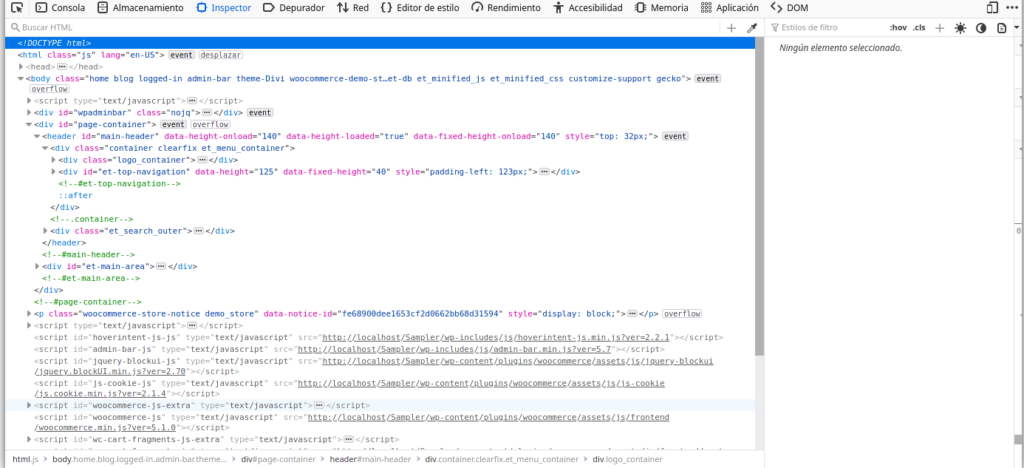
That’s a lot of code! Don’t worry, it may seem overwhelming, but it’s quite easy to handle once you get used to it.
You’ll see how the elements are highlighted on your webpage while you open the HTML tags <body>, <header>, <div> and hover the mouse over them. This way you can see which element you are pointing to and grab the HTML class or ID that you need to use in your CSS code.
Click on the element you want to change and you’ll see the CSS selector
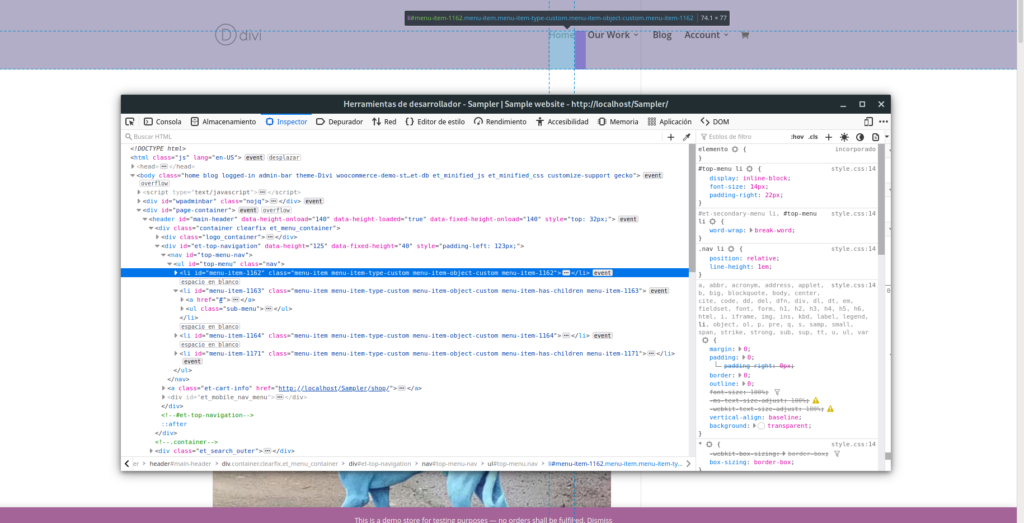
To copy it, right-click on it and select copy > CSS selector. Now that you have copied the CSS selector, go to your WordPress dashboard, head to the Customizer > Additional CSS, and paste it:
#top-menu > li:nth-child(1)
This selector points to the “Home” link on our sample website, so now we can use any of the CSS properties and apply it only to the “Home” link of our menu. For example, to change the color of the background to red, you’ll use something like this:
#top-menu > li:nth-child(1){background-color:red;}
Note that the:nth-child(1) pseudo-class is telling us that this is the first (1) list element in the same level of hierarchy.
Now that you know how to copy a selector using the browser inspector, you can apply your CSS styling to any element of your website.
More sample CSS scripts
There’s a lot more you can do to customize your Divi menu with CSS. Let’s have a look at a few more examples.
Add an icon to the menu element
To use Font Awesome icons, first, you will need to upload them to your website. After that, you can paste the following script to print an icon next to the first element of the menu:
#top-menu > li:nth-child(1) a::before{
padding-right: 10px;
font-family: "Font Awesome 5 Free";
font-weight: 900; content: "\f015";
}

If you see a broken font, it means that Font Awesome isn’t loaded.
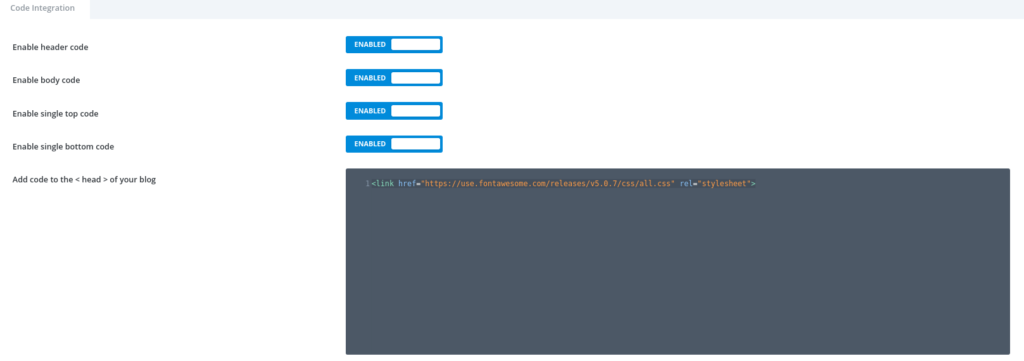
To load icon sets, insert this line in the header section going to Divi options > Advanced.
<link href="https://use.fontawesome.com/releases/v5.0.7/css/all.css" rel="stylesheet">
Hide any element of the menu using CSS
Once you have the right CSS selector, you can apply any CSS property to it. One of the most common and useful ones is display:none; which allows you to remove any element from the menu. For example, to hide the cart element from the menu navbar, paste this code:
.et-cart-info{display:none;}
Conclusion
All in all, editing your site menu is an excellent way to improve your site navigation and improve user experience on your site. Even though Divi has several options for this, the best way is to customize the Divi menu with CSS scripts.
In this tutorial, we’ve seen several ways to edit the menu step-by-step to help you take your site to the next level even if you don’t have coding skills. By now, you should know how to:
- Change the background color of the menu
- Modify the fonts
- Change the text color on hover elements
- Change the width of the dropdown
- Add a background image to the menu
Additionally, we’ve seen how to apply CSS to single elements, add icons to the menu, and hide any element. We recommend you take these scripts as a base, play around and customize them to adapt them to your site.
For more guides about how to make the most of Divi, check out the following guides:
- Customize Product Page in Divi
- How to Add the Add to Cart Button in Divi Shop Pages
- How to Hide/Remove footer in Divi
- Divi Contact Form not Working – How to Fix it
Have you tried editing your site’s menu with CSS? What did you change? Let us know in the comments section below!

Really useful tutorial. How would you add an icon for the Blog link in menu ?
Thanks.