
How to Add Schema Markup to WordPress Programmatically
Do you want to add schema markup to WordPress programmatically? If so, you can use a number of code snippets in various ways for your WordPress website.
But before we have a look at how to add them, let’s look at what you mean by schema markup in brief.
What is Schema Markup?
Schema markup is a standardized data structure provided by schema.org. Basically, it will provide information about the current page to the search engines. So their crawler bots can understand what is the content about and build rich snippets on search results.
The data contained in the schema is presented on a key-value pair like [“telephone”: “152234029”]. It can also have multiple levels of inheritance. They are very important to increase the Click Through Rate (CTR) for your website and are considered one of the best SEO practices too.
There are many types of key properties that can be used with the schema. They vary from data and data types based on open and closed hierarchies. Visit the shcema.org website to find out all available types can be used currently.
How to Add Schema Markup to WordPress Programmatically?
We’ve talked about how to add schema to WordPress using a plugin in a previous post. Similarly, we have already discussed some more ways to add schema markup to WordPress through the dashboard and themes too.
But now, we will be going to learn how to achieve the same result programmatically. By doing it this way, your website won’t need to load all the extra code that a plugin provides. And you will be adding just the code that your website needs.
In order to include the schema in a piece of content, we need to add the schema tags to our website HTML output. We can edit the HTML of our websites in several ways. The best way is by overwriting the theme template files on the child theme.
You’ll need a child theme in order to include the schema markups programmatically. So if you don’t have one installed yet, go ahead and create and install a child theme. You can even use one of the child themes plugins to create it.
You can add schema markup to WordPress programmatically in two major ways:
- Add a JSON-LD file on head
- Add microdata markup to HTML output
Both are valid methods, and you can freely use the one that better adapts to your needs.
1. Add JSON-LD file
A JSON-LD file is a specific type of format, based on JSON, and used for encoding linked data. Like it happens on JSON files, it contains a list of key-value pairs:
{
    "telephone": "152234029",
    "name": "The name",
    "address": "Johann Street N 433",
    "url": "https://QuadLayers.com",
    "priceRange": "19 - 90",
    "legalName": "QuadLayers",
    "@context": "http://schema.org",
    "@type": "LocalBusiness"
}
As you can see, even the syntaxis is very similar to a JSON file.
There are several JSON-LD generators you can use in order to get the file that better adapts to your needs.
So, the next step is to print this code on the HTML <head> section of the website.
We can use the following function on the functions.php file of the child theme to achieve this.
Note: Before we continue, please make sure that you backup your website as well. We will be modifying the core files of your website and any unwanted changes to it may bring further problems to it.
add_action(‘wp_head’,’QuadLayers_add_schema’);
function QuadLayers_add_schema(){
echo ‘<script type="application/ld+json">
{
"telephone": "152234029",
"name": "The name",
"address": "Johann Street N 433",
"url": "https://QuadLayers.com",
"priceRange": "19 - 90",
"legalName": "QuadLayers",
"@context": "http://schema.org",
"@type": "LocalBusiness"
}’;
}
You can see how the JSON-LD file is included within the <script> tags. Just don’t forget to update the file.
To understand how schema works, note that the previous sample code will add the JSON to all pages of a website. So when a search engine or any other kind of bot reads it, it will be set as a valid schema for all pages where the script is present. In this case, it’s the whole website.
We can apply the JSON code to specific pages by applying some conditional logic to our PHP function. But the schema markup can also be included in the inner HTML of our content, allowing us to include complex markups to some very specific content.
2. Add microdata markup to HTML
Following the modern trends, the previous method is the recommended one. But using microdata markup will allow us to embed the schema markup right on the template files.
Pasting our scripts on the functions.php file of the child theme works fine too. In order to apply the right schema to each piece of content, we would end up having a large and complex piece of code.
So to add microdata markup within HTML, we need to overwrite the template files of your WordPress website.
2.1. Add schema markup to WP posts
In this example, our child theme inherits Twenty Twenty-One theme, so the file we need to overwrite is content-single.php. This is the file where we can add our schema right on the HTML output.
This file might be found under a different name or folder on some themes.
Create the folders needed on your child theme (template parts & content) and a new content-single.php file inside the content folder.
Child theme
/__template-parts
__/__content
__/__/__content-single.php
Copy/paste all the code of the parent theme content-single.phpfile.
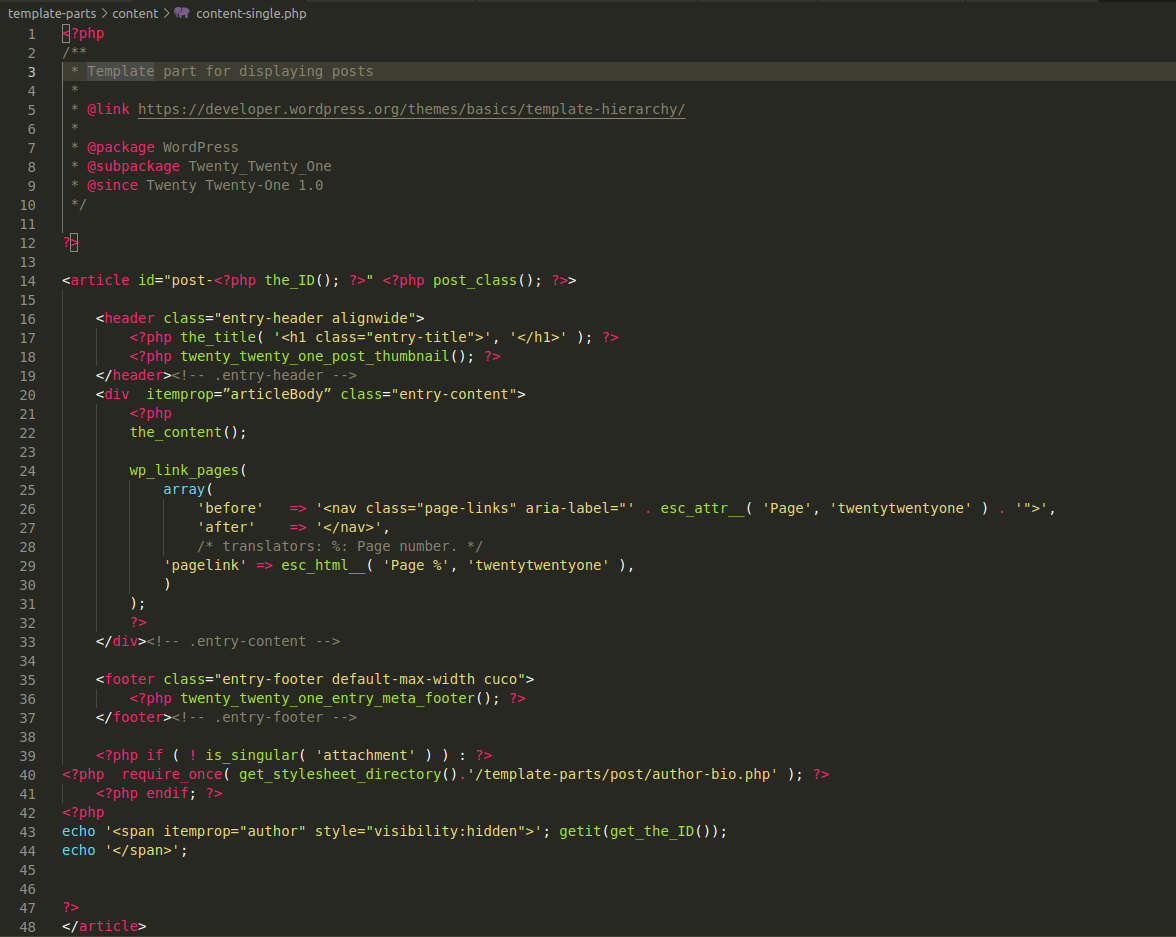
The code that we are going to edit is the following:
<article id="post-<?php the_ID(); ?>" <?php post_class(); ?>>
Adding the schema scope and type like the following snippet.
<article itemscope itemtype ="http://schema.org/Article" id="post-<?php the_ID(); ?>" <?php post_class(); ?>>
This is telling search engines that the content within the <article> HTML tag is an article type.
After declaring the type and scope, we can use some standard properties. For example, declaring the post title as the name of the item:
Source code:
<?php the_title( '<h1 class="entry-title">', '</h1>' ); ?>
Add name property:
<?php the_title( '<h1 itemprop="name" class="entry-title">', '</h1>' ); ?>
Also, we can use the articleBody key property to mark the content of our posts.
Source code:
<div class="entry-content">
<?php

the_content();
Adding articleBody property:
<div  itemprop=”articleBody” class="entry-content">
<?php
the_content();
2.2. Adding schema markup to WooCommerce products
In a similar way, we can overwrite the WooCommerce products template file in order to include our schema.
The file we need to overwrite is the content-single-product.php file. This file must be on a WooCommerce folder in the child theme. If you are having difficulties finding it, please make sure that you have set up WooCommerce properly as well.
Child theme
__/woocommerce
__/__content-single-product.php
Complete the same process as above creating a new file in its place.
Define scope and schema type on the main div wrapper:
<div id="product-<?php the_ID(); ?>" itemscope itemtype ="http://schema.org/Product" <?php wc_product_class( '', $product ); ?>>
We can also use the “description” property on this file:
<div itemprop="description" class="summary entry-summary">
However, in order to add more markups to our products, we will need to overwrite different files.
For example, to add the price of products to the schema, create a new path on the child theme files:
woocommerce/templates/single-product/price.php
Child theme
__/woocommerce
__/__/single-product
__/__/__/price.php

After copying the price.php file in its place edit as following:
Source code:
<p class="<?php echo esc_attr( apply_filters( 'woocommerce_product_price_class', 'price' ) ); ?>"><?php echo $product->get_price_html(); ?></p>
Adding markup:
<p itemscope itemtype="https://schema.org/Offer" itemprop="price" class=" <?php echo esc_attr( apply_filters( 'woocommerce_product_price_class', 'price' ) ); ?>"><?php echo $product->get_price_html(); ?></p>
Note that we’ve created a new item with the “Offer” type to define the price. It is a clue to understanding how we can nest different item types within each other, following the original HTML structure.
There are some other files that you can overwrite in order to include more markup.
title.phpstock.phpreview.phprating.phpproduct-image.php
Conclusion
This brings us to the end of our tutorial on how to add schema markup to WordPress programmatically. In order to do so, you need a basic understanding of how a schema works along with some programming knowledge.
It is also very important to understand that all properties and types must match with the defined ones on the schema.org website. That includes properties with multiple levels of inheritance as well.
To summarize, you can add schema to your website using two major ways:
- Add a JSON-LD file on head
- Add microdata markup to HTML output
Adding the JSON-LD file is a very easy approach and is considered by most users. All you have to do is print the JSON-LD code to the <head> section of your website.
However, using the microdata markup approach to embed the schema markup directly into the template files can also be very useful for you. Overwriting the template files can help you customize the website with even more flexibility if you have the required resources for it. You can even add the schema markup to specific elements of your website like posts and WooCommerce products.
So can you add schema markup to your website using these code snippets now? Please do let us know if this tutorial was helpful or not in the comments.
Meanwhile, here are some more of our posts that might interest you and help you improve your WordPress website:
- How to Create a Custom WordPress Plugin
- Add Telegram to WordPress (Full Guide)
- How to Edit HTML in WordPress
