
How to add a Wishlist to WooCommerce
Are you looking for ways to add wishlists to your store? You’ve come to the right place. In this guide, we will show you how to add a wishlist to WooCommerce step-by-step.
Nowadays, almost every eCommerce store uses wishlists since they are very useful for both users and website admins. Wishlists let customers save items they are interested in and encourage them to continue shopping in your store for a longer time. Similarly, they help store owners understand what shoppers are interested in and create special deals based on that.
Before we see how you can add a wishlist to WooCommerce, let’s have a look at the main differences between wishlists and the cart page.
What’s the difference between a Wishlist and the Cart Page?
As its name suggests, a wishlist allows shoppers to add various items to a specific product list that they want to buy in the future. In this sense, it’s similar to the cart page, however, in the wishlist the quantity and the price of the products are irrelevant. Customers can add items that they might buy in the future to the wishlist even if they aren’t in stock.
People usually tend to add the products to the wishlist when they are particularly out of stock. This way, they can get notifications when the item is back in stock if the store has that functionality, or check the wishlist later to purchase those items.
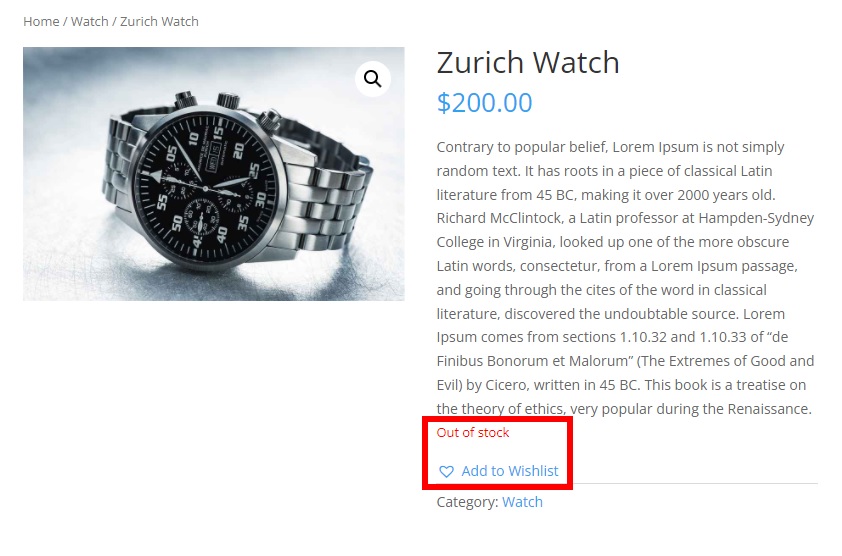
On the other hand, you can’t add an item to the cart if it’s out of stock and some stores even hide out-of-stock products. Additionally, if you add a product to the cart that is in stock, the quantity changes for the next customer who wants to buy the same item.
Finally, most stores indeed give shoppers the option to purchase items both from the wishlist and the cart page.
Why add a Wishlist in your WooCommerce Store?
Nowadays, most eCommerce sites have wishlists, so customers expect them when shopping online. As we saw before, it’s not only useful for users but also for store owners as it gives you valuable information about what products shoppers are interested in. Users can add items to the wishlist even if they are not in stock, which also helps store owners know what products they need to restock first.
Most stores have functionalities that let users know when a product is back in stock or when its price drops, making it a great tool to bring users back to the store and generate loyal customers.
On top of that, wishlists can help store owners create a virtuous cycle around popular items. Admins can monitor the products that users frequently add to their wishlists and not only plan their product stocks, but also create special deals around them and get similar or complementary items to have more high-demanding products and boost their sales.
Now that we better understand some of the main benefits of wishlists, let’s see how you can add them to your store.
How to add a Wishlist to WooCommerce
There are two main ways to add a wishlist in WooCommerce: programmatically and with a dedicated plugin. Creating a wishlist with code is quite complex and it requires creating a plugin from scratch. Considering the number of excellent tools out there, for this demonstration, we’ll use plugins as it’s a much easier option.
There are several plugins you can use to add a wishlist to your store. These are some of the top ones:
1) TI WooCommerce Wishlist

TI WooCommerce Wishlist is one of the most popular wishlist plugins for WooCommerce. It is a very simple tool that includes a lot of customization options to help you add a wishlist to your website. This tool provides you with a wishlist table that you can show or hide on the wishlist page of your customers.
Additionally, there are many options for the add-to-wishlist button. You can let your customers add the products to the wishlist as a link or with an icon. Finally, you can customize the position and the appearance of the wishlist button to best suit your website’s style.
Key Features
- Fully customizable wishlist table
- Predefined icons for wishlist
- Multiple position options for wishlist button
- Additional shortcodes and widgets
- WPML and translation-ready
Price
TI WooCommerce Wishlist is a freemium plugin. The free version has basic features while the premium plans start at 79 USD per year and include more functionalities and a 14-day money-back guarantee.
2) YITH WooCommerce Wishlist
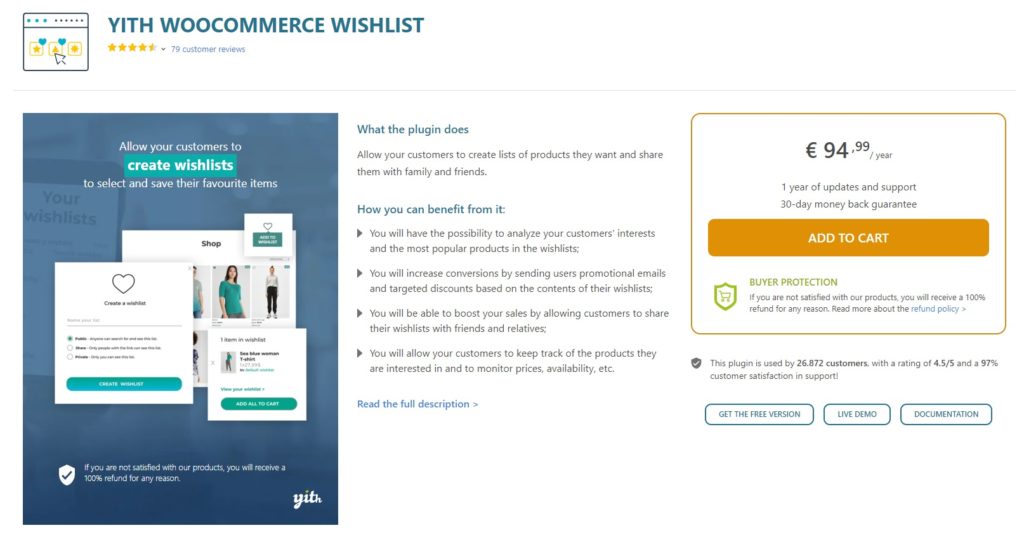
YITH WooCommerce Wishlist is another of the best plugins to add a wishlist to your WooCommerce store. It includes powerful features such as add or remove wishlist buttons, custom wishlist pages, product variation support, and more. These features make it easy for your customers to add items to the wishlist and let you create special promotions.
This tool comes with a lot of options for the wishlist button allowing you to hide or display it in any part of your website with shortcodes. Moreover, you can even show the add to wishlist button for a particular product on the Shop page and add a button to let your customers remove a product from the wishlist.
Key Features
- Select custom wishlist page
- Shortcode options for the add to wishlist button
- Customizable columns for wishlist table
- Product variation support
- Manage wishlist features for visitors
Price
YITH WooCommerce Wishlist has a free version and a premium plan that starts at 94.99€ per year and a 30-day money-back guarantee.
Add a Wishlist using TI WooCommerce Wishlist
Now that we’ve had a look at some of the plugins, let’s see how to use them to add a wishlist to your WooCommerce store.
NOTE: Before we start, make sure that you have properly set up WooCommerce and updated it to the latest version. Also, ensure that you’re using one of the compatible WooCommerce themes and that your theme is updated. This will reduce the risk of any theme or plugin conflicts that might cause issues later on.
1. Install and Activate the Plugin
For this demonstration, we’ll use TI WooCommerce Wishlist. If you prefer to use a different tool, feel free to choose any of the wishlist plugins from this list.
First, you need to install and activate the plugin. In your WordPress dashboard, go to Plugins > Add New and search for the plugin. Then, click Install Now and once it’s installed, activate it.
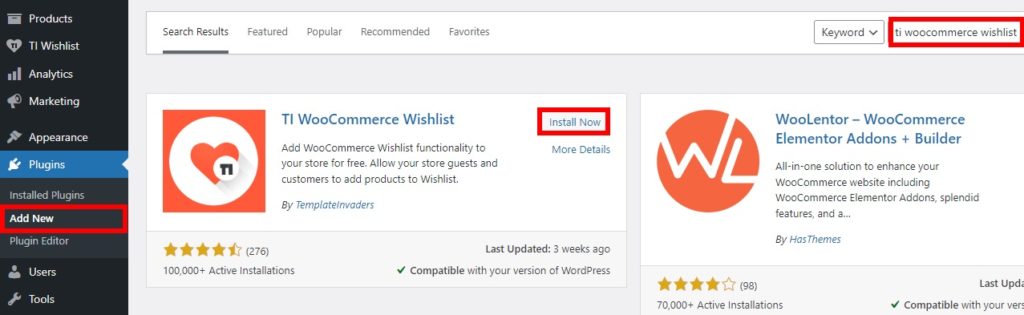
Alternatively, you can install the plugin manually if you want to use the premium versions. If you aren’t sure how to do that, check out our detailed guide on how to install a WordPress plugin manually.
2. Configure the Quick Setup Wizard
Once you activate the plugin, you will be redirected to the setup wizard. Here you can start editing all the mandatory options to add the wishlist to your WooCommerce store.
To start the setup process, press Let’s Go.
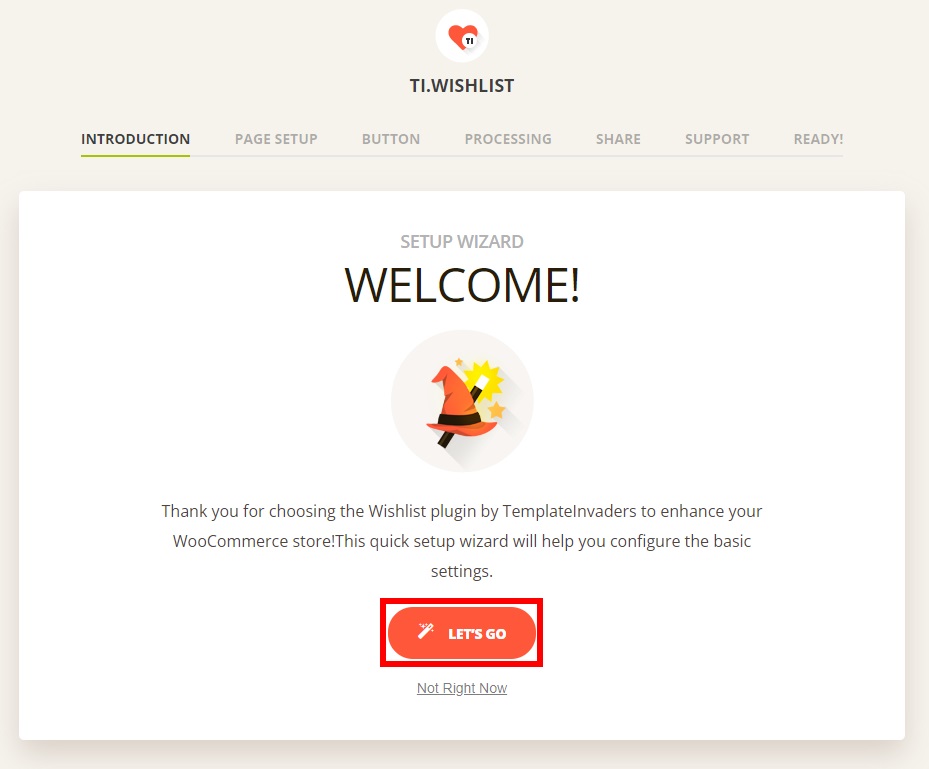
NOTE: You can skip the setup or any of the setup steps and do this later. However, we recommend doing it at the beginning because running the setup wizard will configure all the basic settings to enable the wishlist on your website.
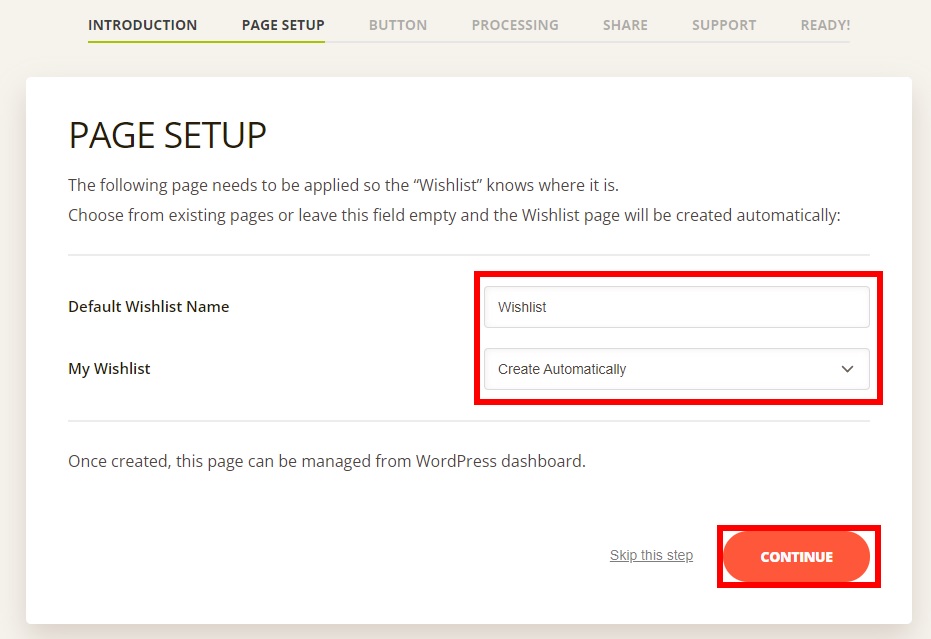
2.1. Setup the Wishlist Page
The first step of the setup wizard is to configure the wishlist page. All you have to do is add a name to your wishlist and choose how you want to create the wishlist page. You can either create the page automatically or select an existing page from your website.
After you have changed all the necessary settings, click Continue to go to the next step.
2.2. Adjust the Buttons
Then, you need to edit the buttons of your product wishlist. Your customers will use these buttons to add products to their wishlists from your WooCommerce store, so they are key.
You can edit the “Add to Wishlist” button position and text. You can place the button either before or after the “Add to Cart” button. Additionally, you can display or hide the “Add to Wishlist” button on the product listing as well as customize the button text.
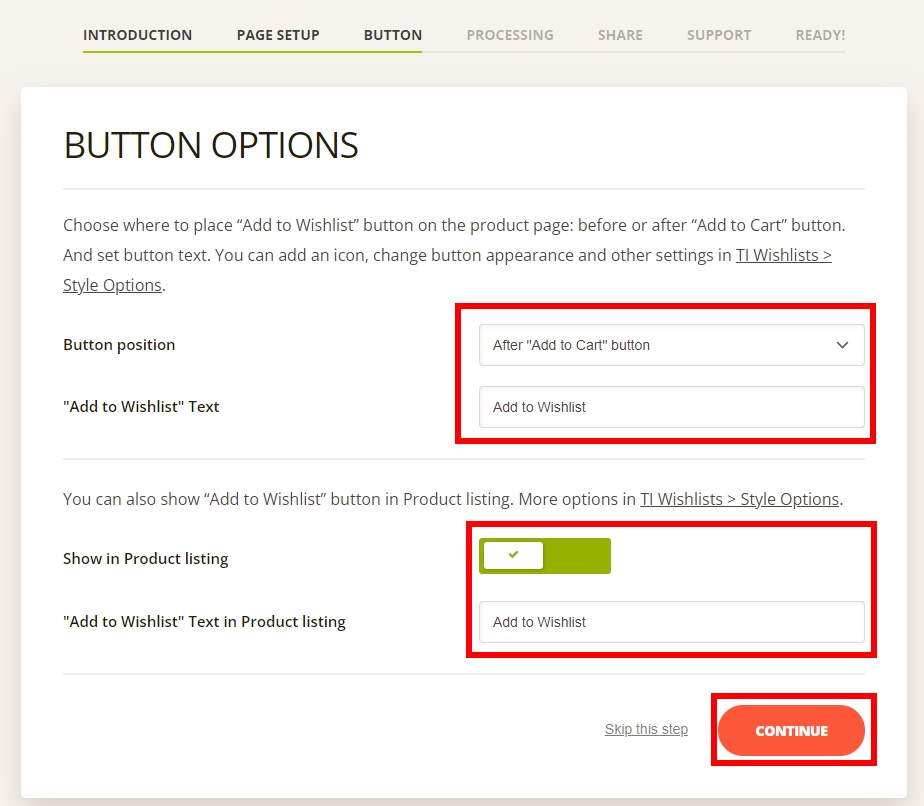
After you’re happy with your changes, Continue to the next step.
2.3. Product Removal from Wishlist
The process of adding a wishlist to WooCommerce also includes how shoppers will remove items from it.
In this step, you need to select how you want customers to remove products from the wishlist. You can either let them remove items automatically or manually. This is crucial as it will determine how convenient it is for customers to manage their wishlist in your store.
If you select the “Automatically” option, the products in the wishlist will be automatically removed from the customer’s list when they are added to the cart. Alternatively, if you select the “Manual” option, the customers will have to remove the products from the wishlist by themselves.
The automatic option is the default for most WooCommerce stores, but you can choose the option that best suits your shoppers.
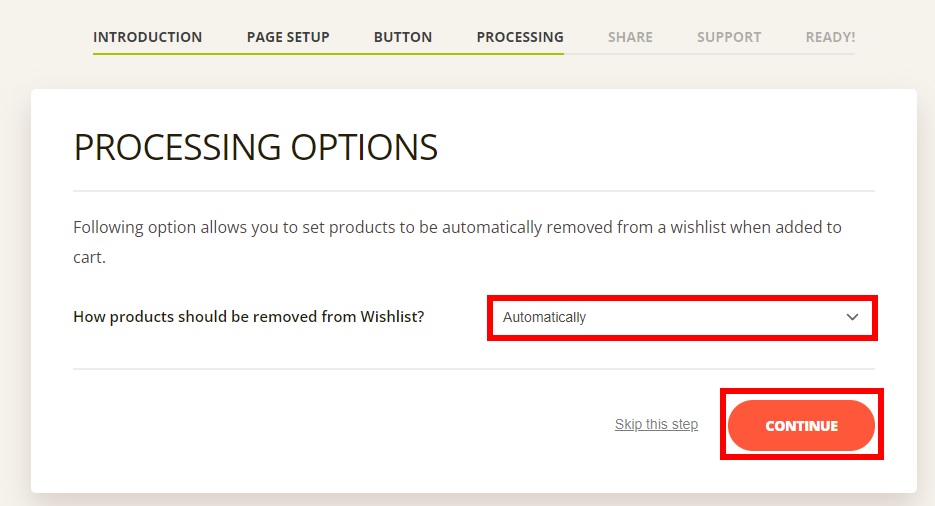
After you’ve chosen your preferred option, press Continue to move on to the next step.
2.4. Share Options and Support
By now, you’ve configured all the required options for your wishlist. To get more reach, you can let your customers share their wishlists on various social platforms from the wishlist page.
All you have to do is enable the social share buttons that you want. The available options are Facebook, Twitter, Pinterest, WhatsApp, Clipboard, and Email.
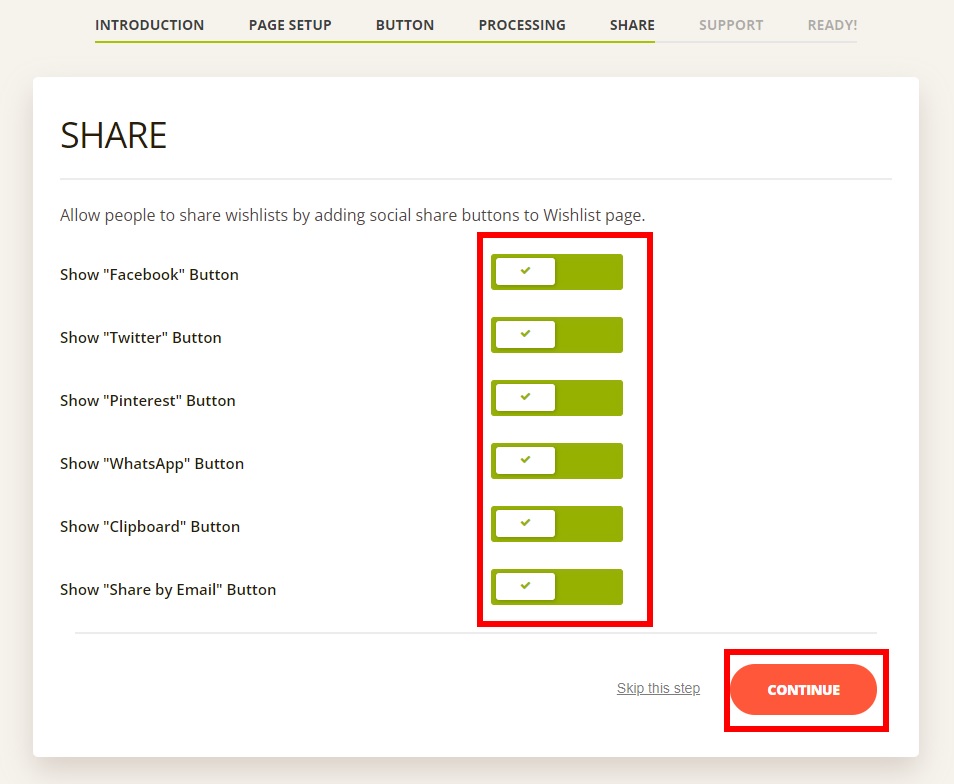
Finally, press Continue and you will see the support options of the plugin. If you want to enable their support chat, you can do so here and then continue to the final step.
2.5. Finalizing the Wishlist
Your wishlist should be ready by now. You can now either return to the WordPress dashboard, view the documentation, or wishlist settings.
If you want to further customize your store wishlist, check out the documentation and the wishlist settings button. There are some more advanced options that you can configure.
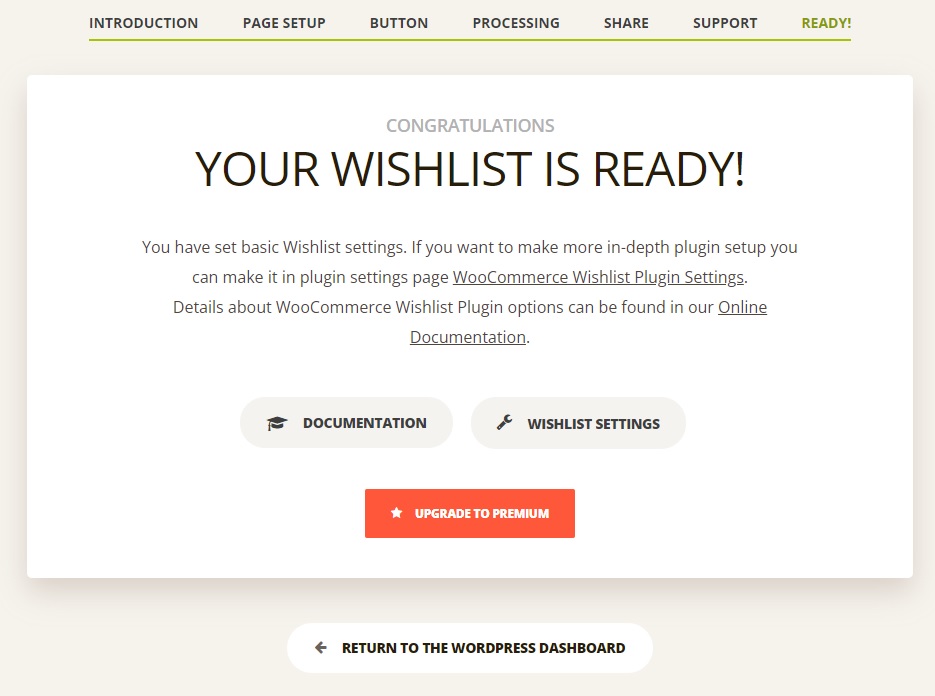
For now, we’ll simply return to the WordPress dashboard and go to the frontend to see that the wishlist option is live.
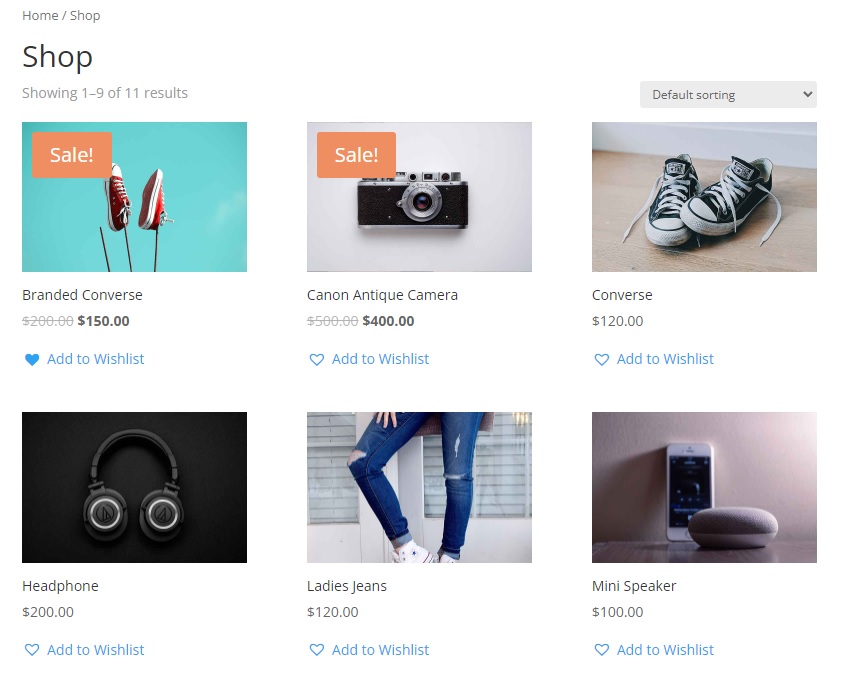
If you go to the Shop page, you will see that the Add to Wishlist button is already available for all your products.
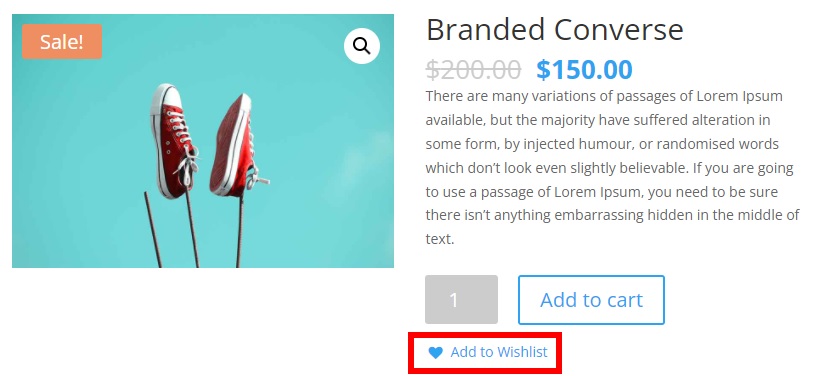
Similarly, you will also see the Add to Wishlist button on the product pages to make it easier for customers.
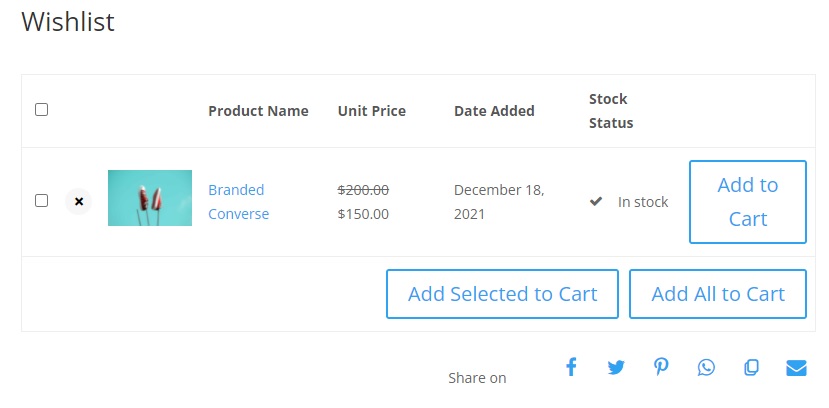
If you click on the button, you will be able to view the wishlist. Your customers can also add items to the cart directly and go to the checkout from here too. Alternatively, you can skip the Cart step and take your shoppers directly to the checkout to shorten the process. If you want to learn more about that, check out our guide on how to skip the cart page in WooCommerce.
Keep in mind that the wishlist might be different depending on the theme you use. For this tutorial, we have used the Divi theme, so it might look different in your store.
That’s it! Your customers can now add products to their wishlist on your WooCommerce store.
Conclusion
In summary, adding a wishlist to your store is a great way to keep your customer engaged and give them reasons to visit your store frequently. On top of that, you can keep an eye on the most popular products and use that information to create targeted campaigns to boost your sales.
In this guide, we have listed a couple of plugins to add a wishlist to WooCommerce and have also shown you how to use them. You can also create wishlists with some code, but considering the complexity of that solution, we recommend you use a plugin. The best part is that there are excellent tools that are easy to use and configure, allowing you to add a wishlist in no time.
Even though a wishlist is similar to a cart page, they are quite different from each other. If you want to learn more about cart pages, we have detailed guides on how to customize add-to-cart buttons and how to change the WooCommerce add-to-cart message. Alternatively, you can also skip the cart page to shorten the purchase process or even hide the Add to Cart button.
If you liked this post, share it on social media to help your friends add wishlists to their sites.
For more interesting tutorials, check out these articles:
