How to Automatically Clear Cache in W3 Total Cache
Do you want to clear the cache in W3 Total Cache automatically? Regularly removing the cache is very important to improve your website’s performance and provide up-to-date content to your website users. And W3 Total Cache is one of the best caching plugins in WordPress for this job.
However, the plugin doesn’t allow you to clear the cache on your website by default automatically. Instead, you must do it manually in certain intervals, which can be tedious and time-consuming. Fortunately, you can overcome this inconvenience of the plugin by following the simple steps mentioned in this guide.
We will get to the actual process shortly. But for now, let’s understand caching plugins in brief.
What Are Caching Plugins?
Caching plugins help you improve the performance of your WordPress website by implementing various caching techniques. These plugins temporarily store static versions of web pages, database queries, or other resources and reduce the need to regenerate these elements from scratch every time a user visits the website.
As a result, this leads to reduced load times and server load. They can significantly enhance website speed and user experience, especially during high-traffic or highly demanding tasks.
Some of the most common features that caching plugins offer are:
- Page caching: Store static HTML versions of web pages to serve visitors, reducing the need for dynamic page generation.
- Object caching: Cache database queries or objects to minimize the load on the database server.
- Browser caching: Specify how long a browser should cache static resources like images, stylesheets, and scripts to reduce redundant downloads.
- Minification and compression: Optimize files by removing unnecessary characters and whitespace (minification) and compressing files for faster transmission.
- Content Delivery Network (CDN) integration: Integrate with CDNs to distribute static assets across multiple servers for improved global access speed.
- Cache preloading: Generate caches for new content or updates in the background, ensuring visitors always receive cached content.
- Cache exclusions: Allow customization of which parts of the website should not be cached, such as dynamic elements.
W3 Total Cache, WP Rocket, and WP Fastest Cache are some of the best caching plugins for WordPress. But for this tutorial, we will focus on clearing the cache in W3 Total Cache automatically with scheduled intervals. However, it’s better to familiarize yourself with clearing the cache automatically before we go through the process.
Benefits of Automatically Clearing Cache
Automatically clearing the cache in scheduled intervals offers several benefits for your WordPress website:
- Improved performance and faster load times: Clearing the cache regularly enhances performance by eliminating the storage of outdated or irrelevant data. This allows visitors to access the most up-to-date content directly from the source. It also reduces the need for servers to retrieve and process unnecessary cached data, which results in faster load times.
- Optimized user experience: When your website serves up-to-date content to your visitors, you provide them with a better browsing experience and increase user satisfaction. This is because they encounter the latest, relevant information, resulting in smoother browsing and fewer roadblocks. In return, it minimizes frustration and cultivates higher user satisfaction as individuals effortlessly access accurate and current content aligned with their needs and expectations.
- Accurate analytics: Regularly clearing the cache helps you avoid inaccurate website analytics that might result from users viewing cached pages. So, it plays a crucial role in collecting more accurate data to track user behavior.
- Maintenance and bug resolution: Regularly clearing the cache allows you to identify and address conflicts or errors within the system introduced from cached content. So this proactive approach simplifies pinpointing root causes and facilitates efficient bug resolution. Hence, it also contributes to a stable and reliable digital environment.
- Search Engine Optimization (SEO): Search engines prioritize websites that offer consistent delivery of fresh, relevant, and updated content to users. This signals the search algorithms that the website remains actively engaged with its audience and provides valuable, up-to-date resources. Therefore, clearing the cache can improve your website’s SEO rankings in search engines.
How to Automatically Clear Cache in W3 Total Cache?
To automatically clear cache in W3 Total Cache, add a code snippet to your theme file functions. So you will need a basic understanding of programming to clear the cache automatically. If you lack programming knowledge, seeking a professional developer or programmer assistance is better.
But before adding the codes, you must ensure the plugin is installed and activated on your website. Since you are looking for a specific guide to automatically clear the cache in the plugin W3 Total Cache, we assume you’ve already installed it.

But if you haven’t installed and activated it yet, here’s how you can do so.
1. Install and Activate W3 Total Cache
First, go to Plugins > Add New and enter the keywords for the plugin here. When you see the plugin in the search results, click Install Now.
![]()
The installation will take just a few seconds. Activate the plugin immediately after the plugin is completely installed.
If you want to use the plugin’s premium version for additional features, you must install it manually by uploading it to your website. For further information, you can look at our detailed guide on manually installing a WordPress plugin.
2. Complete the Setup Guide
After activating the plugin, you must complete the setup guide. You can access it by going to Performance > Setup Guide from your WordPress dashboard.
If you prefer to configure the plugin alone, skip the setup guide by clicking on SKIP. However, enabling a few settings before clearing the cache using W3 Total Cache is recommended. You can start the setup guide by clicking on NEXT.
![]()
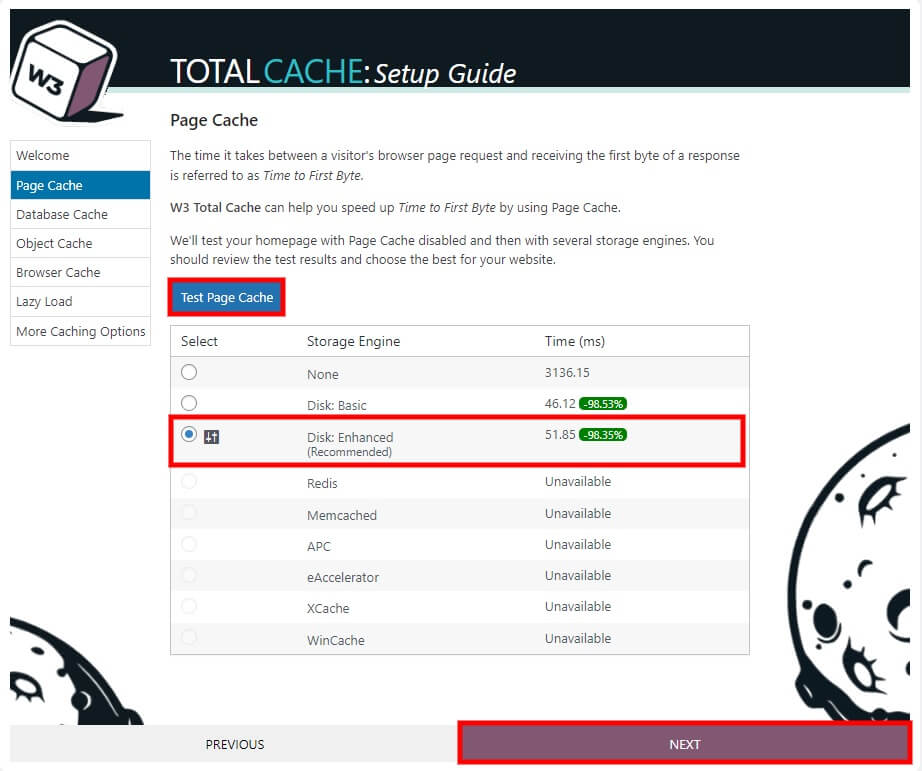
2.1. Run Cache Tests
The plugin will provide you with many tests you can perform for various types of cache data. They include page cache, database cache, object cache, and browser cache.
The first test is the page cache. Just click on Test Page Cache, and it will show you the test results based on your web pages.
Selecting the Disk: Enhanced option is recommended for your website’s best performance. So click on NEXT after you choose it.
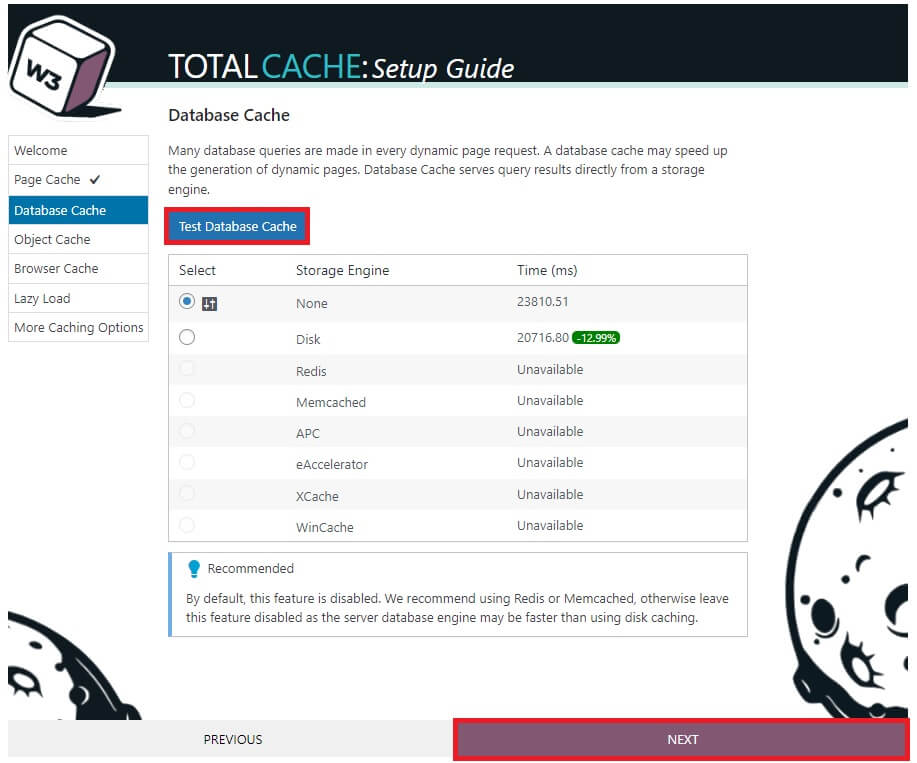
Similarly, you can also run the tests for the database, object, and browser cache with the same steps and select the recommended options for the best performance on your website.
For example, if you test the database case in the next step, you can see that the recommended storage engines are Redis or Memcached. Or else, you can also leave it disabled as suggested by the plugin.
You can also run the tests for the object and browser cache the same way in the next steps. There aren’t any recommended options for the object cache tests. However, it is recommended that you enable the browser cache after you perform the browser cache test.

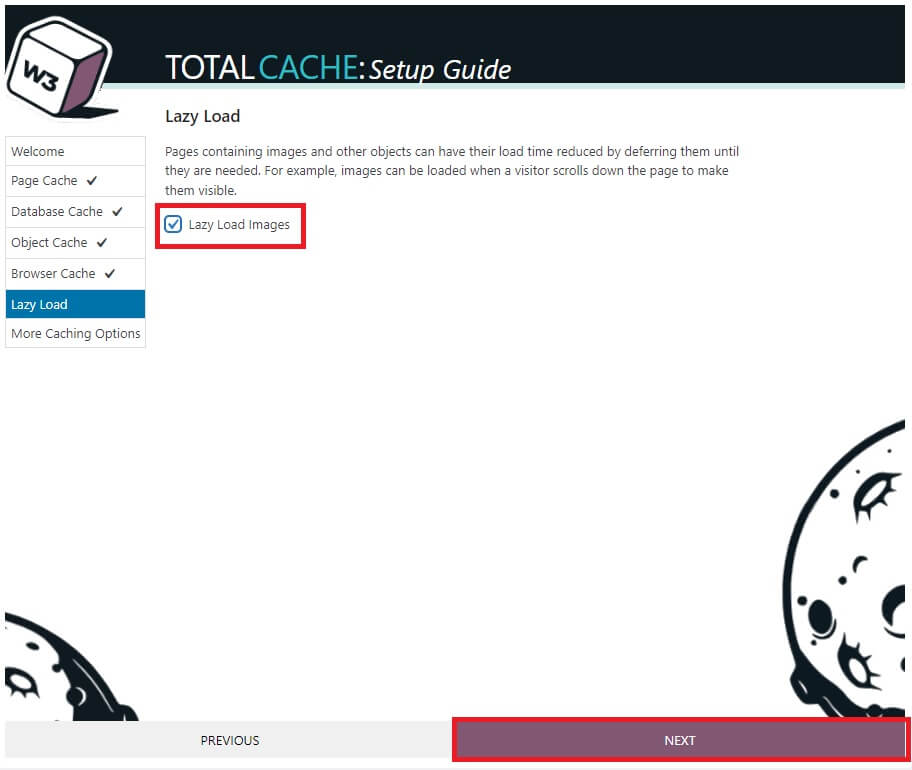
2.2. Enable Lazy Load
After successfully running the cache tests, you must also enable lazy load on your website. Lazy load delays loading images and other objects on a web page until they are needed to improve the initial page load performance. So, you should enable it to complete the setup.
Just check the option for Lazy Load Images on the setup and click NEXT.
Finally, this will complete the setup. After that, you can add the codes to your theme files.
But if you need to adjust more options, click the General Settings link or open Performance > General Settings from your WordPress dashboard.
3. Add Code to Clear Cache Automatically
Once you have completed the setup guide of W3 Total Cache, go to Appearance > Theme Files Editor from your WordPress dashboard. Select the Theme Functions (functions.php) file and add the following code at the bottom of the editor.
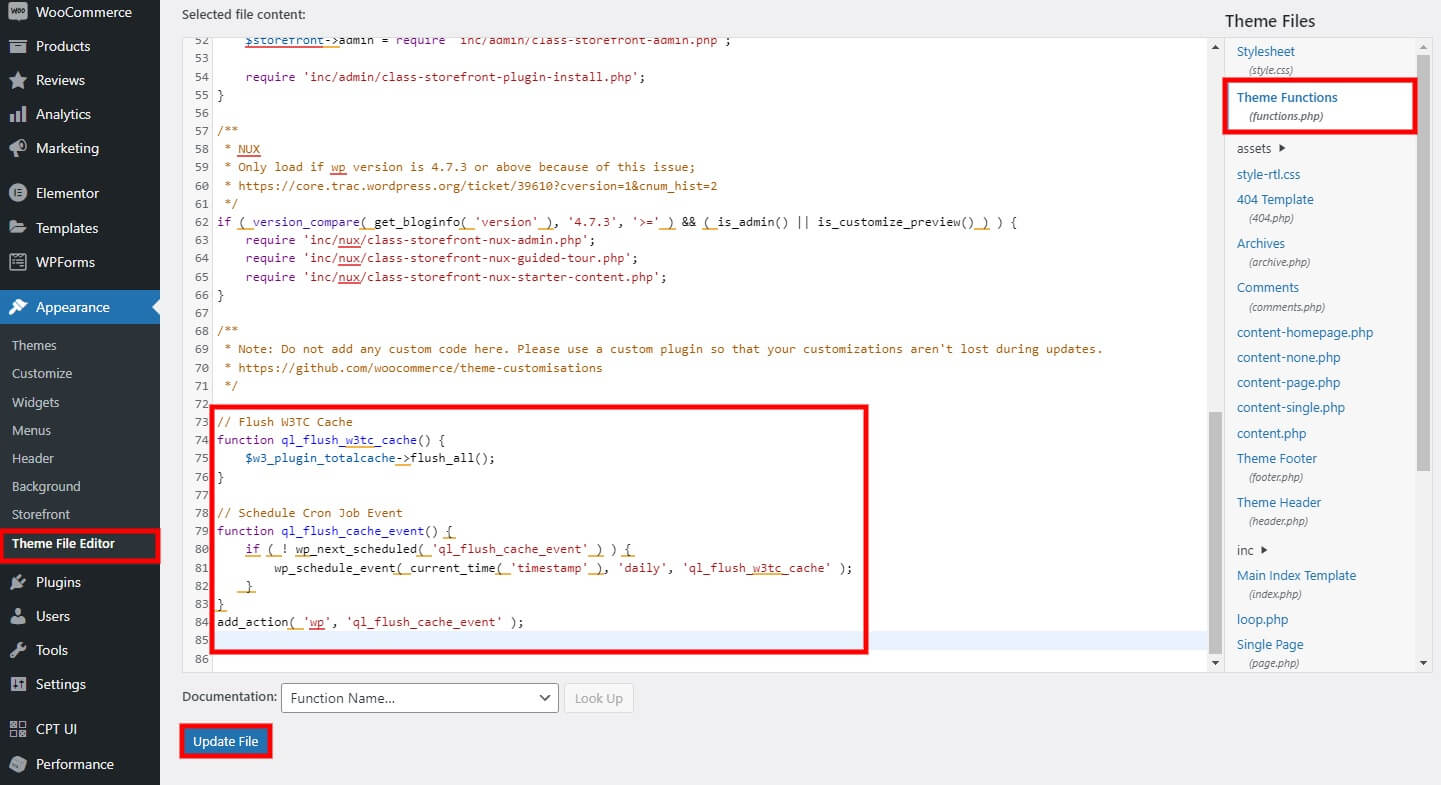
Note: You will modify the core files of your website, and any unintended changes to them may result in further issues on your website. So, we recommend you backup your WordPress website or create a child theme before you continue.
// Flush W3TC Cache
function ql_flush_w3tc_cache() {
$w3_plugin_totalcache->flush_all();
}

// Schedule Cache Clearing Process
function ql_flush_cache_event() {
if ( ! wp_next_scheduled( 'ql_flush_cache_event' ) ) {
wp_schedule_event( current_time( 'timestamp' ), 'daily', 'ql_flush_w3tc_cache' );
}
}
add_action( 'wp', 'ql_flush_cache_event' );
After adding this code to the editor, click Update File to save the changes.
The above code will clear all the cache automatically based on the exact timestamp of the execution of this code. You can change it accordingly before updating the file if you want a different schedule to clear the cache in W3 Total Cache automatically.
The code is also scheduled to clear all the types of cache data in W3 Total Cache using the flush_all command. So if you want to clear a specific type of cache on your website, you can also use the following functions supported by the plugin as an alternative:
- flush_pgcache(); // clears the page cache
- flush_dbcache(); // clears the database cache
- flush_minify(); // clears the minify cache
For example, using the command $w3_plugin_totalcache->flush_dbcache(); will remove all cache data in the database.
That’s it! This is how you clear the cache in W3 Total Cache automatically.
Bonus: Automatically Clear Cache Using Alternative Plugin
As mentioned earlier, you will need a basic understanding of programming for the above process since you will automatically add codes to your theme files to clear the cache in the W3 Total cache.
But if you aren’t familiar with programming and have the option to use an alternative caching plugin, you can also use WP Fastest Cache. It is a free plugin equipped with inbuilt options to enable scheduled automatic cache-clearing functionalities.
![]()
But just like any other plugin, you’ll have to start by installing and activating the plugin. So make sure you install them properly before moving forward.
1. Install and Activate WP Fastest Cache
You can install it using the same method as W3 Total Cache. Once again, go to Plugins > Add New from your WordPress dashboard and search for the keywords of the plugin. Then, click Install Now after seeing the plugin in the search results.
After installing the plugin, click on Activate to start using the plugin.
2. Add a Timeout Rule for Automatic Cache Clearing
After the plugin is activated, open the WP Fastest Cache menu from your WordPress dashboard first. Then, select the Delete Cache tab and click on Add New Rule under the Timeout Rules section.
![]()
Here, you can select the request URL to clear the cache based on all pages or just the homepage. But you can also use conditional logic to automatically clear the cache on specific pages with specific schedules if required.
After selecting the URLs, you can adjust the time interval to schedule the automatic cache clearing. You can choose the time interval based on minutes, hours, days, months, or years.
In this demonstration, we have set the request URL as “ll” and the timeout as once an hour. But you can specify it according to your needs. Don’t forget to click on Save to apply the timeout rule.
![]()
Great! Your website cache will be cleared automatically, depending on the time interval you’ve set in the plugin. Suppose you need further help to automatically clear the cache using an alternative plugin other than W3 Total Cache. In that case, you can also take a look at our detailed guide on how to set up WP Fastest Cache or how to configure WP Rocket.
Conclusion
This is how you clear cache in W3 Total Cache automatically. It is essential to clear the cache data on your website so that your website performance always remains the best. It also helps your website visitors always to access up-to-date information.
To summarize, you must install the W3 Total Cache plugin with the proper setup guide and procedure. Then, you can move on with adding the code snippet to the theme files and adjust the timestamp into the code itself. The timestamp will determine the interval on how frequently the cache should be cleared on your website.
But if using the codes isn’t your cup of tea, you can use an alternative plugin like the WP Fastest Cache or WP Rocket. They both have inbuilt options that allow you to schedule cache clearing automatically.
So can you automatically clear the cache in W3 Total Cache now? We’d love to hear about your experience in the comments below.
In the meantime, feel free to go through the following posts to help you further optimize your WordPress website:
