
How to Configure WP Rocket the Right Way
Do you want to configure the WP Rocket WordPress plugin? Setting up the plugin properly can help you boost the speed of your website within a few clicks. If you are looking for a step-by-step guide, keep reading this article. Here, we will teach you how to configure WP Rocket and improve the website’s speed.
But first, let’s see why using a WordPress caching plugin is a good idea.
Why Using a WordPress Caching Plugin is Good?
A Caching plugin will offer you so many benefits:
- Improved website speed: This is the primary goal of caching plugins. Without adding extra load, they can help you boost the performance of your website.
- Reduced server load: Server RAM and CPU usage are two things you need to keep under control. When a visitor lands on the page, they will spike up. A caching plugin can help you keep them under by serving cached web page files without making additional requests.
- Better search engine ranking: Google considers page speed as one of the ranking factors. So, if you need to rank higher than your competitor, you must optimize your website for performance. A caching plugin can help you with the process.
- Reduced bounce rate: If your website is slow, people will leave. This causes a high bounce rate. You can reduce the high bounce rate with the caching plugin’s performance improvement.
- Better user experience: Everyone loves websites that load faster. With a caching plugin, you can improve the overall user experience.
- Handle high-traffic situations: Your web server will struggle when you receive more traffic on your website. This can cause temporary outages or completely slow your website down. With a caching plugin, you can reduce the server load and deal with high-traffic situations.
- Reduced bandwidth usage: Some shared hosting providers will limit your resources. For example, if you use shared hosting that limits bandwidth, your website will go offline if you exceed the limit. A caching plugin will help you solve this issue.
Now you understand why you should start using a WordPress caching plugin. Next, let’s see why we recommend WP Rocket as one of the best caching plugins.
WP Rocket: An Introduction

If you are into caching and need the best solution, check out WP Rocket. WP Rocket is one of the most popular WordPress plugins in the market, and it is used by hundreds of thousands of people. What makes WP Rocket special is its features. The easy-to-use wizard will make the WP Rocket configuration seamless.
The plugin is also optimized for eCommerce. So, if you are running an online store with WooCommerce, you can ensure you will make the most of it by boosting the performance. WP Rocket is also compatible with most third-party themes and plugins. This way, you can run the perfect WordPress website or WooCommerce store without causing any problems.
Now you know what WP Rocket is and why it is best. In the next section, let’s learn how to configure WP Rocket correctly.
How to Configure WP Rocket the Right Way
The first thing you need to do is get WP Rocket. Since it is a premium plugin, you must purchase it from the official author. As you can see in the screenshot, there are three pricing options.
After paying for a subscription, you can download the plugin files. Once you have done that, install the plugin on your website.
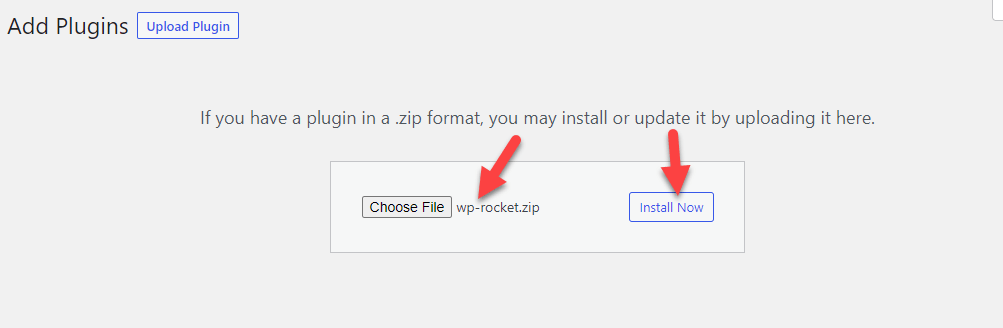
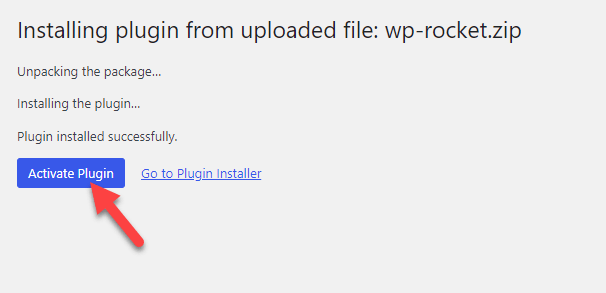
After installation, activate it.
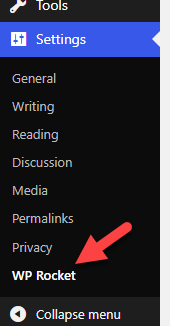
Once you have acted the tool, you can see the plugin’s settings under the WordPress settings.
Inside your WP Rocket account, you can see a license key. The key will give you access to priority support and updates. Fetch the key from there and enter it inside the WP Rocket settings.
It will take a few seconds for you to see your subscription details.

Next, let’s move to the ideal WP Rocket configuration.
1) Caching Options
This is the main feature of WP Rocket.

There, you can see three main configuration options.
- Mobile cache
- User cache
- Cache lifespan
Enable the first option when you need to enable caching for mobile users. You can also store a separate caching file for mobile users. If your website attracts many mobile visitors, enabling this option would be one of the best things you should do.
The next option will allow you to enable caching for logged-in users. You do not have to do this by default when focusing on a content blog. On the other hand, if you run something like a WooCommerce store or a membership website, enable this option.
Finally, setting up a lifespan for caching is a good option. This way, the cached files will be removed automatically after the specific interval. With the preloading feature, you can quickly generate the latest version of the cache without any hassle.
2) File Optimization
Optimizing your static files is a great way to boost the website’s speed. With WP Rocket, you can minify static files and compress them.

There, you can minify the CSS, combine it, minify the JS, blend it, lazy load the static files, delay JS, and so on.
Remember that sometimes, compressing the CSS or JS files will break the website’s design. If you are experiencing any issues in the front end, ever the setting back to its previous state.
3) Media Optimization
Check out the image optimization section if you need to optimize your image serving without using any third-party plugin.

You can enable lazyload for images, iframes, and videos from there. The exclusion option will help you avoid the lazy loading of specific files, CSS classes, or domains. Finally, the plugin will also help you add missing image dimensions automatically. It will help you run the blog perfectly without compromising the user experience.
4) Preload Options
Once you have enabled the preloading feature, the plugin will go through your sitemaps and ensure the cached file is up to date. Here are the configuration options you can have.

You can preload your
- Cache
- Links
- Font
And so on. URL prefetching is another notable feature of the plugin. When you have added external links in your website’s header, like Google AdSense, Analytics, or any other ad networks, the server will make HTTP requests whenever a user lands on the website.
This is a bad practice.
With the URL prefetching feature, you can ensure the domains will be ready to be fetched, and it will make the process faster. It mainly works on mobile devices.
5) Advanced Rules
If you need to exclude specific parts of your website from caching, use these advanced rules settings.

This option will come in handy when running a WooCommerce/membership website. There, you can see configuration options like:
- Never cache URLs
- Never cache cookies
- Never cache user agents
- Always purge URLs
- Cache query strings
As the name suggests, these configurations are pretty much advanced. So, if you are running a simple blog, you do not need to get into the advanced rules options.
6) Database Optimization
If your database is bulky, it can affect the website’s speed. In that case, optimizing the database would be one of the crucial things you need to do. With WP Rocket’s database optimization feature, you can take things further.

You can optimize the following:
- Revisions
- Auto drafts
- Trashed posts
- Spam comments
- Trashed comments
- Transients
- Tables
You can select the option to optimize them individually. On the other hand, if you like to optimize the database occasionally, use the automatic clean-up option. The automatic clean-up would be a good choice if you run a multi-author blog and all work on multiple blog posts.
This way, you can clean your database without manually doing anything.
7) CDN Integration
A CDN (Content Delivery Network) provider will help you serve your website faster to visitors all around the globe. Most CDN networks have data centers in multiple locations, which will help you boost the website’s speed.
If you are using a CDN and need to integrate the URLs with your WP Rocket configuration, check out the CDN customization.

You can enter the CDN CNAMES there and complete the process. Apart from that, you can also exclude specific files from serving through CDN.
8) Heartbeat Control
By limiting WordPress’s heartbeat, you can save the server’s resources. WP Rocket comes with an option to take control of the heartbeat.

By default, there will be one hit in every minute. If you change the option, there will be only one hit every two minutes. Limiting it won’t be feasible if you have plugins or themes that rely entirely on the heartbeat function. Some functions of your theme/plugin won’t work correctly if you have limited the heartbeat or disabled it.
9) Add-Ons
To make your website more robust and secure, you can use tools like Cloudflare, Sucuri, etc. Thankfully, WP Rocket comes with in-built add-on options.

If you need to configure Cloudflare or Sucuri, enable the add-on and start the integration process. The process would be simple; you only need to provide them with a valid API key.

Once you have entered the keys, save the settings, and are ready.
10) Tools
You can use the tools section to import/export WP Rocket settings.

From the same page, you can roll back to the previous version of WP Rocket. You can also optimize the Google fonts from the same page. Google font optimization will help you send fewer external HTTP requests and improve overall performance.
That’s it!
This is how you can configure WP Rocket and boost your website’s speed. You can quickly increase the overall performance and user experience by fine-tuning the plugin with the recommended settings.
If you are looking for a caching plugin and need the best one, check out WP Rocket.
Bonus: Best WordPress Caching Plugins
This section will show you two WordPress caching plugins you should use apart from WP Rocket.
WP Super Cache
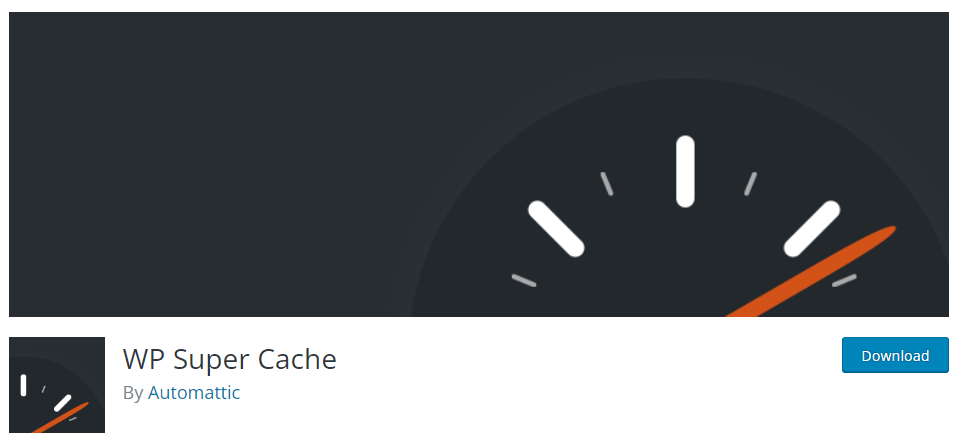
If you need a free solution to optimize website speed, check out WP Super Cache. WP Super Cache is a popular tool, and over 2 million websites use it. The main advantage of the tool is the simple user interface. The easy-to-use tool will help you serve cached files on the front end, reduce the server load, and optimize the website’s performance.
Since WP Super Cache comes with in-built CDN integration, you can directly enter the CDN URLs in the cache settings and optimize the website further. The tool has a caching tester to identify if you have configured the caching properly. Under the settings, you can see this option. You can verify that the cache settings are correctly configured and working fine by going to the page.
WP Fastest Cache
You should start using the WP Fastest Cache to drastically reduce the server’s CPU and RAM usage. This tool uses the Mod_Rewrite method for caching, making the process simple and efficient. Also, when you update or publish a new blog post, all the cache files will be deleted. After the cache file is deleted, the plugin generates the updated version.
This will help you serve the latest information on your website without any issues. You can also manually delete the cache files from the WordPress dashboard. The Cloudflare integration makes things even better. Another notable feature of WP Fastest Cache is you can enable/disable cache for both logged-in users and mobile visitors.
If your website attracts more mobile visitors, this feature will be helpful.
Conclusion
WP Rocket is one of the best WordPress caching plugins we have used and has decent features. It only has a premium version, which makes things even better. Since the plugin provides only a premium version, it has cutting-edge features. As you can see in this article, setting up WP Rocket on a website is straightforward.
You can configure WP Rocket on your WordPress or WooCommerce installation without dealing with a single line of code. It offers several speed optimization methods that you can experiment with. With our configuration options, you can quickly increase the speed of your website with WP Rocket.
We hope you have found this article helpful and enjoyed reading it. If you did, please consider sharing this post with your friends and fellow bloggers on social media.
Similar articles you might like:
