Are you looking for a simple way to edit your login page? We’ve got you covered. In this article, we will show you different ways to customize the WordPress login page and make it more elegant.
What’s the WordPress Login Page?
As its name suggests, the WordPress login page is the page where you have to enter your username and password to log in and access your WordPress dashboard. Depending on the type of user you are and the permissions you have, you’ll have access to different parts of the dashboard.
Most sites leave the default login page because it’s something that usually visitors don’t see. However, to take complete control of your site and make it more secure, you should customize the login page.
Why Should You Change the Login Page?
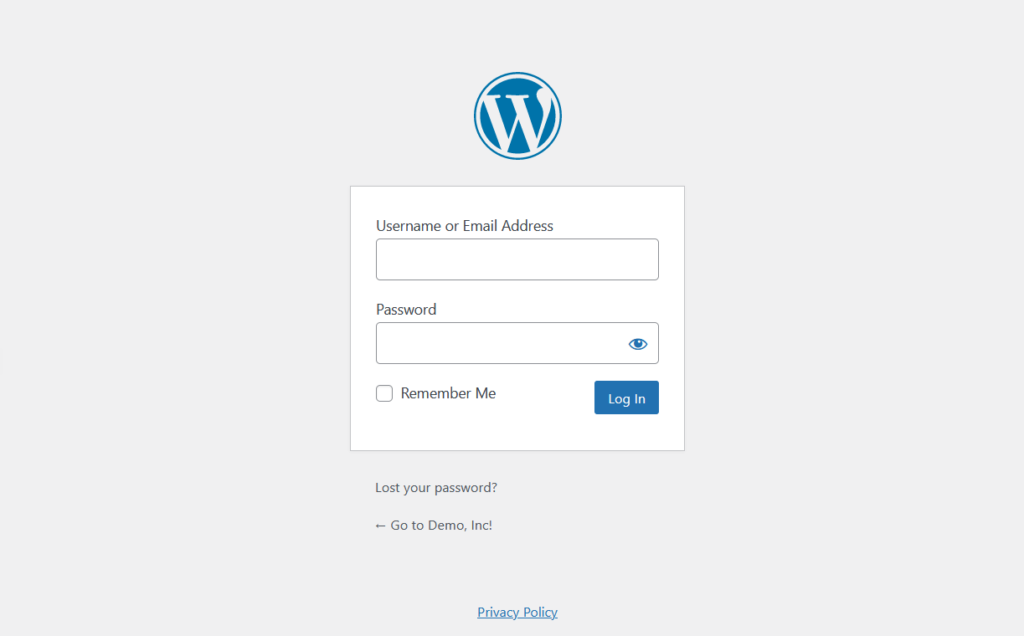
The default WordPress login page looks quite simple and basic. Additionally, it could be any site’s login page. There’s no personalization whatsoever.
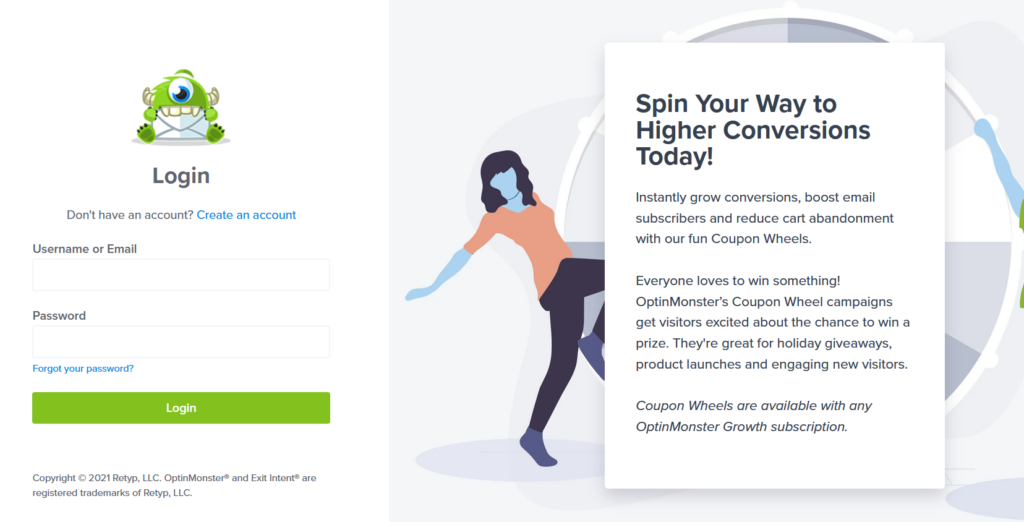
However, if you check the login page of a famous brand like OptinMonster, you’ll see that it looks like this:
The login page is completely customized and you can tell straight away that it belongs to OptinMonster.
There are several reasons why you should customize your WordPress login page. For example, if you’re running an eCommerce store or a membership website, customizing the login page is a good idea. Shoppers will need to log in to their accounts to complete a transaction or accessing their membership benefits, so displaying the default login page might not look professional. Similarly, if you have an affiliate program, it’s a good option to edit the login page and customize it.
Additionally, by customizing the login page, you can make your site more secure against hackers.
There are many ways in which you can customize the WordPress login page. You can add your logo, brand name, brand colors, and even some text, to make an impression on your users. Most sites don’t do it, so simply by putting a bit of effort, you’ll stand out from most sites.
Now let’s see the different methods to edit the login page.
How to Customize the WordPress Login Page
There are three main ways to customize the login page:
- Using plugins
- Programmatically
- With page builders
Let’s have a look at each method below so you can choose the most appropriate one for you.
1) Edit the login page with plugins
There are many plugins to customize the WordPress login page. Some of the best ones are:
- Theme My Login (limited customization)
- Custom Login Page Customizer (highly customizable)
- CSS Hero (dedicated customization plugin)
- WPForms (form plugin with advanced features)
- SeedProd (complete solution for landing pages)
For this tutorial, we will use Theme My Login and Custom Login Page Customizer. Let’s see the step-by-step process.
1.1) Theme My Login
Theme My Login is a free plugin used for creating custom login pages in WordPress. Without using any additional CSS snippets, you can match the site’s styling with the login page.
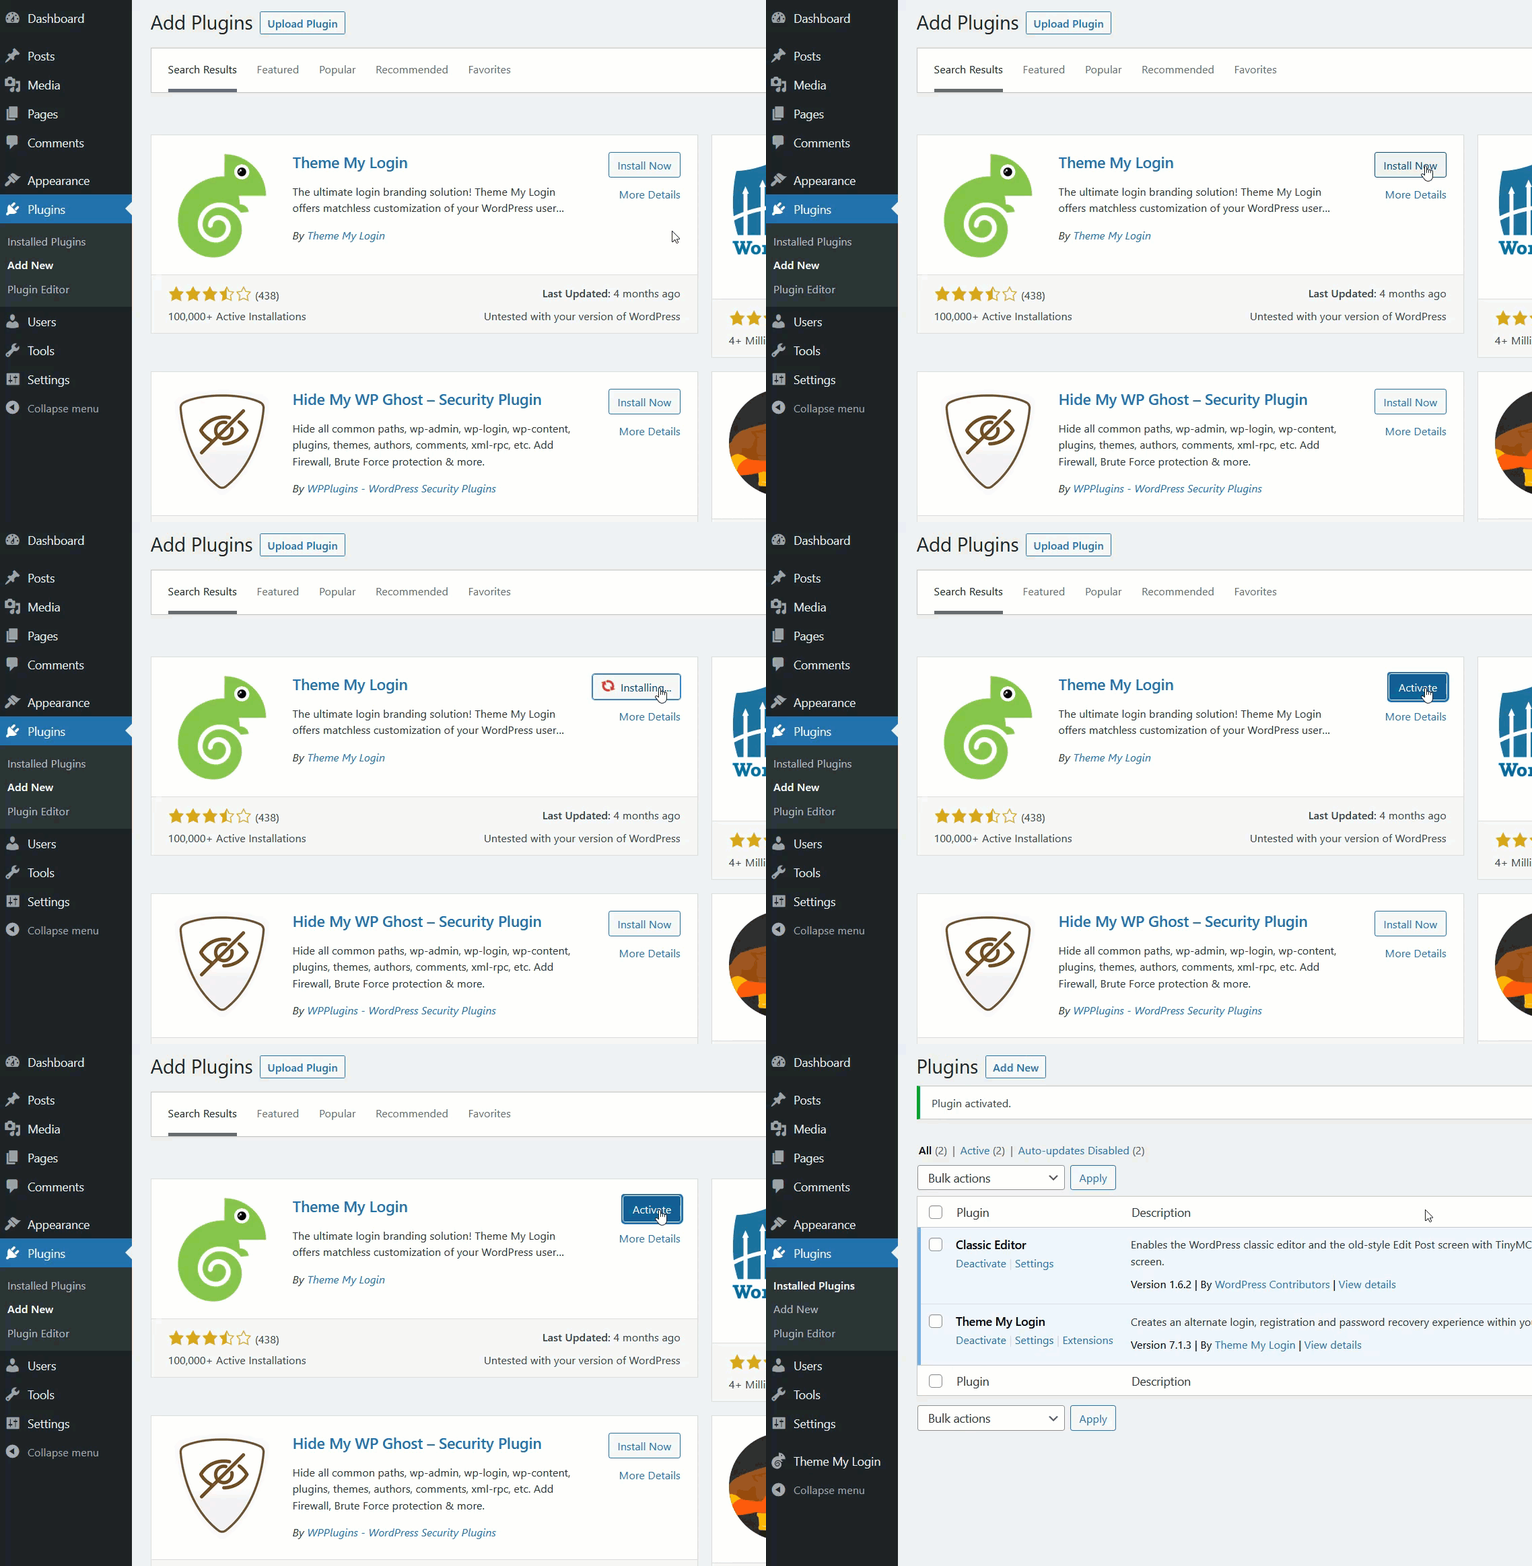
First, install and activate the plugin. In your WordPress dashboard, go to Plugins > Add New, look for the plugin and install it.
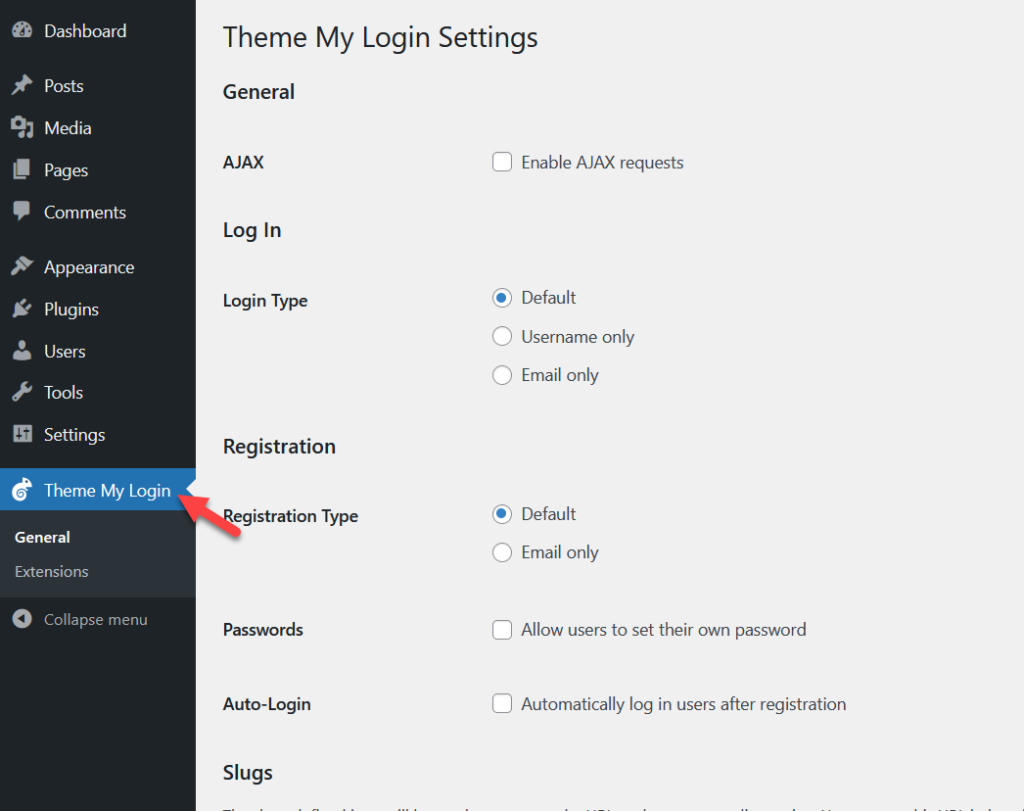
Once you have activated it, you will see the plugins’ settings on the left-hand side.
The main configuration you will see are:
- General
- Login
- Registration
- Slugs
Under those options, you will see some sub configurations. Theme My Login doesn’t come with a lot of customization options, but they are enough for those who want to make some basic changes.
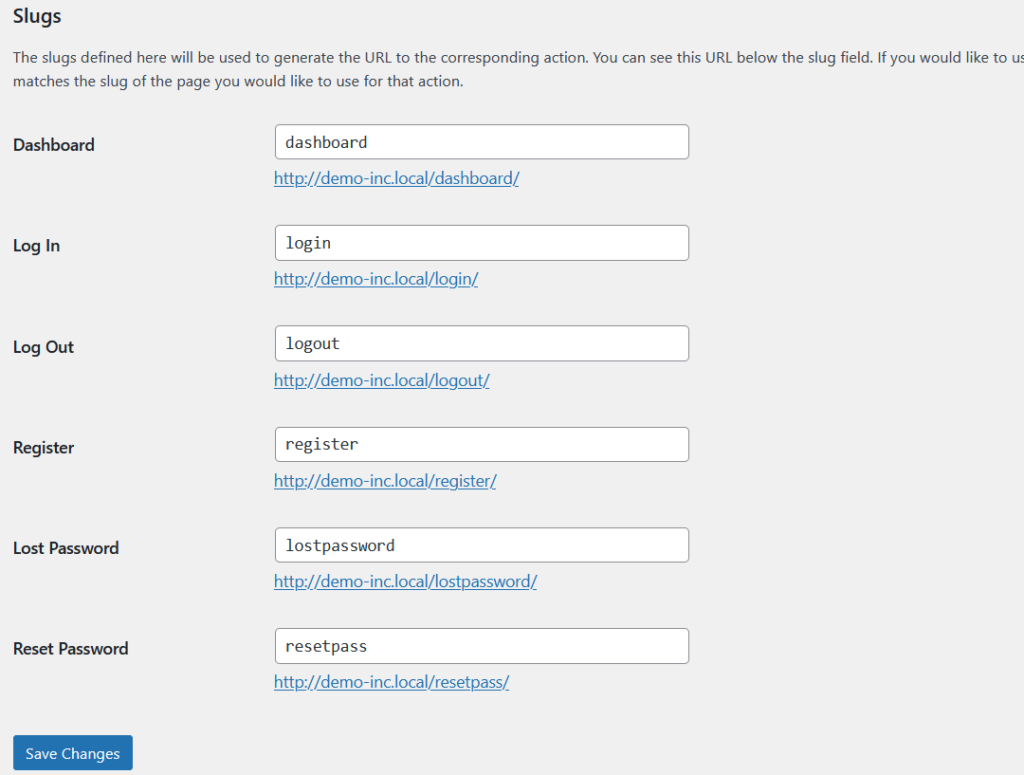
Scroll down to the slugs section and you will see all the available permalinks that you can use and change.
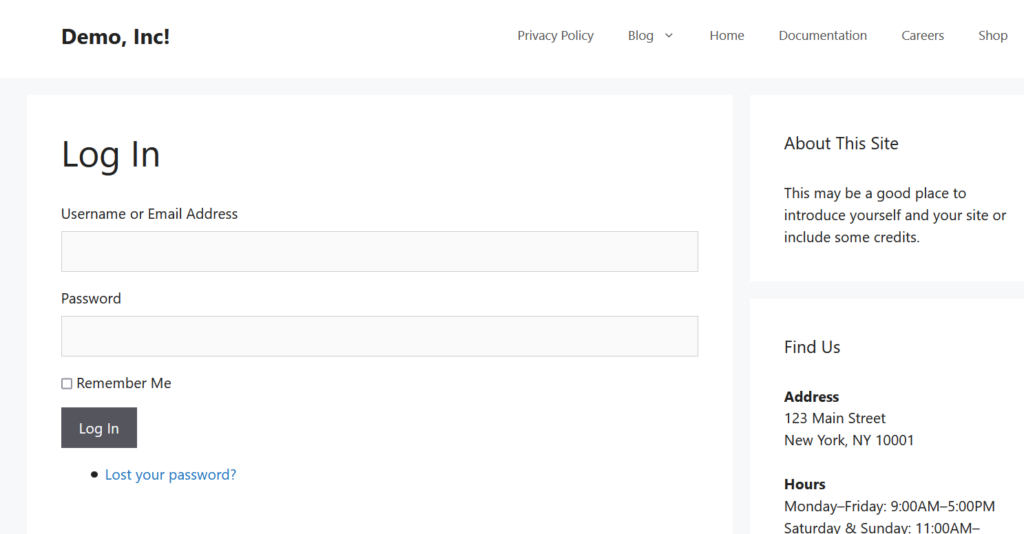
Once you’re done with the modification, save your changes, and check the login page in the front end.
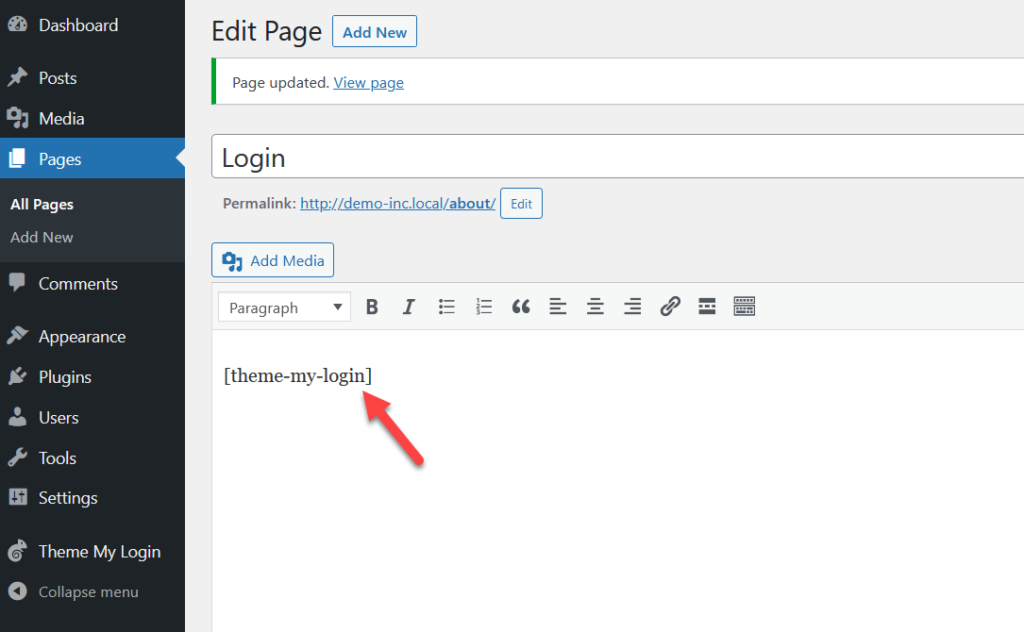
The plugin is also optimized for WordPress shortcodes, which allows you to embed the login, registration, dashboard, or lost password pages inside your posts/ pages.
Some of the available shortcodes are:
- [theme-my-login] – login page
- [theme-my-login action=”register”] – registration page
- [theme-my-login action=”lostpassword”] – lost password page
- [theme-my-login action=”resetpass”] – reset password page
Simply add the shortcode you want on the classic editor or Gutenberg editor, and publish (or update) the page.
That’s it! That’s how you can edit the WordPress login page with Theme My Login. If your users need to log in often, we recommend you add the login page to your WordPress menu.
1.2) Custom Login Page Customizer
If you want more advanced features but still want a free plugin, Custom Login Page Customizer is for you. It is another dedicated tool that allows you to edit the WordPress login page without using any code.
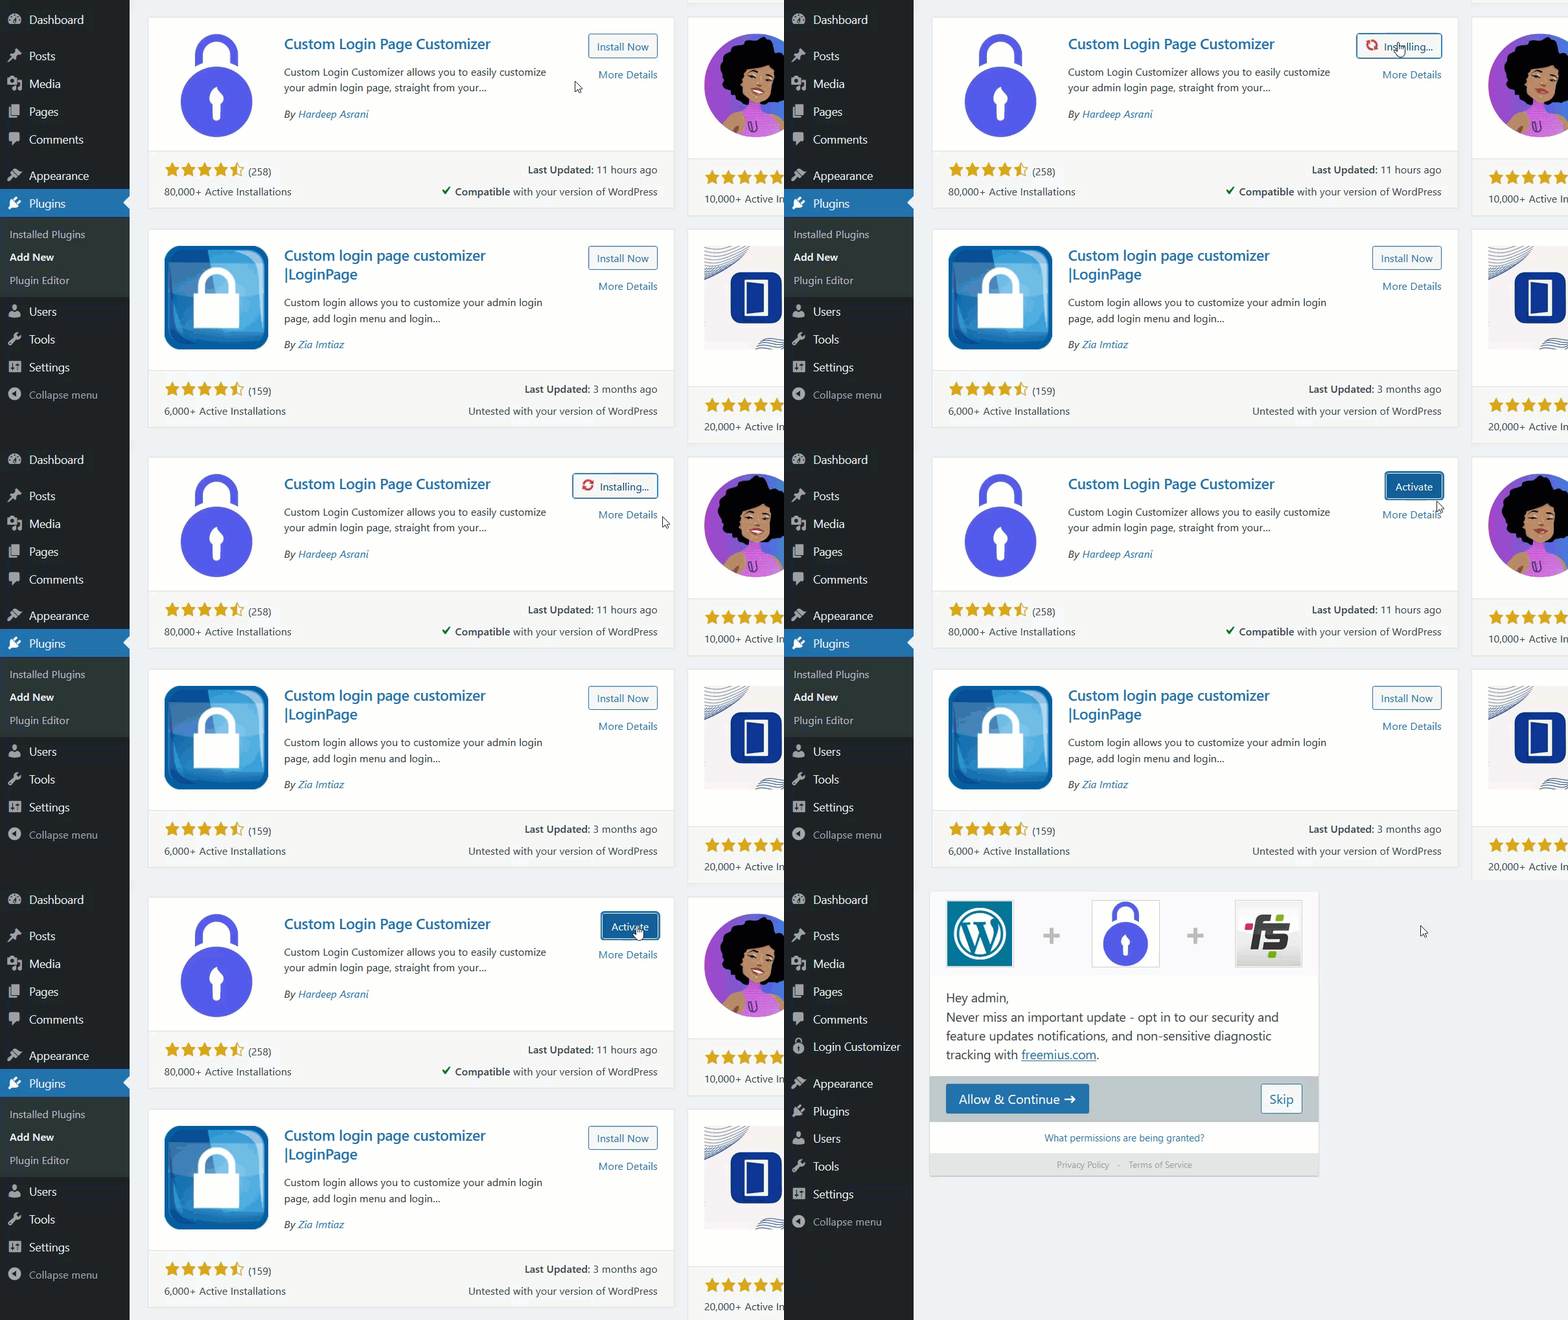
First, you need to install and activate the plugin on your website by going to Plugins > Add New.
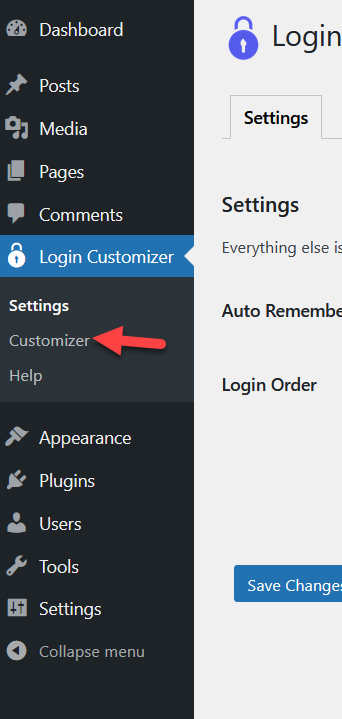
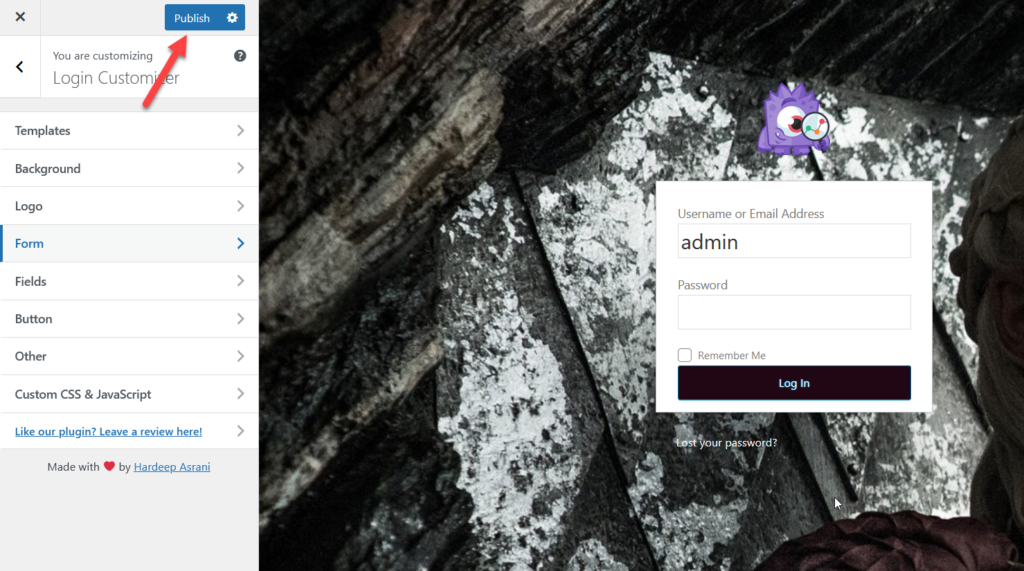
You will see the settings on the left-hand side. Click Customizer and you’ll be redirected to the WordPress customizer where you’ll be able to manage everything.
Alternatively, you can access the Customizer from the Appearance section by selecting the Login Customizer option.
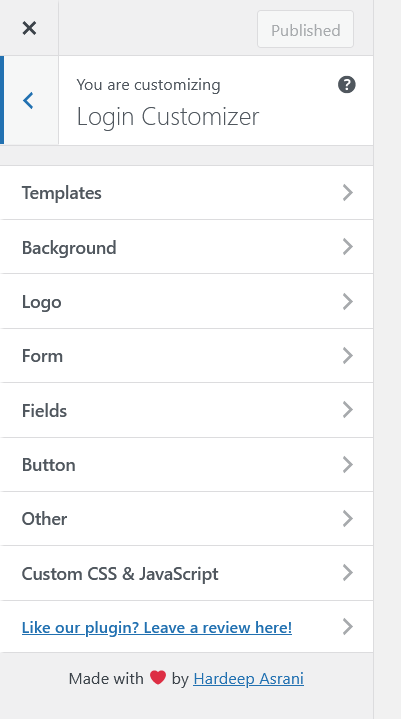
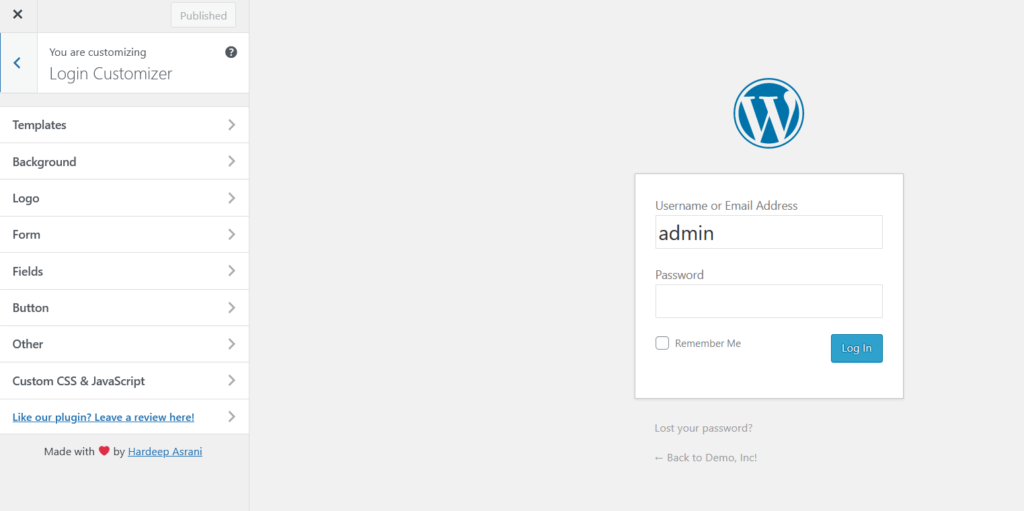
On the left side, you will see all the available options, while on the right side, you can preview the login form.
The options you can customize in the login form are:
- Templates
- Background
- Logo
- Form
- Fields
- Button
- Other
- Custom CSS & JavaScript
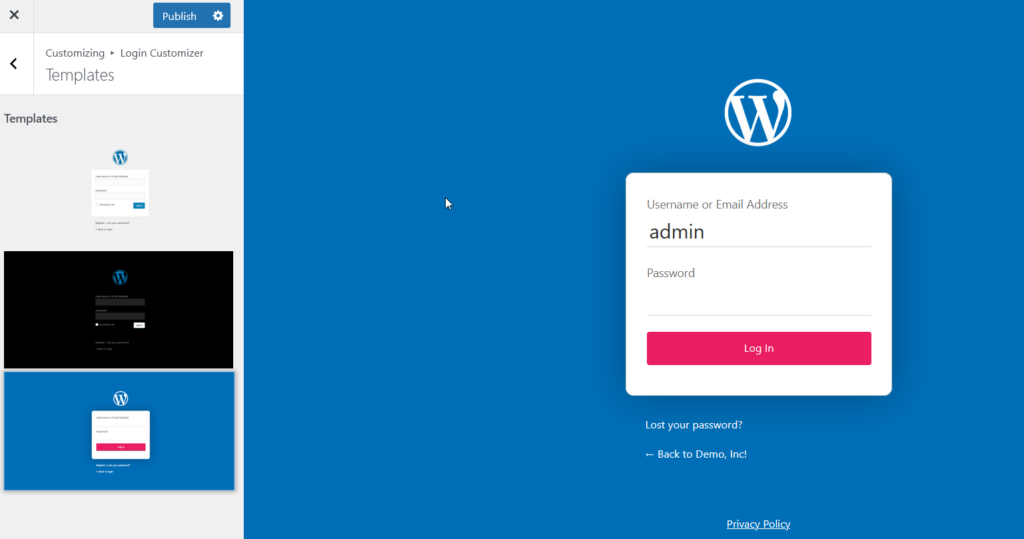
If you don’t want to spend time designing your login page from scratch, you can use one of the templates.
Alternatively, you can check out the different options and craft your login page exactly as you want it. For this tutorial, we’ll change the logo, colors and add a background image. Once you’re happy with your design, save the updates.
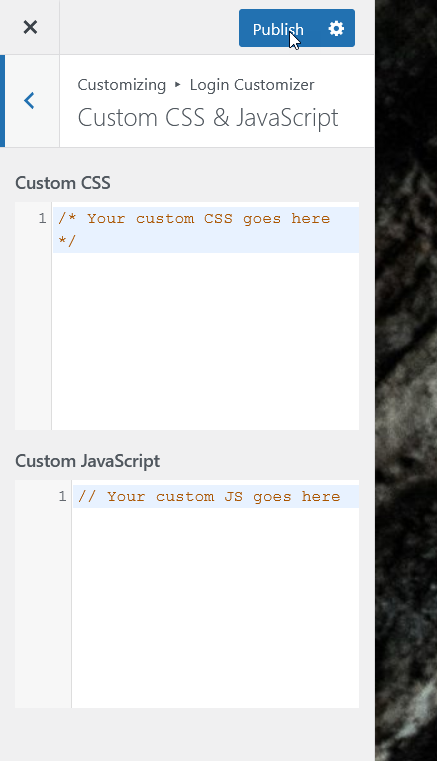
Additionally, you can add custom CSS or JavaScript code to the login page which can be a very interesting option for those with coding skills.
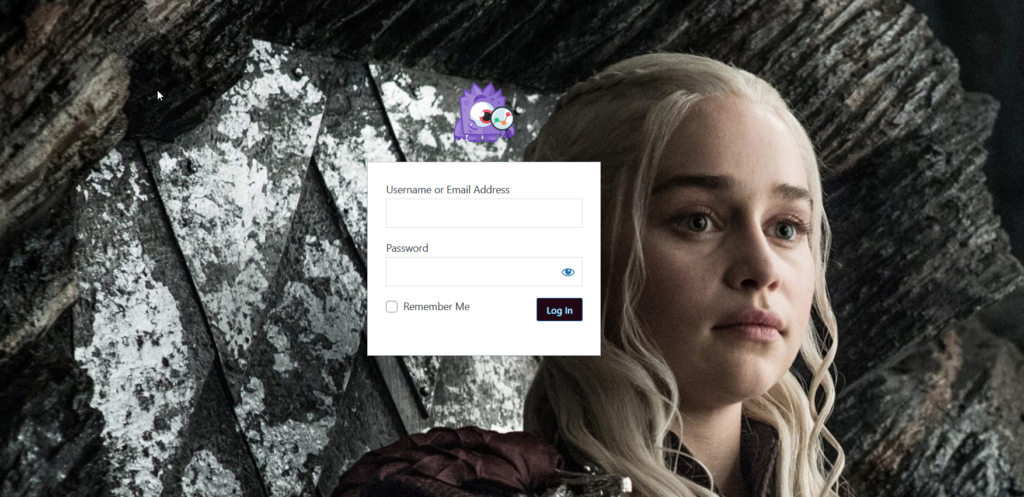
So now if you check the front end, you’ll see your customize WordPress login page.
For more information about plugins to edit the login page, have a look at this post.
As you can see, editing the login page with plugins is easy. However, if you know how to code, you may want to customize it programmatically.
2) Customize the WordPress login page programmatically
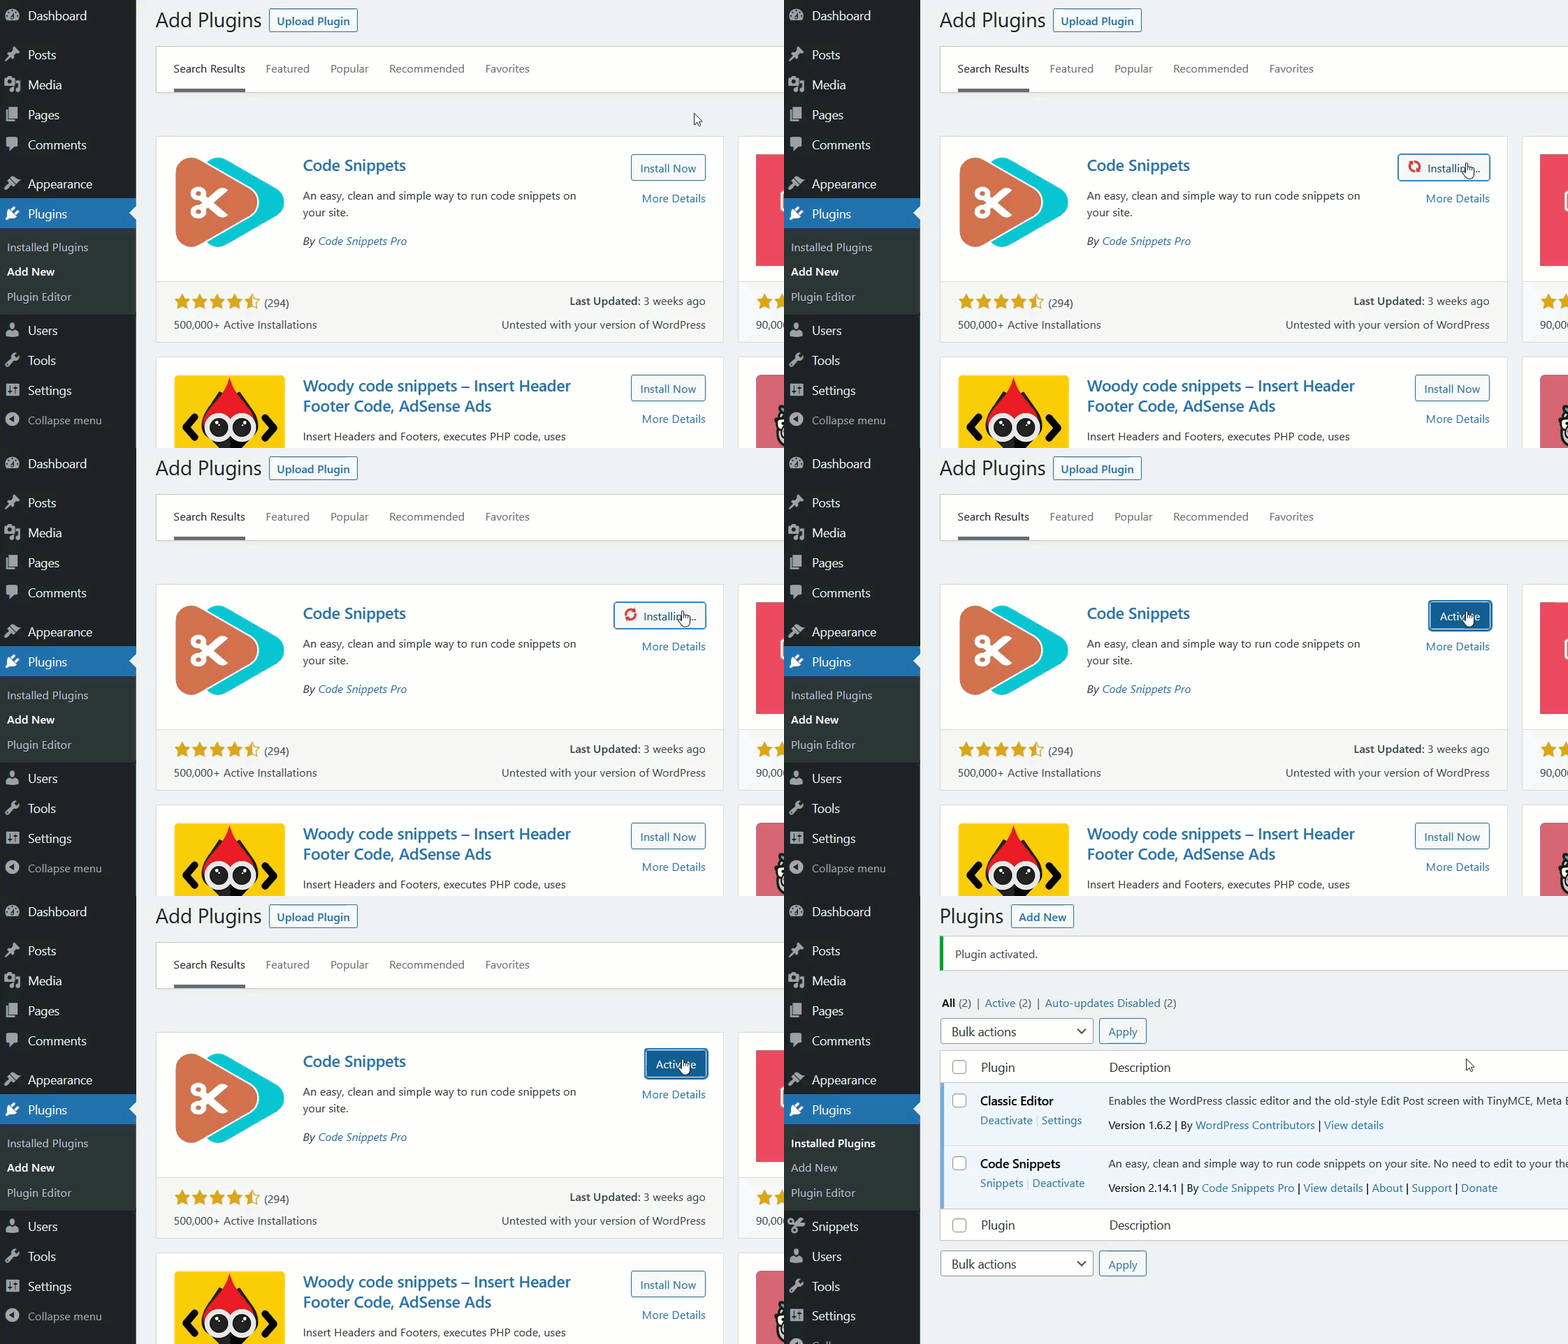
If you prefer not to install third-party tools and code your own solution, you can edit the login page programmatically. You can paste the code inside the theme’s functions.php file or use a site-specific plugin. For this demo, we will use the Code Snippets plugin.
NOTE: If you’re going to edit the functions.php file directly before you start, we recommend you create a full backup of your site and create a child theme.
First, install and activate Code Snippets on your website.
Now let’s see a sample code that you can use.
function quadlayers_login_logo() { ?>
<style type="text/css">
#login h1 a, .login h1 a {
background-image: url(https://www.example.com/image.png);
height:100px;
width:300px;
background-size: 300px 100px;
background-repeat: no-repeat;
padding-bottom: 10px;
}
</style>
<?php }
add_action( 'login_enqueue_scripts', 'quadlayers_login_logo' );
If you take a quick look at the code, you’ll see that we’re adding a logo with certain dimensions. You’ll also see that there’s a link. That’s the URL of your logo, so make sure you adjust the URL accordingly to display your logo.
How to find an image URL
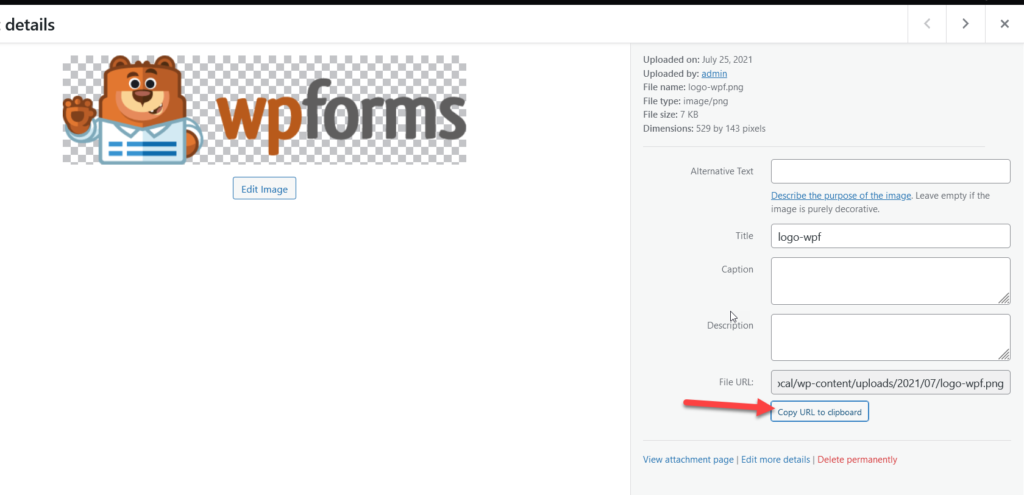
Finding an image URL is quite simple. Once you have uploaded the image to your website, open the Media Library and select the image. On the right-hand side, you will see the image URL.
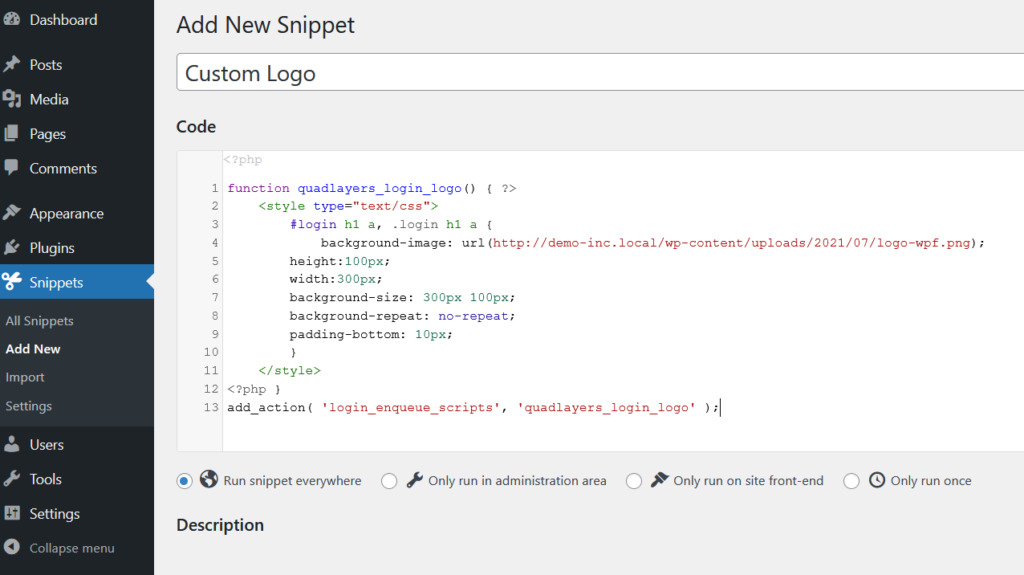
Copy the file URL and paste it inside the code. For example, the final code using the above image will be:
function quadlayers_login_logo() { ?>
<style type="text/css">
#login h1 a, .login h1 a {
background-image: url(http://demo-inc.local/wp-content/uploads/2021/07/logo-wpf.png);
height:100px;
width:300px;
background-size: 300px 100px;
background-repeat: no-repeat;
padding-bottom: 10px;
}
</style>
<?php }
add_action( 'login_enqueue_scripts', 'quadlayers_login_logo' );
You can also customize the dimensions, but for now, simply copy the code using your own image URL. Now, you need to create a new snippet using the Code Snippets plugin. Go to Snippets > Add New, paste the code and activate the snippet.
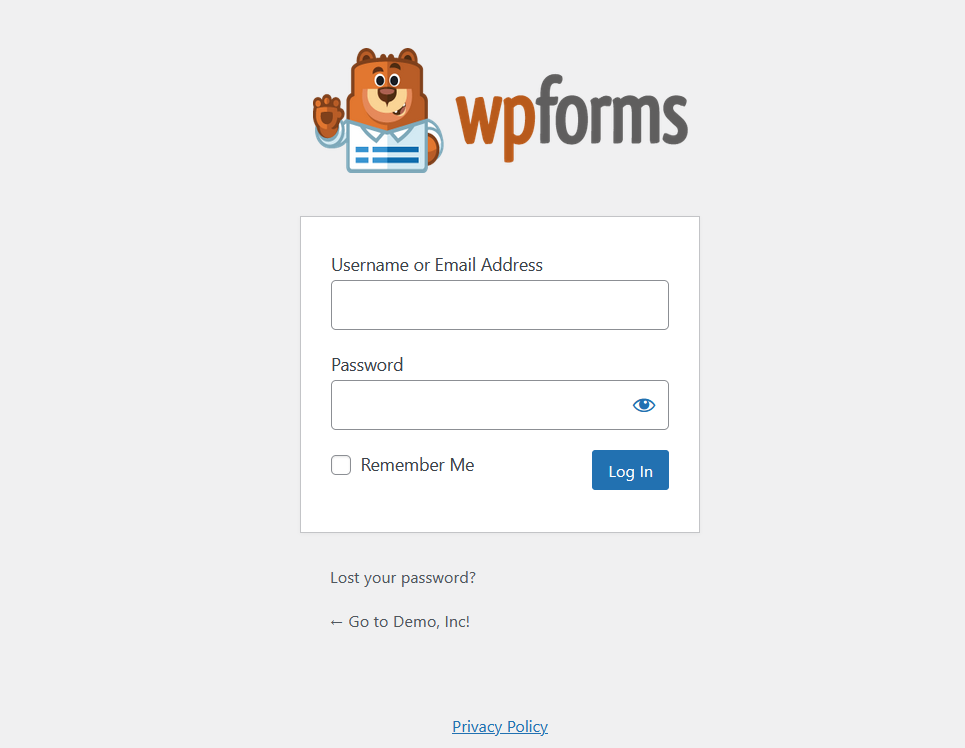
Now, check the login page using an incognito window and you will see the new logo.
If you check the code once again, you’ll see that there’s a bit of CSS to give it a certain style. If you prefer, you can remove the code <style type=”text/css”></style> and add the below CSS code to your theme’s stylesheet or inside the Customizer.
#login h1 a, .login h1 a {
background-image: url(http://demo-inc.local/wp-content/uploads/2021/07/logo-wpf.png);
height:100px;
width:300px;
background-size: 300px 100px;
background-repeat: no-repeat;
padding-bottom: 10px;
}
Keep in mind that you need to edit the CSS code according to your requirements. The classes you need to work on are:
#login h1 a
and
.login h1 a
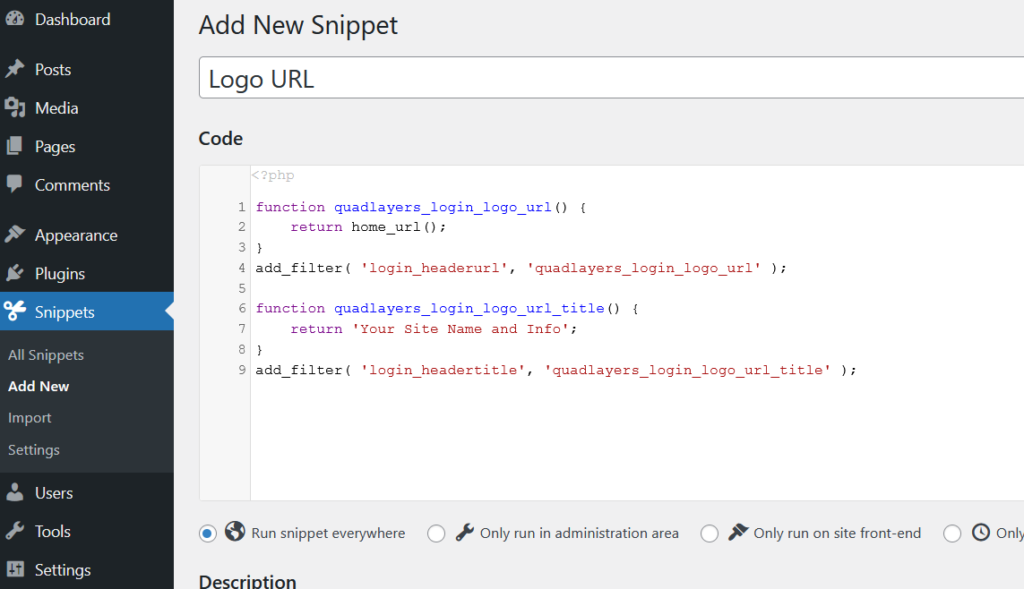
We have successfully changed the WordPress logo, but the logo URL is still pointing to the WordPress.org domain. However, you can easily change that by adding a small PHP script to the functions.php file or using Code Snippets.
Create a new snippet using the Code Snippets plugin and paste the below code.
function quadlayers_login_logo_url() {
return home_url();
}
add_filter( 'login_headerurl', 'quadlayers_login_logo_url' );

function quadlayers_login_logo_url_title() {
return 'Your Site Name and Info';
}
add_filter( 'login_headertitle', 'quadlayers_login_logo_url_title' );
After activating the PHP snippet, the logo URL will be your domain name.
These are just a few customizations but there’s a lot more you can do. We recommend you play around with the code and edit the login page exactly as you want it.
3) With Page Builders
Another way to customize the WordPress login page is by using a dedicated page builder. There are many page builders that you can use, but for this tutorial, we will use SeedProd.
SeedProd is a freemium tool that allows you to build quality landing pages. If you want to use its templates, you need to get the premium version that starts at 39.50 USD per year.
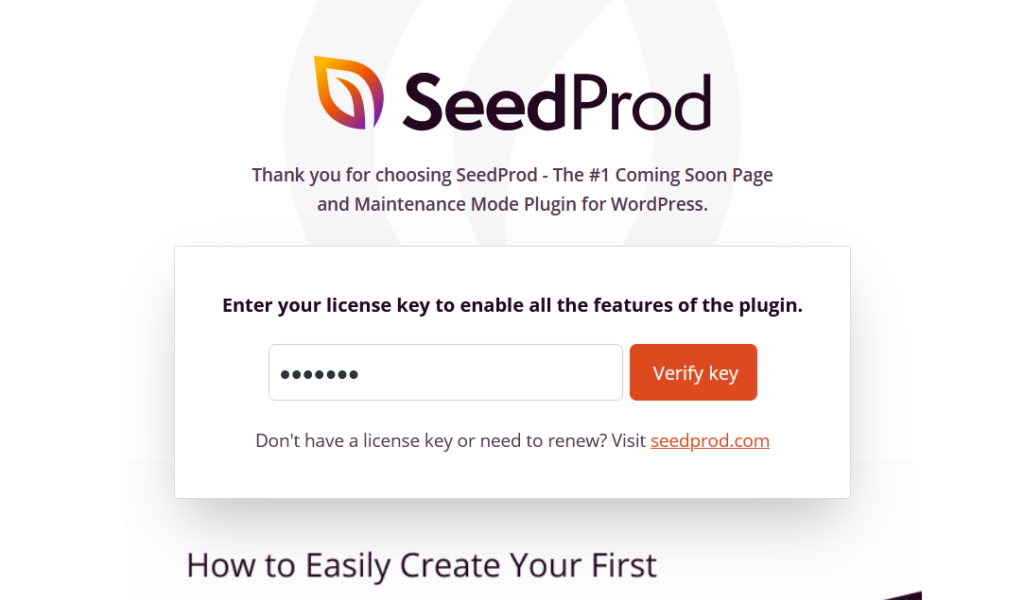
Once you have activated the plugin, you need to verify the license key.
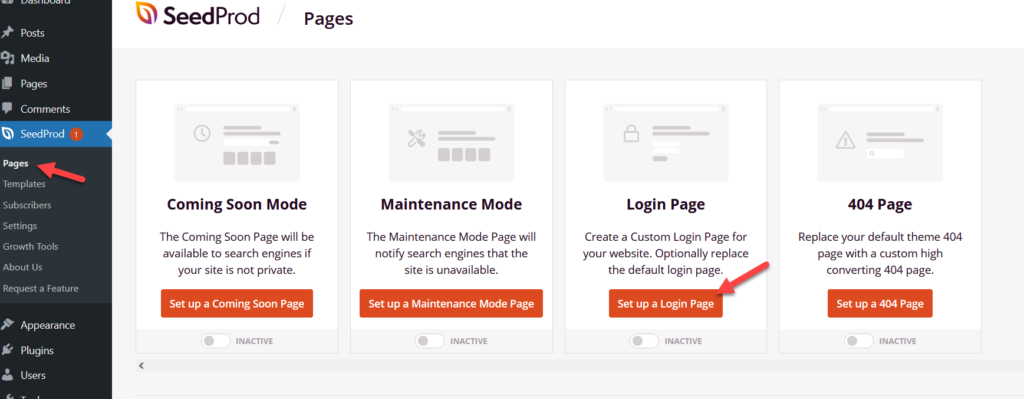
This will give you access to all the pre-made templates. After verifying the key, go to SeedProd > Pages and choose the Login Page option.
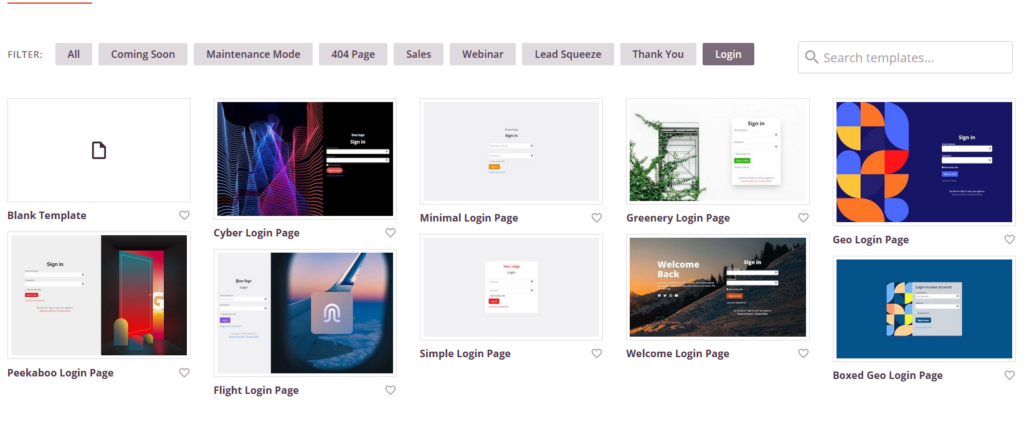
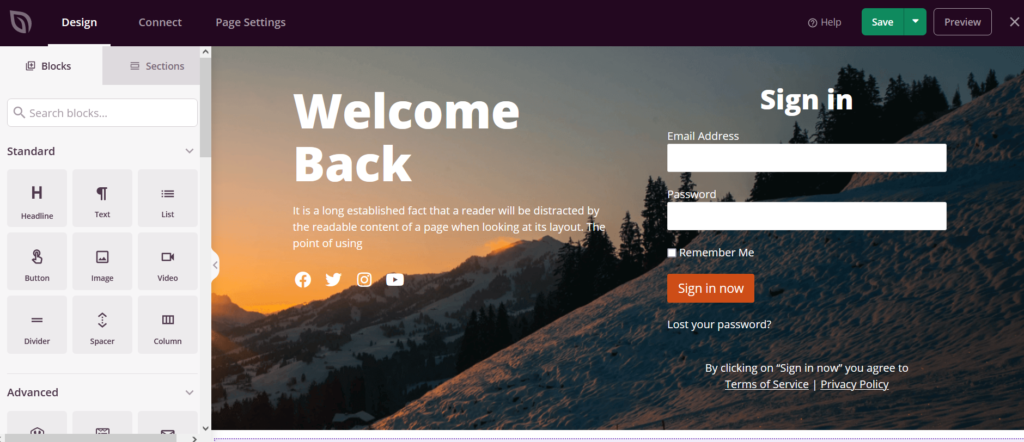
You will see all the available login templates on the screen. You can either pick any of these pre-made templates or create a new one from scratch.
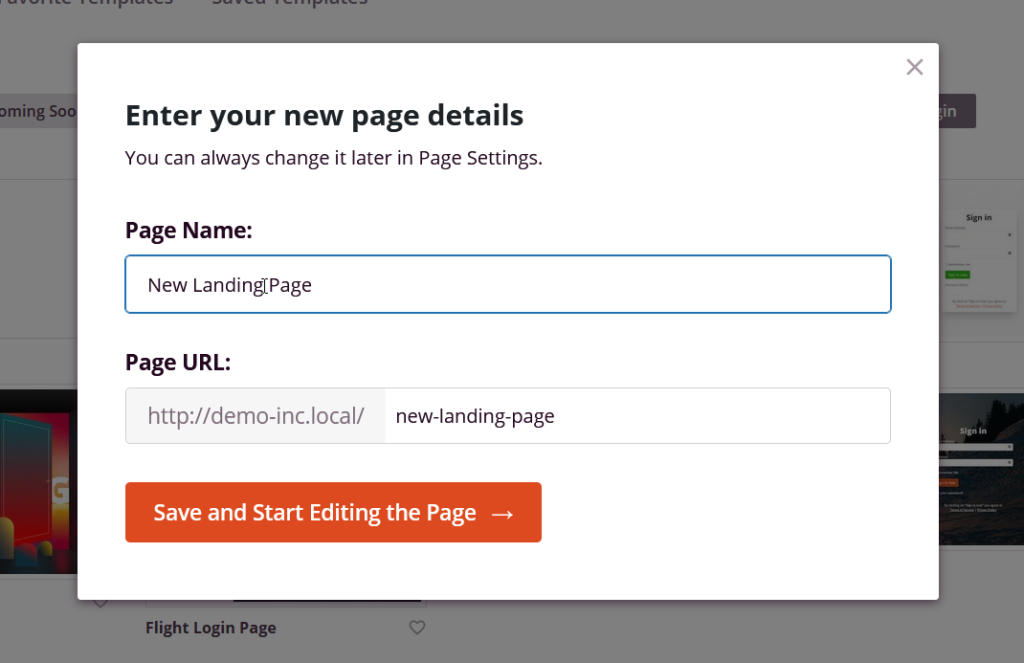
For this tutorial, we will select one of the templates. Once you have selected a template, name it.
After that, you will be redirected to the page builder.
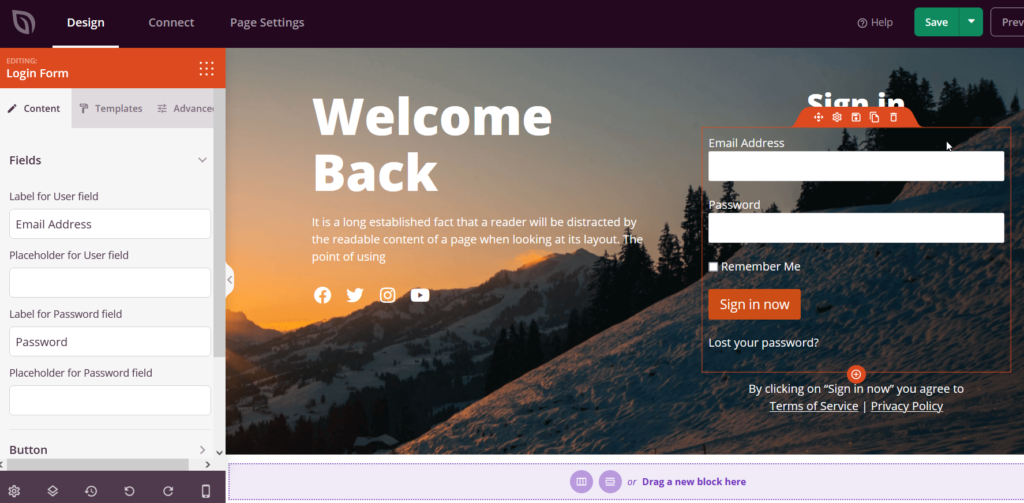
On the left-hand side, you will see all the elements you can use to edit the login page, and on the right-hand side, you will see the preview of the page. To add elements and customize the login page, simply drag the elements from the left column and drop them in the preview wizard.
By default, the login template we’ve chosen comes with a background image, a login form, and some text content. You can edit any of these elements by clicking on them. For example, to edit the login form, select it, and on the left panel, you will see the configuration options.
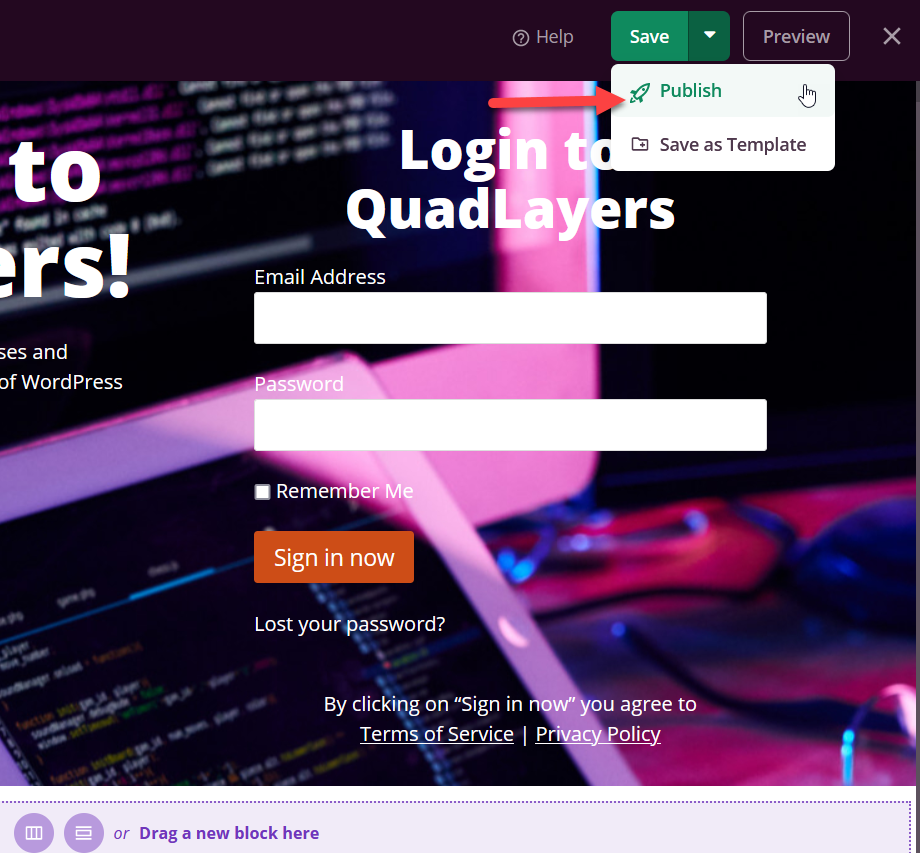
After modifying the page, publish it.
Now check the page from the front end, and you will see the newly customize login page.
Make sure that you add the page URL to your WordPress menu or a sidebar widget, so users can log in using the new URL.
Most WordPress page builder plugins come with this feature, so you should be able to do it regardless of the tool you’re using.
How to Find the WordPress Login Page URL
Finding the WordPress login URL is easy. If you have a bare WordPress install, you can add /wp-admin/ to the end of the domain and it will redirect you to the WordPress dashboard. If it doesn’t, you can add /wp-login.php to the end of the domain name. For example, if your domain name is example.com, enter www.example.com/wp-admin/ or www.example.com/wp-login.php to the browser.
In most cases, these two methods will work. Alternatively, you can also try adding /admin/ or /login/ to the end of the domain name.
Keep in mind that if the website admin has configured a custom login path, you will need to contact them and ask them for it.
Now that you have found the login page URL, let’s see how to change the login URL.
How to Change the WordPress Login URL
WordPress is the most popular CMS in the world, so it’s the favorite platform for hackers. The login page is one of the pages that receive more attacks, so for security reasons, it’s a good idea to change the login page URL. This will help you prevent unauthorized users from accessing the login page and trying random username and password combinations.
In this section, we will show you how to change the default WordPress login URL.
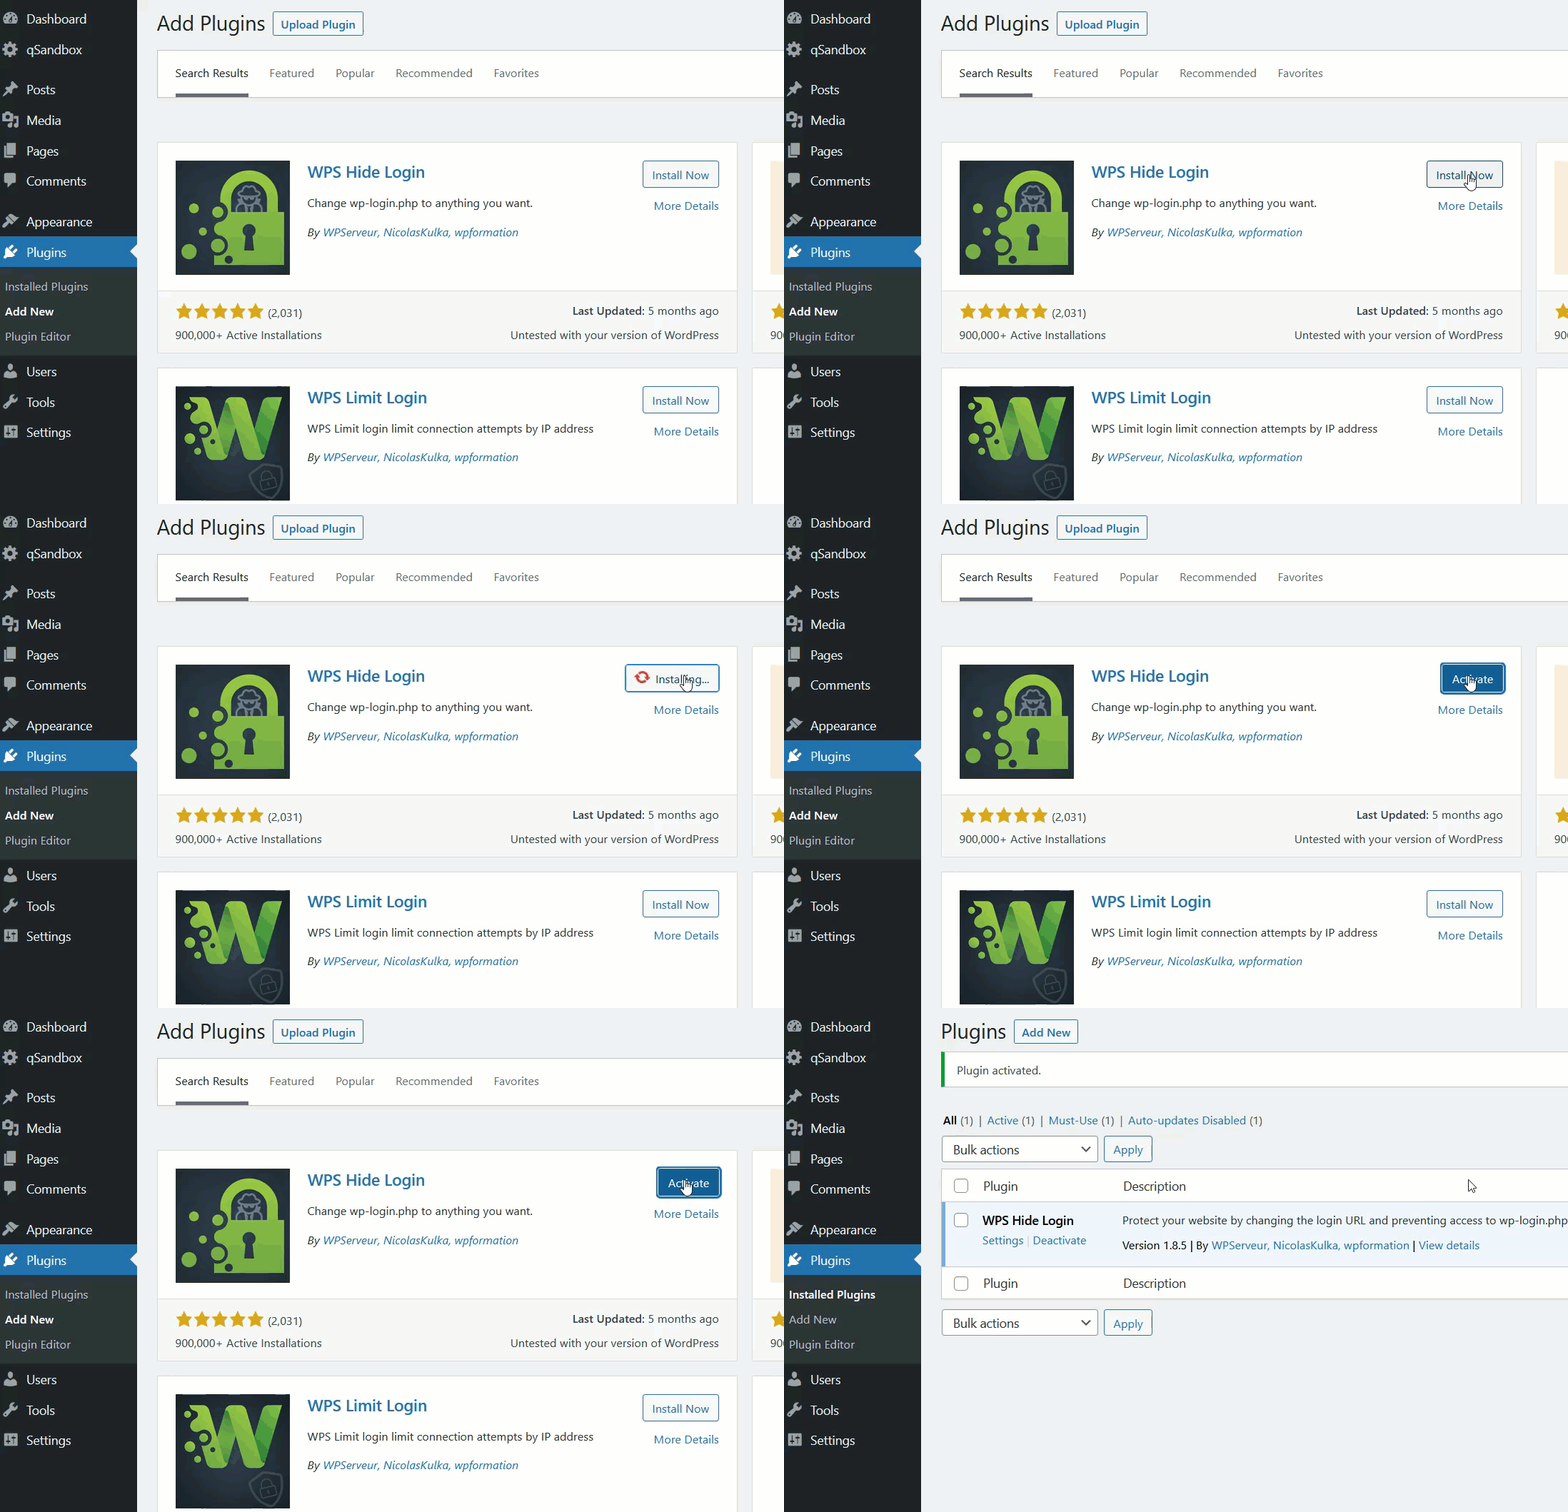
To make this process as simple as possible, we will use the WPS Hide Login plugin. It is one of the famous security tools and it’s 100% free. First, install and activate the plugin on your website.
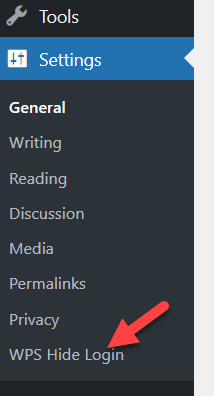
After that, you will see the plugins’ settings under the Settings section.
Creating a new login page URL
You can open the plugin’s settings or go to the general Settings and modify the login URLs from there. However, we recommend you use the plugin’s setting because it gives you more customization options.
- Login URL: This is your new WordPress admin URL. By default, the plugin will add login as the permalink. In that case, the new login URL would be www.example.com/login. Keeping login as the default WordPress admin path is not recommended. Instead, you should add a unique path. For example, if you add mainentry as the login path, the login page URL will be www.example.com/mainentry.
- Redirection URL: Here’s another useful option for redirecting unauthorized users from the wp-admin page. As you know, WordPress comes with the wp-admin permalink for the login page. If you disable it, you need to set up redirection, so that all the unauthorized traffic will be forwarded to that specific page. For example, you can forward them to a 404 error page or a custom blog post/page.
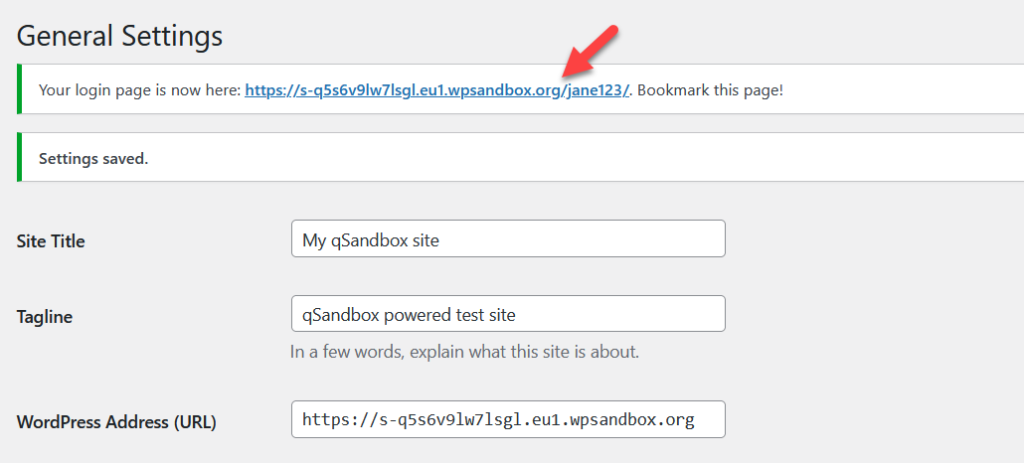
Simply change the plugin’s settings accordingly and save the settings. You’ll see the confirmation of the new login URL.
You have successfully modified the WordPress default login URL. To test the new configuration, open an incognito window and enter the default WordPress login URL (www.yourdomain.com/wp-admin). If everything is working correctly, you will be redirected to the 404 page that we configured as the redirection URL. To access the login page, you need to enter the new login URL you’ve just created.
If you are looking for a more detailed guide to customize the login page URL, check out this complete guide.
Recover the login URL
What happens if you change the login URL but then forget it? The good news is that it has an easy fix. Simply connect an FTP client such as FileZilla to your server, access the WPS Hide Login plugin folder, and delete it. After that, the login URL will be the default one (wp-admin).
How to Limit the Login Attempts
Another interesting option to improve the security of your site is to limit login attempts. By default, WordPress allows unlimited login attempts which give hackers a good chance of accessing your site. As there is no inbuilt option for limiting the login attempts, we will need to use a third-party plugin. In this section, we will show you how you can restrict the login attempts using Limit Login Attempts Reloaded.
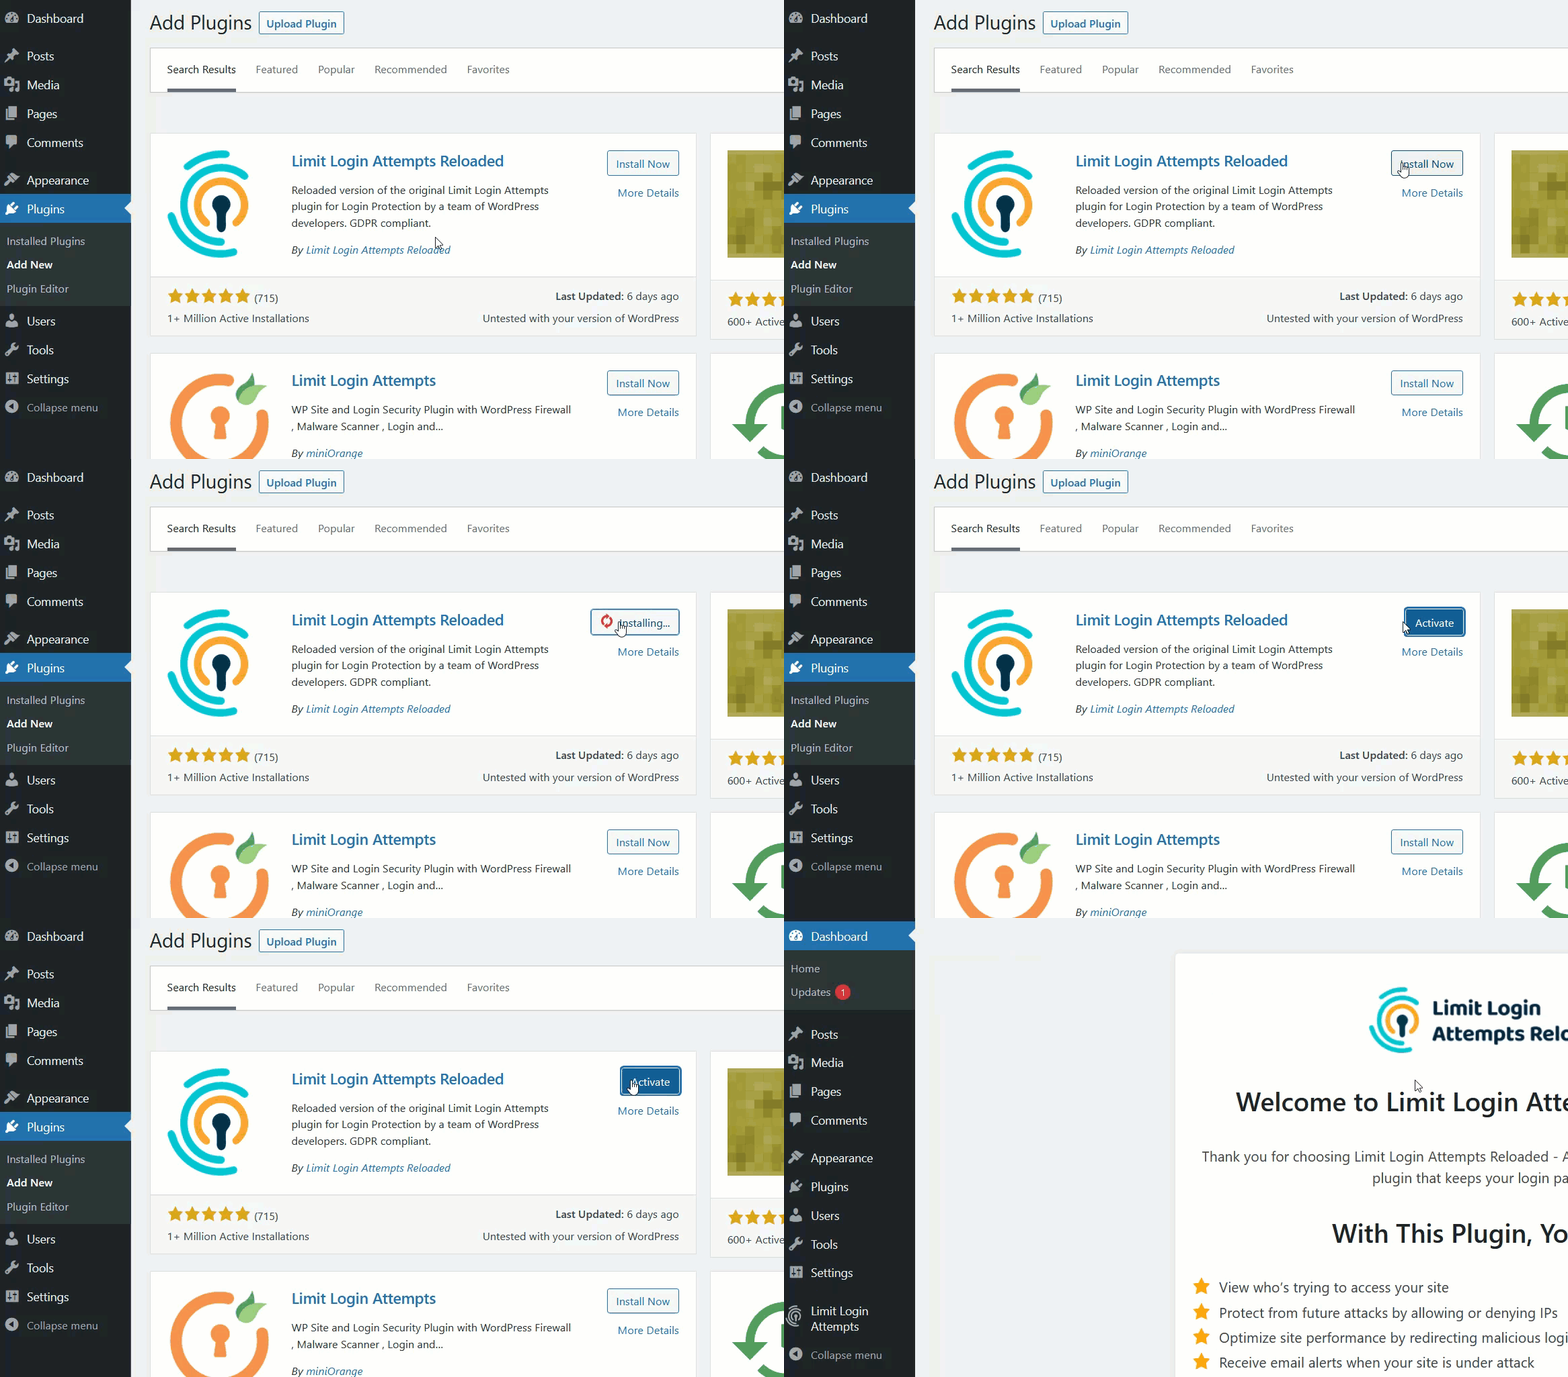
First, install and activate the plugin on your website.
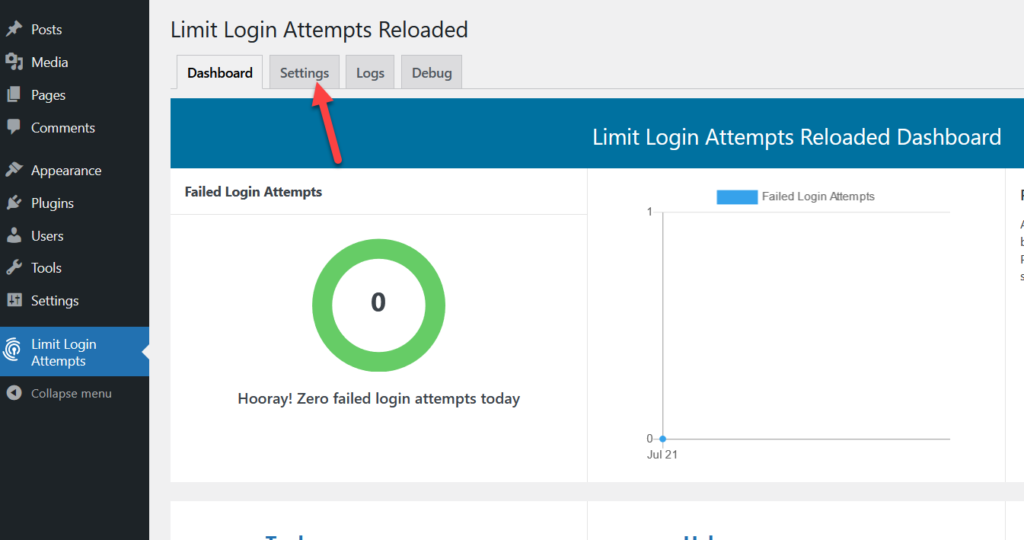
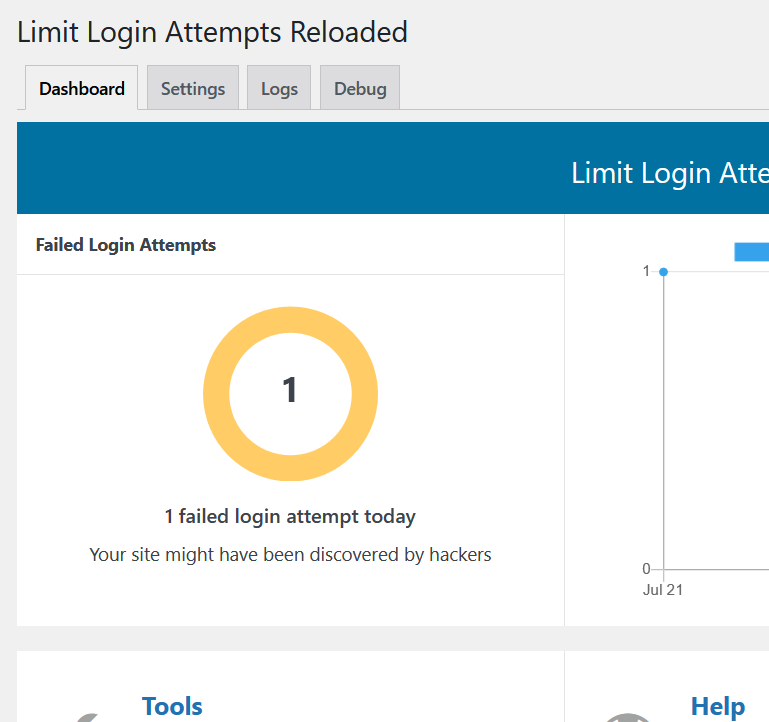
On the left-hand side, you will see the plugin’s configuration options. Open it, and you will be redirected to the plugin’s dashboard where you will see that we don’t have any failed login attempts. To make the plugin more efficient, we’ll make some modifications to the settings, so go to the Settings tab.
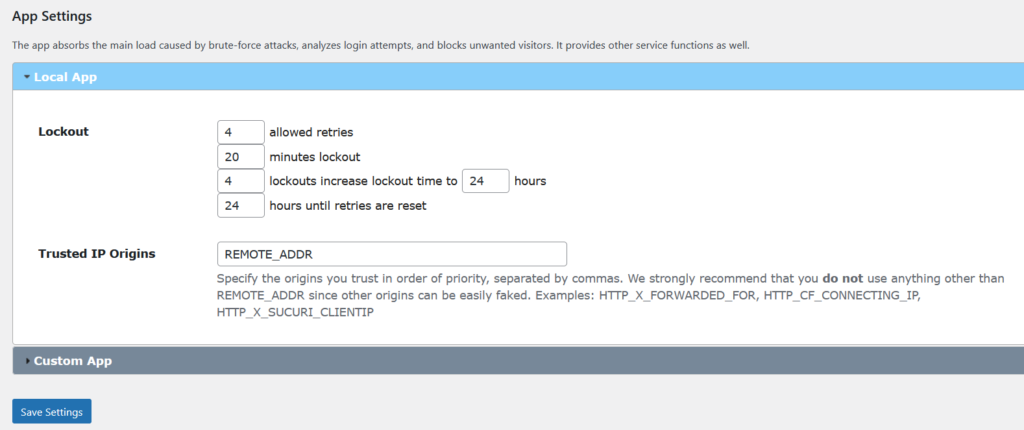
Scroll down to the app settings section and you will see something like this:
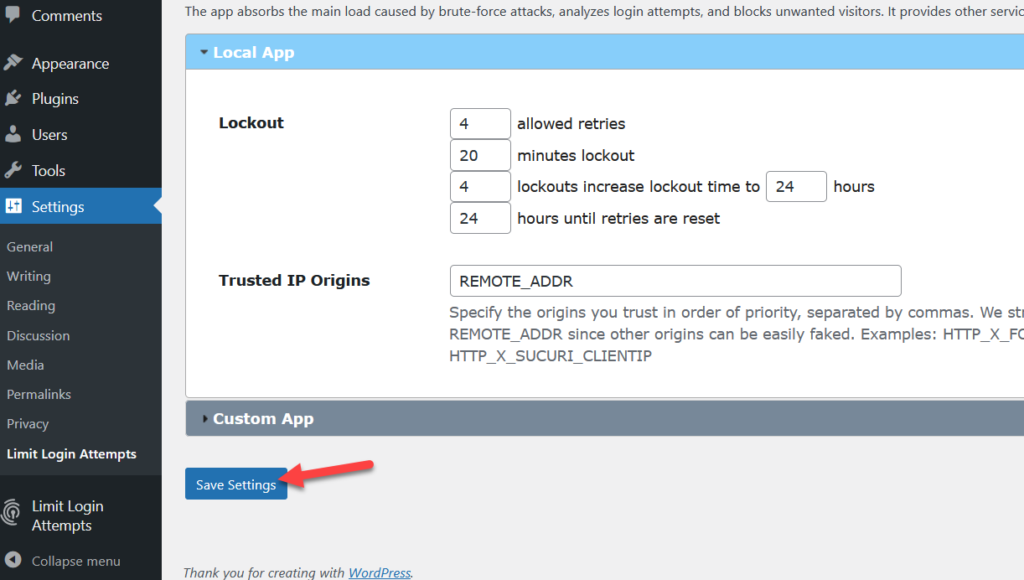
The plugin comes with a basic configuration. The current configuration says that after four wrong username and password combinations in a row, the plugin will lock the user’s IP for the next 20 minutes. If the IP gets four continuous lockouts, the lockout time will increase to 24 hours.
You can modify the configuration according to your requirements. Once you are happy with the changes, save the settings.
That’s it. Now when someone enters the wrong username and password combination on the login page, you will get a notification in the plugin’s dashboard.
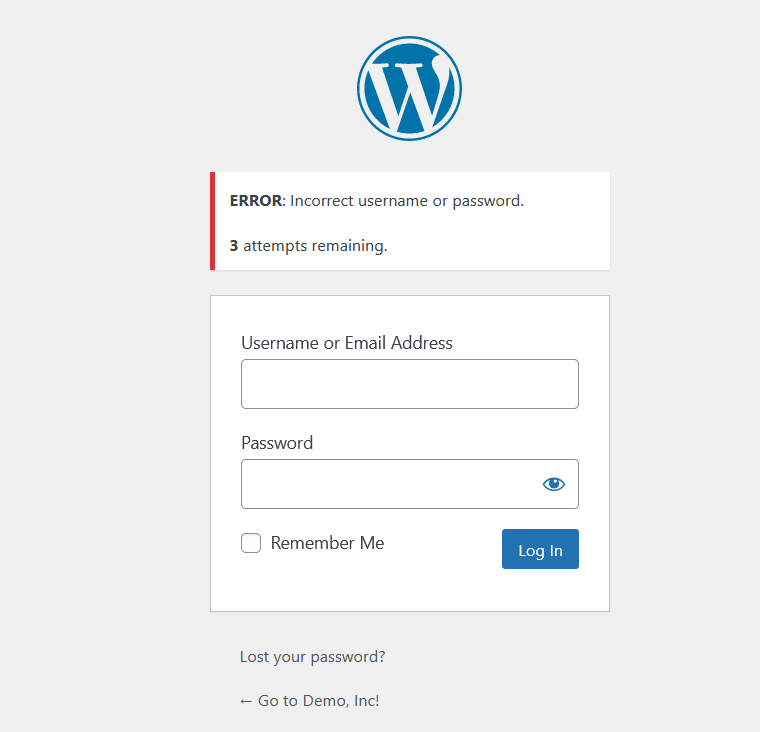
And the user will also see an error message on the front end with their remaining attempts.
This is a great way to protect your WordPress site from hackers and brute force attacks.
Bonus: How to Change the Default Error Messages
We’ve seen several options to make your site more secure. But there’s more you can do. Let’s go a step further and change the default error messages in WordPress.
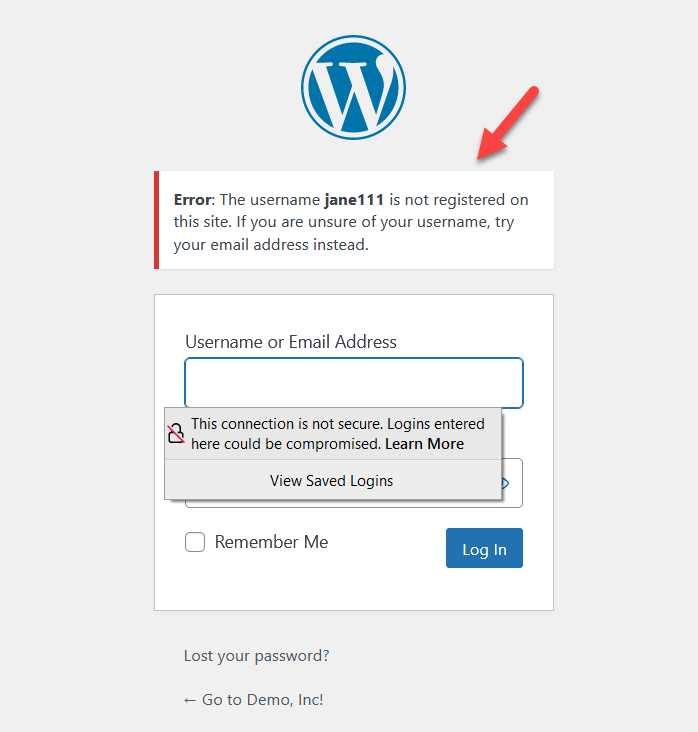
By default, WordPress will tell people what the actual error is on the login page. For example, if someone enters a username that doesn’t exist, WordPress will display a message saying that the username isn’t registered.
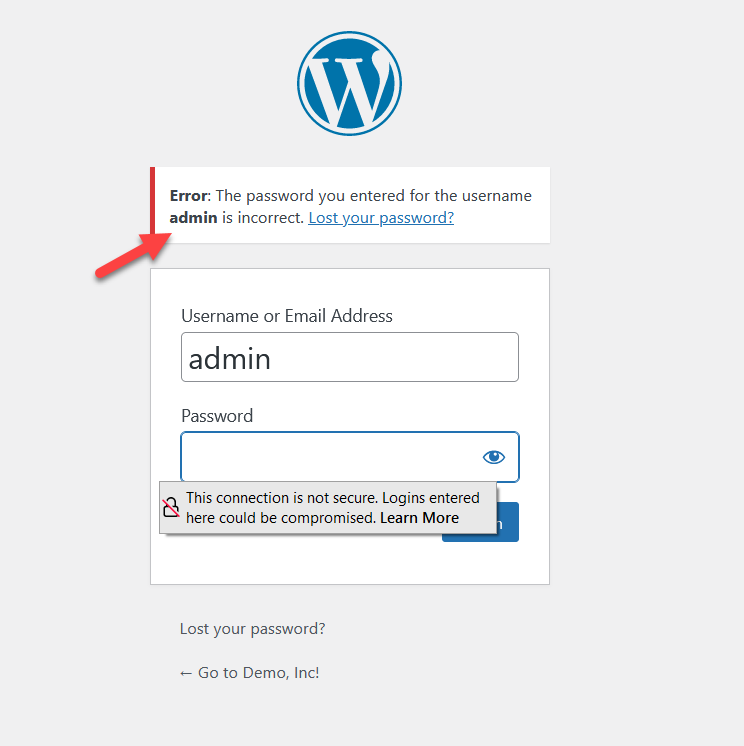
This way, the potential hacker will know that the username isn’t valid and may try using another username until they find one that exists, so then they can try different passwords. If the username is valid but the password isn’t, WordPress will show the following message on the login screen.
This may be useful for someone from your organization with good intentions, but it provides valuable information to hackers. So, to make your site more secure, you can change the default error messages.
Changing the login error messages
To change the login error messages you don’t need any plugins. With a few lines of PHP code, you can disable the login hints/default error messages.
NOTE: As we’ll edit the functions.php file, make sure you do a full backup of your site and install a child theme before starting.
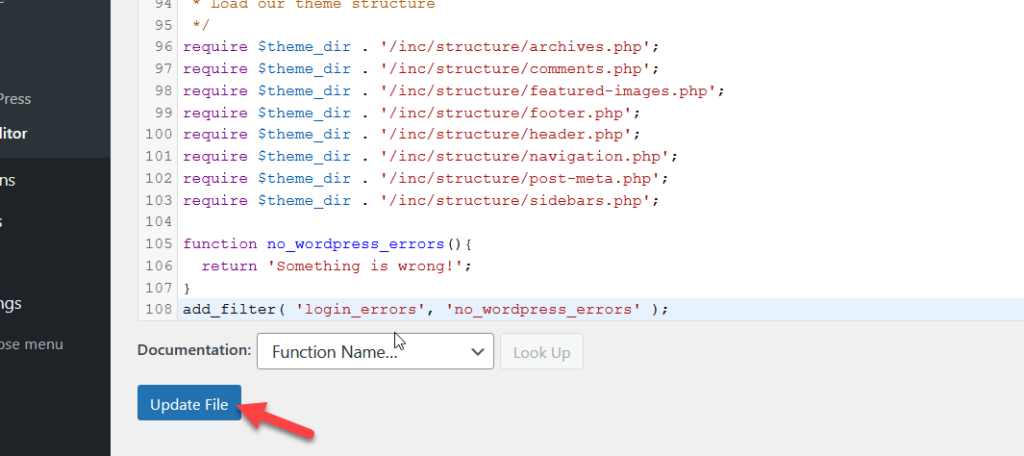
First, go to the theme editor and open the functions.php file of your child theme. Then, copy the below code.
function no_wordpress_errors(){
return 'Something is wrong!';
}
add_filter( 'login_errors', 'no_wordpress_errors' );
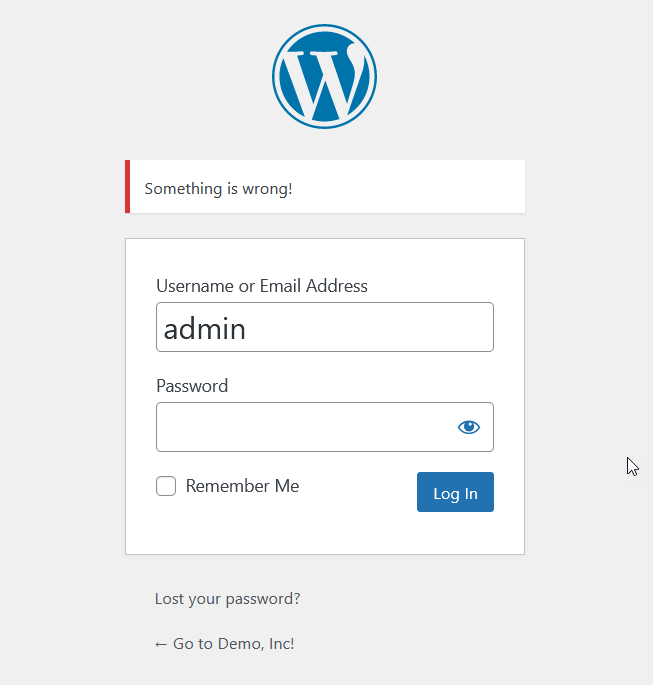
As you can see, the code will display a message saying “Something is wrong!” when the username and password combination is incorrect.
Paste it inside the functions.php file and update it.
Now open an incognito window and try accessing the WordPress admin page with some random username and password.
This will help you make your site more secure as hackers won’t know if there’s a problem with the username or password.
Add CAPTCHA to the login page
Another way to customize your login page is by adding CAPTCHA. This is an excellent solution for those who want to improve their login security and keep bots away.
You can add CAPTCHA programmatically or with a dedicated plugin. For this demo, we’ll use a plugin but for more information about this, check out our full guide on how to add CAPTCHA to the WooCommerce login.
In this section, we’ll use reCaptcha by BestWebSoft, an excellent free CAPTCHA plugin.
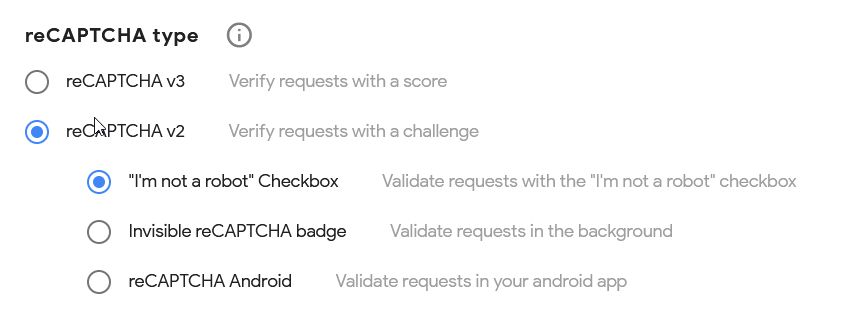
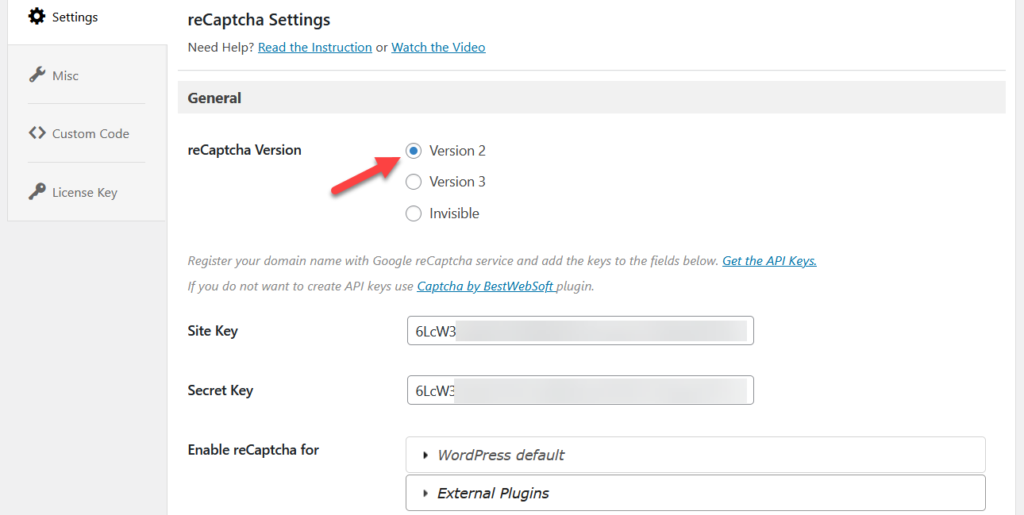
First, install and activate the plugin from you your WordPress dashboard. Then, go to the Google reCAPTCHA admin console and complete the registration filling in the required information. You’ll need to select the type of CAPTCHA you want to use. In our case, we’ll use reCAPTCHA v2, which is the most common one.
Then copy the site key and the secret key and paste them in the reCAPTCHA settings in your WP dashboard. Make sure that you have selected the same CAPTCHA version you chose before.
After that, select the pages where you want to display the CAPTCHA, save the settings and that’s it! Your site will be safer now.
For a more detailed explanation, check out the full guide from this link.
Conclusion
All in all, editing the login page is a must for membership sites, eCommerce stores, and websites with an affiliate section On top of that, considering how many attacks login pages receive, you should personalize it to improve the security of your site.
In this guide, we’ve seen different ways to customize the WordPress login page. If you want something quick and easy, the plugin’s method is the way to go. Custom Login Page Customizer comes with lots of features and is easy to use.
On the other hand, if you have coding skills, you can edit the login page programmatically and code your own solution.
Finally, with a page builder/landing page builder, you can customize the login page without writing any code. One of the main advantages of page builder plugins is that you can see the changes in real-time and that they come with several pre-made templates.
For more ways to personalize your site, have a look at the following tutorials:
- WordPress Login not working? How to fix it
- How to customize the WordPress Registration Form
- Learn to Edit the WooCommerce Thank You Page
- How to customize the WooCommerce Product Page
- How to Edit My Account page in WooCommerce
Do you know any other way to customize the WordPress login page? Which method are you going to use? Let us know in the comments below.



I have read your blog on customize the WordPress login page.It was very interesting and helpful but I can add some extra points in your article. Here some extra points:
1.Access the LoginPress customizer.
2.Rebrand the WordPress login screen.
3.Change the background image.
4.Customize the login form.
5.Replace the default error messages.
These are some extra points to add to your article.