
How to Compress Images in WordPress (With and Without Plugins)
Whether you run a personal blog or business website, you must optimize your site for speed and performance. And when it comes to boosting the speed, images hosted on your site hold a vital role. So, we will show you how to compress images in WordPress in this article to help your website optimize for speed.
Why Should you Compress Images in WordPress?
The main reason to compress images in WordPress is to optimize your website speed. But with the improved website speed, there are some additional advantages as well.
When you add too many images to your website with large image sizes, the overall size of the web pages also increases. So, it will take a much longer time to load the webpage. But if you compress these images, the image size will be reduced and the webpages can load faster, resulting in a better website speed.
Moreover, Google considers website speed as a ranking factor for SEO too. Hence, if you want your website to rank higher on search engine result pages, you must also optimize it for better performance. And thankfully, compressing the images is one of the quickest ways to improve the website speed.
How to Compress Images in WordPress
To compress images in WordPress, we have got two methods:
- Using Plugins
- Manually
We will take a look at both options.
Compress Images in WordPress using Plugins
If you want to compress images that are already uploaded to your WordPress website, this method can be suitable for you.
All you have to do is use one of the WordPress image compression plugins. Then, the plugin will automatically compress all existing images automatically. Once you have configured the plugin and selected a compression level, the plugin will take care of the image compressions so that you can focus on other tasks.
For this tutorial, we are going to use the ShortPixel plugin. However, you can use any other plugin that suits your needs. But to start using the plugin, you must install and activate it first.
1. Install and Activate the Plugin
To install the plugin, go to Plugins > Add New from your WordPress dashboard and search for the plugin using the keywords. Then, click on Install Now.
After the installation is complete, Activate the plugin.
![]()
If you want to use a premium plugin or a plugin that is not included in the WordPress repository, you’ll have to install it manually. You can download the plugin from the plugin website or marketplace and upload it to your WordPress website. Please have a look at our detailed guide on how to install a WordPress plugin manually for any more information.
2. Configure the Plugin
After you have activated the plugin, you need an API key to start using it further. You can request a new API key if you are new to the platform. Just enter your email address and click on Request Key.
But if you already have the API key, enter it and click on Validate.
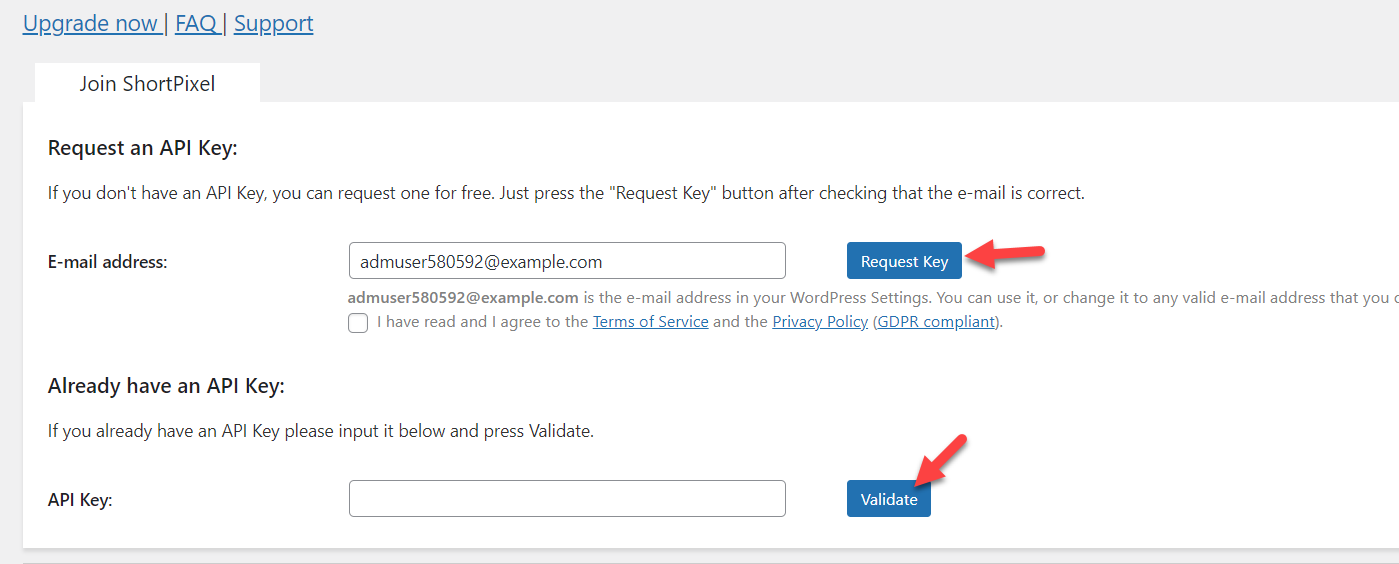
Once you have entered a valid API key, you will be able to see the plugin’s settings on the next page.
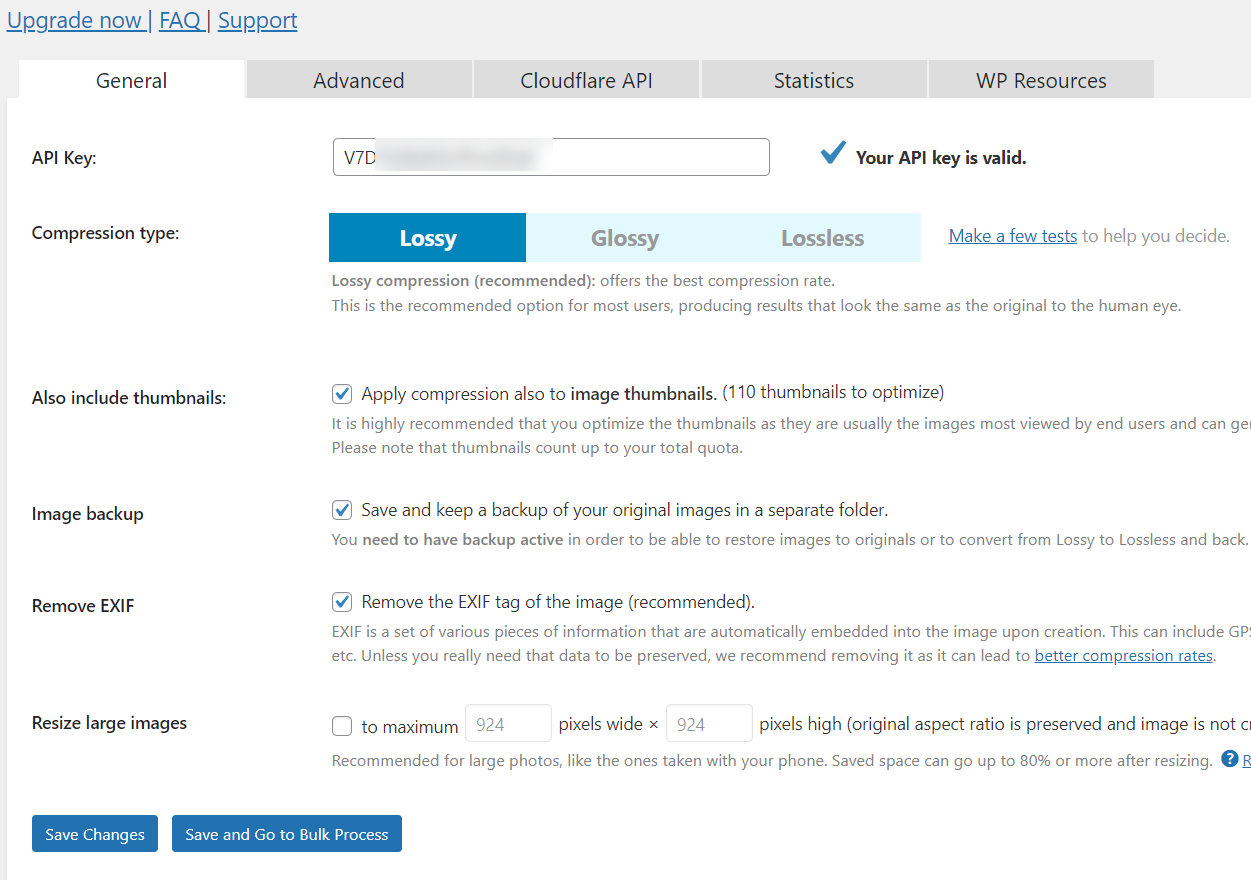
You can configure the basic settings like compression model, thumbnail optimization, EXIF data, and image resizing from the General settings page.
There’s an option to keep a backup of original image files in a separate folder too but may take more storage space. If you have limited space available from your hosting plan, keeping the backup inside the server is not a wise choice. So, make sure that you have available disk space and bandwidth before making the decision.
From the Advanced tab, you can select specific image folders to optimize, enable automatic optimization, PNG to JPEG conversion, and so on. The plugin also comes with some more default settings which are adequate for image compressions. But if you need, you can change them as well.
![]()
On top of that, if you are using Cloudflare CDN, you can integrate it with the plugin from the Cloudflare API tab. This will make the image serving even faster. All you need is a zone ID and token.
![]()
Finally, the stats page shows the compressed images, compression ratio, disk space, and bandwidth saved. Once you are done with the configuration, you are good to go. Just don’t forget to save the changes after you have configured them.
From now on, whenever you upload new images to the library, the plugin will automatically compress them.
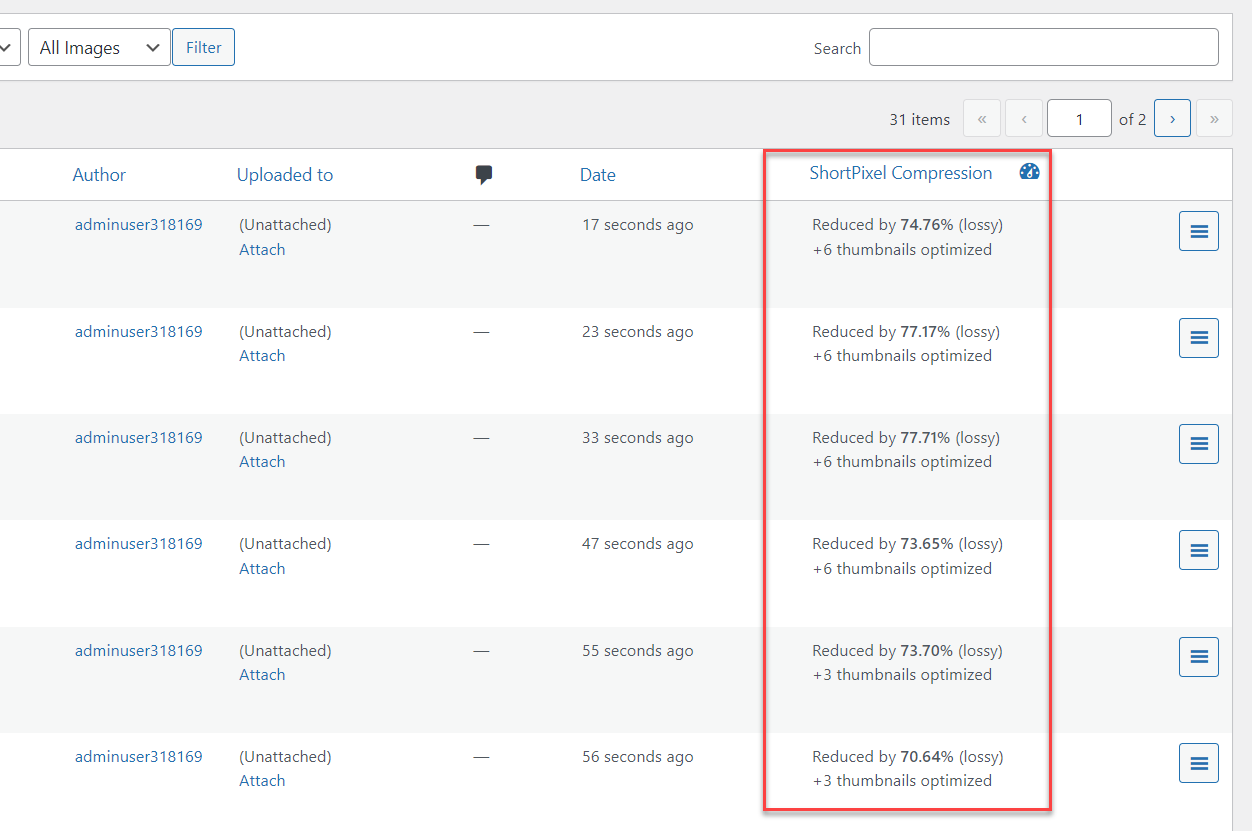
Under the media settings, you can also see a Bulk Compress option that will help you with mass optimization. The image optimization will automatically start after you click on Start Optimizing.

That’s it! You can now reduce the image size with ShortPixel. And even if you use any other plugin, the steps are very similar.
Compress Images in WordPress Manually
If you haven’t started adding images to your WordPress installation and don’t want to use too many plugins yet, this method is more suitable for you. There are a lot of online image compression tools available nowadays. You can simply upload the pictures that you need to compress to these tools and get the optimized version.
Fortunately, most tools are free and you can set how much image compression and size reduction you need. But there can still be some limitations. Let’s go through the steps to look at the tool in detail.
For this tutorial, we will use the ShortPixel online image compression tool. ShortPixel’s image compression tool is completely free and comes with adequate features. You can optimize up to 50 images simultaneously and also choose three compression levels.
![]()
1. Select a Compression Level
Before uploading the images, you need to choose the compression level for your images. There are 3 levels for image compression:
- Lossy
- Glossy
- Lossless
The lossy level provides you with the maximum size reduction, and the lossless level provides you will the least image size reduction. We recommend the lossy level to compress the images since it’s the most decent and balanced. You can get great picture quality with maximum size reduction for your images.

2. Upload the Images
After you select the compression level, you can start uploading the images to compress. Just upload them to the image box on the website. As soon as the images are uploaded, the tool will start compressing them automatically.
![]()
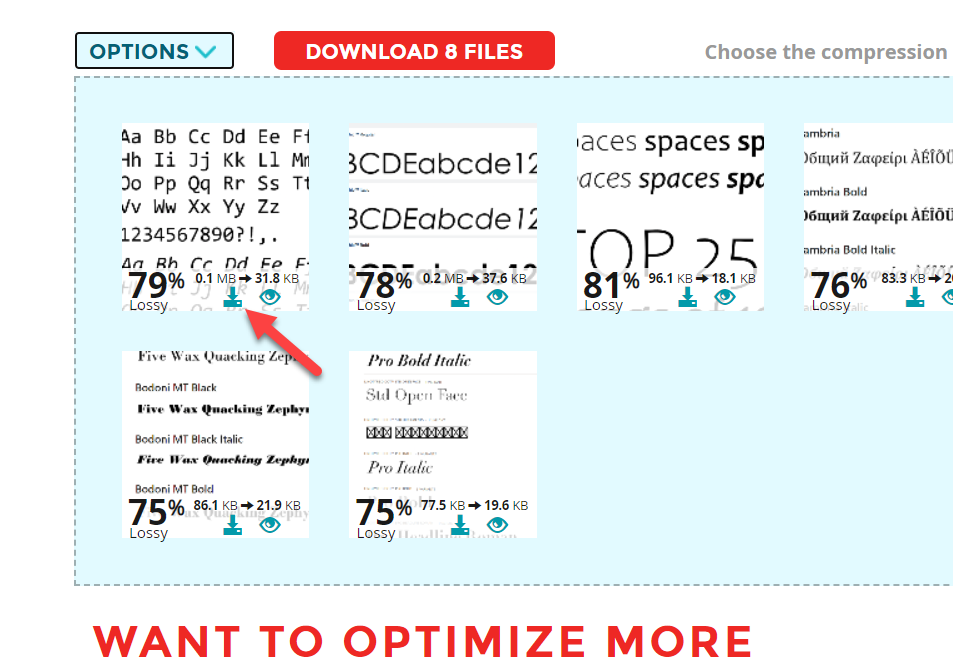
The process will take a couple of seconds according to the size of the images and the compression level you have chosen. After that, you will see the newly compressed image files on the web page with compression rate and size.
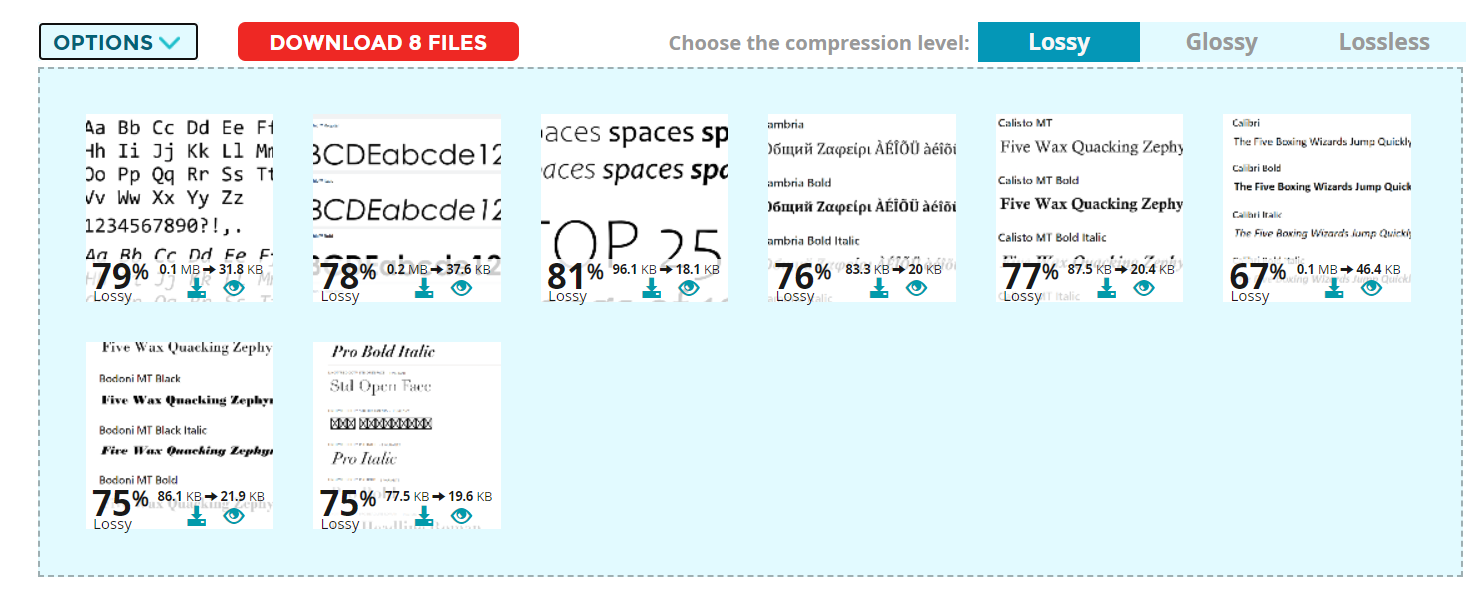
As you can see in the above screenshot, we have an average of 75%+ reduction in the image size which is great. You can also compare the image sizes and notice that the compressed image quality is still very good.
When you are ready to download the images, you can do it individually or in a zip file. If you need to download each image separately, you must use the Download button.
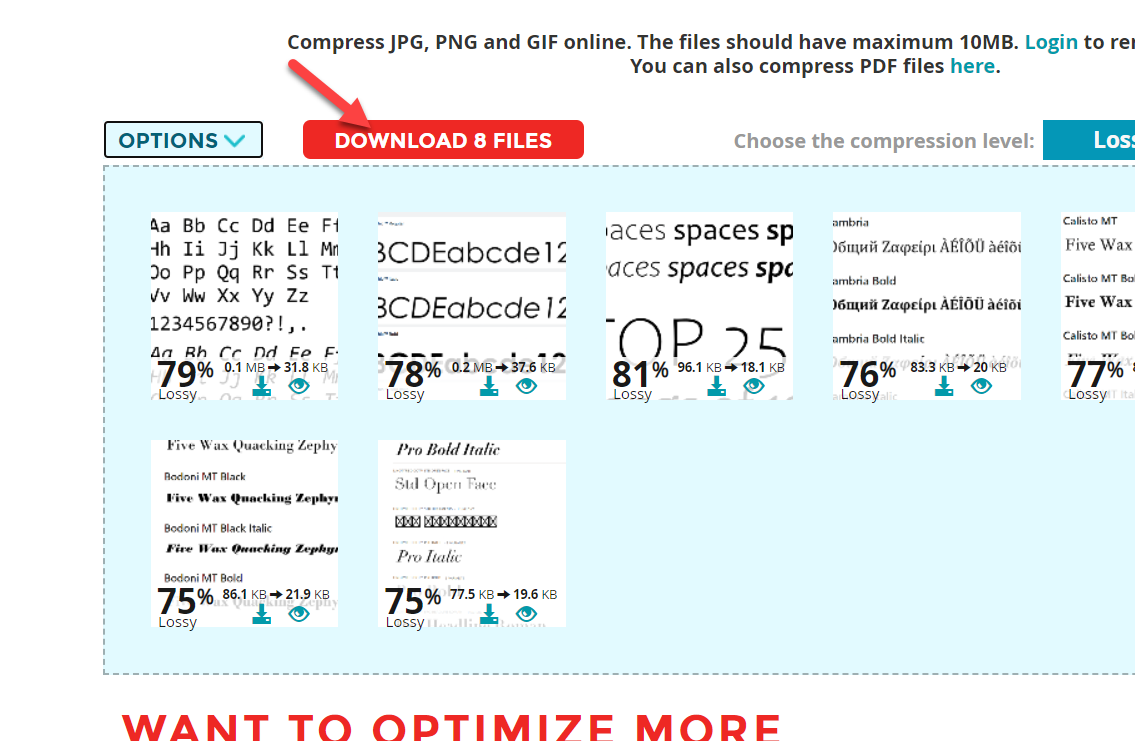
On the other hand, if you need to download all the compressed images at once, click on the Download Files button you can see on top of the screen.
After that, you can upload these images to your WordPress website. The manual method is simple but comes with a few additional steps compared to the plugin method.
Now, you know how to compress images in WordPress without losing the image quality.
Tips to Compress Images in WordPress
While you can compress images in WordPress to make your website faster, there are certain things you need to keep in mind while doing so. They can further help you to load the images faster.
1. Lazy Load the Images
By default, when someone lands on any of your pages, WordPress will load the entire content at once. So if you have too many images on it, it will take a while according to your server’s performance. However, there’s a simple technique available for optimizing the image serving which is called lazy load.
Once you have enabled it, all the images won’t load at once when someone lands on your page. Instead, the images will be served when the user scrolls down to the respective section of the webpage. This is an excellent way to reduce page loading time.
Most caching plugins for WordPress come with the lazy load feature by default. If your caching plugin doesn’t support it, you should consider using a dedicated plugin like BJ Lazy Load. The plugin is not updated for a while, but it will do the job.
2. Remove EXIF Data
EXIF data are small details added by cameras to images. When we upload images to our WordPress installation, EXIF data are stored and will not get removed by default. However, when we handle a WordPress installation, these aren’t necessary.
So, removing the EXIF data is another good choice to serve images faster. They can be easily removed with an image compression tool like ShortPixel. But, you can simultaneously remove EXIF data of the entire image library with the automated EXIF data removal tool.
3. Cache the Images
Using a caching system is also a great way to speed up the image serving and reduce HTTP requests.
A caching system will help you create a copy of every web page and serve it when a user requests it. The users will be viewing a cached version of the web page. But you can continually update the copy manually through the caching plugin’s settings.
Once again, you can use a WordPress caching plugin or the caching plugin provided by your web hosting provider if you want to cache the images.
Tips to Improve Your Site’s Speed
Once you are done with the image compression, you are halfway there. Next, let’s see some of the best practices to speed up a WordPress installation.
1. Use Caching Plugins
A caching plugin generates an offline copy of your web pages and stores them on your server. So, when a visitor lands on your pages, the caching plugin will serve the saved copy. This way, you can reduce the requests to the server and optimize the page speed.
Some WordPress hosting companies come with an integrated caching system. But you can choose any of the following well-known caching plugins if needed.
There are some more caching plugins for WordPress if you want to use another plugin than these. Click here to view them.
All these plugins have minimal configuration options and can boost page loading speed. Moreover, some caching plugins even come with the in-built lazyloading feature and CDN integration. Using those options can reduce additional plugins and get a better result as mentioned in the previous sections.
Additionally, you can also exclude certain pages from caching like the checkout page if you are running a WooCommerce store using some of these plugins.
2. Use a Lightweight Theme
Don’t go for fancy WordPress themes if you need a basic website. They have heavy frameworks and come with a lot of JavaScript and other files. So, they can affect your website’s performance by reducing the website speed.
Most theme authors provide a demo website for the users to try out their theme. You can use this demo website to find out the performance and speed of the themes.
Just copy the demo website URL and head over to a website speed tool like Pingdom or PageSpeed Insight. Then, start the process to test the performance and see the result. If it is a lightweight theme, it will have very good performance results.
However, keep in mind that the demo website is not 100% optimized with caching plugins and compressed images. So, there will be slight variations in the test results.
In our experience, the top lightweight WordPress themes are:
3. Choose a Good Hosting Provider
If you search for a web hosting company, Google will display hundreds of search results. There will be free, freemium, and premium web hosting companies in the market. However, if you are serious about your business, we will not recommend using a free web hosting provider. Premium web hosting companies will offer better-scaled server performance, support, and security.
Here’s a list of the best WordPress hosting companies you can use in 2022. You can use any of the hosting services according to the need of your website.
However, if you are not happy with your current hosting, you can always migrate to a better one. Just creating a complete website backup and restoring it will do the job.
4. Use CDN
CDN stands for Content Delivery Network. When you choose a hosting plan for your WordPress website, the hosting company will ask you for your preferred data center. Reputed hosting companies got data centers on multiple locations from which the users can choose according to their liking.
If you have chosen a data center located in the USA, the website will load faster for visitors from the USA. But, on the other hand, if someone visits the website from India or any other country far from the data center location, there will be a slight delay in website loading time. To fix this issue, you have to use a CDN provider.
CDN providers will have multiple data center locations around the globe. Once you’ve added your website to their network, the provider will pick the appropriate server closest to your website visitor’s location. As a result, you can provide optimized performance for website visitors worldwide.
If you are looking for a CDN provider, check out Cloudflare. Cloudflare is a freemium platform, and you will get many cutting-edge features when it comes to page performance.
Bonus: How to Optimize Images for Search Engines
Apart from typical Google search results, people will also use the image results to find what they need. So, optimizing your images for search engines is a crucial task. However, you can easily optimize your uploaded images for Google and other search engines with slight tweaks.
Here are some of the essential elements that you need to consider while uploading images to your WordPress website.
1. Title Tags
WordPress will automatically generate title tags according to your image’s name by default. But, you can easily override it through the media library page. If you want, you can add the title tags to the HTML version of the page and make the image easier to understand.
2. ALT Tags
Search engine crawlers use alt tags to understand the image which is why adding alt tags to images is a must. You can do it manually or by using a WordPress plugin.
WordPress will ask for the alt tag when you upload photos or GIF files to the media library. Just enter the keywords related to your images or website content, and you are good to go. You can make your alt tags even better by describing the image correctly.
Furthermore, you can also modify alt tags whenever you need them from the media library itself.
3. XML Sitemaps
You can quickly improve your search engine presence by creating sitemaps using a sitemap plugin. All you need to do is submit the sitemap inside the Google Search Console tool and start fetching content. For better image ranking, you can also consider creating a sitemap file containing every image you want.
Most SEO plugins come with this feature. After creating a sitemap, add it to your GSC property. Then, the SEO plugin will fetch every image and submit it for search engine indexing whenever you add new photos.
How to Add ALT Tags Automatically
We have already mentioned the importance of alt tags in your images. So, we will show you how to add alt tags automatically with a simple WordPress plugin.
You can find a number of plugins to add alt tags to images in WordPress. But for now, we will be using the plugin PB SEO Friendly Images.
The first thing you need to do is install and activate the plugin on your WordPress site.
After activation, you will see the plugin’s configuration options on the left-hand side. Just go to Settings > SEO Friendly Images from your WordPress dashboard.
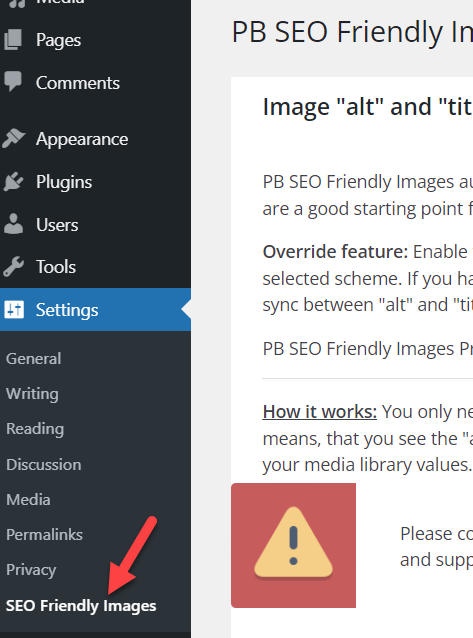
From there, modify the alt scheme according to your preferences.

After modifying it, you need to update the settings.
That’s it! The plugin will alter the alt tags of every new image that you’ll upload from now on. If you need further information, we even have a detailed guide to automatically add alt tags to images in WordPress.
Conclusion
Compressing the images is one of the best ways to increase your website speed. So, if you need to compress images in WordPress, you should do it right away. They even further help your website rank better in the search engines at some point.
To summarize, you can compress images in your website using two major ways:
- Using a plugin
- Manually
You can use a plugin to compress the images if you have already uploaded them to your website. Whereas, the manual approach is easier if you need to upload new images to your website. Nonetheless, it all comes down to your preference since both of these methods can be used to compress images whether you have already uploaded them or not. ShortPixel can be used for both approaches and it’s also our favorite tool to compress images since it has Cloudflare integration and many more useful features.
In addition, we have also included some tips to compress images, improve website speed, and optimize images for search engines. We also have some more interesting articles that you might like:
- How to Fix WooCommerce Image Size Issues
- Add image to a product in WooCommerce
- How to Add Custom Image Sizes in WordPress
We hope you have found this article helpful and enjoyed the read. Please share it with other bloggers if you do.
How are you going to compress images in WordPress? Manually or by using a plugin? Let us know in the comments.
