
How to Manage Inventory in WooCommerce
Have you just started an online business with lots of products but are not sure how to deal with the inventory? If so, then you have come to the right place. In this article, we’ll show you how to manage the inventory in WooCommerce.
Before we dive into that, let’s better understand why it is important to have good control of your store catalog and have a look at some important terms you should know.
Why is it important to Manage your Inventory in WooCommerce?
WooCommerce is a great option when it comes to setting up an eCommerce store. It’s easy to set up, has a low learning curve, and a huge selection of plugins. But the biggest challenge for business owners is to control their stock.
To offer a good shopping experience for users, it is very important that you keep your inventory up to date. An organized inventory ensures that the products you display in your online store are available. Some stores let users purchase products that aren’t available but most of them hide out-of-stock products.
Suppose you sell curtains and a customer has just placed an order for a four-piece set of curtains. Your website states that delivery takes place within 24 hours, but in the purchase confirmation email, you inform the shopper that delivery isn’t possible for another week since you only have two pieces available at the moment. Not only is this going to make a bad impact on your business but you’ll be also losing future sales opportunities.
Even if your response is quick and you handle the problem well, they will think twice before placing an order in your store next time. To prevent such situations, it is important that you keep your stock up to date. You’ll also manage fewer returns which will save you time and money.
What is included under WooCommerce Inventory Management?
In the default WooCommerce inventory settings, there are six different options to choose from. Let’s have a look at them.
SKU: SKU (stock keeping unit) is a scannable bar code that is printed on the product labels. The code allows vendors to track inventory movement in real-time. When a customer purchases an item at a POS, the system scans the SKU, and the POS system removes the item from inventory.
Manage Stock: Enabling this setting allows WooCommerce to keep track of the product’s stock. However, it only tracks inventory at the product level rather than the variation level.
Stock Quantity: This setting lets you display the amount of product that is available in the stock. Also, it is only visible if you have enabled the option to manage stock.
Allow backorders: Backorders occur when a customer purchases a product from the company but they do not receive it. You can manage backorders in one of three ways: ‘Do not allow,’ ‘Allow, but alert customer,’ or ‘Allow.’. Again, this setting is available only if you have enabled the option to manage the stock.
Stock Status: This option allows you to set the current stock status of a product. Stock status is automatically updated after each purchase. Similar to Stock Quantity and Allow Backorder, it is also available only after enabling the manage stock option.
Sold Individually: By selecting this option, you can limit the amount of a product a customer can buy in a single order.
So these are the options included in the inventory settings. Now, let’s see how we can use these options to manage the inventory in WooCommerce.
How to Manage Inventory in WooCommerce
In this section, we’ll show you different ways to manage your inventory in WooCommerce:
- Manually with Inventory Settings
- Using a plugin
Let’s see the manual method first.
But, before we get started, make sure that you’ve completed all of the essential steps in the WooCommerce setup process. It’s also recommended to use a WooCommerce compatible theme for your site. This will help you to avoid any theme or plugin conflicts that may arise during the process.
1. Manually Manage Inventory with Inventory Settings
You can manually manage your inventory with two different types of WooCommerce settings. The settings are:
- Global Inventory Settings
- Product Inventory Settings
The changes made in global inventory settings are automatically applied to the entire product until modified by individual product inventory settings. Let’s see what kind of changes we can make in the global settings to manage the inventory.
1.1 Manage Inventory with Global Inventory Settings
Go to WooCommerce > Settings and select the ‘Products’ tab. Within that tab, you can find a link to ‘Inventory’ settings. Here you can see various setting options related to inventory management. Let’s see how to use them.
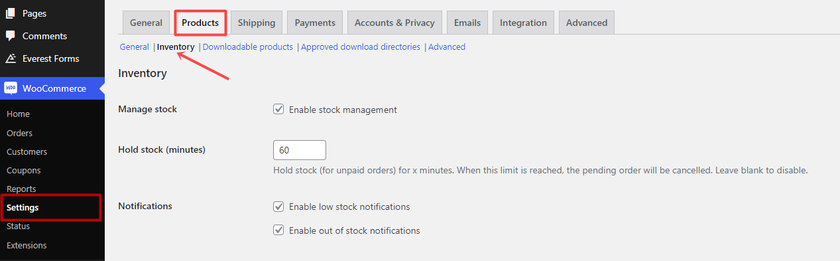
Enable Stock Management
Now the first thing is to make sure to enable stock management if you want WooCommerce to handle stock management automatically. The automated process operates by reducing the amount of available in-stock products once someone buys one. Even though this is a global setting, it can be used to manage individual products too which we’ll see in a while.
Hold Stock
This option allows you to input the number of times to hold stock for an order while it is being processed. If a customer has a pending order, WooCommerce will remove the item from the global inventory until the time restriction expires.
Holding the stock generally for 1-3 hours is a good strategy. But make sure the duration is not too short. The duration should be equal to the typical amount of time someone would spend shopping on your site before checking out.
Notifications
After that, you can enable low or out-of-stock alerts as an email notification. If the stock is low or you’re out of stock, enabling these settings helps you to keep track of your stock. Just be sure to include a notification recipient email address in the Notification Recipient field address to which notifications should be sent.
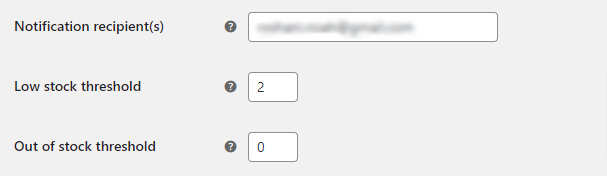
Next, you can set the low stock threshold which should be at least set 1. You’ll receive an alert in your email if the stock falls below this level. It is possible to adjust the low stock threshold globally or individually for each product.
Similarly, you can enter a value in the out-of-stock threshold. The value you enter here will decide whether an item is out of stock. Also, remember that the value of the Out of Stock threshold must be set to 0.
Out of Stock Visibility
Another option in the inventory settings is to hide the product which is out of stock. If you check it, then out-of-stock products are hidden from the WooCommerce catalog. It won’t be visible to the customers on the WooCommerce shop page as well.
Stock display format
Lastly, you can choose a stock display format to control how stock appears on the WooCommerce product page. Because of the stock display, customers can see how many items are remaining in the stock.
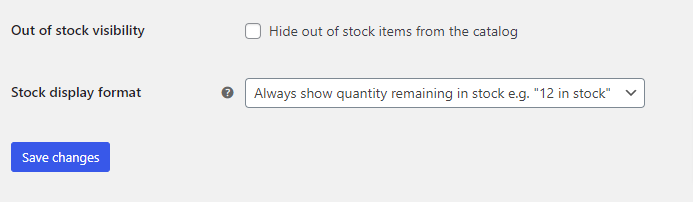
After you’re done with settings, make sure to click on the ‘Save Changes‘ button.
These were the settings options for the overall products in your WooCommerce store. If you want to manage the inventory for individual products then you can do that from the product edit page. Let’s see how to do so.
1.2 Manage Inventory with Product Inventory Settings
There are altogether six different default types of products in WooCommerce. Here we’ll just see how to manage inventory of simple products also known as individual products and variable products.
i) Individual Products
To apply the settings for individual products select Product > All Products from the dropdown menu. Now choose a product for which you’d like to manage the inventory.
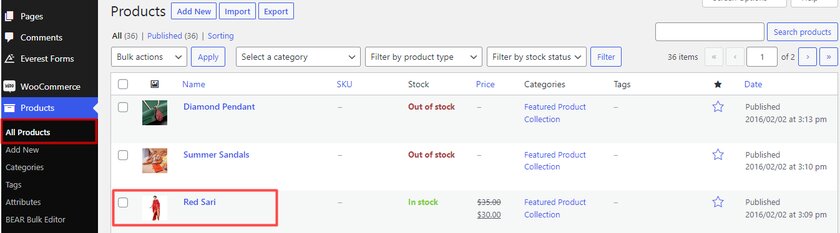
This will open up a product edit page but if you scroll further you’ll come across the product options section.
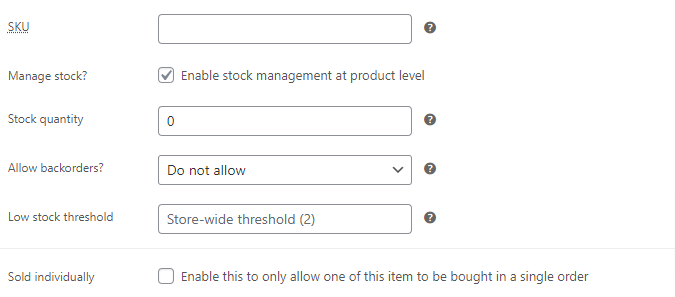
In the product data, you should select ‘Simple Product’. Now you’ll find various options from which we have to select ‘Inventory’.
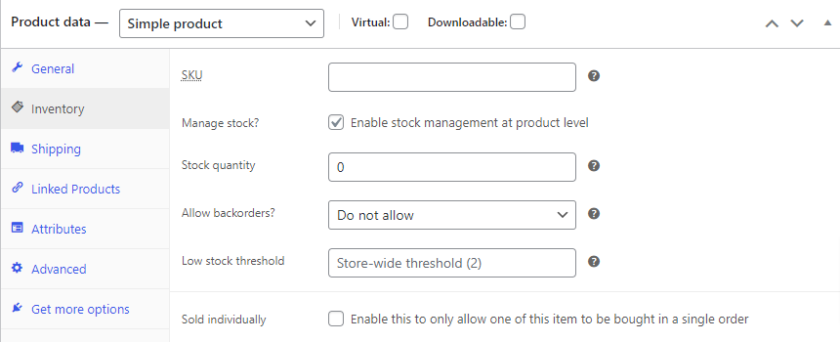
The first field requires you to fill up with the SKU number. You can use the physical SKU of the product or the SKU provided by your manufacturer. If you don’t have an SKU you can just leave the field empty.
The next option is to enable the stock management by simply ticking the box. Enabling this option control the inventory for the selected product. This option is only available if you have enabled Manage Stock in the global settings. If you uncheck the box, the stock management is disabled only for the selected product.
After that, you can enter the number of product which is available in the Stock quantity area.
You can also allow backorders for the product. If you enable backorders, customers will be able to place orders for the items even when it’s out of stock.
Then similar to global inventory settings, you can set a different stock threshold for an individual product. However, the number should not be less than 1.
Finally, we have the option to enable selling the products individually in a single order. This option comes in handy if you sell limited edition products or exclusive products. Just check the box to let your customers purchase only one product in a single order.
Once you have made all the required changes, click on the ‘Update’ button.
ii) Variable products
As you can see, the options and settings are very minimal which makes it easy to manage the inventory of an individual product. On the other hand, if you sell variable products then the steps to manage the inventory are quite different. Let’s see what are the required steps to manage inventory in variable products.
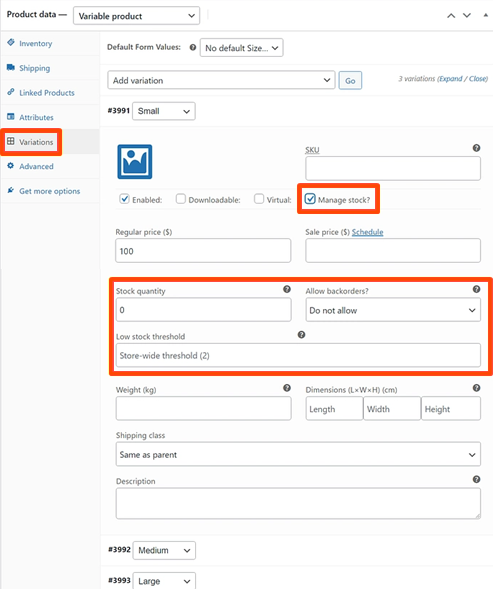
There are two different options to manage inventory for variable products. They are through ‘Product Level‘ and another is through ‘Variation Level’.
To manage the inventory of variable products at the product level go to the ‘Inventory’ tab of the product data box. All you have to do is select ‘Variable product’ from the drop-down menu of the product data box. Rests of the other steps are exactly the same as simple products.

But to manage the inventory at the variation level, click on the ‘Variations’ tab. Choose one of the variations from the dropdown. As soon as you select the variations more options expand. These new options also help you to manage and keep the track of inventory for other variations of the product.
And that’s how you can manage inventory from the settings that are available in WooCommerce. This method is perfect for small businesses. But if you have a very large quantity of products then this method will be time-consuming. So for that, you can use a dedicated plugin for inventory management.
2. Automatically Manage Inventory using a Plugin
To manage the inventory automatically without the tedious manual process, we’ll be using Bear Bulk Editor and Products Manager for the demonstration.

You’ll find new business-oriented dashboards, advanced search and filtering, out-of-stock email notifications, and more features included in this plugin. In addition, this is an incredibly reliable plugin that is free for extra functionality.
Now let’s see how we can use the plugin to automatically manage inventory in WooCommerce.
2.1 Install and Activate Bear Bulk Editor and Products Manager plugin
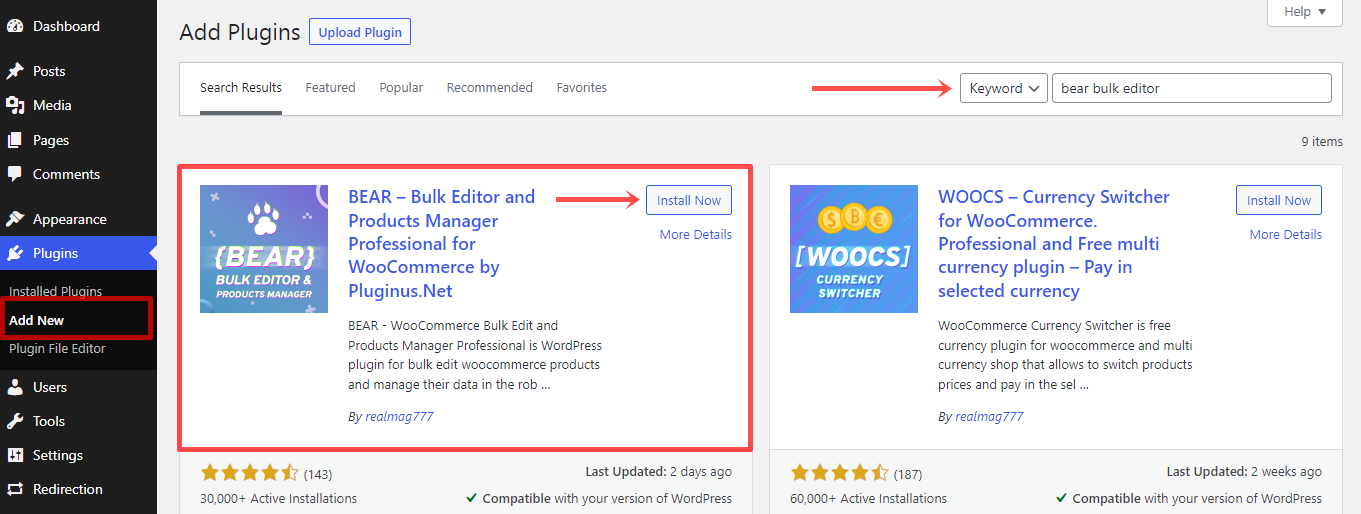
To use any plugin, you must first install and activate the plugin. For that, go to Plugins > Add New from the dashboard.
Then, on the right side of the screen, type the plugin’s keywords (Bear Bulk Editor) into the search bar. Then click on Install Now to begin installing the plugin. After that, activate the plugin by clicking the Activate button.
If you want to use the premium version of the plugin or any other premium plugin, you’ll have to install it manually. Please have a look at our guide on how to install a WordPress plugin manually for more details on it.
As soon as you activate the plugin, you can find a newly added option “Bear Bulk Editor” inside the ‘Products‘ menu.
2.2 Bulk Edit the Products
There are five main tabs in the plugin: WooCommerce Products Editor, Settings, Meta Fields, History, and Help. However, we just need the ‘Product Editor‘ tab to manage all of the inventory. Here, you will be able to see a list of all of your WooCommerce products on a well-organized table.
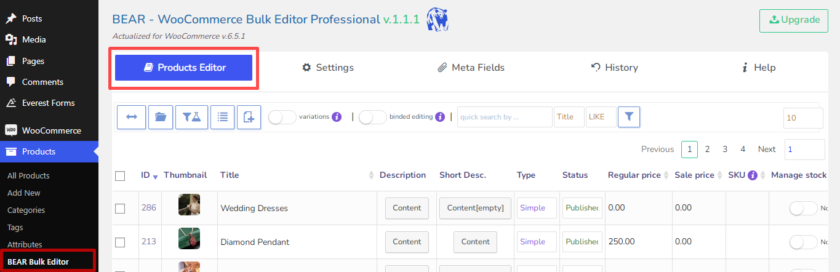
Now the process is very simple. Not only can you manage your inventory from there, but you can also edit the products directly from the plugin dashboard.
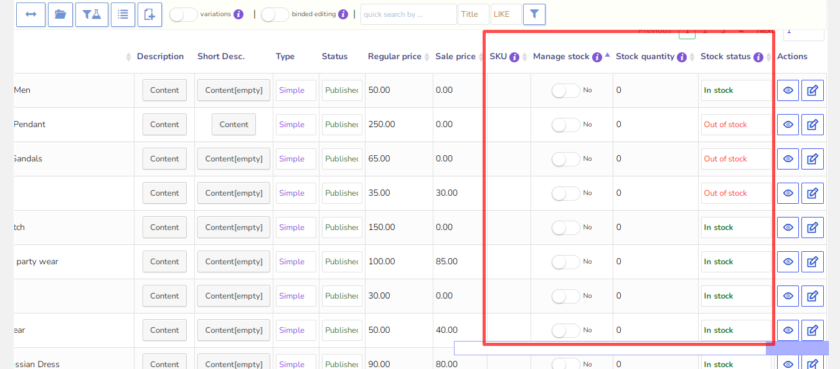
You can enable ‘Manage stock‘ for multiple products, set the stock quantity, and change the Stock Status from a single page.
2.3 Bulk Edit Variable Products
As we can bulk edit our simple products directly from the dashboard, the steps are almost the same for variable products. By using the filter, we can display only the variable products for bulk editing. For that, click on the filters profile tab and select variable products, and then click on the load button.
As a result, only the variable products are shown on the plugin sheet. Similar to simple products, you can manage the inventory of variable products directly from the dashboard.
And that’s it. Just with a few easy steps, you can manage both the simple and variable products on your WooCommerce website.
Conclusion
This brings us to the end of our guide on how to manage inventory in WooCommerce. All in all, managing WooCommerce inventory not only improves the user experience but also lets you evaluate important information about your products and sales.
With the right management strategy and tools, you can track inventory levels at any given moment and ensure you are on the right path to profit and success. In addition, it also helps with things like reorder agreements, raw material tracking, and supplier management.
To summarize, you can manage inventory in WooCommerce in two major ways:
- Manually with Inventory Settings
- Using a plugin
In the manual approach, we used the global and product settings that are provided by default in WooCommerce. All these options are included within the inventory management options. Afterward, we also had a look at how you can bulk edit and manage the inventory with the help of a plugin.
Lastly, we added a short tutorial to hide the out-of-stock products as a bonus. It can help the customers to shop only for the items that are available in stock.
Which method would you prefer to use for your WooCommerce site? Let us know your experience in the comment below.
If you want to learn more about WordPress and WooCommerce, check out our blogs on:
