How to customize WooCommerce templates programmatically
Do you want to edit templates on your site? This guide will show you how to customize WooCommerce templates programmatically both with hooks and overwriting them.
Why edit WooCommerce templates?
Shopping online is more comfortable and faster than going to brick-and-mortar stores, so eCommerce has become extremely popular in the last few years. With so much competition, it’s not enough to set up your WooCommerce shop and put your products online. You need to find ways to differentiate and stand out from the crowd.
One of the best ways to do that is by customizing your store. Apart from changing the header and editing key pages such as the checkout or the shop page, you can also customize the templates you use. There aren’t that many sites that edit their templates, so by doing so you will be able to have an edge over your competitors.
If you have coding skills, you probably know that using a child theme is recommended when editing your shop. Similarly, WordPress and WooCommerce in-built hooks offer a lot of possibilities to edit and add new features to any website.
How to customize WooCommerce templates programmatically
There are two main ways to customize WooCommerce templates programmatically:
- With hooks
- Overwriting the templates
Each of these methods serves different purposes. Let’s have a closer look at their main differences.
Overwrite template files or use hooks?
Customizing your store with hooks is a recommended practice. However, when customizing WooCommerce with hooks, you may face incompatibility issues. For more complex customizations overwriting WooCommerce template files can be a better option.
It’s important to note that when you overwrite a template file, the hooks that work on that file will stop working. Each hook points to a specific file, so you won’t be able to use them if you edit the same file that triggers the hook.
For example, let’s grab the single-product.php file to see how hooks are created. Also, note where the hooks are both before and after the loop.
if ( ! defined( 'ABSPATH' ) ) {
         exit; // Exit if accessed directly
    }
    get_header( 'shop' ); ?>
    <?php
                 /**
                  * woocommerce_before_main_content hook.
                  *
                  * @hooked woocommerce_output_content_wrapper - 10 (outputs opening divs for the content)
                  * @hooked woocommerce_breadcrumb - 20
                  */
                 do_action( 'woocommerce_before_main_content' );
         ?>
                 <?php while ( have_posts() ) : ?>
                         <?php the_post(); ?>
                         <?php wc_get_template_part( 'content', 'single-product' ); ?>
                 <?php endwhile; // end of the loop. ?>
         <?php
                 /**
                  * woocommerce_after_main_content hook.
                  *
                  * @hooked woocommerce_output_content_wrapper_end - 10 (outputs closing divs for the content)
                  */
                 do_action( 'woocommerce_after_main_content' );
         ?>
         <?php
                 /**
                  * woocommerce_sidebar hook.
                  *
                  * @hooked woocommerce_get_sidebar - 10
                  */
                 do_action( 'woocommerce_sidebar' );
         ?>
    <?php
    get_footer( 'shop' );
If you have a look at the script, you will see how we create the hooks on the do_action(‘name-of-the-hook’); lines.
Let’s say you have the following hook on the functions.php file of your child theme:
add_action('woocommerce_after_main_content',function(){echo “custom content after single product template file”;});
You can echo the same content right on the template file as follows:
<?php endwhile; // end of the loop. ?>
         <?php
echo “custom content after single product template file”;
                 /**
                  * woocommerce_after_main_content hook.
do_action( 'woocommerce_after_main_content' );
However, by doing so, the do_action(’woocommerce_after_main_content’); function will become useless since you’ve added your code there instead of pulling it with the hook. So you might want to remove all the unnecessary hooks in the file deleting the do_action(‘name-of-the-hook’); sections.
Keep in mind that if you are using the woocommerce_after_main_content() hook somewhere else on your website and you remove the do_action( 'name_of_your_hook' ); in this file, the hook won’t work anymore.
After removing the hooks and the unnecessary PHP tags, your file should look like this:
if ( ! defined( 'ABSPATH' ) ) {
        exit; // Exit if accessed directly
}
get_header( 'shop' );
while ( have_posts() ) :
the_post();
wc_get_template_part( 'content', 'single-product' );
endwhile; // end of the loop.
do_action( 'woocommerce_sidebar' );
get_footer( 'shop' );
NOTE: Removing hooks this way can affect third-party code such as plugins and themes, causing failures or breaking your website. It is assumed that you know what you are doing.
Customize and overwrite WooCommerce template files
Overwriting WooCommerce template files gives you a lot of flexibility to customize your store. However, as mentioned before, you must understand that when you overwrite the content of a template file, the hooks that work on that file will stop working. Additionally, WooCommerce may change the template files from time to time, so if there’s an update and they change the files, you may find that the file you edit is out of date.
Things to keep in mind when overwriting templates
If you are here, you probably have some coding skills and you know how to use and install a child theme. If that’s not the case, check out our guide to create a child theme or use one of these plugins.
Overwriting WooCommerce templates is similar to overwriting the functions.php file. The main difference is that you edit the template files of WooCommerce instead of your theme files.
To do that, you need to copy the desired template file from the WooCommerce plugin templates folder and paste it into your child theme under the WooCommerce folder. If you follow the same structure of the WooCommerce templates folder, file names, and subfolders; you’ll be able to overwrite template files, even those within subfolders.
There are many WooCommerce template files and each one of them is responsible for a single task. you can check the full list of template files that you can edit as well as subdirectories and folder structure in this link.
As you can see, there are some files in the root template folder as well as several subdirectories. You can customize files inside any subdirectory in the same way you edit main files such as archive-product.php, single-product.php or content-single-product.php. Similarly, you can also customize files in the cart, My account, emails, or checkout folders if you follow the same names of folders and structure as in your child theme.
So if you want to customize some of these files, your child theme would look something like this: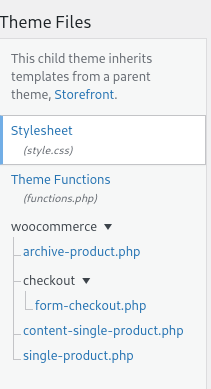
Having said that, let’s have a look at some examples of things you can do to customize WooCommerce templates.
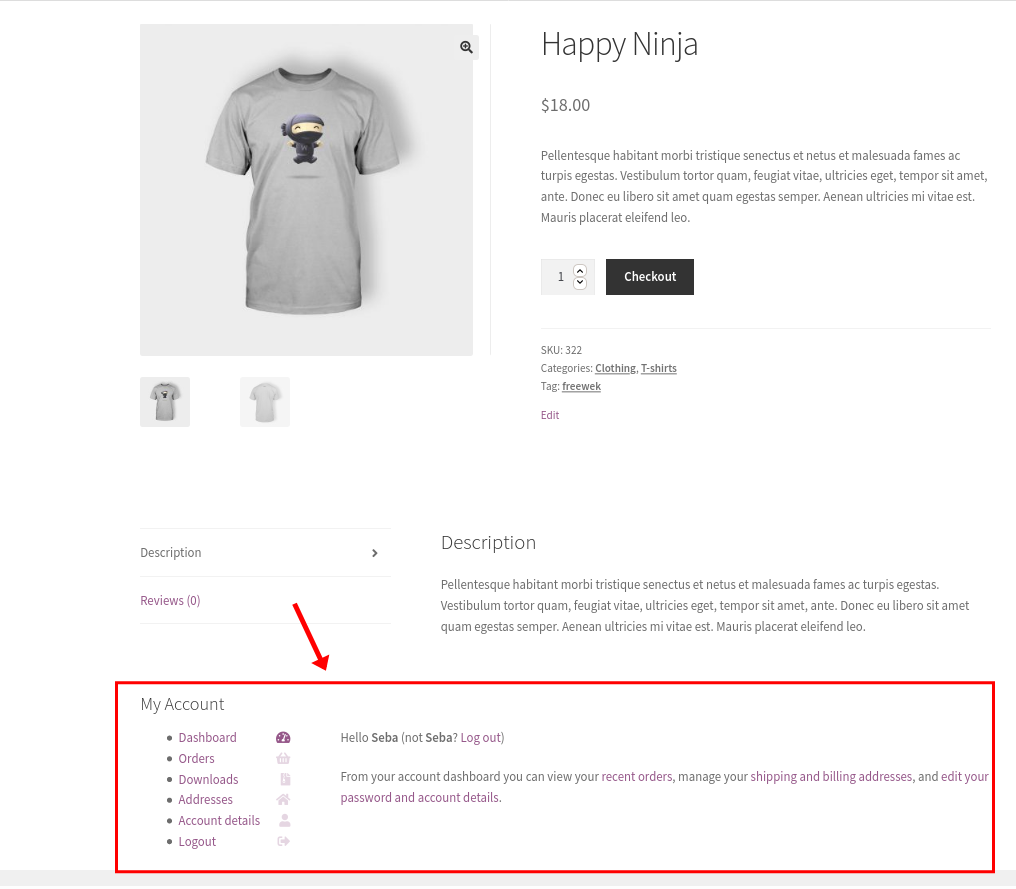
1. Add shortcodes to WooCommerce template
One interesting alternative is to use shortcodes in your code. Most of the existing shortcodes should work here, but it’s also common to find some unsupported shortcodes outside the official WooCommerce and WordPress ones.
For example, the following script will include the account dashboard in all single product pages. Remember to paste it on the single-product.php file that you’ve created on your child theme.
<?php
if ( ! defined( 'ABSPATH' ) ) {
    exit; // Exit if accessed directly
}
get_header( 'shop' );
    while ( have_posts() ) :
       the_post();
       wc_get_template_part( 'content', 'single-product' );
    endwhile; // end of the loop.
do_action( 'woocommerce_sidebar' );
    $t= '<div id="myacc"><h4>My Account</h4>';
    $t.= do_shortcode("[woocommerce_my_account]");
   $t.="</div>";
echo $t;
get_footer( 'shop' );
And this is the result on a live product page:
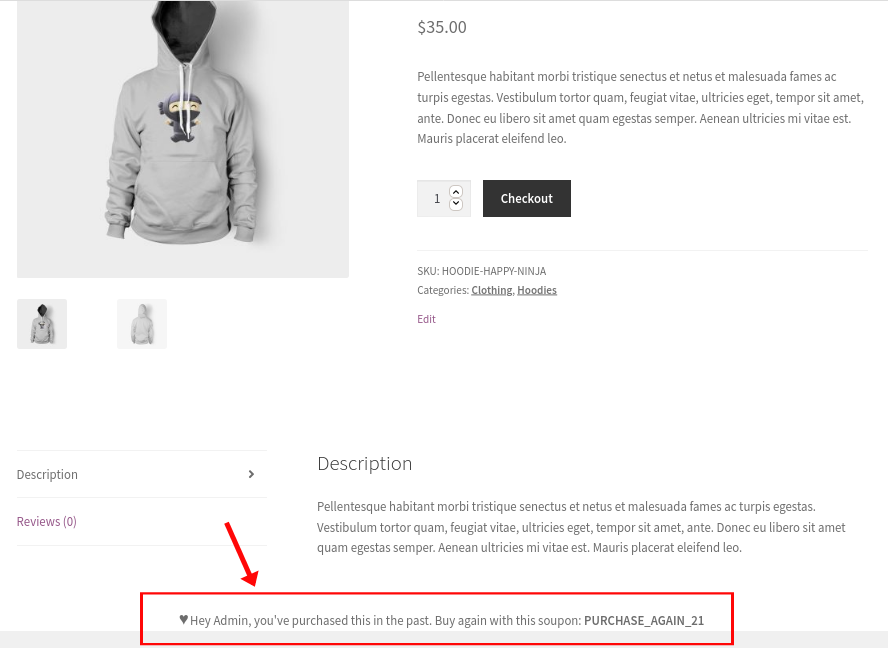
2. Show content for customers who purchased that product before
If you have customers that have already bought a product from you and come back to buy the same product again, you can provide them with a discount code as a way to improve their experience and make them come back to your store over and over again.
The following script will display content on the product page for returning customers who purchased the same product in the past. Once again, we edit the single-product.phpfile:
get_header( 'shop' );
while ( have_posts() ) :
the_post();
wc_get_template_part( 'content', 'single-product' );
endwhile; // end of the loop.
$current_user = wp_get_current_user();
if ( wc_customer_bought_product( $current_user->user_email, $current_user->ID, $product->get_id() ) ):
echo '<div class="user-bought">♥ Hey ' . $current_user->first_name . ', you\'ve purchased this before. Buy again using this coupon: <b>PURCHASE_AGAIN_21</b></div>';
endif;
get_footer( 'shop' );
3. Remove add to cart button based on product quantity and total price of the cart
Another interesting example if you want to customize your WooCommerce templates programmatically is to add the Cart button depending on the number of items the customer is buying as well as the total price of the cart.
In this case, we are going to get into the WooCommerce loop using a file located inside the loop folder in the template directory. Simply create a new add-to-cart.php file under a folder called loop, under the woocommerce folder of your child theme, and paste this script:
if ( ! defined( 'ABSPATH' ) ) {
  exit;
}
global $product;
$count= WC()->cart->get_cart_contents_count();
$total_price= WC()->cart->get_cart_total();
preg_match_all('!\d+!', $total_price, $matches);
$to_int = intval($matches[0][1]);
if($to_int>500){
   echo "Exceeds limit amount for total cart";
}
elseif($count<10){
echo apply_filters(
   'woocommerce_loop_add_to_cart_link', // WPCS: XSS ok.
   sprintf(
       '<a href="%s" data-quantity="%s" class="%s" %s>%s</a>',
       esc_url( $product->add_to_cart_url() ),
       esc_attr( isset( $args['quantity'] ) ? $args['quantity'] : 1 ),
       esc_attr( isset( $args['class'] ) ? $args['class'] : 'button' ),
       isset( $args['attributes'] ) ? wc_implode_html_attributes( $args['attributes'] ) : '',
       esc_html( $product->add_to_cart_text() )
   ),$product,$args);
}
else{
   echo "Quantity limit exceeded";
}
In this case, we are adding a conditional logic if() statement to check if there are more than 10 items added to the cart, and the total price of the cart isn’t over $500.
As you can see, we are getting into the WooCommerce class scope calling the WooCommerce object in this way: WC()->cart. This way, you can retrieve some information to add a cart button to the shop page or not, based on your conditionals.
Here is the result when applying both conditional restrictions:
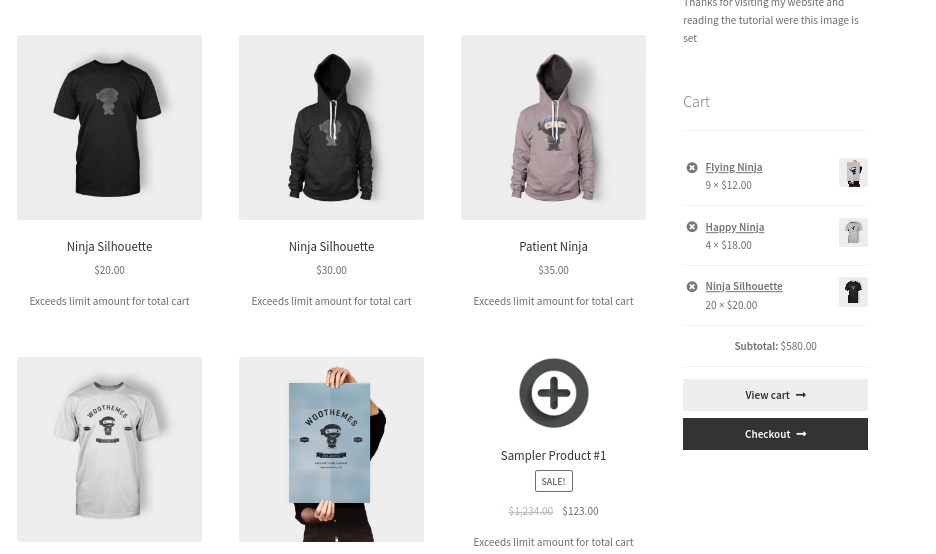
Keep in mind that this will only work on the main shop page. You’ll need to add some more code if you want to do the same on other pages.
4. Edit WooCommerce email templates files
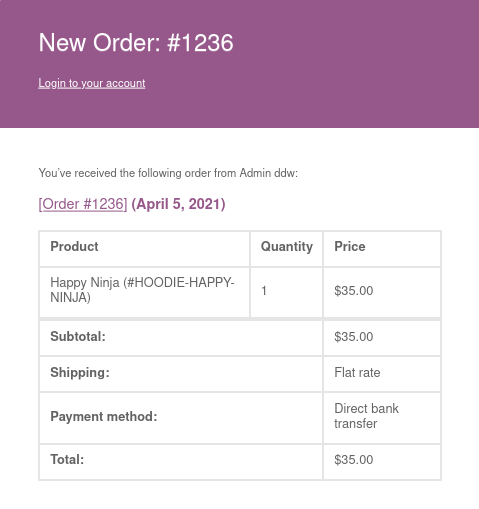
Email templates already include useful links to your website, but some users might not be aware of this. So let’s add a link to the email templates where users can log in to the website right from the email they’ve received.
We’ll add the link into the header of the email layout, so we need a copy of the email-header.php file, located in the email folder of the templates subdirectory of WooCommerce.
Create a new folder on your child theme and paste the file there with the same name. You will see the starting flags <!–header–> and <!–end header–>, and that’s where you’re going to add the link:
                                   <!-- Header -->
                                   <table border="0" cellpadding="0" cellspacing="0" width="100%" id="template_header">
                                        <tr>
                                            <td id="header_wrapper">
                                                <h1><?php echo $email_heading; ?></h1>
                                                <h3>
                                                    <?php echo '<span class="my-link"><a href="#login-URL">Login to your account</a></span>';?>
                                                </h3>
                                            </td>
                                        </tr>
                                    </table>
                                    <!-- End Header →
That’s it! You’ve just edited the WooCommerce email template header file. In the same way, you can edit all the email template files located in this directory. For more information on how to test your email templates, have a look at this complete guide.
To preview the templates, we recommend you use an email preview plugin. Here, you’ll find some of the email plugins you can use.
5. How to apply CSS style to WooCommerce email templates
Another interesting alternative is to customize the style of your WooCommerce templates programmatically. Once you edit the HTML markup, you can add some CSS styling to the email templates. Considering that inline CSS is not a recommended practice, we’ll need to use the email-styles.php file. This is the file that handles the CSS for the email templates.
To apply a custom CSS code to emails, copy this file from WooCommerce plugin folders and paste it into your theme WooCommerce folder. This is a PHP file, so you will be able to use variables, functions and build your own logic statement and apply them to the styles:
a {
    color: <?php echo esc_attr( $link_color ); ?>;
    font-weight: normal;
    text-decoration: underline;
}
And this is the custom link selector:
.my-link > a:nth-child(1){
color:white;
font-size:14px;
}
Conclusion
In summary, editing template files is an excellent way to stand out from your competitors and provide your customers with a better shopping experience.
There are 2 main ways to customize WooCommerce templates programmatically:
- With hooks
- Overwriting the templates
We’ve compared both methods and showed you several examples. You can use the scripts as a base and play around to customize them and apply them to your store.
If you have any issues following the guide, let us know in the comments below and we’ll do our best to help you out.
