
How to Edit Payment Gateways in WooCommerce
Setting up your payment gateways is one of the first things you should completely figure out when you build your WooCommerce store. When your customers need to pay for their purchases, the bank transfer isn’t always a reliable or convenient option. This is why we at QuadLayers have brought you our guide on how to edit WooCommerce payment gateways in WooCommerce.
Why edit WooCommerce Payment Gateways?
Having easy-to-use payment gateways to help you smooth the checkout process is very important when it comes to maintaining your conversions. Not only do you want accessible payment gateways for your products, but you also want your customers to trust your payment systems. Nowadays, online payments can have many risks, and customers are warier in purchasing if they don’t have 100% trust in your store.
That is why our guide will cover all the ways you can edit your payment gateways in WooCommerce to provide more clarity and accumulate trust from your customers. Whether you’re adding new payment methods or customizing them, you have to make sure that your customers get the best user experience from your store too. So, you can also choose to add payment gateway icons and badges if needed.
We’ll be covering all of this today and more. But before that, let’s look at the default WooCommerce options to edit payment gateways.
How to edit Payment Gateways in WooCommerce
You can edit your WooCommerce payment gateways in 3 major ways:
- Default WooCommerce Dashboard
- Programmatically
- Using Plugins
First, let’s look at how you can manage your payment gateways using the default WooCommerce dashboard.
1. Edit Payment Gateways in WooCommerce using Default Options
To start using the default options for your WooCommerce payment gateways, you need to set them up initially.
1.1. Set Up Payment Gateways
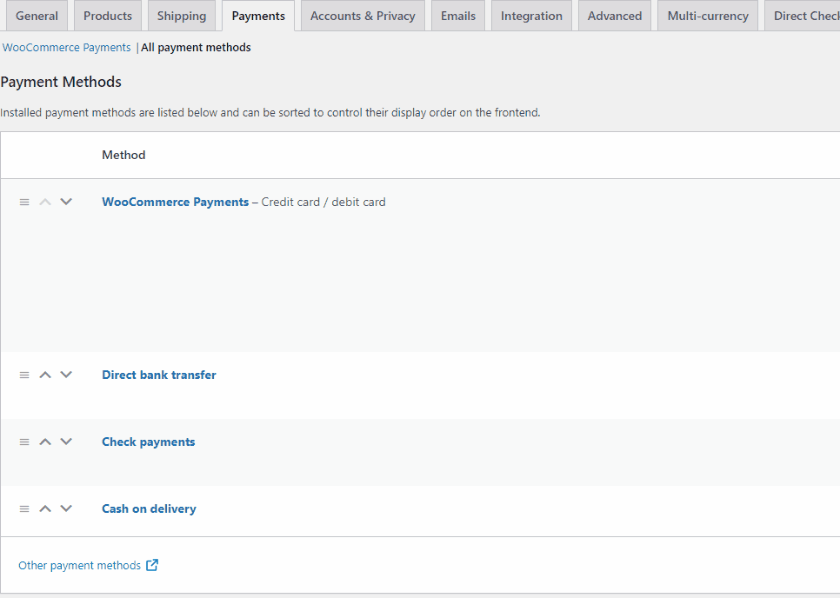
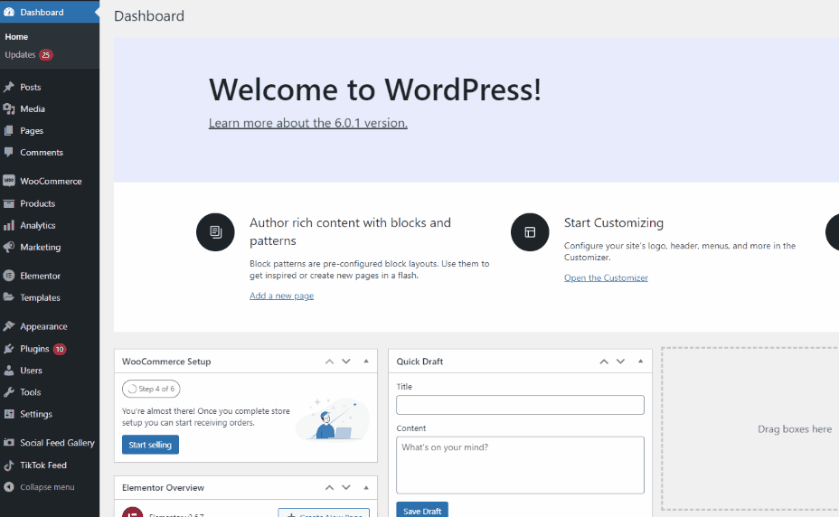
Open your WP Admin Dashboard and click on WooCommerce > Settings > Payments. Here, you will see all your payment gateways enabled for your website. By default, you should see options like Check, Bank Transfer, and Cash on Delivery.
You can enable/disable any of these options by clicking on the Enabled toggle option. Click on it, and the corresponding payment gateway will be disabled. You can also drag any of the payment gateways to rearrange their position as well. This way, you can also edit the order in which these gateways are provided to your customers on the front end.
Of course, you can also use this dashboard to set up additional payment methods such as PayPal and Stripe. If you’d like, you can check out these guides for better instructions on setting them up:
1.2. Manage Payment Gateways using Default WooCommerce Options
By default, WooCommerce lets you customize a few details regarding your payment gateways. For example, if we click on Manage on Cash on Delivery, you’ll be able to access options such as:
- Title: Use the title field to change the title/text of the payment gateway users see on their checkout.
- Description: Using this field, you can add a short but clear description of how the payment getaway would work and how you’d process the payments.
- Instructions: Additional instructions regarding how to handle the payments and transfer/pay the money depending on the payment gateway.

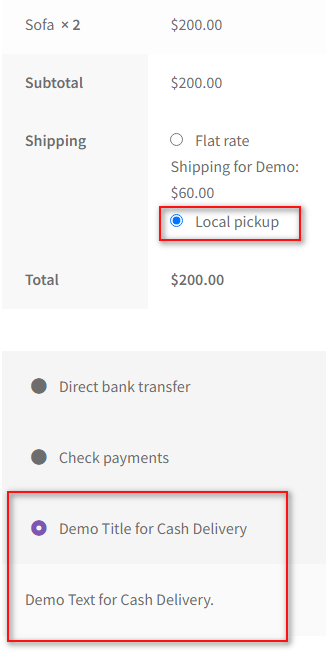
With the cash-on-delivery payment gateway, you can only enable the payment gateway for specific shipping methods. For example, we’ll set this field for local pickups only, so the cash-on-delivery payment will only show up when customers choose local pickup as their shipping method.

Once you fill in these details how you see fit and click on Save Changes. Then, your payment gateway will be updated successfully. Now, you will be able to see the result of our customizations:
While this is enough to customize your payment gateways to a certain extent, you can get better editing options with some extra steps as well. They can be further modified either programmatically or by using a plugin.
2. Edit Payment Gateways in WooCommerce Programmatically
If you have a basic technical idea of programming, you can edit the WooCommerce payment gateways programmatically as well. But to customize your payment gateways, you’ll need to use WooCommerce hooks using your payment ID. Then, we can use the payment ID to modify your payment gateways.
So first, let’s look at how you can find your payment gateway ID.
2.1. How to view your Payment Gateway ID
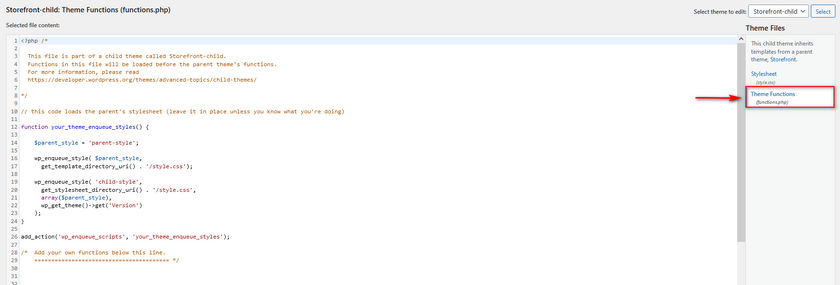
For this, you’ll have to access your functions.php theme file. However, we recommend using a child theme instead since it is safer, and your theme files won’t change or revert when you update your main theme. So, go ahead and switch to your child theme. You can even use one of the child theme plugins for WordPress if you need further help with it.
We’d also like to remind you to backup your website before we begin as we will be changing the core files of your store. So any unwanted changes on them may lead to further issues on your website.
Then, open your Theme Editor by clicking on Appearance > Theme File Editor from your WordPress dashboard.

Now, click on functions.php from the Theme files on the top right of your screen.
Use the file editor in the middle and copy the following script into the editor:
add_filter( 'woocommerce_payment_gateways_setting_columns', 'QL_add_payment_method_column' );

function QL_add_payment_method_column( $default_columns ) {

$default_columns = array_slice( $default_columns, 0, 2 ) + array( 'id' => 'ID' ) + array_slice( $default_columns, 2, 3 );
return $default_columns;

}

// woocommerce_payment_gateways_setting_column_{COLUMN ID}
add_action( 'woocommerce_payment_gateways_setting_column_id', 'QL_populate_gateway_column' );

function QL_populate_gateway_column( $gateway ) {

echo '<td style="width:10%">' . $gateway->id . '</td>';

}
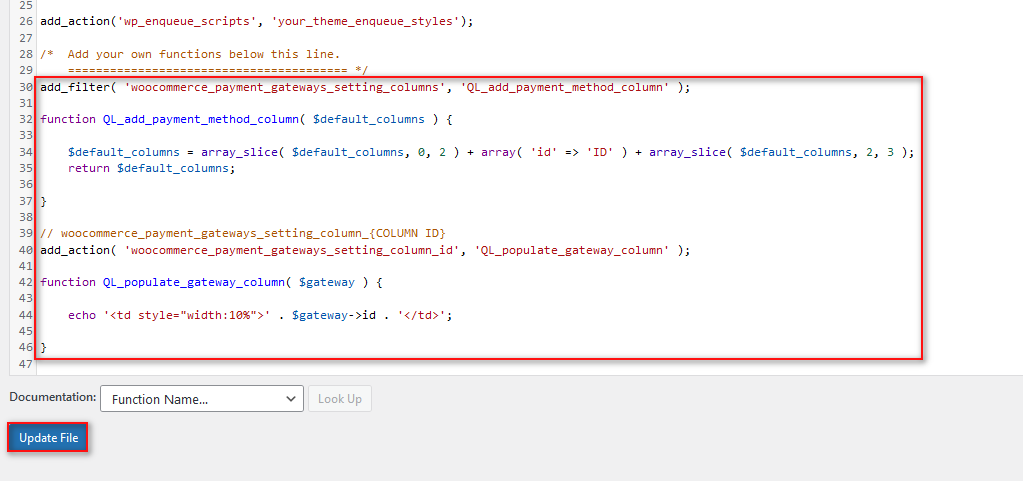
Paste it into the editor and click on Update File. This will add a column to your payments list that shows you your payment gateway ID. To view this list, click on WooCommerce > Settings > Payments.
2.2. Edit Payment Gateway Title Programmatically
You can now use this ID to customize the title and description for your payment gateways. You can use the following script to change the title of your payment gateway:
add_filter( 'woocommerce_gateway_title', 'QL_change_payment_gateway_title', 25, 2 );

function QL_change_payment_gateway_title( $title, $gateway_id ){

if( 'cod' === $gateway_id ) {
$title = 'Insert-Text-Here';
}

return $title;
}
Here, all you need to do is replace ‘cod’ in the if statement with the id of the payment gateway you want to customize. Then, replace the Insert-Text-Here section in the $title argument to use your custom text for the title.
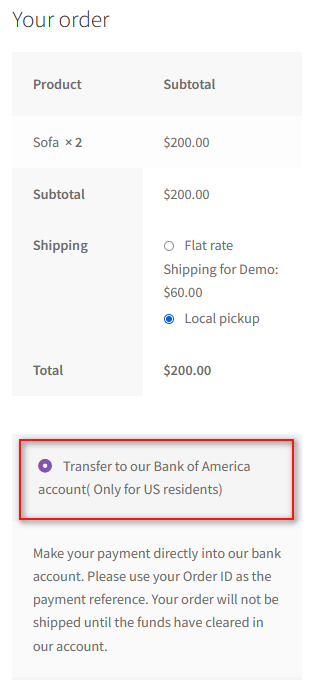
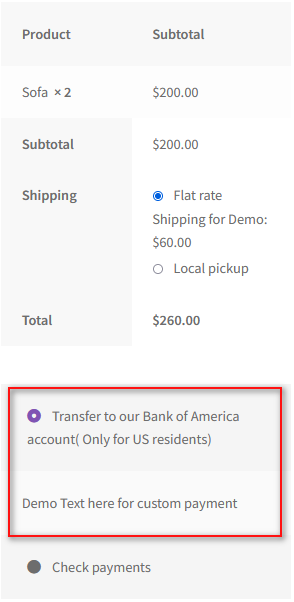
For example, we have the ID bacs for our direct bank transfer payment. So, we take the above lines of code and replace the cod with bacs. Next, we can add the custom text ‘Transfer to our Bank of America account(only for US residents.).’ Now, the code should look like this:
add_filter( 'woocommerce_gateway_title', 'QL_change_payment_gateway_title', 25, 2 );

function QL_change_payment_gateway_title( $title, $gateway_id ){

if( 'bacs' === $gateway_id ) {
$title = 'Transfer to our Bank of America account( Only for US residents)';
}

return $title;
}

With this, our front-end checkout should look like this:
2.2. Edit Payment Gateway Description Programmatically
You can also add custom description texts with a similar function that uses the gateway_id. Just replace the ‘Insert-text-here’ section in the following script to do so:
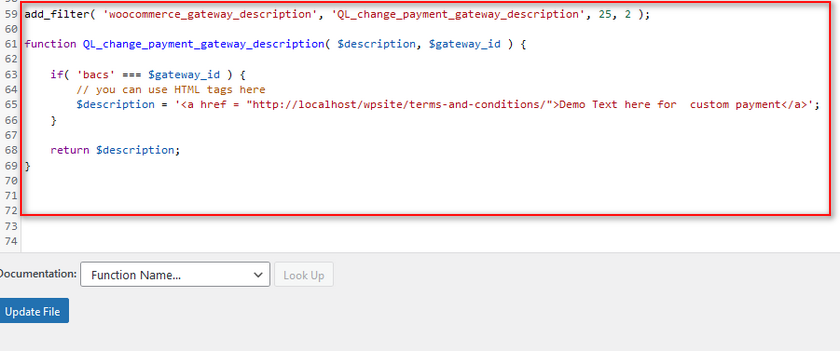
add_filter( 'woocommerce_gateway_description', 'QL_change_payment_gateway_description', 25, 2 );

function QL_change_payment_gateway_description( $description, $gateway_id ) {

if( 'bacs' === $gateway_id ) {
// you can use HTML tags here
$description = 'Demo text here for custom payment ;)';
}

return $description;
}
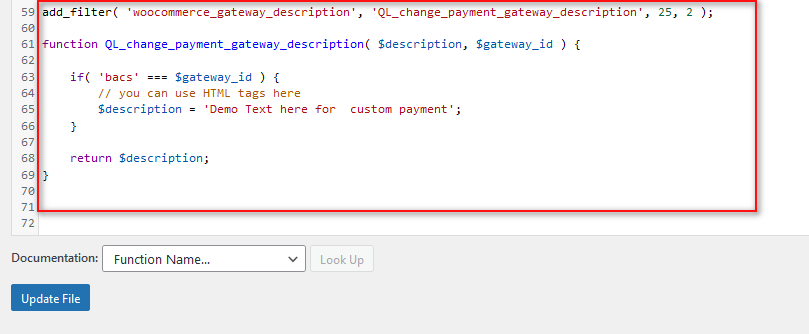
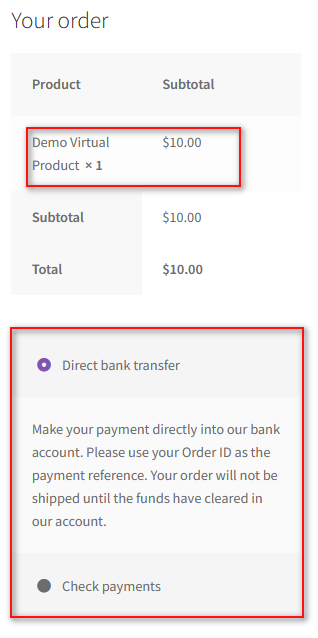
Here, you can see our custom text in our demo checkout:
2.2.1. Using HTML tags in your Payment Gateways Description
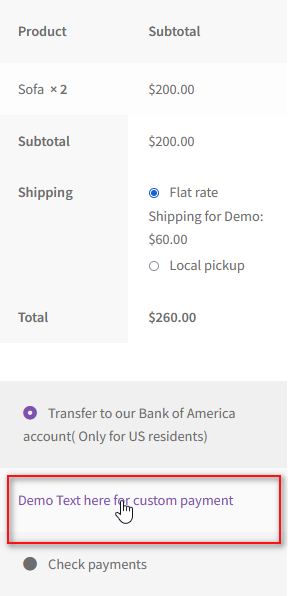
You can even use HTML tags to add images or even links to specific pages using this code. This will simply edit the text using HTML tags. However, we request users to use HTML tags only if they’re comfortable with it. For example, to direct our customers to our TOS page, we can use the code like this:
add_filter( 'woocommerce_gateway_description', 'QL_change_payment_gateway_description', 25, 2 );

function QL_change_payment_gateway_description( $description, $gateway_id ) {

if( 'bacs' === $gateway_id ) {
// you can use HTML tags here
$description = '<a href = "http://localhost/wpsite/terms-and-conditions/">Demo Text here for custom payment</a>';
}

return $description;
}
With this code, our description text will also link to our Terms and Conditions page, which can be used to provide customers with more details about the payment as well as any available refunds or rebates.
This covers how you can edit payment gateways in WooCommerce programmatically. As you can see, it can still be a bit tricky to edit and customize your payment gateway using the codes. It can be especially difficult if you’re not comfortable adding custom functions to your theme.
This is why we’ve also brought you the guide on editing payment gateways using plugins.
3. Edit Payment Gateways in WooCommerce using Plugins
With plugins, the process of editing payment gateways becomes a lot easier and more user-friendly. You get a number of advanced features using specific plugins. Some of them even include the ability to show/hide payment methods based on products or product categories.
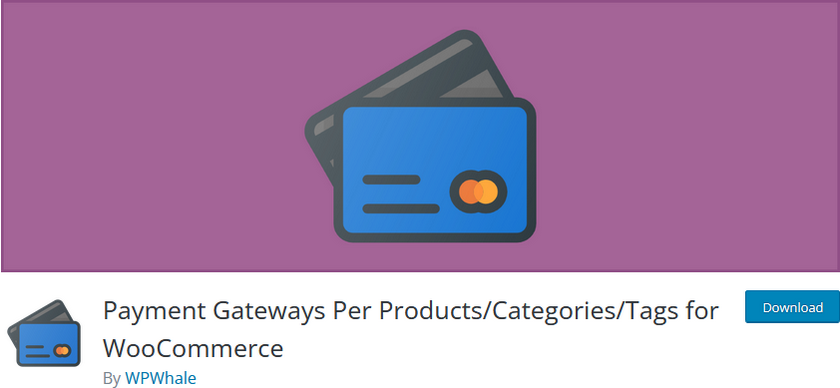
But for our demo today, we’ll be using the Payment Gateways Per Products/Categories/Tags for the WooCommerceplugin. The plugin is quite simple, and as the name suggests, it lets you enable or disable specific payment gateways for specific products, categories, or tags.
3.1. Install and Activate the plugin
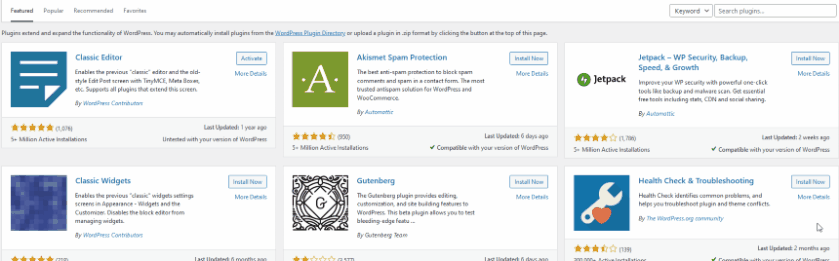
Let’s start by installing and activating the plugin. First, open your WP Admin Dashboard and click on Plugins > Add New.
Then, use the search bar on the top right and search for the keywords of the plugin. Click on Install Now on the plugin’s tab to install the plugin.
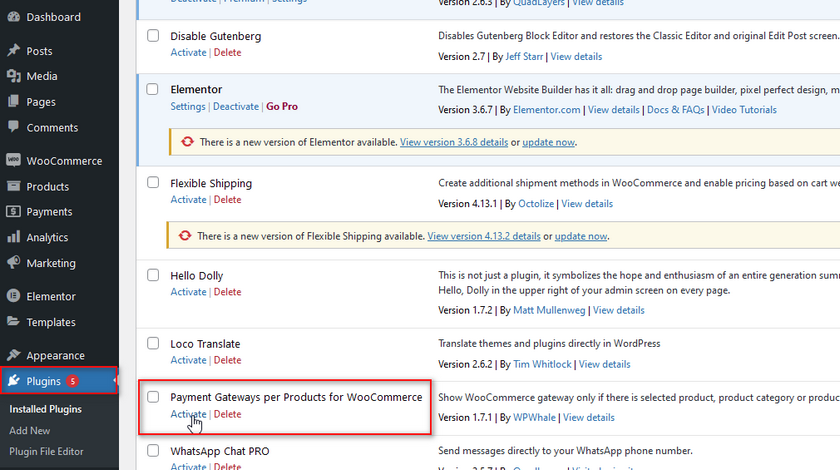
To activate the plugin, you can click on Activate when the button switches to Activate. Alternatively, you can click on Plugins many on your sidebar and manually click on Activate under the plugin listing.
However, if you want to use any of the premium plugins, you will have to install the plugin manually.
3.2. Configure the Plugin Settings
To use the plugin, you need to open the plugin’s options by clicking on WooCommerce > Settings > Payment Gateways per product. Here, you have three different tabs that you can use: Per Product Categories, Per Product Tag, and Per Products.
All of these features require similar steps. Let’s demonstrate using the Per Products Categories tab first. Click on Per Products Categories, and you will be given a list of all your available payment gateways.
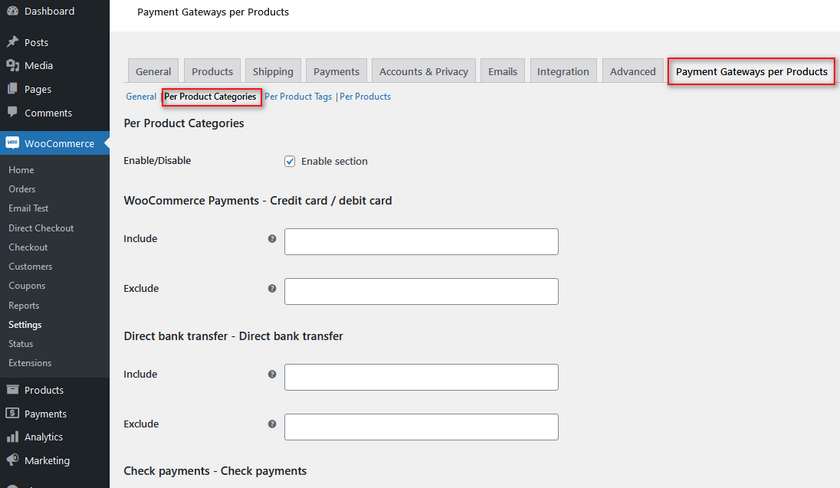
Here, you can use the Include and Exclude field to hide/show payment gateways for specific product categories. You can choose which products will have the corresponding payment gateway shown using the Include field. Conversely, using the exclude lets us hide the payment gateway for specific products.
This works excellently well if you want to disable certain payment gateways for products with different profit margins or costs. So, for example, if we want to disable cash on delivery for specific virtual products, we can simply type in the name of the product category on the Exclude field for Cash on Delivery. After you’re done, click on Save Changes.

For a demo, we can see that the Cash on Delivery payment gateway is disabled for our checkout since we have a virtual product in our cart.
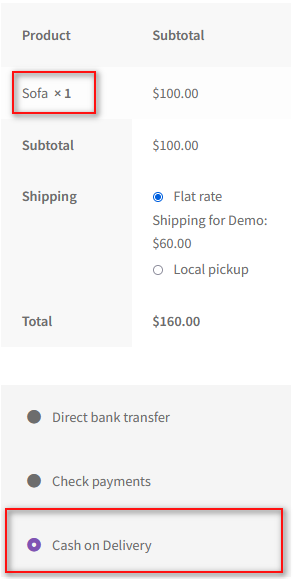
Similarly, you can use the Include tag in a similar to show a payment gateway for specific categories too. For the include option, we can add the Furniture category, so the option is shown if we have a matching product in our cart.
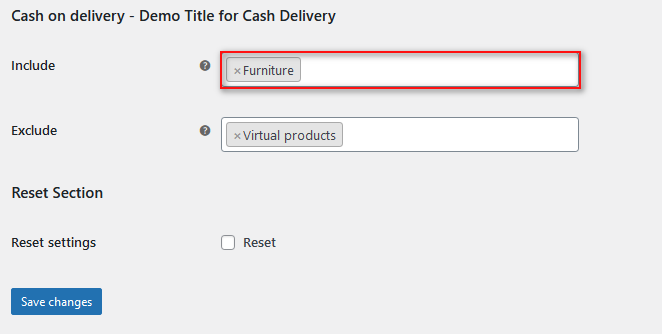
Now, if we add our demo furniture product, we’ll have the payment gateway enabled for us in the checkout:
Disable Payment Methods in WooCommerce
WooCommerce also lets you disable payment methods with ease. Moreover, you can even choose to employ smart methods to disable them using either cart conditions, billing address, and more. First, let’s look at how you can disable payment methods in WooCommerce.
To do so, first go to WooCommere > Settings > Payments. Here, you can see the Enabled column next to each payment gateway. Click on the enable/disable button next to the payment method to disable it. Then, click on Save Changes.
This is an extremely simple way to disable payment gateways. However, suppose you want to deactivate payment gateways using even more detailed cases and conditions. In that case, you can do so using custom WooCommerce functions and plugins.
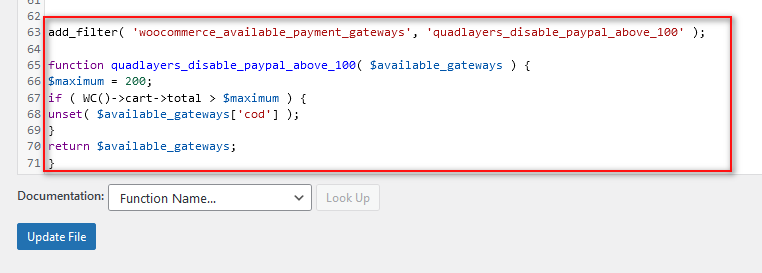
For example, if you want to disable a payment gateway using the total cart value, you can do so with a simple WooCommerce function. The code checks if your cart total is over 200, and if it is, it disables cash on delivery for that specific order. This is an excellent way to stop large volume payments for specific payment gateways you cannot handle.
So to use this code, open your functions.php as we have highlighted above by clicking on Appearance > Theme File Editor from your WordPress dashboard.
Then, paste this script into the editor and click on Update File.
add_filter( 'woocommerce_available_payment_gateways', 'quadlayers_disable_paypal_above_100' );

function quadlayers_disable_paypal_above_100( $available_gateways ) {
$maximum = 200;
if ( WC()->cart->total > $maximum ) {
unset( $available_gateways['cod'] );
}
return $available_gateways;
}
And that’s just one way to disable payment gateways in WooCommerce. If you’re looking for ways to use other conditions like cart items, address, user roles, etc., we recommend checking out our guide here on How to disable payment gateways in WooCommerce.
Bonus: How to Add Custom Trust Badge for your Payment Gateways
Trust Badges are a great way to clearly show that you support specific payment gateways and are verified by these services. This way, if you have payment gateways like Paypal or Stripe enabled, you can add a nifty little image for it.
The quickest way to add Trust badges is by adding the following little script to your child theme’s functions.php file. So once again, click on Appearance > Theme File Editor and click on functions.php on the right theme files sidebar.
After that, paste in the following code and click on Update File.
add_action( 'woocommerce_after_cart_totals', 'add_content_on_cart' );

function add_content_on_cart() {
echo "<img src='https://www.nicepng.com/png/full/313-3136141_add-to-cart-checkout-trust-badges-shopify-png.png' >";
}

add_action( 'woocommerce_review_order_after_payment', 'add_content_on_checkout' );

function add_content_on_checkout() {
echo "<img src='https://www.nicepng.com/png/full/313-3136141_add-to-cart-checkout-trust-badges-shopify-png.png' >";
}
![]()
This should now add a trust badge to your checkout like so:
![]()
Moreover, if you’re comfortable changing HTML codes, you can create a custom badge, upload it to your website and link it using the src attribute.
Conclusion
And that ends our guide on How to Edit Payment Gateways in WooCommerce. For our reader’s convenience, we’ll quickly summarize all the points that we went through in this post:
- Edit payment gateways using WooCommerce Dashboard
- Edit the payment gateway’s title and description programmatically
- Use plugins to edit payment gateways for specific product categories
- Disable payment gateways in WooCommerce
- Add Trust badges to your WooCommerce Payment section
Of course, the easiest way to edit your payment gateway would be straight from the WooCommerce dashboard or using a plugin. While the WooCommerce dashboard is the easiest way, the dashboard might not have the right range of features you require.
We highly recommend using a plugin if you’re more of a beginner-friendly user, and you don’t necessarily have to use the plugin we demoed. With our guide as a reference and a quick look at your plugin’s documentation, you should be good in no time. But if there’s any confusion, you can ask us for our help in the comments section.
Additionally, if you’re looking for other ways to improve your customer’s checkout experience, why not check out some of our other guides here:
