
How to Add Virtual Products to WooCommerce
Do you want to add virtual products to WooCommerce? They are very essential if you have an eCommerce website associated with software or digital products.
So in this article, we’ll show you every possible way to add them. But first, let’s look at the difference between virtual and physical products and also understand why do you need virtual products.
Virtual Products vs Physical Products
Virtual products include every type of product which are represented as software in an eCommerce store. They include products like plugins, themes, video games, tokens, e-books, and other digital applications. For example, we at QuadLayers have a huge variety of virtual products as plugins like Instagram Feed Gallery, Telegram Chat, QuadMenu, and so on.
Usually, the virtual products are used by the users or customers mostly by downloading them. But depending on the service they provide, they might have their own integrated systems and might not require any downloads like hosting services, website builders, and other online tools.
Alternatively, physical products may be referred to as physical goods that can be purchased through an online store. They can include any type of physical substances like digital devices, kitchen appliances, furniture, clothes, accessories, and many more.
The physical products can be used by customers only after they have been delivered to their address. They can be picked up by the customers from the nearest stores too, but it’s very rare nowadays.
Why add Virtual Products to WooCommerce?
Virtual products are very essential if you want to sell any type of software product from your WordPress website. In fact, it is the only way to sell software to your customers through WooCommerce.
We all know that you can’t sell a product in WordPress without WooCommerce. And when it’s a virtual product, you’ll need to customize the product in such a way that they are accessible for the users for their technical purposes.
Purchasing a virtual product from an eCommerce store is totally different than purchasing a physical product too. The virtual product won’t be delivered to your doorstep, or you can’t collect it from any physical stores. Instead, you can start using the virtual product as soon as you purchase it from their website whether they need to be downloaded or not.
So to make sure that everything goes smoothly when a customer makes a purchase of your software, you need to make sure that you can properly add the virtual products to your WooCommerce website.
How to add Virtual Products to WooCommerce?
WooCommerce comes with a lot of built-in options for your eCommerce website. That is why you can easily add virtual products to WooCommerce from the default product options themselves.
Just make sure that you have installed and set up WooCommerce properly on your WordPress website before you continue. It’s also best that you use one of the WooCommerce compatible themes to avoid any theme or plugin conflicts.
1. Set up a New Virtual Product
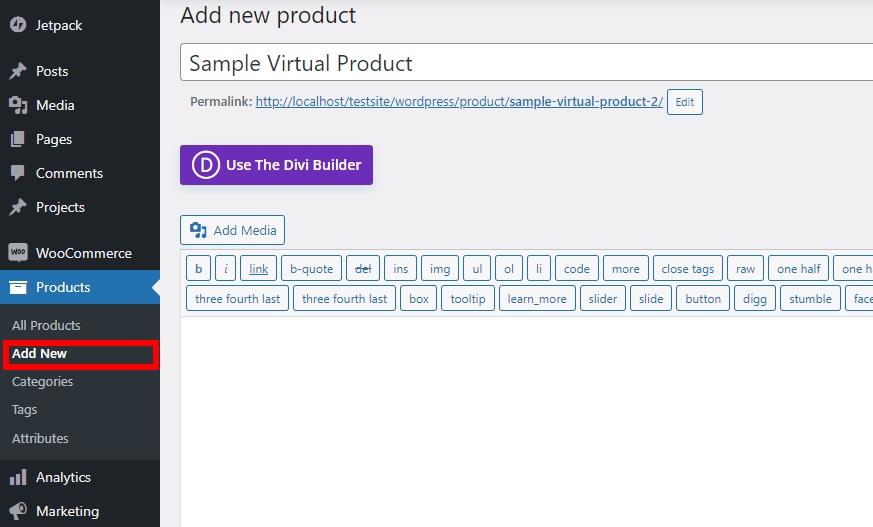
Firstly, go to Products > Add New from your WordPress dashboard to add a new virtual product to your WooCommerce store.
If you want to create a virtual product for an existing product, open Products > All Products and click on Edit for the particular product.
Then enter all the necessary details for the new product like the product title, product image, and so on. For this demonstration, we’ve added a “Sample Virtual Product” as our product.
If you want to add more product details and need help, we have a complete guide on how to add WooCommerce products.
After you’re done, just scroll to the Product Data section and check the Virtual option for the product.
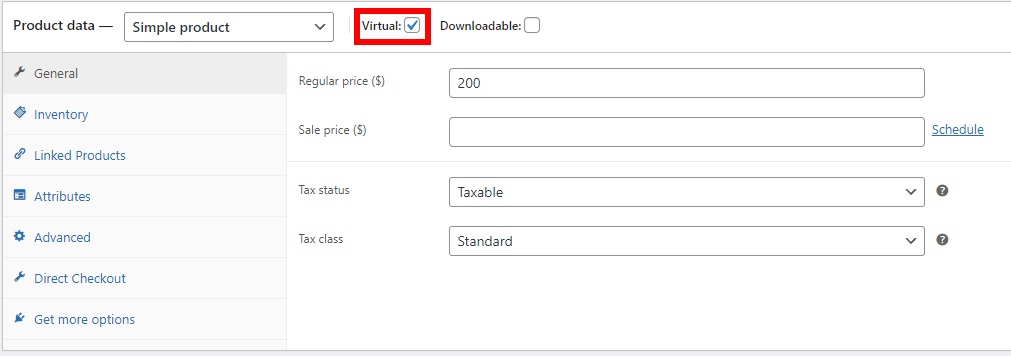
Then, add the regular price of the product for purchase. The sale price is optional but you can add it too if you have any ongoing sales for the product
That’s it! You just added a virtual product to your WooCommerce website. But you have to make it downloadable for the customers too.
2. Configure the Product as Downloadable
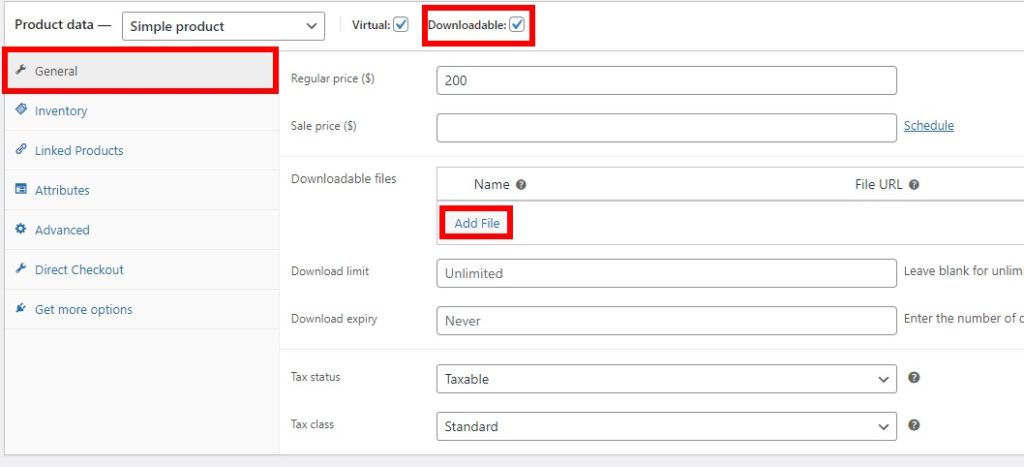
Since you are selling a virtual product, it’s obvious that your customers will need to download it. Hence, check the Downloadable option as well. It’s right beside the virtual option that you checked earlier.
As soon as you set the product as downloadable, you’ll be able to see some additional general options for the product. They include downloadable files and download limit and expiry.
You can add the product file in the downloadable files options. Just click on Add File.
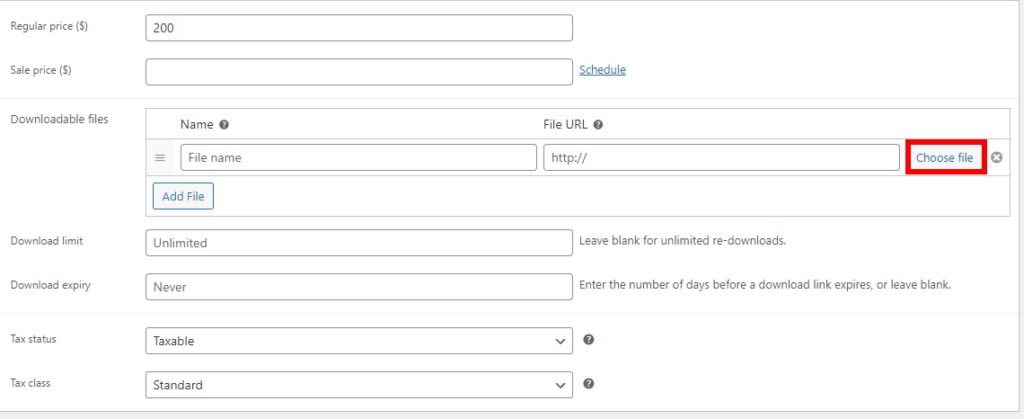
Then, you’ll need to add a File name and the File URL for the product. If you want to create a new file URL, you can simply upload the file by clicking on Choose File.
Some virtual products may need more than one file to download. In that case, just click on Add File once again and repeat the process.
Next, you have to add the download limit. We have added the download limit as 1 for this tutorial since a user can generally download the product only once per purchase. But if you want to allow your users unlimited re-downloads, just leave it blank.
However, if you want to add a specific download limit other than once, you can do so too.
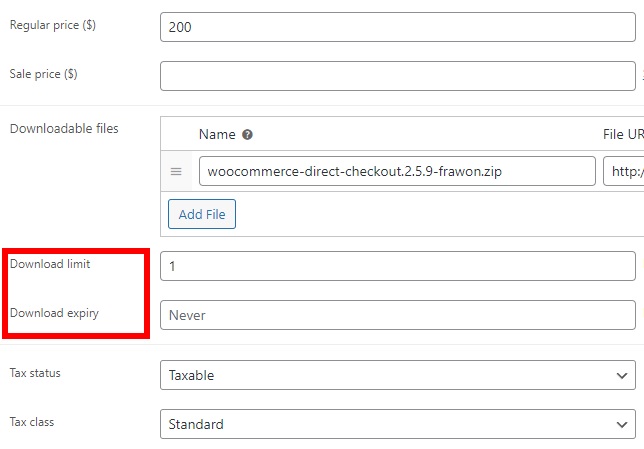
Finally, you have to set an expiry date for the download. The value is counted in the number of days after which the download link expires. You can leave it blank if you don’t want to add any download expiry.
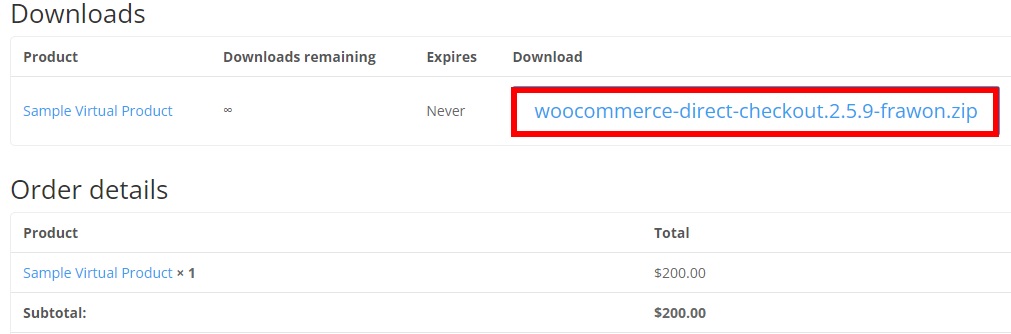
Now, all you have to do is Publish or Update the product.
Then, your product is ready for download. The customers can download the product after they have successfully made the purchase to the order.
Bonus: Remove Checkout Fields for Virtual Products
After you add a virtual product to your WooCommerce website, the users can download it only after they checkout the purchase. But for a virtual product, some checkout fields like shipping addresses are not required.
So, it’s better to remove these unnecessary fields to shorten the checkout process. This can be very convenient for your users as well. The easiest way to remove these checkout fields is by using a plugin.
While there are many checkout plugins that allow you to customize the checkout page, we will be using Checkout Manager for WooCommerce in this tutorial.
So let’s start by installing the plugin.
1. Install and Activate the Plugin
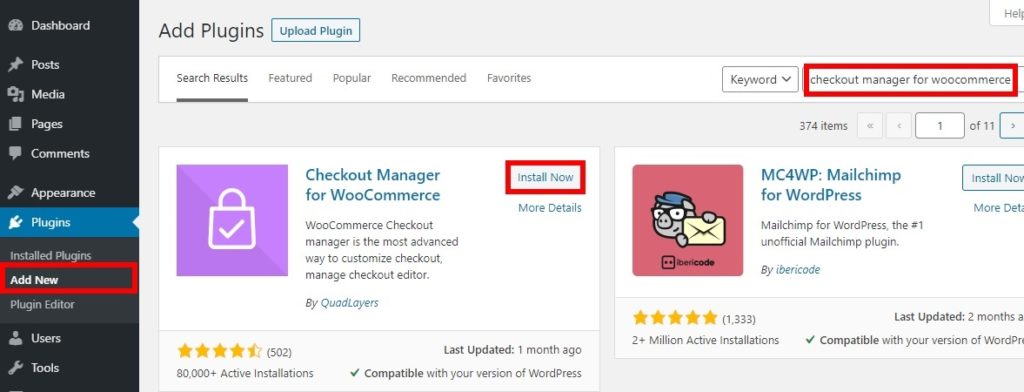
Go to Plugins > Add New from your WordPress dashboard and search for the keywords for the plugin. After you find it, click on Install Now to install the plugin. Then, Activate the plugin once the installation is complete.
If you want to use its premium version, you’ll need to upload the plugin and install it manually. Have you a look at our guide to install a WordPress plugin manually for more information on it.
2. Remove the Checkout Fields
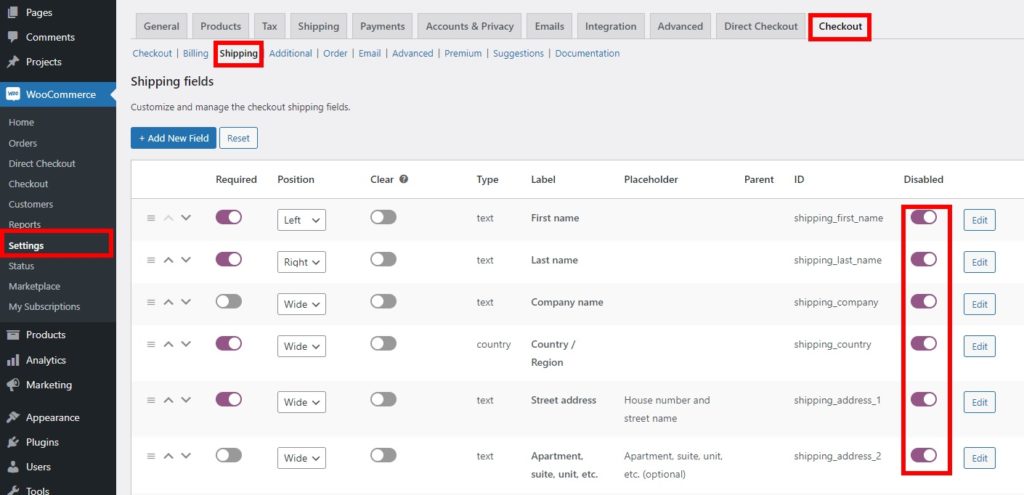
Now, go to WooCommerce > Settings from your WordPress dashboard and open the Checkout tab. Then, click on the Shipping tab. You can start removing the shipping fields from here.
Just activate the toggle to disable the shipping fields in the “Disabled” column. Since you don’t need any shipping details for a virtual product, you can disable all the fields.
Similarly, if you want to disable some of the fields from the billing details too, you can do so from the Billing tab.
Don’t forget to Save changes. Once your customers are redirected to the checkout page, they won’t have to add any unnecessary checkout details.
This is how you remove the fields from the checkout page when you add virtual products to your WooCommerce store. Then, you can display only the necessary checkout fields to your customers.
You can also remove the checkout fields using other methods. Please go through our guide to remove checkout fields in WooCommerce for more details.
Skip the Cart Page in WooCommerce
We’ve discussed how to add virtual products to your WooComemrce store. Additionally, we’ve also presented you with a small tutorial to ease your checkout process by removing the checkout fields. But to help you shorten the checkout process even more, you can skip the cart page entirely too.
The use of mini carts in WooCommerce is very common nowadays. On top of that, when you make a purchase of a virtual product, it’s less complicated than physical products.
The price and the quantity are always constant in the case of virtual products. As a result, the cart page is a bit unnecessary for virtual products and may seem to be just an additional page before the actual checkout page.
So we can just skip the cart page for them and redirect your users straight to the checkout page. For that, all you have to do is add a snippet to the theme functions file of your website. But before that, please back up your website and create a child theme programmatically or by using one of the child theme plugins to make any changes on the theme files. This ensures that the changes you make are saved even when you update your WordPress theme.
1. Adjust Add to Cart Behavior Options
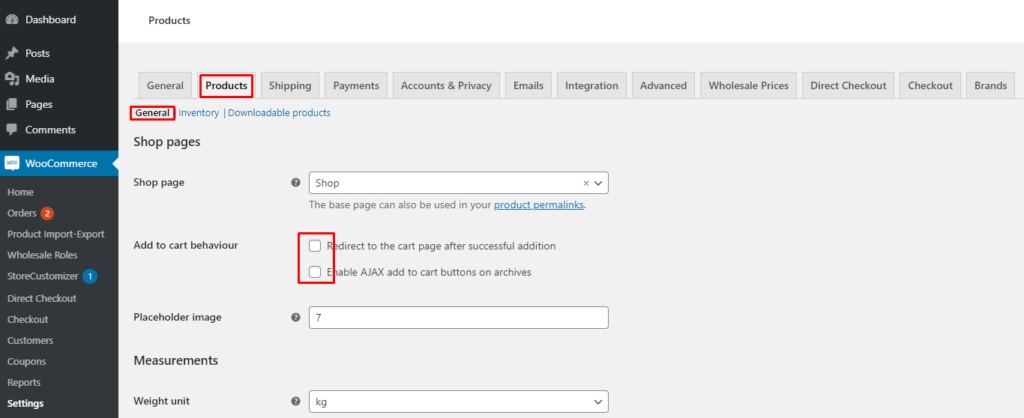
Before you add the code snippets to your website, you have to adjust the add-to-cart behavior in WooCommerce. Go to WooComerce > Settings and open the Products tab. Under the General options, you have to uncheck the following options:
- Redirect to the cart page after successful addition
- Enable AJAX add to cart buttons on archives
After you uncheck these options and save the changes, they won’t interfere with the code’s functionality.
2. Add Code Snippet to functions.php file
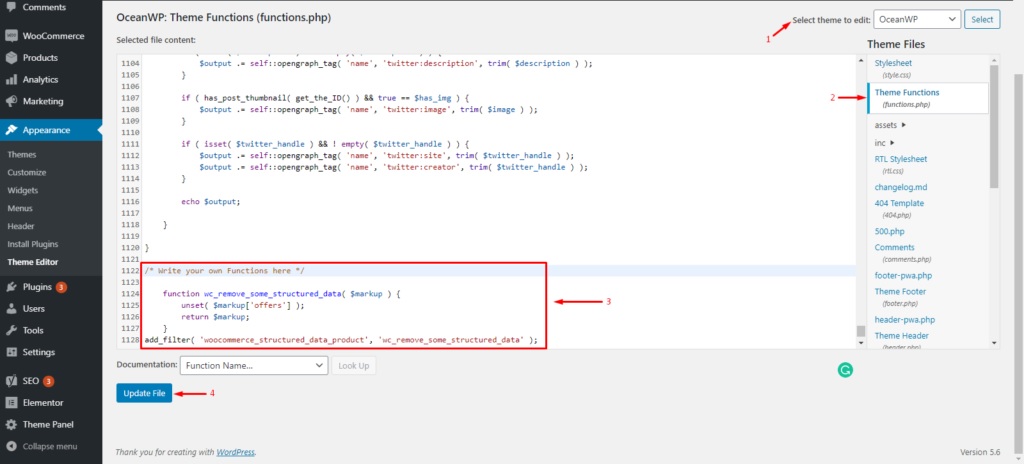
Now, go to Appearance > Theme File Editor from the WordPress dashboard and open the functions.php file. At the end of the editor, just add the following code:
add_filter('add_to_cart_redirect', 'ql_skip_cart_page');
function ql_skip_cart_page () {
global $woocommerce;
$redirect_checkout = $woocommerce->cart->get_checkout_url();
return $redirect_checkout;
}
This will redirect the customers directly to the checkout page when they add a product to the cart.
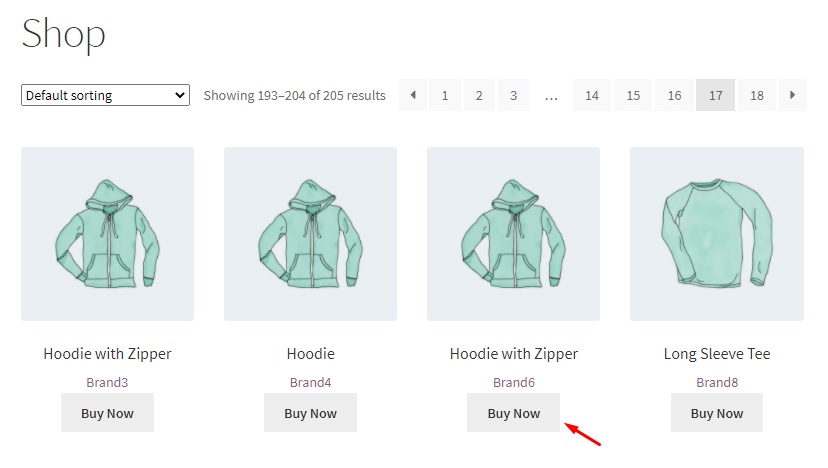
But you can change the “Add to cart” text with your own custom text like “Buy Now” with the following code snippet.
add_filter( 'woocommerce_product_single_add_to_cart_text', 'ql_replace_add_to_cart_button_text' );
add_filter( 'woocommerce_product_add_to_cart_text', 'ql_replace_add_to_cart_button_text' );
//Replace Add to Cart text with Buy Now!
function ql_replace_add_to_cart_button_text() {
return __( 'Buy Now!', 'woocommerce' );
}
Once you make all the necessary changes, Update the file.
If you aren’t comfortable with using codes, you can use the plugin Direct Checkout for WooCommerce to skip the cart page as well.
Conclusion
All in all, we have shown you how to create and add virtual products to WooCommerce in this article. A virtual product is very essential if you want to sell any type of software from your eCommerce website.
You can easily create virtual products from the default WooCommerce options and make them downloadable.
But since virtual products are less complicated than physical products, you can also shorten the checkout process for them. It can be done by removing the unnecessary checkout fields and skipping the cart page entirely.
So can you create a virtual product and make it downloadable for your customers now? Please let us know in the comments.
Meanwhile, here are some more of our posts that you might be interested in:
