
How to Reorder WooCommerce Checkout Fields
Do you want to reorder WooCommerce checkout fields on your online store? We will show you all the best ways to reorder the checkout fields in this tutorial.
WooCommerce allows you to reorder and rearrange a number of elements in your eCommerce website to improve the conversion rates. Out of them, the checkout fields can also be rearranged to suit the needs of your website and customers.
But before we go through the steps, let’s see why you might need to change them.
Why change the Order of the Checkout Fields?
When you install WooCommerce in your online store, there are some essential pages that the plugin creates by default. They include the cart, shop, my account, checkout page, and so on. But when it comes to the checkout page, the default fields might not be applicable for every type of eCommerce website.
Depending on your website and customers, you might need to reorder the WooCommerce checkout fields from time to time. For example, on the default checkout page, the customer needs to enter the first name followed by the last name. But in some cases, you might find that entering the last name at the beginning, or asking the customer’s billing address first may be more appropriate.
Hence, if you want to customize these fields based on similar situations, you will have to reorder them.
How to Reorder WooCommerce Checkout Fields?
You can reorder WooCommerce checkout fields using 2 major ways in WordPress:
- With Plugins
- Programmatically
We will go through each step in detail for this guide. However, please make sure that you have properly set up WooCommerce for your website and use one of the compatible WooCommerce themes before we begin.
Reorder WooCommerce Checkout Fields with Plugins
Plugins can help a lot with increasing the functionality of your website. Similarly, one of the easiest ways to reorder WooCommerce fields is by using a plugin. All you have to do is install the plugin to your WordPress website and rearrange the checkout fields through it.
There are many WooCommerce checkout plugins that you can use to customize your checkout page. But, only a few provide you with the option to reorder the checkout fields in WooCommerce.
For this tutorial, we will be using the Checkout Manager for WooCommerce plugin since it’s very easy to use. It’s also one of the best plugins to customize the checkout page and you can even use it to reorder the checkout fields.

But to start using the plugin, you need to install and activate it.
1. Install and Activate the Plugin
To install the plugin, go to Plugins > Add New from your WordPress dashboard and search for the keywords for the plugin. Once you find the plugin, click on Install Now.
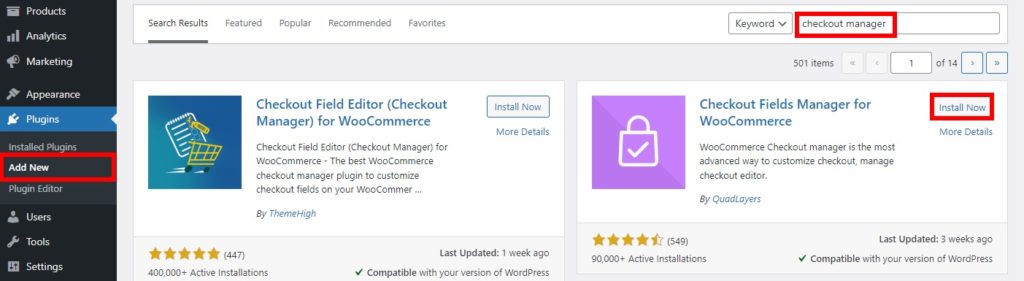
After the installation is complete, Activate the plugin.
You can also install the plugin manually if you want to use a premium plugin or a plugin that is not included in the WordPress repository. The plugin needs to be downloaded from the marketplace and uploaded to your website. Take a look at our guide to install a WordPress plugin manually for more information.
2. Reorder WooCommerce checkout fields from plugin options
Once the plugin is activated, you can start using it to reorder the WooCommerce checkout fields. Just go to WooCommerce > Settings from your WordPress dashboard and open the Checkout tab.
A checkout page usually includes billing and shipping details. We will reorder the billing fields first. So, select the Billing option in the Checkout tab. Here, you will be able to see all the fields for the billing details.
Now, all you have to do is use drag and drop to reorder the fields of the billing details. Just drag the fields and drop them to the positions where you want to place them on your checkout page. You can also use the upward and downward arrows to shift the fields to the desired position.
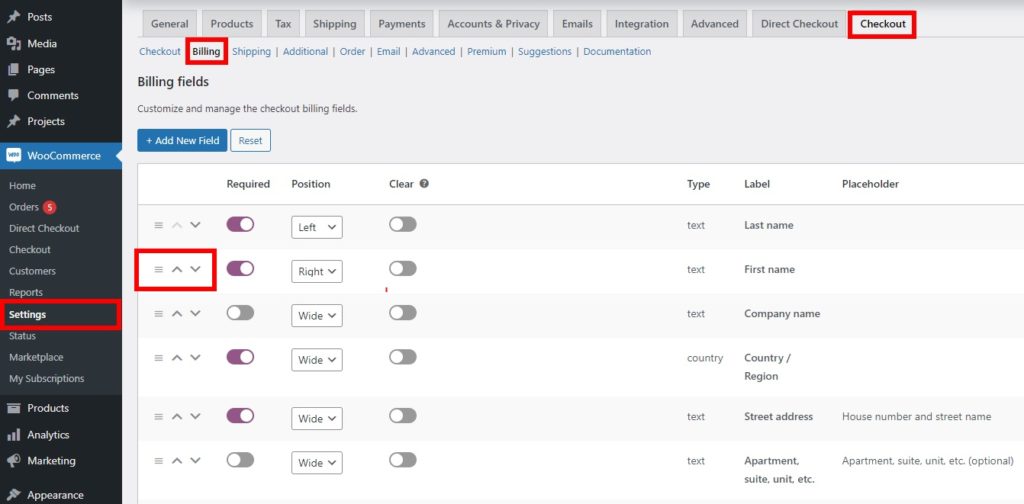
Additionally, you also have a position option for each field. The fields can either be placed at the left or right side of the screen or with a wide field area. The fields can even be hidden if it’s necessary by activating the toggle on the Disabled column.
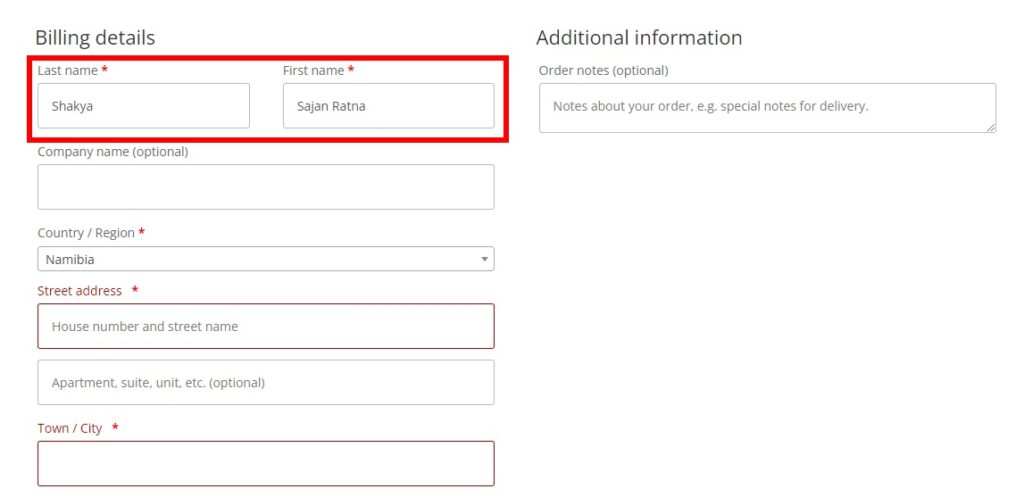
After you have reordered all the checkout fields for your WooCommerce store, click on Save changes. When you reload the checkout page, you will be able to see the newly ordered fields.
In the same way, you can reorder the fields of shipping details too. Just select the shipping option from the Checkout tab and reorder the fields again. Once you have rearranged all the necessary fields, you will be able to see that they are reordered on the frontend checkout page as well.
Reorder WooCommerce Checkout Fields Programmatically
You can also reorder WooCommerce checkout fields using code snippets if you don’t want to add any additional plugins to your website. But this approach is suitable for you only if you have advanced knowledge in programming.
Also, the code snippets are added in the functions.php file of your website and you might lose them when you update your WordPress theme. So, you must create a child theme to add the snippets. If you need help with it, you can even use one of the best child theme plugins for WordPress to create one.
However, we would also recommend you backup your WordPress website before adding the code snippets. The functions.php file is one of the core files of your website and any unwanted changes to it might result in more issues. Now, let’s move on with the process.
1. Access the functions.php file in Theme Editor
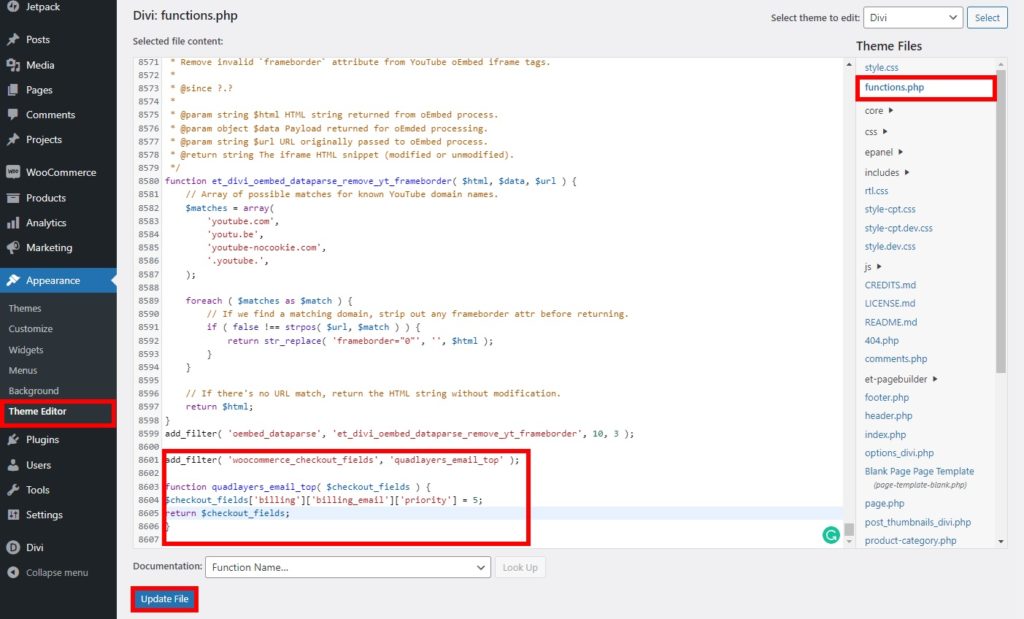
You’ll need to add the code snippets in the functions.php file from the theme editor. To access it, go to Appearance > Theme Editor from your WordPress dashboard. Then, select the functions.php file from the right side of your screen in the theme files.
Now, you can start adding the code snippets after you scroll to the bottom of the editor and update the file. We have used the Divi theme for this tutorial. So it might look a bit different than your editor depending on the theme that you use.
2. Add the Code Snippets
There are a number of code snippets that you can add to your website to reorder the WooCommerce checkout fields. But first, you need to understand that the fields are divided into 4 groups:
- Billing address – billing
- Shipping address – shipping
- Account login – account
- Additional information – order
Furthermore, each of the fields in these groups has its specific priority. You also need to know their priority if you wish to reorder the fields.
You can find the fields in the following list below. The number represented after the fields is their priority.
- Billing
billing_first_name– 10billing_last_name– 20billing_company– 30billing_address_1– 40billing_address_2– 50billing_city– 60billing_postcode– 70billing_country– 80billing_state– 90billing_email– 100billing_phone– 110
- Shipping
shipping_first_name– 10shipping_last_name– 20shipping_company– 30shipping_address_1– 40shipping_address_2– 50shipping_city– 60shipping_postcode– 70shipping_country– 80shipping_state– 90
- Account
account_password(no priority)
- Order
order_comments(no priority)
Now, let’s look at a couple of examples:
2.1. Move a Field to the Top
If you want to move a checkout field to display it at the top, or the first row, you can use the following code snippet.
add_filter( 'woocommerce_checkout_fields', 'quadlayers_email_top' );

function quadlayers_email_top( $checkout_fields ) {
$checkout_fields['billing']['billing_email']['priority'] = 5;
return $checkout_fields;
}
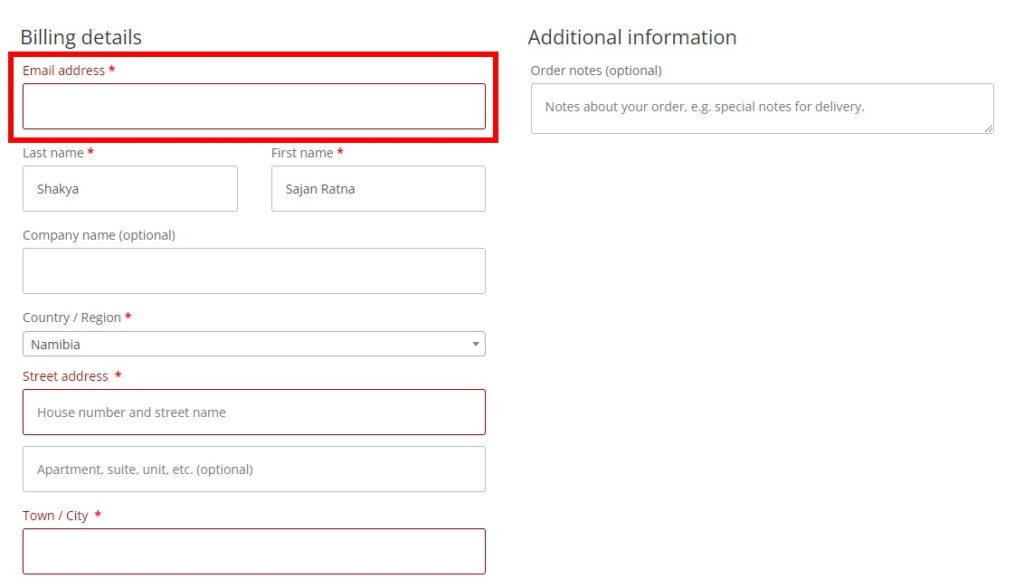
By default, the first name has the topmost priority with 10. So, if you want to reorder a field to the top, just make sure that the priority of the field is less than 10.
In our case, the priority of the email field is 5. This is why it is placed at the top in the checkout field.
2.2. Move a Field to Another Group
Using the code snippet to reorder the WooCommerce checkout field is not limited just to moving a field to the top. You can modify or create more code snippets to move a field to another group as well.
For example, let’s consider the following snippet:
add_filter( 'woocommerce_checkout_fields', 'quadlayers_billing_email_another_group' );
function quadlayers_billing_email_another_group( $checkout_fields ){
// 1. We assign a field array to another group here
$checkout_fields['order']['billing_email'] = $checkout_fields['billing']['billing_email'];
// 2. Remove a field from a previous location
unset( $checkout_fields['billing']['billing_email'] );
return $checkout_fields;
}
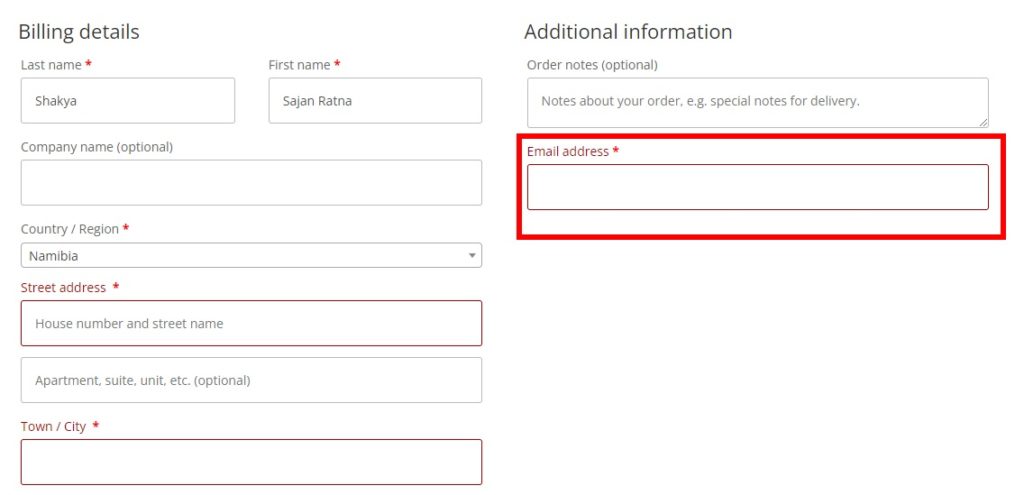
As you can see, the billing email has been moved to the additional information group. Similarly, you can change the code according to the needs of your website and use it to move fields in different groups too.
If you need some more help on it, even WooCommerce has provided a detailed guide to edit the checkout fields using codes. Just click here to view it.
Bonus: Enable Direct Checkout in WooCommerce
Since you are now familiar with the process to reorder WooCommerce checkout fields, it might be better to shorten the checkout process for your website too. And if you want to simplify the process, skipping the cart page is one of the best practices. In this way, the customers can be redirected to the checkout page directly if they want to purchase just a few products.
To enable direct checkout, we will use the Direct Checkout for WooCommerce plugin. It is a simple plugin that lets your customers skip the cart page and redirect them to the checkout page. But to start using the plugin, you have to install and activate it first.
So, go to Plugins > Add New from your WordPress dashboard once again and search for the plugin. Then, click on Install Now and activate the plugin as soon as the installation is complete.
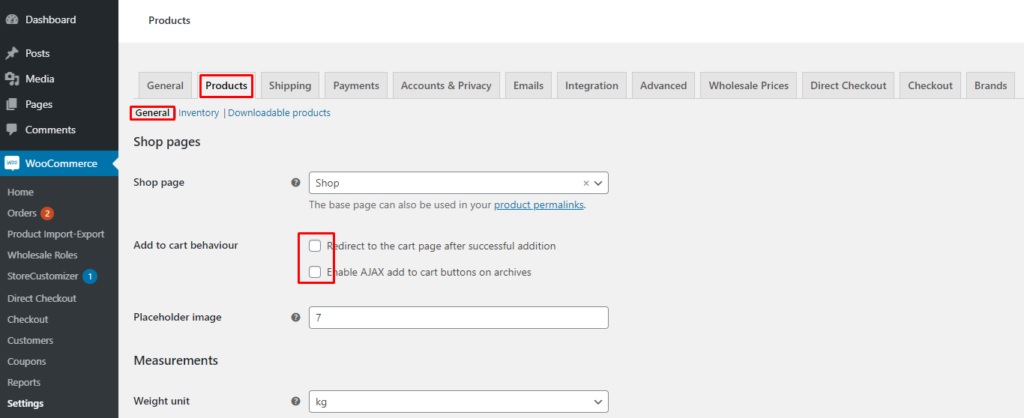
Now, you have to adjust some default WooCommerce settings. They can be found in WooCommerce > Settings under the Products tab from your WordPress dashboard. Here, select the General option and you will be able to see the general options for WooCommerce products.
Then, navigate to the add to cart behavior and check both the options so that they don’t interfere with the plugin settings.
After that, open the Direct Checkout tab and select the General option here as well. Now, set the Added to cart redirect to as Checkout from the dropdown menu. Finally, save the changes.

That’s it, the customers will be redirected to the checkout page instead of the cart page on your website. We also have a detailed guide to skip the cart page if you need any more information.
Conclusion
These are the various ways through which you can reorder WooCommerce checkout fields on your website. It is a very good customization that you can apply to your checkout page for the satisfaction of your customers. And depending on your website, it may be easier for you too.
To summarize, we have reviewed the two best ways to reorder the checkout fields. They are:
- Using a plugin
- Programmatically
Using a plugin is one of the quickest ways to reorder the fields. You just need to adjust some options from your WooCommerce dashboard and reorder the fields. However, if you want a more advanced approach and have technical knowledge, you can also reorder them using code snippets.
Additionally, we have also included a short tutorial to simplify the checkout process by skipping the cart page. If you want to improve your checkout page more, we also have detailed guides to optimize WooCommerce checkout, create one-page checkout, change proceed to checkout text, and so on.
We hope that this tutorial was useful for you. Here are some more articles that might be interesting for you:
- How to Change WooCommerce Checkout Error Messages
- Best WooCommerce One Page Checkout Plugins (Free and Paid)
- How to add conditional fields to WooCommerce checkout
So, can you reorder the checkout fields now? Did you have any issues? Please let us know in the comments!
