
How to Add WooCommerce Related Products: 3 Methods
Are you looking for ways to improve your product conversions? Adding a custom related products section for your online store can be a great way to lead your customers into buying more of your items. To help you do this, we’ve brought you our guide on how to add WooCommerce related products.
Showing similar products can be a great way to improve your conversions. If you present your customers with the correct range of products, it will surely improve your sales. But before we go to the process of doing so, let’s look at why do you need the related products section in brief.
Why Use Related Products Sections in WooCommerce?
Cross-selling is an important part of improving your conversion rates. By providing options for customers to buy similar products, you can encourage them to consider buying more products for the added value. Similarly, you can also use cross-sells to promote products that you see being purchased together. If you can track your purchases well, you can always choose to add specific products to your cross-sells list for more profits.
This method itself is very prominent in large-scale online businesses. For example on Amazon, you can see them providing cross-sells using sections labeled “Frequently bought together”, “customers also bought”, or “similar brand products”.
So, if you want to boost your sales, we recommend you add and customize your WooCommerce related Products section. Now that you have an idea about its importance, let’s see how we can add them to your eCommerce website.
How to Add WooCommerce Related Products
By default, WooCommerce lets you customize three different types of related products. These options are:
- Up-Sells: Products that are shown when viewing the product page.
- Cross-Sells: Products that are shown when viewing the cart page.
- Related products: Products that are shown automatically on the product page based on product tags and categories.
While you can manually add which products to show in the up-sells and cross-sells for each WooCommerce, you can only configure related products sections by setting your tags and categories correctly.
Altogether, there are 3 major ways to add the related products in WooCommerce. They are:
- From WooCommerce dashboard
- Using a plugin
- Programmatically
Note: Make sure that you have installed one of the compatible WooCommerce themes and set up WooCommerce properly on your website to avoid any unnecessary issues in the process.
Configure WooCommerece Related Products in WooCommerce Dashboard
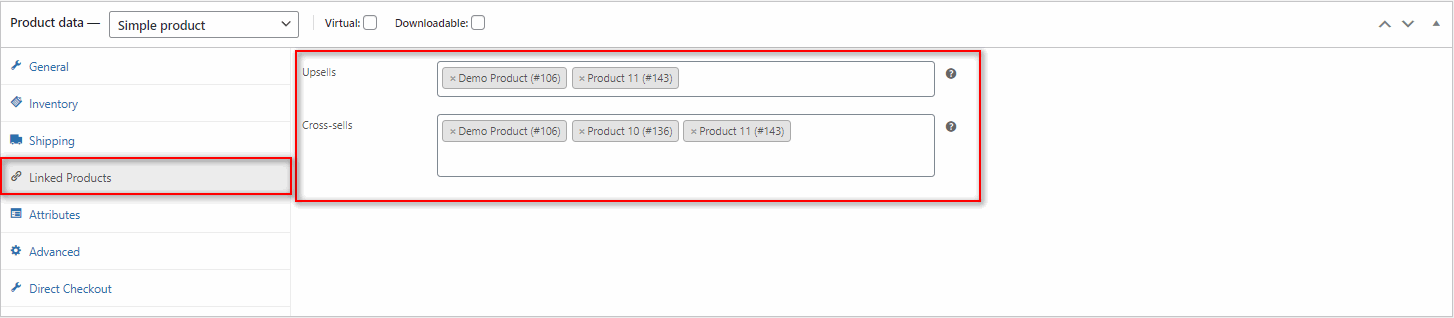
To set up your up-sells and cross-sells for a specific product, go to Products > All products from your WordPress admin dashboard. Then, click on the Edit button of any specific products that you’d like to add up-sells and cross-sells for.

Next, scroll down and under Product Data, click on Linked Products. Now, go ahead and list all the products you’d like to be shown as related products for the particular product. They can include both the up-sells and the cross-sells.
Finally, update the product.
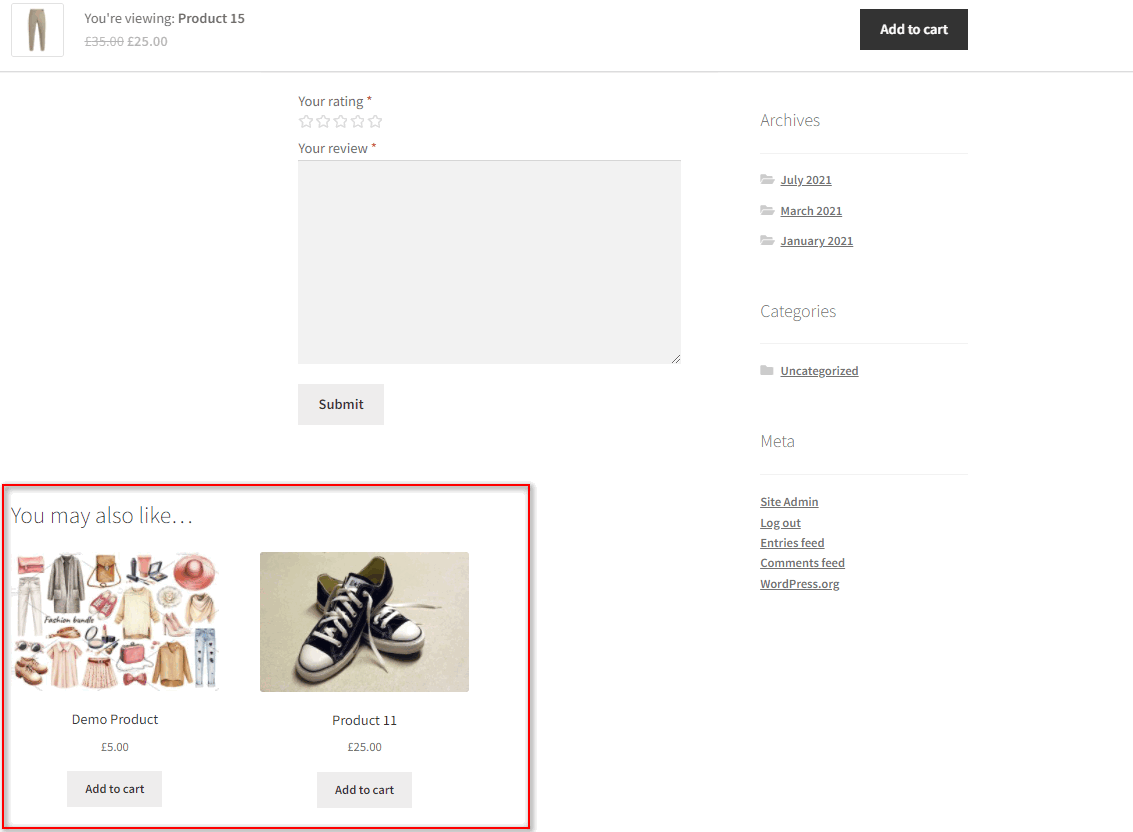
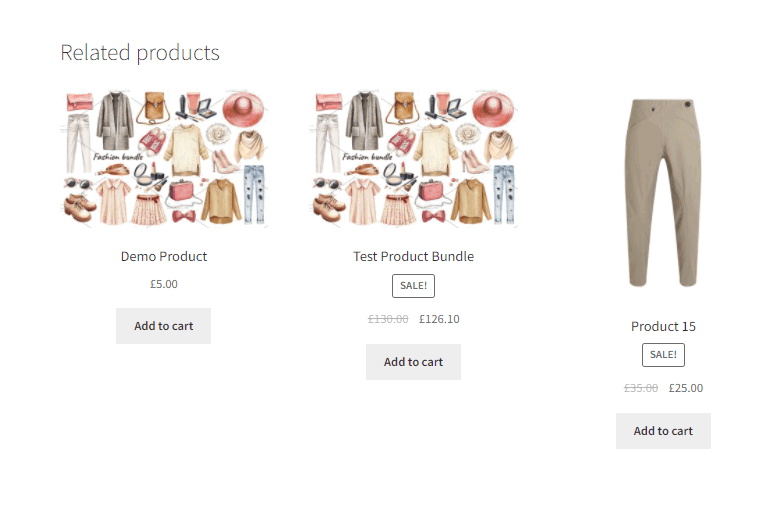
When you preview the particular product on your website, you will be able to see the linked products on the front end of your website.
Similarly, you will also be able to see the cross-sell related products when you preview the cart page.
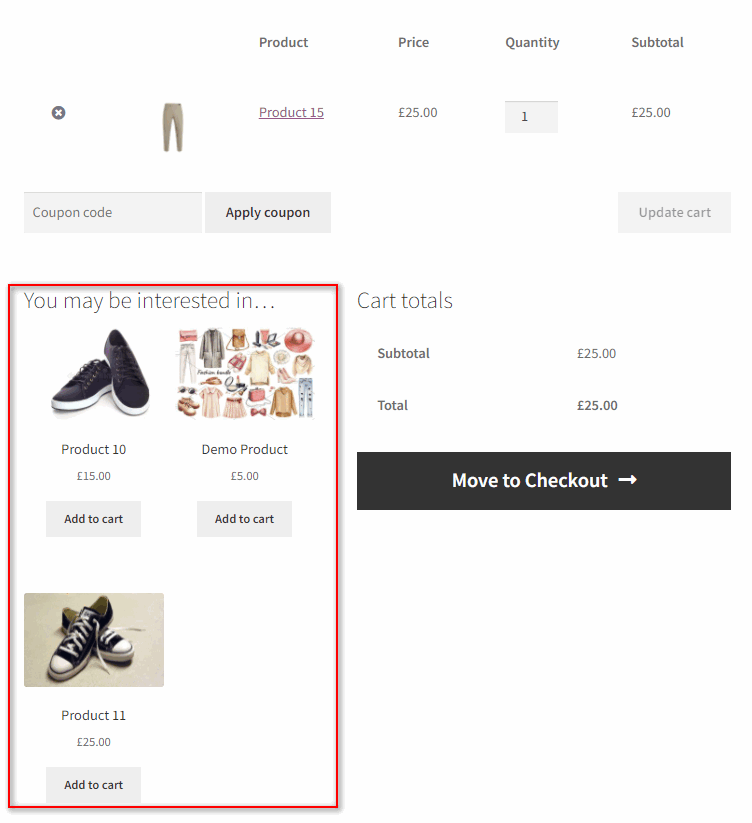
However, the WooCommerce related products are quite different from the “You may like” section that the cross-sells and upsells provide you with. By default, WooCommerce randomly selects products to be shown in the “You may like” sections using the tags and categories. This option is not configurable using WooCommerce’s default options.
You can only customize these related products by either using WooCommerce related products plugins or programmatically using WooCommerce Hooks.
We will further discuss how to do both of them in this guide. So, if you’d like to learn how to customize your WooCommerce related products more, we recommend you keep reading. Let’s start with the plugin method as it is more beginner-friendly.
How to Add WooCommerce Related Products using a Plugin
Using a plugin is one of the easiest ways to add and customize the related products. These plugins are specifically designed to help you manually choose which products to add to your WooCommerce related products sections.
There are a number of plugins available in WordPress with various features. Some of them let you add customizable related sections that you can add to any part of your website. While other work by providing you fully customizable featured sliders and banners.
Of course, the option to choose your plugin relies on you. But for today’s demo, we’ll be using the Custom Related Products for WooCommerce plugin by Scott Nelle. This plugin works by the simple method of letting you specify products to add for the related products of any products that you’d like.

But to start using the plugin, you need to install and activate it first.
1. Install and Activate the Plugin
Open your WP admin dashboard and click on Plugins > Add New to start. Then, use the search bar on the top right to search for Custom Related Products for WooCommerce. Next, click on Install Now on the plugin’s tab and then Activate it after the installation is complete. Now, you should be done activating and installing the plugin.
If you wish to use a plugin that is not included in the WordPress repository, you will have to install them manually. We have a detailed guide to install a WordPress manually if you need more information on it.
2. Add Related Products through Product Page
The plugin itself works by letting you add a related products section to each specific product. You can do so by opening any of your WooCommerce products and specifying it under Product Data. If you don’t add products to the related products section, the plugin falls back to the default WooCommerce behavior of randomly choosing WooCommerce related products using tags.
So, open Products > All Products from your WP Admin Dashboard once again and click on Edit for the product you wish to add the related products. This is the same as the previous approach from the WooCommerce dashboard.
Again, scroll down under Product data and click on Linked Products. Now, you should see a new field labeled Related Products. Now all you have to do is manually type the names of the product that you wish to add as the related product for the specific product.

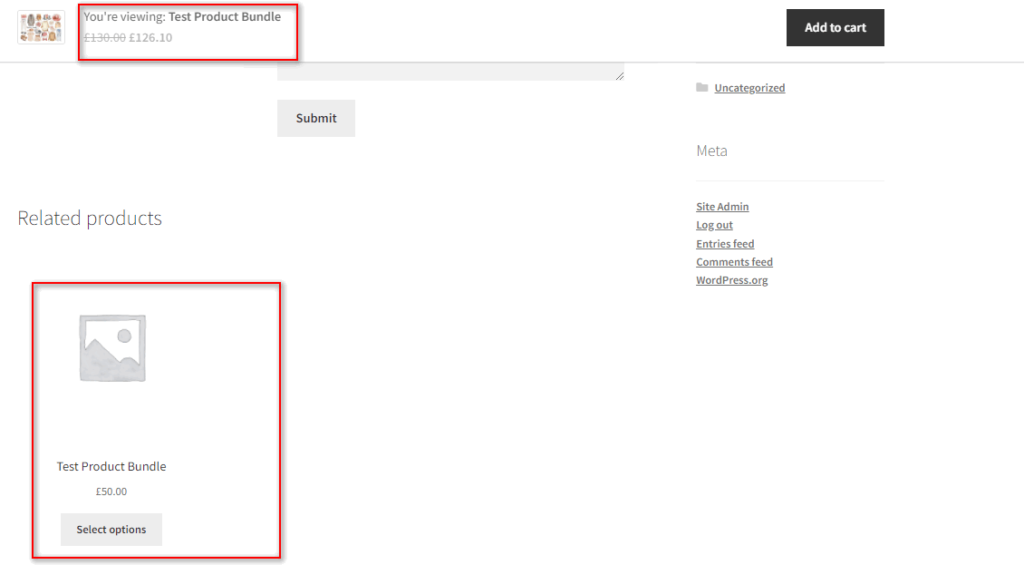
Update the product and you will be able to see the changes on your product page:
Add WooCommerce Related Products Programmatically
Alternatively, if you don’t want to use a WooCommerce plugin to manage and customize WooCommerce related products, you can also choose to add them using a code snippet. For this, you need to add a few lines of codes to your theme’s functions.php file. However, this method can be applicable for you only if you have a basic understanding of programming.
We recommend you create a child theme and back up your WordPress website to do so. This ensures that your changes are saved even if you update your WordPress theme. If you need help, you can even use one of the best child theme plugins for WordPress to create one.
Once you’ve switched to your child theme, you can access your functions.php file by clicking on Appearance > Theme Editor. Then, click on Theme Functions or functions.php file. This will open the file in the theme editor.
Then, you can then use the following code snippet and paste it into the editor.
add_filter( 'woocommerce_related_products', 'QuadLayers_related_products_by_same_title', 9999, 3 );

function QuadLayers_related_products_by_same_title( $related_posts, $product_id, $args ) {
$product = wc_get_product( $product_id );
$title = $product->get_name();
$related_posts = get_posts( array(
'post_type' => 'product',
'post_status' => 'publish',
'title' => $title,
'fields' => 'ids',
'posts_per_page' => -1,
'exclude' => array( $product_id ),
));
return $related_posts;
}
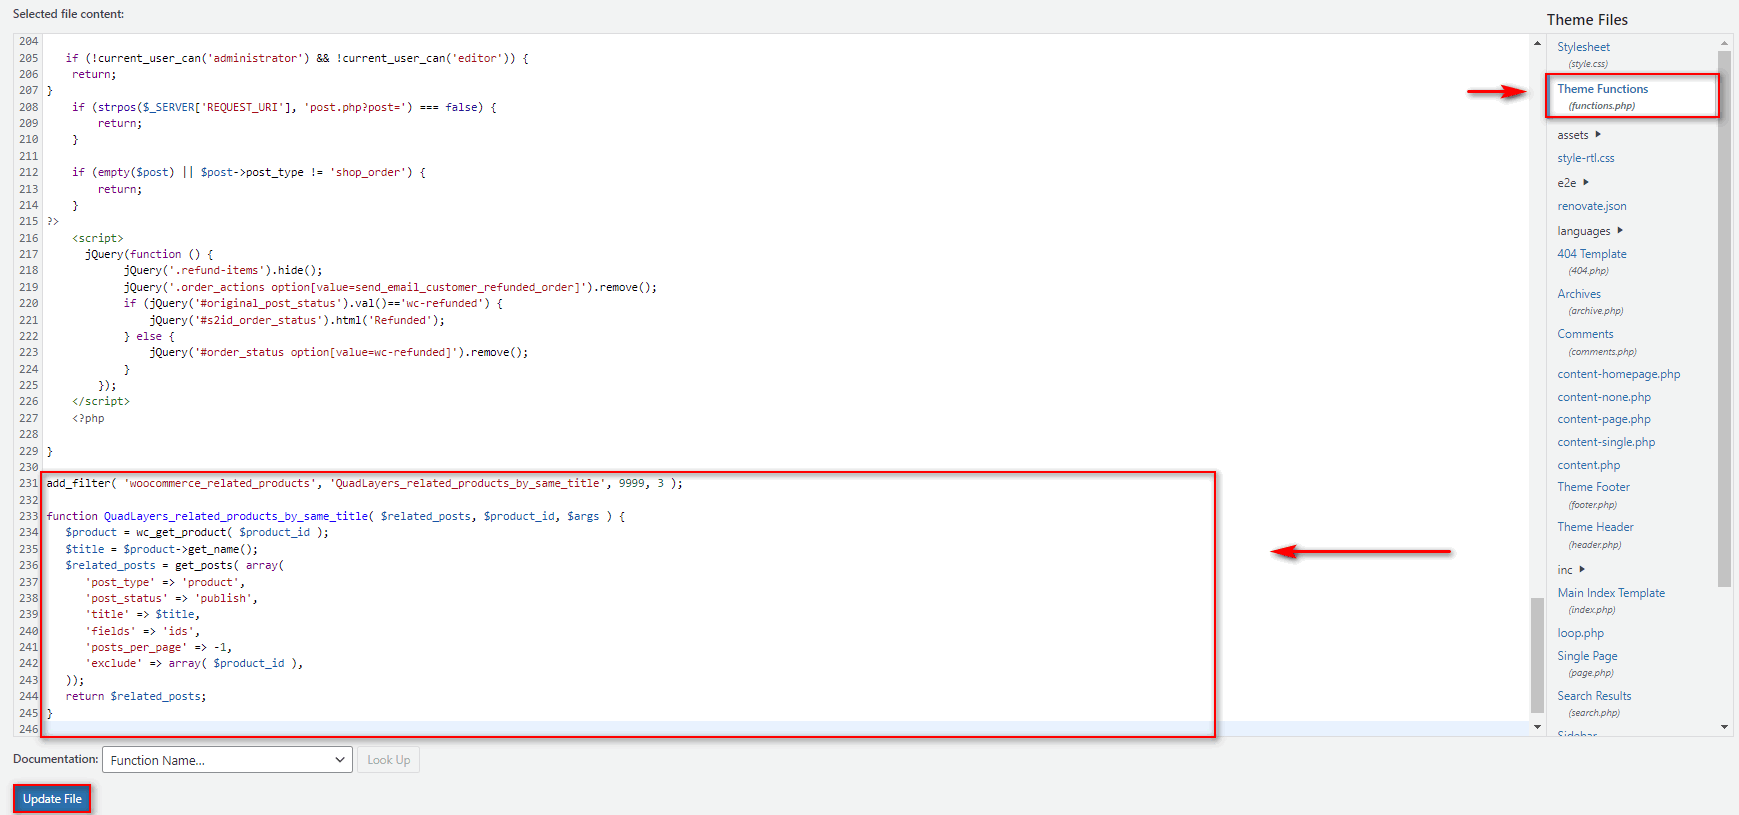
The code snippet works by simply giving you related products with the same title. This way, if you have identical products with the same names, they will be added to your WooCommerce related products section. Update your functions.php file by clicking on Update File and you should be done.
Credits to the original author of the code here.
How to Remove WooCommerce Related Products
Additionally, you can also choose to remove the WooCommerce related products section from your website using the same method as above. You can either choose to remove all the related products entirely, or just for specific products.
1. Remove all Related Products
To remove all the related products section from every product page, simply open your child theme’s functions.php file and paste the following code snippet.
remove_action( 'woocommerce_after_single_product_summary', 'woocommerce_output_related_products', 20 );
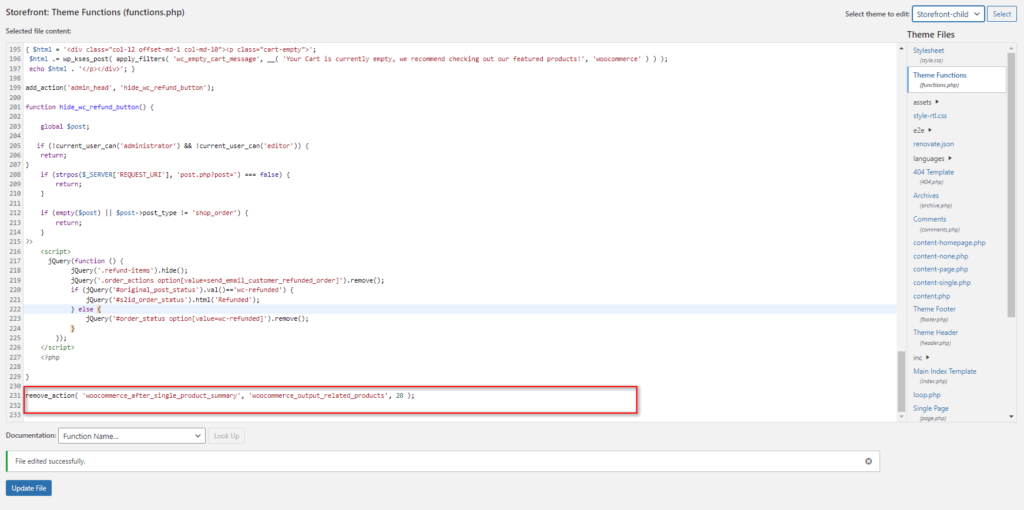
Finally. update the file. This should remove the related products section entirely from all of your WooCommerce products.
Credits to the Author of the Code here.
2. Remove Related Products just for Specific Products
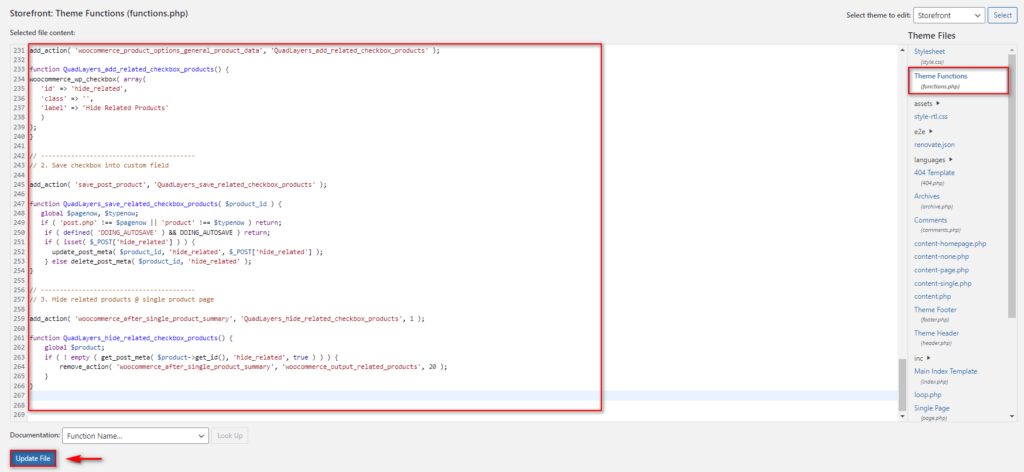
You can also use code snippets to remove the related products section just for specific products on your website if needed. The following code will simply add an option to hide it on all your products.
First, let’s go ahead and paste this on the functions.php file of your theme in the same manner as before.
add_action( 'woocommerce_product_options_general_product_data', 'QuadLayers_add_related_checkbox_products' );

function QuadLayers_add_related_checkbox_products() {
woocommerce_wp_checkbox( array(
'id' => 'hide_related',
'class' => '',
'label' => 'Hide Related Products'
)
);
}

// -----------------------------------------
// 2. Save checkbox into custom field

add_action( 'save_post_product', 'QuadLayers_save_related_checkbox_products' );

function QuadLayers_save_related_checkbox_products( $product_id ) {
global $pagenow, $typenow;
if ( 'post.php' !== $pagenow || 'product' !== $typenow ) return;
if ( defined( 'DOING_AUTOSAVE' ) && DOING_AUTOSAVE ) return;
if ( isset( $_POST['hide_related'] ) ) {
update_post_meta( $product_id, 'hide_related', $_POST['hide_related'] );
} else delete_post_meta( $product_id, 'hide_related' );
}

// -----------------------------------------
// 3. Hide related products @ single product page

add_action( 'woocommerce_after_single_product_summary', 'QuadLayers_hide_related_checkbox_products', 1 );

function QuadLayers_hide_related_checkbox_products() {
global $product;
if ( ! empty ( get_post_meta( $product->get_id(), 'hide_related', true ) ) ) {
remove_action( 'woocommerce_after_single_product_summary', 'woocommerce_output_related_products', 20 );
}
}
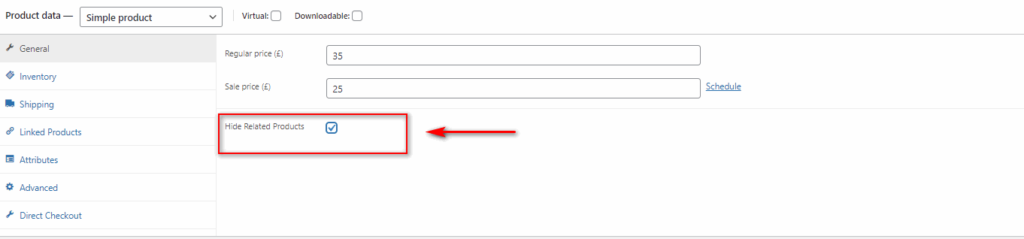
Then, go to Products > All Products from your WordPress dashboard once again and click on Edit for the product in which you want to hide the related products. When you scroll under Product data like in the previous approaches, click on the General tab.
You should see a new Hide Related Products option. Enable this option to hide the related products from the particular product page.
Credits to the author of the code here.
How to Customize Related Products Number and Columns
Moreover, you can also customize your related products section by configuring the number of products shown as well as the rows and columns on your website.
For this, we’ll also be using WooCommerce hooks and custom functions on our functions.php file. Go ahead and open the file using your Theme editor once again and paste in this code snippet:
add_filter( 'woocommerce_output_related_products_args', 'QuadLayers_change_number_related_products', 9999 );

function QuadLayers_change_number_related_products( $args ) {
$args['posts_per_page'] = 4; // # of related products
$args['columns'] = 4; // # of columns per row
return $args;
}

This code simply works by configuring your WooCommerce related products section in 4 columns and 4 rows. You can always change this value by using $args['posts_per_page'] = 4 and $args['columns'] = 4.
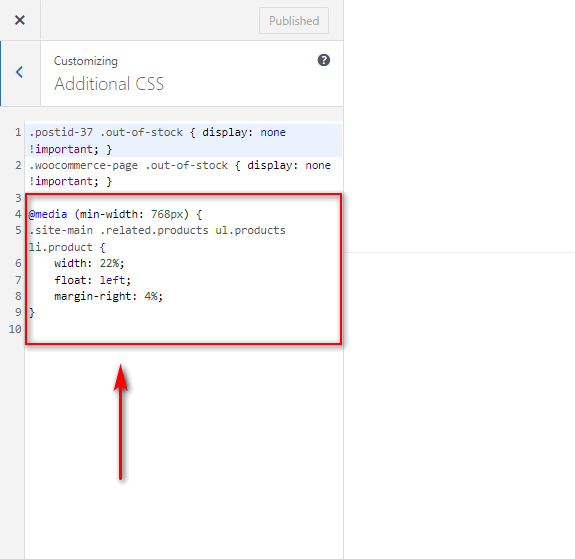
Moreover, you can configure this section using additional CSS codes as well. They can be used to change the layout and the alignment of the columns and rows so that the section fits better for your website. You can use the following CSS snippet for it.
@media (min-width: 768px) {
.site-main .related.products ul.products li.product {
width: 22%;
float: left;
margin-right: 4%;
}
Simply paste it under your Additional CSS in your theme customizer. You can access it by clicking on Appearance > Customize from your WordPress dashboard. This will open the theme customizer.
Then, click on the Additional CSS tab and paste the CSS script here. You can adjust the alignment of the related products according to the needs of your website. Finally, click on Publish when you’re done.
Credits to the author of the code here.
Conclusion
And that ends our guide to Add WooCommerce related products. It is one of the best ways to improve the sales of your eCommerce website. But with this guide, you should be able to add, customize, or even remove them if you want.
To summarize, you can add the related products in WooCommerce using 3 ways:
- From WooCommerce dashboard
- Using a plugin
- Programmatically
Furthermore, we have even included some more helpful steps for you to customize these related products. They include removing them from product pages and modifying the number of related products and their columns. We hope that they also come in handy for you when you add the related products. You can find even more information on our detailed tutorial to customize WooCommerce related products.
If you want to learn more about customizing various other WooCommerce sections and pages, please consider checking out some of our other articles like:
- How to add image to product in WooCommerce
- Customize WooCommerce Checkout Error Messages
- How to Customize WooCommerce Templates
Let us know if you were able to customize and manage your WooCommerce related products sections using our article. If there were any issues, please let us know in the comments section. We will do our best to help you as much as we can.
