How to Change Currency in WooCommerce
Are you looking for ways to change the currency in your WooCommerce store? Then you have come to the right place. In the following guide, we will show you everything you need to know about managing and changing the default currency in your online shop.
WooCommerce is one of the best platforms for eCommerce websites where you sell products or services. Its extreme flexibility and customization options provide both shop owners and customers with everything they need to sell/buy online. One of them also includes the option to change the default currency your store uses.
Let’s have a look at why you might want to change the currency of your WooCommerce store and how you can do it.
Why Change Currency in WooCommerce?
One of the main reasons why people buy products online is convenience. For shoppers, purchasing online is a lot easier than visiting a brick-and-mortar store. And shop owners can grow their audience to a much larger scale and even sell internationally.
However, if you want to target customers from all around the world, you should display prices in different currencies. By default, the prices in WooCommerce are shown in American dollars (USD) but not all your users will know how much the price in USD represents in their local currency.
That’s why to make prices easy to understand for every single user, you should display prices in their local currency. This is a lot more convenient for customers as they avoid having to calculate and convert the price themselves. Furthermore, some websites even let shoppers choose the currency they want to use, which is a huge plus to provide them with a better buying experience.
So, if you want to sell to international customers, you should add multiple currency options to your website.
How to Change Currency in WooCommerce
There are different ways to change the currency in your WooCommerce store:
- From WooCommerce Dashboard
- Using Currency Switcher Plugin
Let’s have a closer look at each option, so you can choose the best one for you.
1) Change Currency from the WooCommerce Dashboard
One of the easiest ways to change the currency is from the WooCommerce dashboard. You don’t need to install any plugin or add any code to your website.
First, you need to make sure that you have properly set up WooCommerce on your site. Then, in your WordPress dashboard, go to WooCommerce > Settings and under the General tab, you will find the Currency options.
There you can edit which currency you want to use as the default and how you want to display it. The options you’ll find here include currency, currency position, thousand separators, decimal separators, and the number of decimals you want to use.
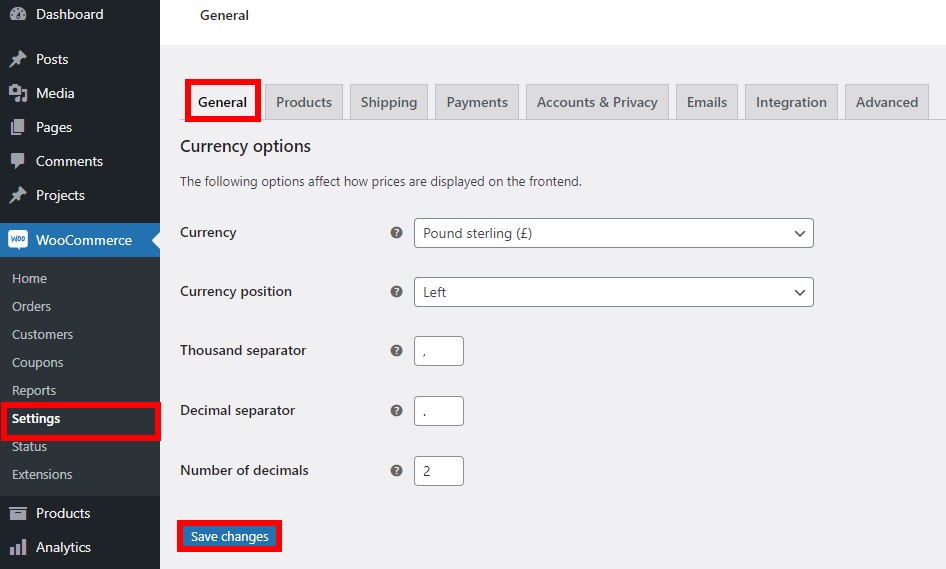
Keep in mind that all the edits you make here will change the default currency of your store. Once you finish, remember to save the changes.
Now go to your site and you will be able to see the new currency applied on your site.
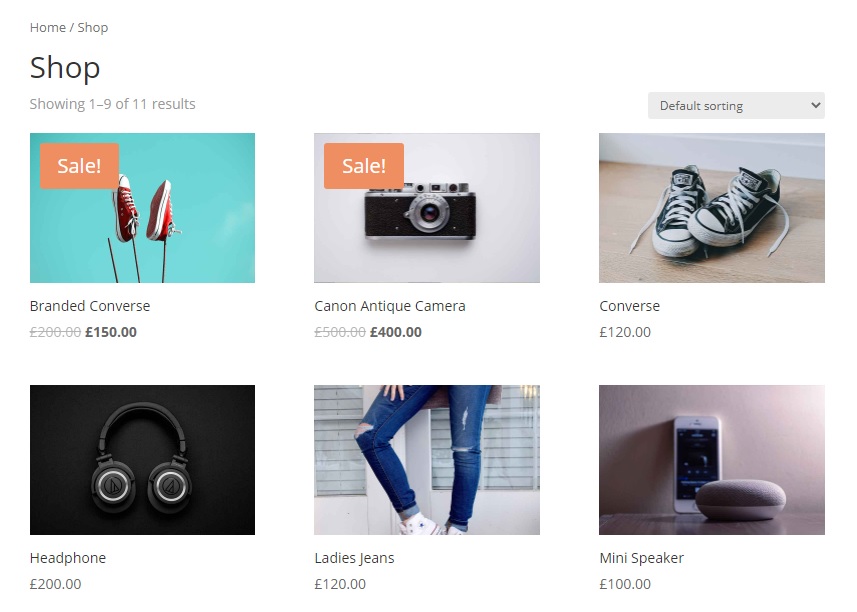
As you can see, this method is very simple and effective. However, it has limited options and it doesn’t let shoppers change the default currency to their local one. To do that, you need to use a currency switcher plugin.
2) Change Currency in WooCommerce with a Currency Switcher Plugin
To have more customization options when you change the default currency in WooCommerce, you need to use a dedicated tool.
We’ve already seen some of the best currency switcher plugins that you can use. For this tutorial, we will use the WooCommerce currency switcher by PluginUs.Net. it’s a freemium plugin that allows you to change the default currency on your website with a few clicks. Additionally, you can let your customers use their local currency to provide them with a better shopping experience.
First, you need to install the plugin. In your WordPress dashboard, go to Plugins > Add New. Then, enter the keywords for the plugin and click Install Now. After the installation is complete, activate the plugin.

After that, go to WooCommerce > Settings and open the Currency tab to see everything you can change regarding the currency.
In the Currencies section, you can add and customize the currencies that you want to display on your site. You can also edit the symbol, position, decimal, interest and rate, cents, visibility, and description for each of the currencies.
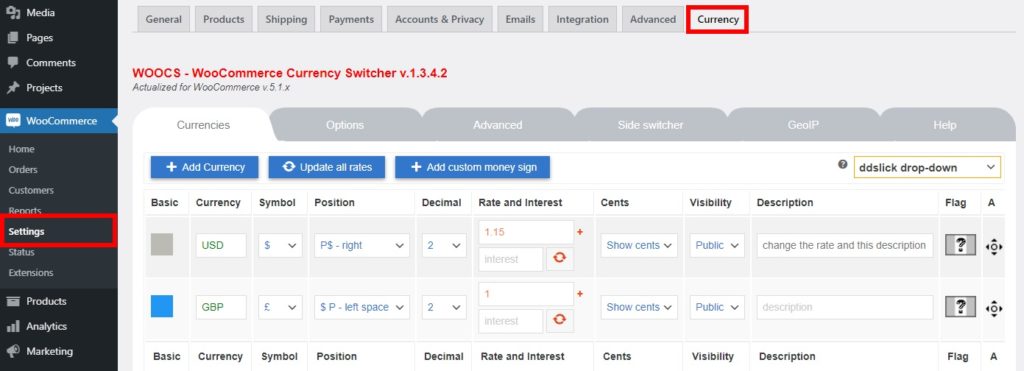
The Options and Advanced sections provide you with some additional and advanced options to display currencies. Some of them include a welcome currency, an individual fixed amount for each coupon or shipping, a currency aggregator, and many more.
Similarly, you can enable and customize the Side Switcher and add GeoIP rules and profiles to automatically display currencies based on the user IP address. Once you are happy with the changes, remember to save the settings.
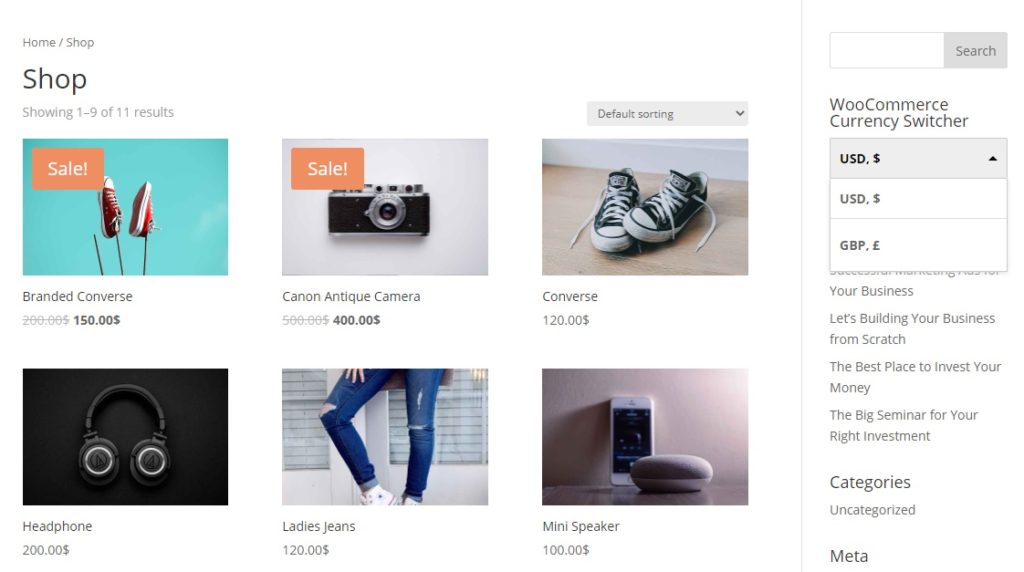
Finally, the plugin also provides you a Help section which includes video tutorials and FAQs to help you use the plugin with ease. After you have made all the changes, you can add the currency switcher as a widget from Appearance > Widget. Just drag the Currency Switcher widget and add it to the desired widget area of your website.
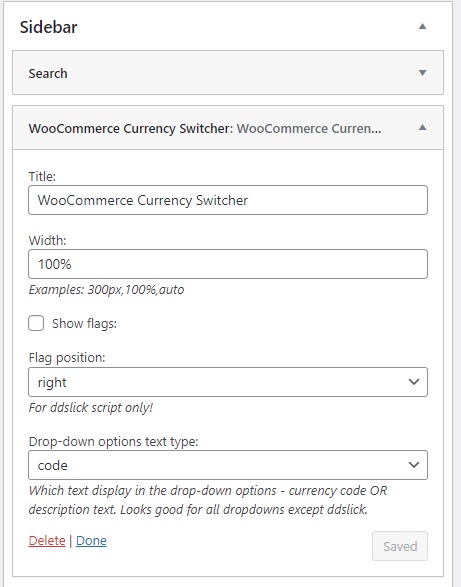
You will be able to see the currency switcher once you preview the website.
How to Add Custom Currencies and Symbols in WooCommerce
As we’ve just seen, the process to change the currency in WooCommerce is quite straightforward. However, if you want to have more customization options but don’t want to install a currency switcher, there’s another solution. If you have coding skills, you can simply create a code snippet and add a custom currency and symbol to your store. This will also help you have a light site with a fast loading speed.
In this section, we’ll show you how to add custom currencies and symbols. As we’ll edit some core files, before you start, make sure that you backup your WordPress website and use a child theme. You can either create one or use any child theme plugins.
Add a Custom Currency in WooCommerce
To add a custom currency in WooCommerce you need to paste the following code in Appearance > Theme Editor under the functions.php tab. Keep in mind that you might need to adjust the code depending on the theme you use.
//To add a custom currency
add_filter( 'woocommerce_currencies', 'add_my_currency' );
function add_my_currency( $currencies ) {
$currencies['ABC'] = __( 'Currency name', 'woocommerce' );
return $currencies;
}

//To add a custom currency symbol
add_filter('woocommerce_currency_symbol', 'add_my_currency_symbol', 10, 2);
function add_my_currency_symbol( $currency_symbol, $currency ) {
switch( $currency ) {
case 'ABC': $currency_symbol = '$'; break;
}
return $currency_symbol;
}
For more information, you can check this documentation page.
Change Currency Symbols
Additionally, you can add custom currency symbols to your website using a code snippet. Once again, in your WordPress dashboard, go to Appearance > Theme Editor and add the following code in the functions.php file.
add_filter('woocommerce_currency_symbol', 'change_existing_currency_symbol', 10, 2);
function change_existing_currency_symbol( $currency_symbol, $currency ) {
switch( $currency ) {
case 'AUD': $currency_symbol = 'AUD$'; break;
}
return $currency_symbol;
For more information, check out this documentation.
Bonus: How to Add Fees to the WooCommerce Checkout
If you’re planning to sell to international clients, apart from changing the currency in your WooCommerce store, you may need to add extra fees as well. This is very useful if you have to deliver your products as you can charge different shipping fees depending on the customer location, size of the product, or speed of the delivery.
We have previously seen how to add fees to the checkout. Even though you can add them from the WooCommerce dashboard, the most efficient method is by using a dedicated plugin because it provides you with more flexibility and customization options.
In this section, we’ll show you how to add fees with Checkout Manager for WooCommerce. It is a freemium plugin that lets you manage and customize every aspect of your checkout. You can easily add and remove fields, include conditional fields, and add fees to the checkout in a few clicks.
There’s a free version with basic features and 3 premium plans that start at just 19 USD (one-time payment).

To use Checkout Manager, you need to install it and activate it first. In your WordPress dashboard, go to Plugins > Add New and enter the keywords for the plugin. Then, click Install Now and activate it after the installation is complete.
After that, go to WooCommerce > Checkout > Billing and click on the Add New Field button.
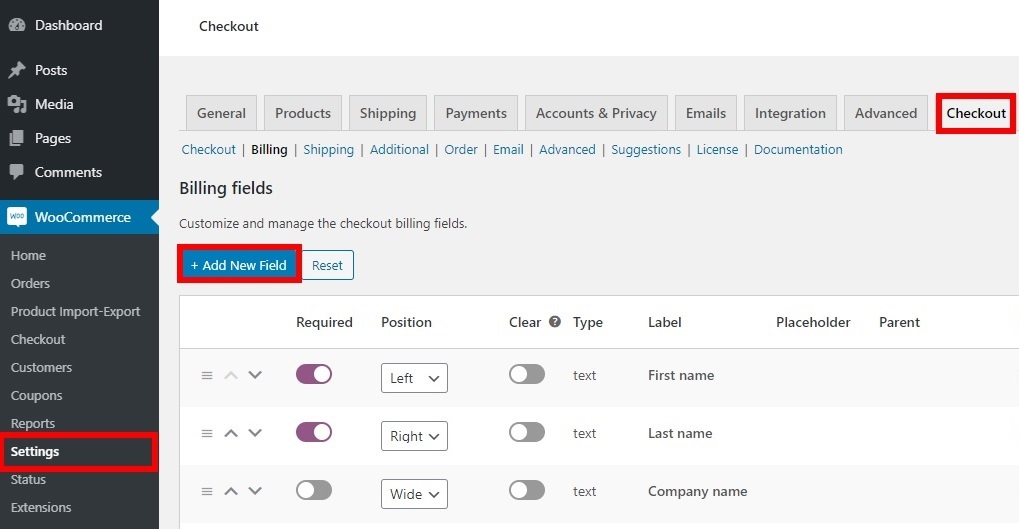
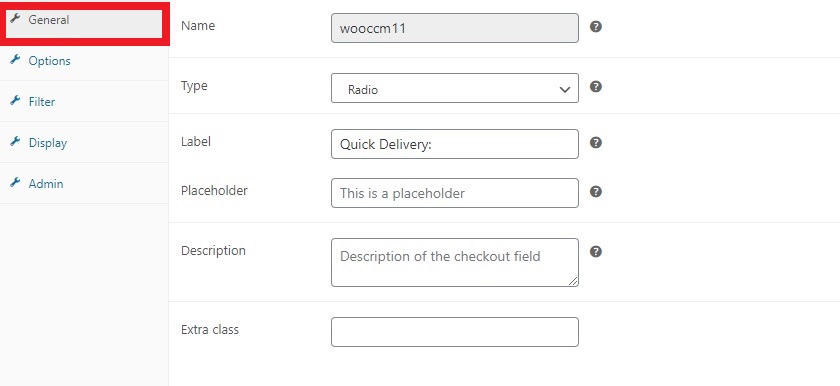
You will be presented with several field options here. Simply fill out the fields under the General tab. For this example, we’ll charge extra for quick delivery.
Now it’s time to add the extra fee, so go to the Options tab and enter the price you want to charge. Don’t forget to save your changes.
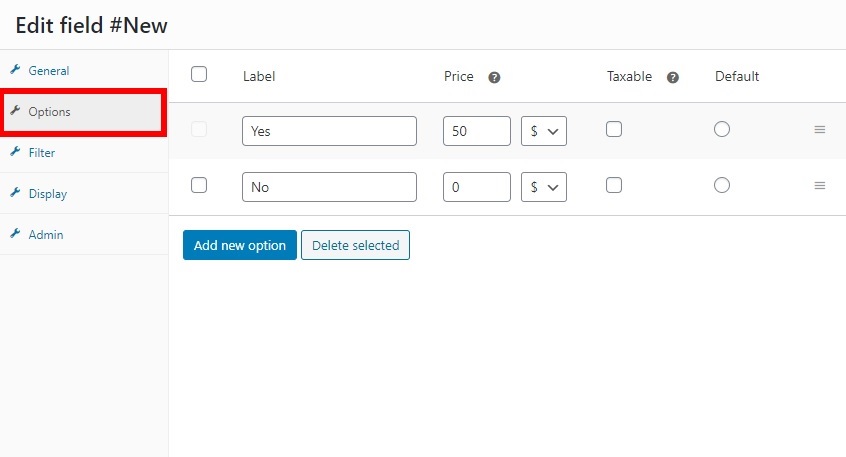
That’s it! From now on, your customers will be charged the extra fee if they select the option for quick delivery.
This example just scratches the surface. There’s a lot more you can do with Checkout Manager such as adding fees using conditional logic. For more information about this, have a look at our step-by-step guide on how to add fees to the WooCommerce checkout.
Conclusion
In summary, if you want to sell to international customers, changing the currency of your store is a great option. Displaying prices in different currencies and allowing shoppers to use their local currency will make the process more convenient and provide customers with a better shopping experience.
In this guide, we’ve seen different methods to easily change the currency on your WooCommerce store:
- From the WooCommerce dashboard
- Using a currency switcher plugin
If you simply want to change the default currency of your site, the options in the WooCommerce dashboard are enough. However, if you want more customization options and to display prices in the customers’ local currencies, using a multi-currency plugin is a better solution for you.
Alternatively, you can use code snippets to add custom currency and symbols to your WooCommerce store without installing any tool. All you need to do is paste the codes into your theme files.
Finally, we have also discussed how to add extra fees in WooCommerce at the checkout. This can come in handy if you want to reach a global audience and charge different shipping and transaction fees depending on the shoppers’ location.
Have you changed the currency in your store? Which method did you use? Let us know in the comments section below!
Here are some other articles that you might find interesting as well:
