Are you looking for the most effective way to accept Bitcoin payments in WordPress? We’ll show you how to do so in this tutorial.
Bitcoin can be a great way to accept payments on your WooCommerce store. So in this guide, we’ll explain how to add Bitcoin as a payment option on your website. But before we go through the actual steps, let’s see what a Bitcoin exactly is.
What is Bitcoin?
Bitcoin is a digital currency, much like the Dollar, Euro, and Pound Sterling. However, these currencies have value only because they are backed by governments or other entities. But Bitcoin has no central authority and relies on cryptography to control its creation and manage transactions.
The main function of Bitcoin involves peer-to-peer payments between individuals without any third-party payment services like PayPal. These transactions are recorded in a public ledger known as the blockchain. Anyone can see all of them at once with their own copy of this ledger, depending on how much of this digital currency they possess.
Bitcoins are “mined” or generated by users around the world running software written specifically for that process. The software is designed to solve mathematical problems and, in doing so, produces new bitcoins.
The miners who generate Bitcoin are rewarded with new bitcoins every time they complete a block of transactions. These generated Bitcoins then get added to the blockchain ledger in a shared database.
Bitcoin has also been referred to as “digital gold“. This is because it offers users anonymity and protection from inflation caused by central banks printing money or even creating their own currency.
There’s no central authority keeping track of what happened before or afterwards in a Bitcoin transaction. So no one can steal someone else’s funds without their consent which allows people not to worry about being cheated out of money when making deals online.
Now that you’ve got some idea about Bitcoin let’s also see why you might want to accept them as payments on your WordPress website.
Why Accept Bitcoin Payments in WordPress
Accepting Bitcoin payments on WordPress websites is a growing trend. Bitcoin is becoming more and more popular, especially in the online world.
With Bitcoin payments, you will be able to reach customers from all over the world with a common interest in digital currencies. It is a faster way to pay than other payment methods, such as credit cards and PayPal.
On the other hand, Bitcoin can also be a great alternative as a payment method on your WordPress website. It can provide lots of benefits to you and your customers compared to the other payment options.
You can start accepting Bitcoin payments immediately. The only thing you need to do is get a merchant account and then add the option to your checkout page.
There are no chargebacks or refunds with Bitcoin transactions too. As a result, it’s cheaper than other forms of payment like credit cards and PayPal. Credit card processing fees can be expensive, and there often may be a fee that goes along with PayPal transactions.
This means you’ll have to pay more money. But by using Bitcoin, you can save money on additional processing fees as they are not required for transactions or any other payments.
But out of all these major reasons, the availability of plugins to integrate your WordPress website with Bitcoin payments is also a great contributor to its popularity. It takes a very short time to start accepting Bitcoin payments using a plugin. Furthermore, this is also one of the easiest methods to start receiving Bitcoin payments on your website.
How to Accept Bitcoin Payments in WordPress
You can start accepting Bitcoin payments in WordPress using two major ways. They are:
- Using a Plugin
- HTML Embed
Both these approaches depend on the Bitcoin wallet that you use. But regardless of the approach you select, you must have a Bitcoin wallet to proceed further. If you haven’t created a Bitcoin wallet yet, here’s what you can do first.
However, if you already have a Bitcoin wallet, you can skip this step.
Create a Bitcoin Wallet
To create a Bitcoin wallet, you need to select a wallet based on your requirements or the plugin you want to use first. If you need any help with it, you have a look at the official Bitcoin wallet page itself.
But as we will be using the plugin BitPay Checkout for WooCommerce in this demonstration, we’ll go ahead and create an account on BitPay. If you are not sure which plugin you may need to use, we have listed a couple of them further down in this article to help you. So you can select the Bitcoin wallet after you go through them.
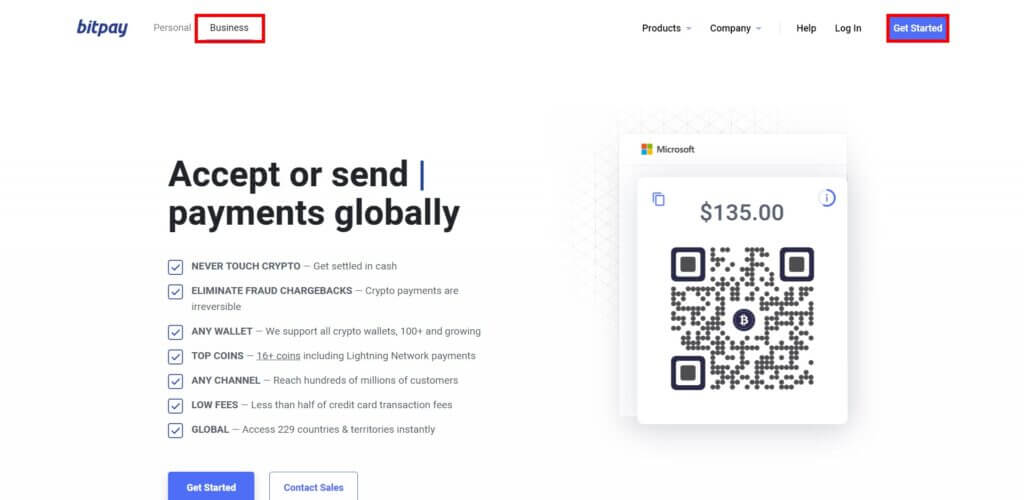
Creating a BitPay account is pretty straightforward. Just select the Business tab on the BitPay website and click on Get Started.
Then, you’ll have to enter the details like your company name, full name, country, annual revenue, employee count, and who your customers are.
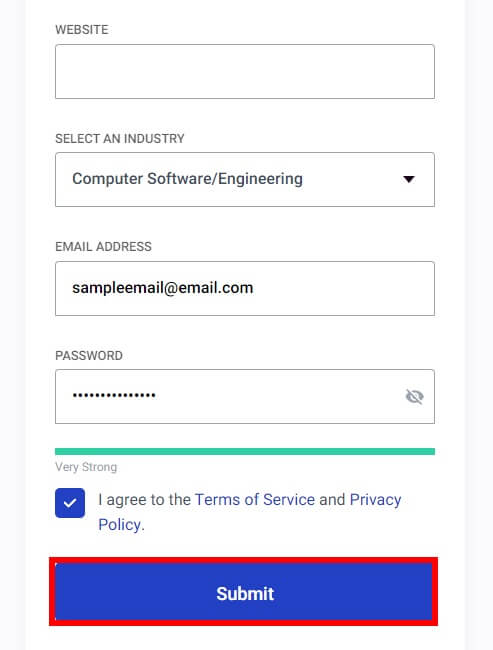
You also need to add your website, industry, email address, and password and accept the terms and conditions. Finally, click on Submit to sign up for the BitPay account.
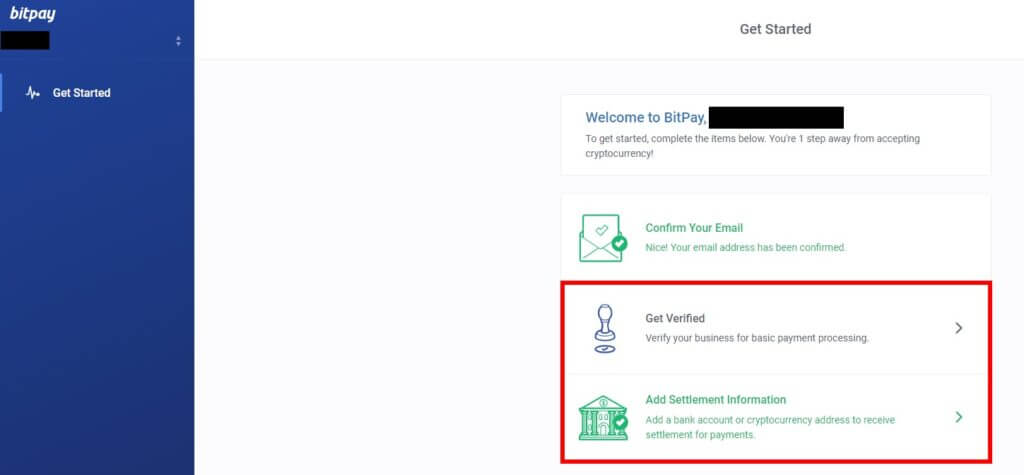
Afterwards, you’ll receive a verification email on the email address that you’ve entered. So go to your email inbox and click the verification link to verify your account. After that, you’ll be redirected to your BitPay dashboard.
But you will need to verify your business for the payment options and add settlement information to fully complete the account setup.
Now depending on your wallet, you can either accept Bitcoin payments by using a plugin or HTML embeds. Since BitPay provides you with both options, we will show both approaches.
1. Accept Bitcoin Payments using a Plugin
As mentioned earlier, using a plugin is one of the most effective ways to accept Bitcoin payments in WordPress. Plugins help you to increase the functionality of your website and also provide additional features that are not present in the default theme. So let’s go ahead and look at some of the best WordPress Bitcoin payment plugins.
BitPay Checkout for WooCommerce
BitPay Checkout for WooCommerce is one of the best plugins you can use to accept Bitcoin payments in WooCommerce and WordPress. It is a very fast and secure tool to accept any type of crypto payment like Ether, Ripple, USD stablecoins, and more. You can even price them in your local currencies.
Besides that, you can also view all the incoming payments from your dashboard itself. The refund orders can also be managed from the same dashboard itself if needed. And the best part is that there are no chargebacks for any of these transactions from BitPay.
Key Features
- Accept crypto payments for Bitcoin, Ether, Ripple, and more
- Price the crypto payments in your local currency
- Easy interface to manage transactions and refund orders
- No chargebacks for the crypto payments
Pricing
BitPay Checkout for WooCommerce is a free plugin. It can be downloaded from the official WordPress plugin repository.
GoUrl Bitcoin Payment Gateway
GoUrl Bitcoin Payment Gateway is an open-source plugin that allows you to accept Bitcoin/Altcoin payments in WordPress. It enables you to add a Bitcoin box on your website, even with your own company logo. Apart from Bitcoin, you can also receive payments for BitcoinCash, Litecoin, Dogecoin, and many more cryptocurrencies.
In fact, the plugin even lets you make 4 different types of payments. They include pay per product, pay per download, pay per view/page, and pay per membership. It even supports auto synchronization, where GoUrl can hold a transaction notification on the queue if your website is unavailable at the moment.
Key Features
- Fully open source on GitHub and extremely developer friendly
- Automatic translation of currencies from your Bitcoin wallet
- Supports payments for Litecoin, Dogecoin, BitcoinCash, and more
- Auto synchronization for transaction/payment notifications from GoUrl
Pricing
GoUrl Bitcoin Payment Gateway is a free plugin. It can be downloaded from the official WordPress repository.
These are some of the best plugins you can use to accept Bitcoin in WordPress. But for this tutorial, we will use the plugin BitPay Checkout for WooCommerce.
Now, you can go ahead and install the plugin on your website.
1.1. Install and Activate the Plugin
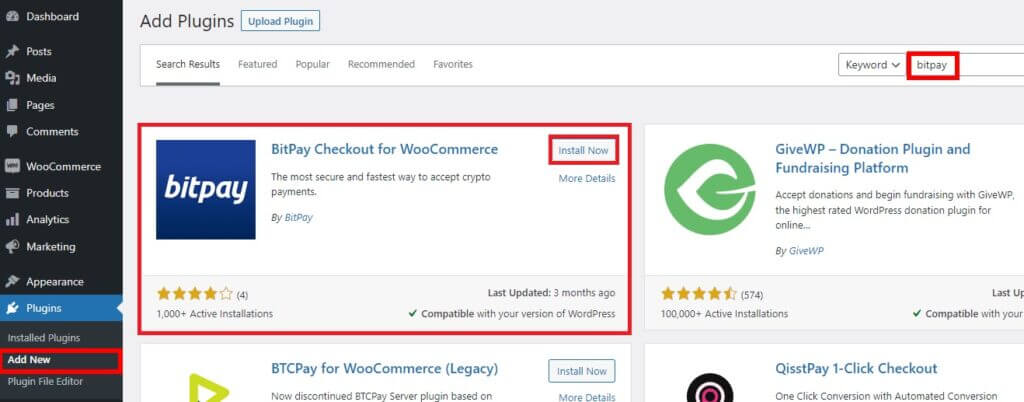
To install the plugin, go to your WordPress dashboard and open Plugins > Add New. Here, enter the keywords for the plugin and search for it on the WordPress plugins repository.
After you see the plugin in the search results, click on Install Now to install the plugin. The installation takes just a few moments.
After the installation is complete, click on Activate to activate the plugin on your website.
If you want to use an alternative wallet and plugin, you may need to install the plugin manually. Kindly have a look at our guide on how to install a WordPress plugin manually for more help on it.
After you activate the plugin, you can now add a merchant token to your website from the BitPay account. For that, you have to go to your BitPay dashboard again.
1.2. Access the Merchant Token From the BitPay Dashboard
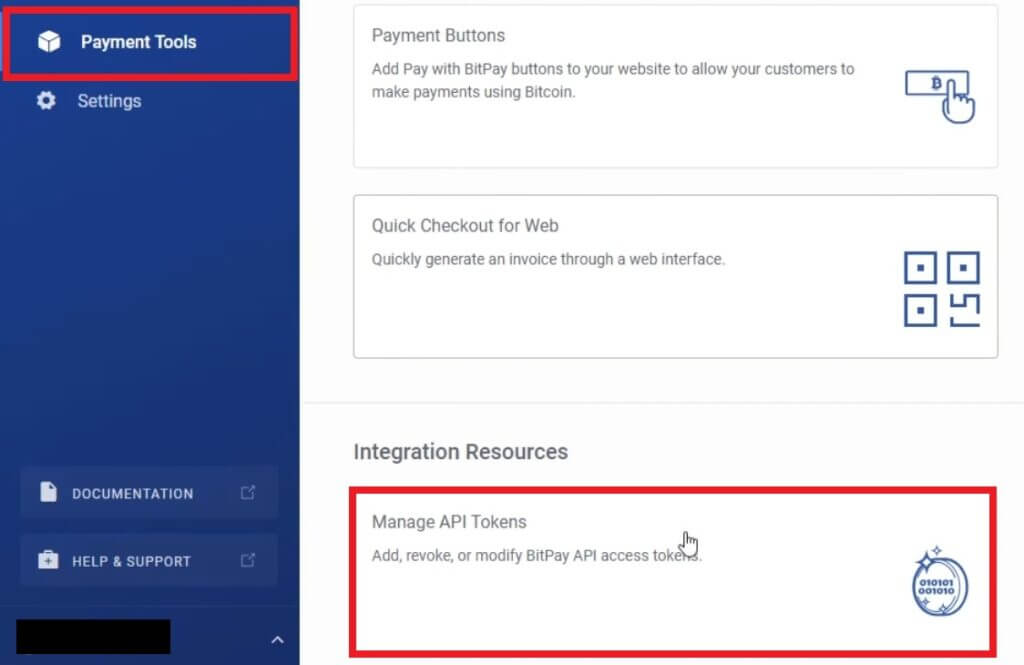
The token can be obtained from your BitPay account itself. Just open the Payment Tools option from your BitPay dashboard and click on Manage API Tokens.
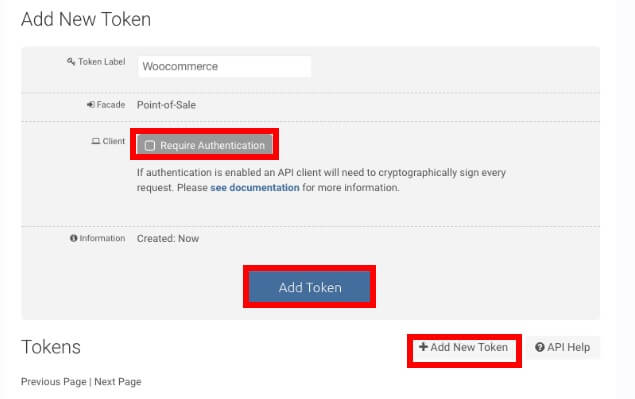
Next, click on Add New Token and enter the token label. We have labelled it as WooCommerce here, but you can change it if you want. Then, uncheck the Require Authentication option and click on Add Token.
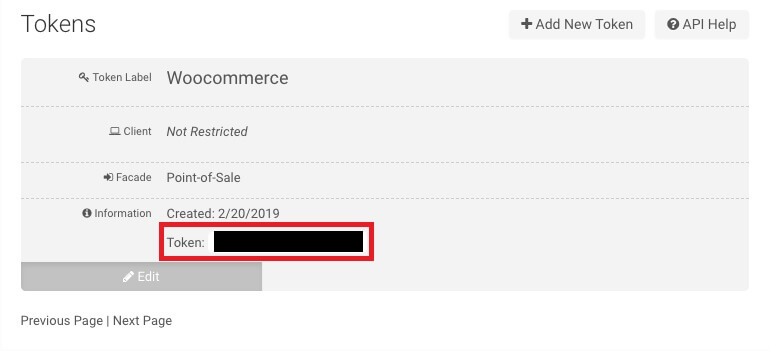
On the next page, a token will be created. Copy the token for your website.
1.3. Add the Token to WooCommerce Store
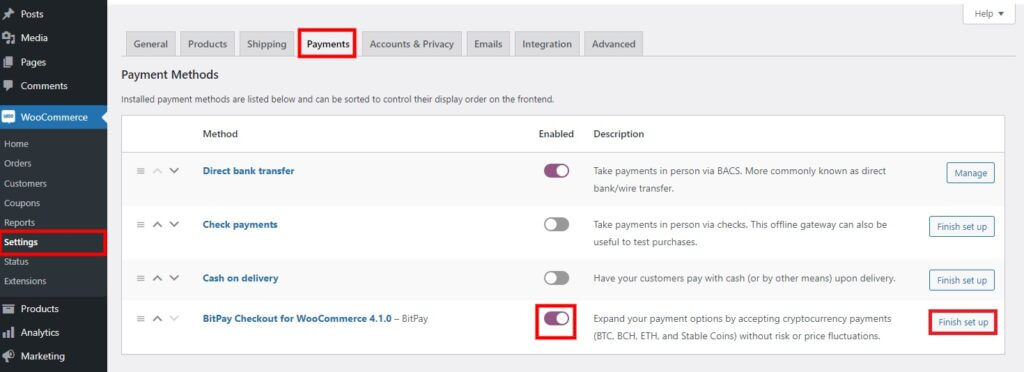
After you copy the newly created token, go to WooCommerce > Settings from your WordPress dashboard and open the Payments tab.
Here, enable the toggle for the BitPay payment option. Then, click on Finish set up to start setting up the Bitcoin payment option.
You will be able to see all the options to set up BitPay on your checkout page here. But first, let’s paste the merchant token that you’ve just created. You can add the new token on the Production Token option. Then, set the Endpoint as Production.
Note: If you want to test your Bitcoin transactions before you go live, you can do so as well. Just create an account on the BitPay test site and create the token with the same steps as mentioned above. But in the WooCommerce payments section for BitPay, you’ll have to add the token on the Development Token option of production. Similarly, select the Endpoint as Test instead of Production too.
After that, you can change the description, checkout flow, checkout page, and checkout message if necessary too. Similarly, you can also enable or disable auto-capture email, developer logging, and mini cart here. There are some more options that you can add to your Bitcoin checkout, like a custom redirect page, a close URL for the redirect, error handling, invoice statuses, and so on.
Once you make all the necessary changes, click on Save changes. Then, if you visit your checkout page, you’ll be able to see the Pay with BitPay button. When your customers click on it, they will be redirected to the BitPay payment system, from where they can complete the Bitcoin transaction.
2. Accept Bitcoin Payments in WordPress using HTML Embeds
If you don’t want to use any plugin for your WordPress, you can still accept Bitcoin payments on your website. But for this approach, you have to make sure that your Bitcoin wallet can generate HTML embeds for your website.
We also recommend that you also have basic programming knowledge before continuing. This is because you will need to copy and paste the codes into the text or code editor of your WordPress website.
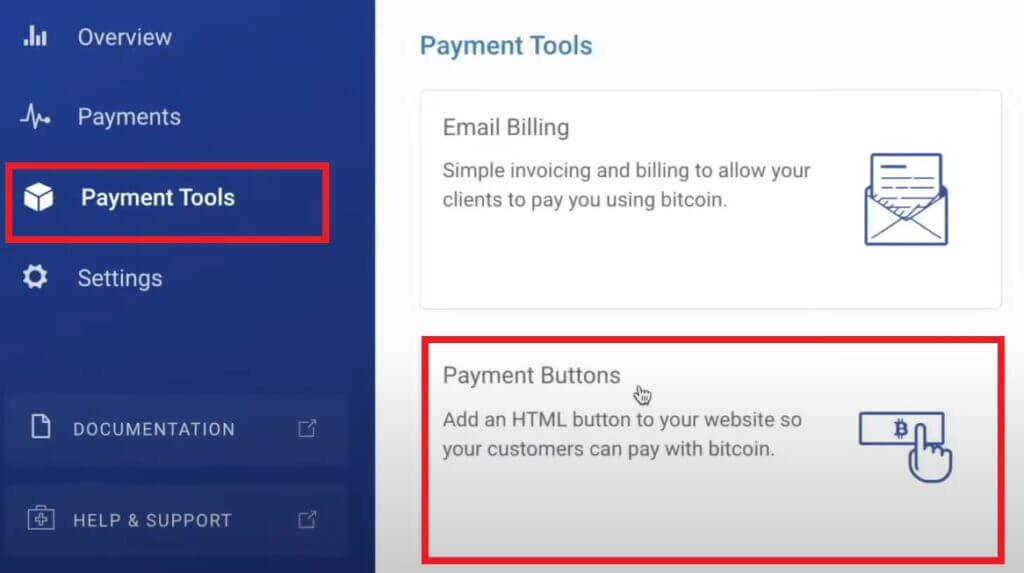
To accept Bitcoin payments on your website using the HTML embeds, you need to go to your BitPay dashboard and click on Payment Tools once again. Here, click on the Payment Buttons option.
Now, you can start customizing your checkout button. Just add the default price and currency for your payments. Then, select the button size. You can also edit the checkout description, but it’s not a mandatory option.
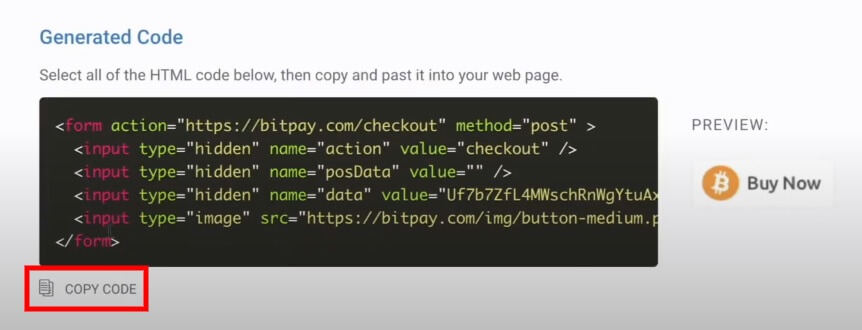
After you make the necessary changes, the codes will be generated when you scroll down under the Generated Codes section. The button preview will be shown beside it. Click on Copy Code to copy the code.
Now, go to the editor of the post or page where you want to add the Bitcoin checkout button. Then, click on the Code editor option and paste the code here. Finally, Update the page.
The Bitcoin button will be shown on the front end of the page when you view it. If you click on it, it will redirect you to complete the Bitcoin transaction with BitPay.
Conclusion
This is how you can accept Bitcoin payments in WordPress. Bitcoin is one of the best alternative payment methods for your website, as it is much faster and easier to get started. It’s always better to have more payment options for your customers to make it more convenient for them during the checkout process.
So to summarize, we’ve shown you the 2 best ways to integrate Bitcoin payments on your website:
- Using a plugin
- HTML embeds
There are a number of plugins that you can use to accept Bitcoin payments. We have listed two of them in this article. You can select any one as the steps to use them on your website is very similar.
Additionally, if HTML embeds are supported by your Bitcoin wallet, you don’t even need any plugin to accept Bitcoin payments. With these steps covered, we hope that you can easily accept Bitcoin payments from your customers. So feel free to share your experience on it in the comments down below.
However, if you want to see more helpful guides on improving your WordPress or WooCommerce website, here are some articles that you may want to go through:


