Do you want to create customized post types on your site? This article is for you. In this tutorial, we will show you the different ways to create a custom post type in WordPress.
You probably know that there are limitless customization options in WordPress. One of the most interesting ones is the possibility to create custom post types on your website so that you can have more variety of content.
Before we look at how to create them, let’s clear out what custom post types are first.
What are Custom Post Types?
A post type can simply refer to any type of content that can be added to a website. By default, WordPress has several post types that include:
- Posts
- Pages
- Attachments
- Navigation Menus
- Revisions
- Customized CSS
- Changesets
Apart from these, all the other post types that you use for your WordPress website are custom post types. Even the WooCommerce products are custom post types since they aren’t exactly included in the default WordPress post types. The post type “product” is registered by the WooCommerce plugin only after it’s installed on your website.
Similarly, you can create another custom post type for your website. The requirement for each custom post type depends on the website itself.
Why Create Custom Post Type in WordPress?
There are many reasons why you might need to create a custom post. For example, you may want to add various types of content to your website other than the default types.
Additionally, you may also need to frequently update or add certain post types. Similarly, there might be a requirement to change the features or behavior of very specific post types on your website. As a result, there may be some cases where you might need to differentiate certain types of posts from the default ones.
In all these scenarios, your best option is to create a custom WordPress post type. This way, you can have different properties for each custom post type that you need. And the best part is that creating a custom post type in WordPress isn’t hard at all.
How to Create WordPress Custom Post Types
There are 2 main ways to create custom post types in WordPress:
- With Plugins
- Using a dedicated plugin
- With WooCommerce
- Programmatically
Let’s go through both the methods in detail with our step-by-step tutorial.
1) Create WordPress Custom Post Types with Plugins
Using a plugin is one of the quickest ways to create a custom post type in WordPress. There are several plugins for this, but for this tutorial, we will use the Custom Post Type UI.
It is a great freemium plugin that allows you to create custom post types without any codes and has an excellent user interface. This tool has an extended version that starts at 29 USD per year. However, for this demonstration, we’ll use the free version.
1. Install and Activate the Plugin
To install Custom Post Type UI, open your WordPress dashboard and go to Plugins > Add New. Then, search for the plugin and click Install Now.
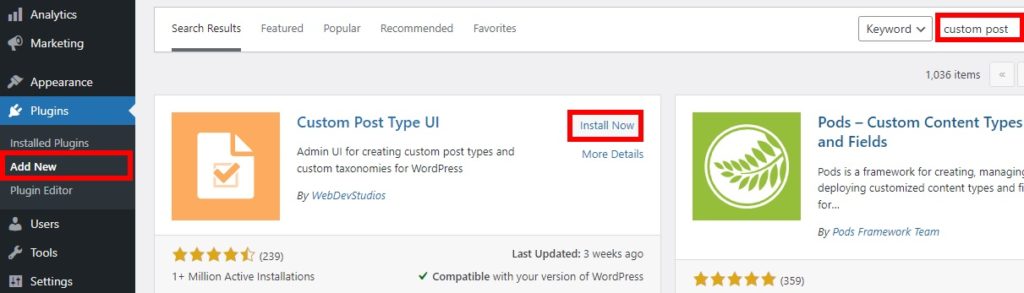
After the installation is complete, activate the plugin.
Alternatively, you can install the plugin manually. If you need more information about it, have a look at our complete guide on how to install a WordPress plugin manually.
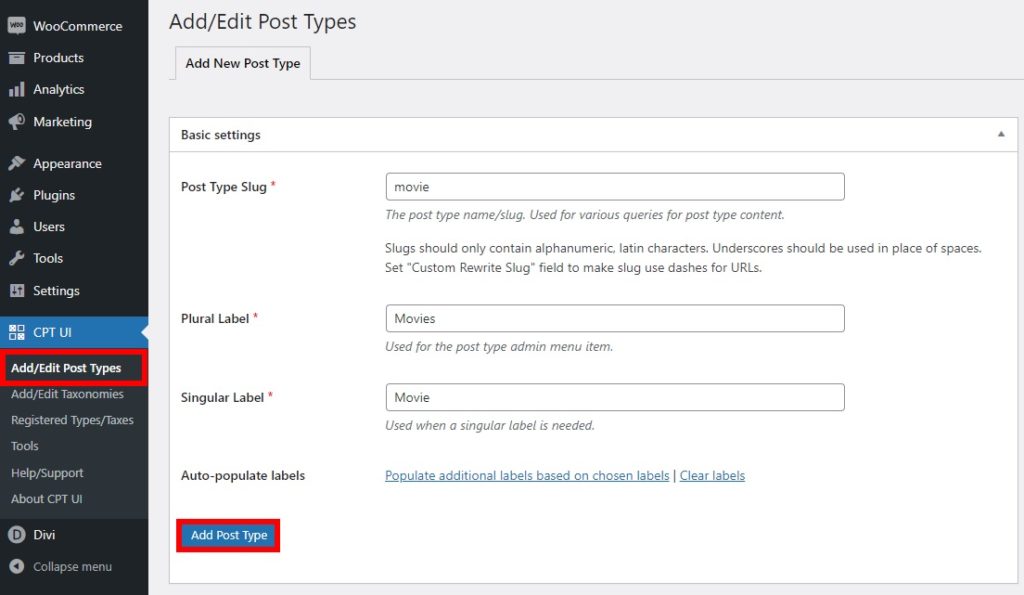
2. Add and Configure the Custom Post Type
After activation, go to CPT UI > Add/Edit Post Types to add and create your custom WordPress post type. All you have to do is enter the name or slug of your custom post type. For example, we’ll add the “movie” post type for this tutorial, but feel free to add any custom post type that makes sense for your website.
Then, you need to add the singular and plural labels according to your custom post type. After you have added all the mandatory details, press Add Post Type.
There are also some additional labels that you can add to your post type. They include details such as post type description, menu name, and so on.
Additionally, you can also change some default settings to suit your needs. You can find them just after the additional labels. Similarly, you can edit the post types after you have created them. The plugin also lets you view all the post types that have been created or even import and export post types for your website.
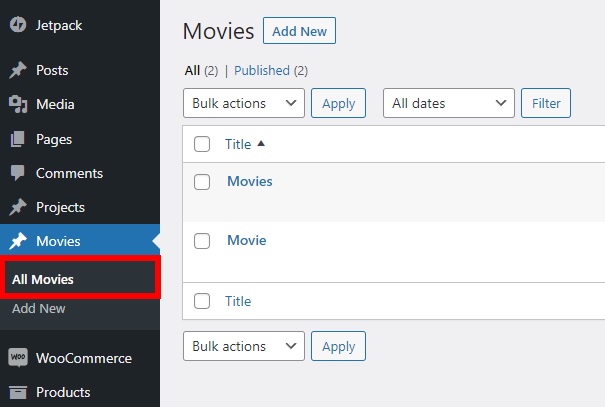
After making all the necessary details, you will be able to see your new post type named Movies from your WordPress dashboard. Just go to Movies > All Movies. Then, you can even add new posts for the post type from the dashboard itself just like pages and posts.
Apart from post types, you can also easily add taxonomies from the dashboard.
That’s it! This is how you can create a custom post type in WordPress using a dedicated plugin.
Add a Custom Post Type using WooCommerce
You can also use WooCommerce to create a custom post type for your eCommerce store. Even though it’s not a plugin specifically designed to create post types, WooCommerce is a good tool to create post types, especially for online stores. One of the best examples of it includes creating a product post type.
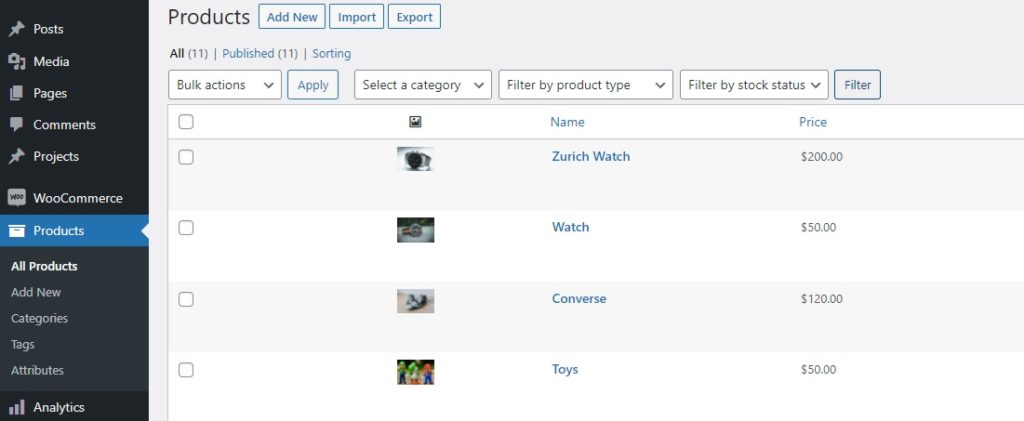
The product post type is one of the most essential types that an eCommerce needs since their main activity is selling products/services. WooCommerce automatically creates this post type when you install it on your website. To avoid any errors, make sure that you have properly set up WooCommerce without missing any major steps.
After you have added all the necessary details for your WooCommerce store, go to the Products tab on your dashboard. You will be able to add, edit, import, or export products for your online store. This is all possible due to the product post type that WooCommerce created.
You can further manage other post types if you want to add custom fields to WooCommerce checkout as well. To help you with it, you can even use plugins like WooCommerce Checkout Manager or WooCommerce Direct Checkout. We also have a detailed guide to remove WooCommerce checkout fields if required.
2) Create WordPress Custom Post Types Programmatically
Alternatively, if you don’t want to install any third-party tools, you can create a custom post type in WordPress programmatically. However, keep in mind that this method is only suitable for those who have adequate programming knowledge.
As we’ll edit some core files, before you start, make sure you backup your WordPress website and create a child theme. If you need any help with that, you can use any of these child theme plugins.
1. Add Code Snippet in functions.php file
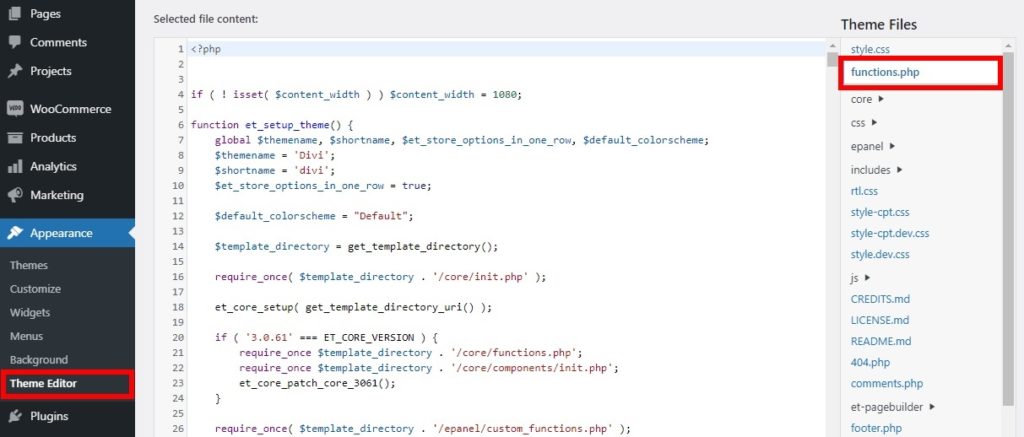
To access the functions.php file, go to Appearance > Theme Editor on your WordPress dashboard. Then, open the functions.php file from the Theme Files section on the right side of your screen.
Now add the following code snippet to the bottom of the editor to create the post type “movies”.
We have used the Divi theme for this tutorial, so the snippet is optimized for Divi. Make sure you adjust the code and make the necessary changes depending on the theme you are using.
function QuadLayers_custom_post_type() {
// Set UI labels for Custom Post Type
    $labels = array(
        'name'                => _x( 'Movies', 'Post Type General Name', 'divi' ),
        'singular_name'       => _x( 'Movie', 'Post Type Singular Name', 'divi' ),
        'menu_name'           => __( 'Movies', 'divi' ),
        'parent_item_colon'   => __( 'Parent Movie', 'divi' ),
        'all_items'           => __( 'All Movies', 'divi' ),
        'view_item'           => __( 'View Movie', 'divi' ),
        'add_new_item'        => __( 'Add New Movie', 'divi' ),
        'add_new'             => __( 'Add New', 'divi' ),
        'edit_item'           => __( 'Edit Movie', 'divi' ),
        'update_item'         => __( 'Update Movie', 'divi' ),
        'search_items'        => __( 'Search Movie', 'divi' ),
        'not_found'           => __( 'Not Found', 'divi' ),
        'not_found_in_trash'  => __( 'Not found in Trash', 'divi' ),
    );
// Set other options for Custom Post Type
    $args = array(
        'label'               => __( 'movies', 'divi' ),
        'description'         => __( 'Movie news and reviews', 'divi' ),
        'labels'              => $labels,
        'supports'            => array( 'title', 'editor', 'excerpt', 'author', 'thumbnail', 'comments', 'revisions', 'custom-fields', ),
        'taxonomies'          => array( 'genres' ),
        'hierarchical'        => false,
        'public'              => true,
        'show_ui'             => true,
        'show_in_menu'        => true,
        'show_in_nav_menus'   => true,
        'show_in_admin_bar'   => true,
        'menu_position'       => 5,
        'can_export'          => true,
        'has_archive'         => true,
        'exclude_from_search' => false,
        'publicly_queryable'  => true,
        'capability_type'     => 'post',
        'show_in_rest' => true,
    );
    // Registering your Custom Post Type
    register_post_type( 'movies', $args );
}
add_action( 'init', 'QuadLayers_custom_post_type', 0 );
After you have added the proper code snippet for your post type, Update the file.
2. Open the Custom Post Type from the Dashboard
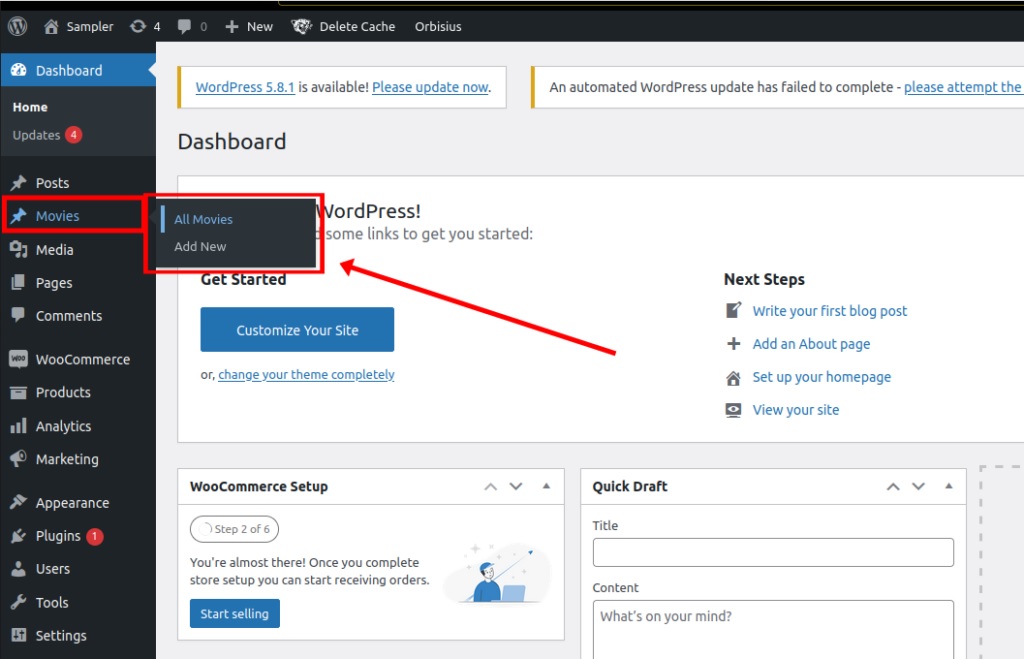
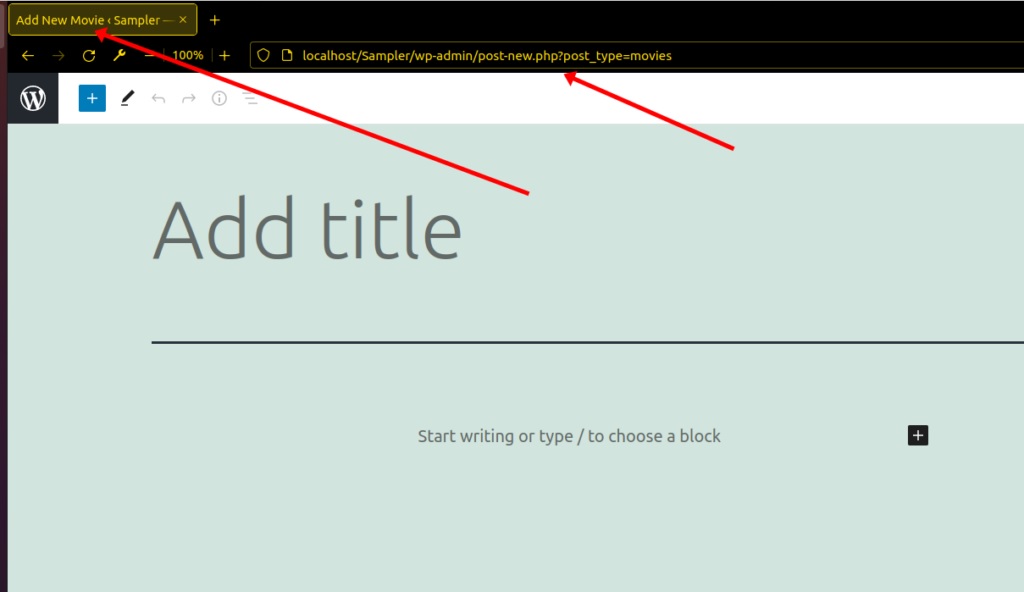
After that, open your WordPress dashboard and you will be able to see that a post type for “Movies” has been added.
If you add a new movie post, you will see that it redirects you to a post editor. And if have a closer look at the page URL and title, you will see that the page is based on the movie post type that you’ve just created.
This way, you can create a custom post type in WordPress programmatically. If you need any more details about it, you can check out our detailed guide on how to create custom post types programmatically.
How to Display Custom Post Types in WordPress
By now, you should be able to create a custom post type in your WordPress site. But what about displaying them?
Creating the post types is useless if you don’t know how to display them. Let’s see some of the simplest ways to display these custom post types on your site.
1. Create a Custom Shortcode
Using shortcodes is one of the best ways to display content. In fact, it is one of the major features of WordPress that led to its immense popularity. You can add a shortcode anywhere on your website and display certain content where you want.
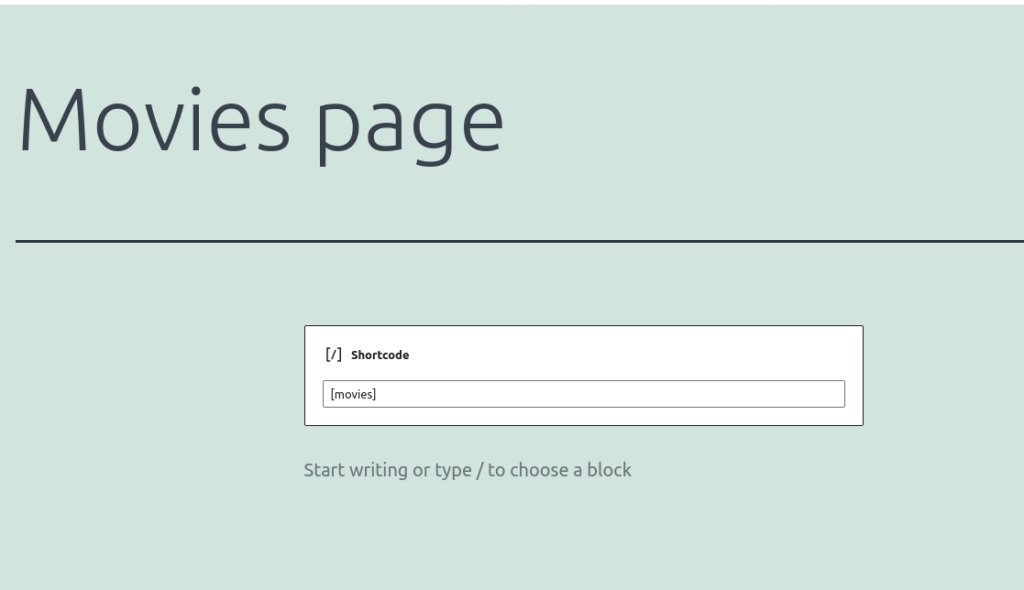
If you have basic programming skills, you can easily create a custom shortcode to display post types. All you have to do is add the following code snippet to the functions.php file like in the previous methods.
Go to Appearance > Theme Editor and open the functions.php file. Then, add the following code snippet to the editor.
add_shortcode('movies', 'QuadLayers_display_cpt_shortcode');
function QuadLayers_display_cpt_shortcode(){
    $args = array( 'post_type' => 'movies', 'posts_per_page' => 10 );
    $the_query = new WP_Query( $args );
    if ( $the_query->have_posts() ) :
    while ( $the_query->have_posts() ) : $the_query->the_post();
    $c= the_title( sprintf( '<h2 class="entry-title">', esc_url( get_the_title() ) ), '</h2>').
    '<div class="entry-content">'.
    the_content().
    '</div>';
endwhile;
wp_reset_postdata();
else:
$c = 'Sorry, no posts matched your criteria.';
endif;
return $c;
}
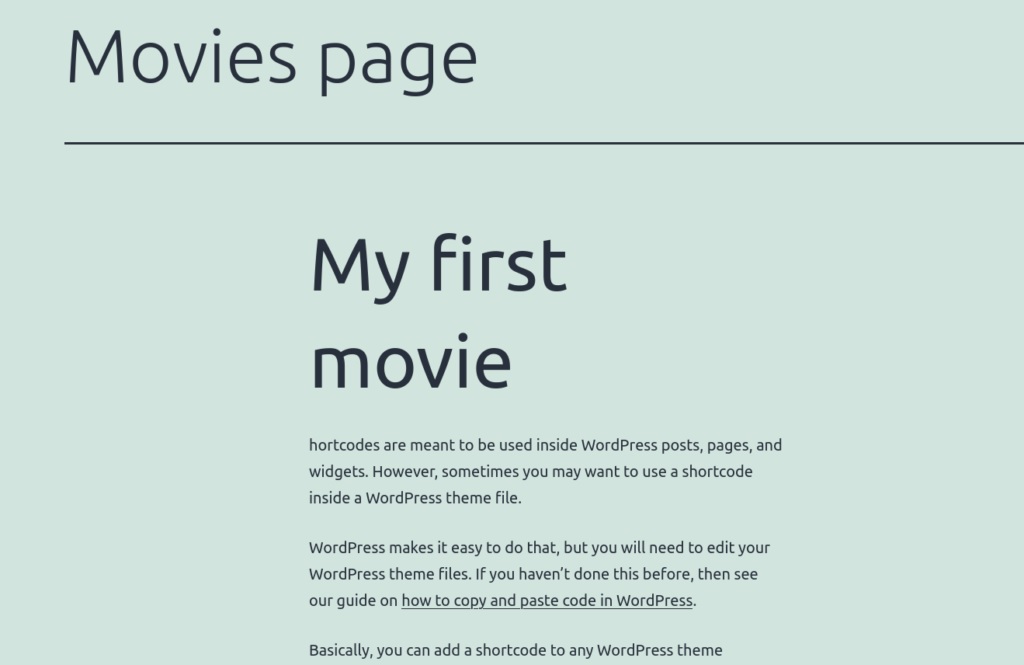
This code will create a custom shortcode that you can use to display the post type on any page or widget area you want.
You will be able to see the result once you reload the page on the front end.
2. Display Custom Post Types on Menu
If you have added a custom post type to your website, you can display it on the menu. All you have to do is add a custom link for that specific post type.
To do this, go to Appearance > Menus and open Custom Links. Then, enter the URL and link text for your custom type and press Add to Menu.
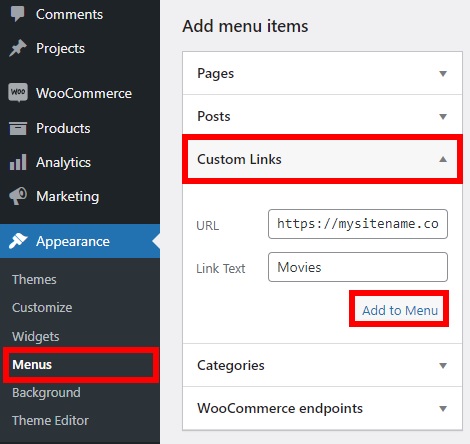
Your custom link should be something like “http://mysitename.com/movies”, where, “mysitename” is your site domain and “movies” is the custom post type that you’ve created.
If you want to learn more about how to make the most of your WordPress menu, have a look at our guide on how to add a page to the WordPress menu. You can also customize the menu and add a WordPress mega menu using QuadMenu or any of the best mega menu plugins.
Conclusion
In summary, adding custom post types is a good alternative if you want to add different types of content to your website other than the default types or apply changes to certain post types on your website.
In this guide, we’ve seen different ways to create a WordPress custom post type:
- With plugins
- Programmatically
The plugin approach is suitable for any type of user as it’s straightforward. Alternatively, if you have programming skills and don’t want to install more plugins on your site, you can create your custom post type programmatically.
Additionally, you can make changes to the post types in WordPress after you’ve created them. For example, you can change the post type, add posts to a page, turn a post into a page. Those are just a few examples, but there’s a lot more you can do including the custom post types.
Finally, if you liked this post, there are some more articles that might interest you:
- How to create posts and pages programmatically in WordPress
- Customize WooCommerce Product Page Template
- How to Share WordPress Post on WhatsApp (Plugins and Shortcodes)
Have you created any custom post types? Which method did you use? Let us know in the comments below!
